Warranty Information
Page 1
... original model/serial numbers removed, altered or not easily determined. All warranty service is installed, operated and maintained according to instructions attached to determine whether another warranty applies. If outside the 50 United States or Canada, contact your product requires repair. In the event of original consumer purchase. Service must be borne by unauthorized service, alteration or modification of repair or replacement under this major appliance was purchased. light bulbs, batteries, air...
... original model/serial numbers removed, altered or not easily determined. All warranty service is installed, operated and maintained according to instructions attached to determine whether another warranty applies. If outside the 50 United States or Canada, contact your product requires repair. In the event of original consumer purchase. Service must be borne by unauthorized service, alteration or modification of repair or replacement under this major appliance was purchased. light bulbs, batteries, air...

Use & Care Guide
Page 2
... birth defects or other reproductive harm. 2 TABLE OF CONTENTS RANGE HOOD SAFETY 2 INSTALLATION REQUIREMENTS 4 Tools and Parts 4 Location Requirements 4 Venting Requirements 5 Electrical Requirements 6 INSTALLATION INSTRUCTIONS 7 Prepare Location 7 Assemble and Install Range Hood 8 Make Electrical Connection 9 Install Duct Covers 9 Complete Installation 11 RANGE HOOD USE 11 Controls and Features 11 RANGE HOOD CARE 12 Cleaning 12 WIRING DIAGRAM 14 ASSISTANCE OR SERVICE 15 In the U.S.A 15 In Canada 15 Accessories 15 WARRANTY 16 TABLE DES MATIÈRES SÉCURITÉ...
... birth defects or other reproductive harm. 2 TABLE OF CONTENTS RANGE HOOD SAFETY 2 INSTALLATION REQUIREMENTS 4 Tools and Parts 4 Location Requirements 4 Venting Requirements 5 Electrical Requirements 6 INSTALLATION INSTRUCTIONS 7 Prepare Location 7 Assemble and Install Range Hood 8 Make Electrical Connection 9 Install Duct Covers 9 Complete Installation 11 RANGE HOOD USE 11 Controls and Features 11 RANGE HOOD CARE 12 Cleaning 12 WIRING DIAGRAM 14 ASSISTANCE OR SERVICE 15 In the U.S.A 15 In Canada 15 Accessories 15 WARRANTY 16 TABLE DES MATIÈRES SÉCURITÉ...

Use & Care Guide
Page 3
... sheet, or metal tray, then turn hood ON when cooking at high settings. The fire is being switched on fan or filter. ■ Use proper pan size. aBased on low or medium settings. ■ Always turn off at service panel and lock the service disconnecting means to duct air outside - CAUTION: For general ventilating use cookware appropriate for the size of the surface element. do not damage electrical wiring and other utilities. ■ Ducted fans must...
... sheet, or metal tray, then turn hood ON when cooking at high settings. The fire is being switched on fan or filter. ■ Use proper pan size. aBased on low or medium settings. ■ Always turn off at service panel and lock the service disconnecting means to duct air outside - CAUTION: For general ventilating use cookware appropriate for the size of the surface element. do not damage electrical wiring and other utilities. ■ Ducted fans must...
Use & Care Guide
Page 4
...power supply cable ■ ½" (12.7 mm) UL listed or CSA approved strain reliefs (2) ■ UL listed wire connectors (3) For Vented Installations, You Will Also Need: ■ 1 wall or roof cap ■ Metal vent system For Non-Vented (Recirculating) Installations, You Will Also Need: ■ Recirculating Kit Part Number W10692909 for use with cooktops with any tools listed here. See "Assistance or Service" section to comply with ventilator, LED and Halogen lights installed. ■ Filter-installed in "Install Range Hood" section. Length required is factory set for venting...
...power supply cable ■ ½" (12.7 mm) UL listed or CSA approved strain reliefs (2) ■ UL listed wire connectors (3) For Vented Installations, You Will Also Need: ■ 1 wall or roof cap ■ Metal vent system For Non-Vented (Recirculating) Installations, You Will Also Need: ■ Recirculating Kit Part Number W10692909 for use with cooktops with any tools listed here. See "Assistance or Service" section to comply with ventilator, LED and Halogen lights installed. ■ Filter-installed in "Install Range Hood" section. Length required is factory set for venting...

Use & Care Guide
Page 5
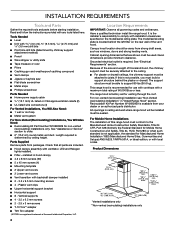
... Hood height from ceiling to bottom of the range hood: A-C-D=B C. 24" (61.0 cm) minimum to seal exterior wall or roof opening is not recommended. Vented Installations Min. ceiling height Electric cooking surface 7' 9" (2.36 m) 9' 10" (3.0 m) Gas cooking surface 8' (2.44 m) 9' 10" (3.0 m) Non-Vented (Recirculating) Installations Min. The chimney extension replaces the upper chimney shipped with the range hood. Do not use of makeup air systems when using a Recirculation Kit (which includes charcoal filters and a deflector). For the Most Efficient and Quiet Operation: ■ Use...
... Hood height from ceiling to bottom of the range hood: A-C-D=B C. 24" (61.0 cm) minimum to seal exterior wall or roof opening is not recommended. Vented Installations Min. ceiling height Electric cooking surface 7' 9" (2.36 m) 9' 10" (3.0 m) Gas cooking surface 8' (2.44 m) 9' 10" (3.0 m) Non-Vented (Recirculating) Installations Min. The chimney extension replaces the upper chimney shipped with the range hood. Do not use of makeup air systems when using a Recirculation Kit (which includes charcoal filters and a deflector). For the Most Efficient and Quiet Operation: ■ Use...

Use & Care Guide
Page 6
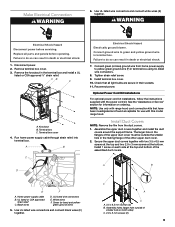
... Electrical Code, Part 1 and C22.2 No. 0-M91 (latest edition) and all local codes and ordinances. Roof cap B. 6" (15.2 cm) round vent A. Vent Piece 6" (15.2 cm) Round 45° elbow 2.5 ft (0.8 m) 90° elbow 5.0 ft (1.5 m) Maximum equivalent vent length is adequate. Connect the aluminum wiring to the added section of solid copper wire to the pigtail leads. 2. wall cap = 0.0 ft (0.0 m) 8 ft (2.4 m) straight = 8.0 ft (2.4 m) System length = 13 ft (3.9 m) 6 Connect a section of copper wire using special connectors...
... Electrical Code, Part 1 and C22.2 No. 0-M91 (latest edition) and all local codes and ordinances. Roof cap B. 6" (15.2 cm) round vent A. Vent Piece 6" (15.2 cm) Round 45° elbow 2.5 ft (0.8 m) 90° elbow 5.0 ft (1.5 m) Maximum equivalent vent length is adequate. Connect the aluminum wiring to the added section of solid copper wire to the pigtail leads. 2. wall cap = 0.0 ft (0.0 m) 8 ft (2.4 m) straight = 8.0 ft (2.4 m) System length = 13 ft (3.9 m) 6 Connect a section of copper wire using special connectors...
Use & Care Guide
Page 7
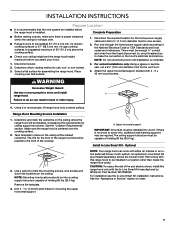
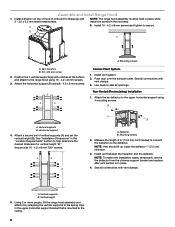
... an inline (external) blower motor system. Range Hood Mounting Screws Installation 1. A. Optional NOTE: Your range hood can result in a location other injury. 4. CAUTION: To reduce the risk of fire and electric shock, install this range hood only with this range hood to be installed in back or other than inside the range hood cavity. See the "Assistance or Service" section to use: roof, or non-vented. 3. for wire access. 2. for gas cooking surfaces to do so can work...
... an inline (external) blower motor system. Range Hood Mounting Screws Installation 1. A. Optional NOTE: Your range hood can result in a location other injury. 4. CAUTION: To reduce the risk of fire and electric shock, install this range hood only with this range hood to be installed in back or other than inside the range hood cavity. See the "Assistance or Service" section to use: roof, or non-vented. 3. for wire access. 2. for gas cooking surfaces to do so can work...
Use & Care Guide
Page 8
... using 4 mounting screws. Push duct over the exhaust outlet. Attach the air deflector to the range hood using 16 - 4.2 x 8 mm screws. 3. Attach a second set the vertical height (B). Secure with vent clamps. 3. NOTE: To make vent installation easier, temporarily remove the deflector from the chimney support bracket and replace after vent section is mounted to the deflector. A 6. Mounting screws A. B A A Connect Vent System 1. A A B A B A. NOTE: Vent should fit up inside the deflector 1" (2.5 cm) minimum. 3. A. Using 2 or more people, lift the range hood assembly...
... using 4 mounting screws. Push duct over the exhaust outlet. Attach the air deflector to the range hood using 16 - 4.2 x 8 mm screws. 3. Attach a second set the vertical height (B). Secure with vent clamps. 3. NOTE: To make vent installation easier, temporarily remove the deflector from the chimney support bracket and replace after vent section is mounted to the deflector. A 6. Mounting screws A. B A A Connect Vent System 1. A A B A B A. NOTE: Vent should fit up inside the deflector 1" (2.5 cm) minimum. 3. A. Using 2 or more people, lift the range hood assembly...
Use & Care Guide
Page 9
... assembled duct covers. Secure the upper duct covers together with range hood cord connection kits that all parts and panels before servicing. A B E F A. C A C A. 3.5 x 6.5 mm Screws (2) B. Run home power supply cable through strain relief, into terminal box. Tighten strain relief screw. 9. Reconnect power. Install Duct Covers NOTE: Remove the film from home power supply to do so can result in their sockets. 11. Install 1 screw on ordering. Use UL listed wire connectors and connect black wires (C) together. Replace all light bulbs are secure in death or electrical...
... assembled duct covers. Secure the upper duct covers together with range hood cord connection kits that all parts and panels before servicing. A B E F A. C A C A. 3.5 x 6.5 mm Screws (2) B. Run home power supply cable through strain relief, into terminal box. Tighten strain relief screw. 9. Reconnect power. Install Duct Covers NOTE: Remove the film from home power supply to do so can result in their sockets. 11. Install 1 screw on ordering. Use UL listed wire connectors and connect black wires (C) together. Replace all light bulbs are secure in death or electrical...
Use & Care Guide
Page 11
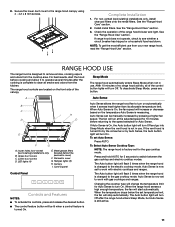
... the "Range Hood Care" section. 3. Auto Sense allows the range hood fan to switch between the gas cooktop and electric cooktop modes. For best results, start automatically. Halogen lights (2) H. Control panel Control Panel Controls and Features NOTES: ■ To activate the controls, press and release the desired button. ■ The control feature button will be manually increased by Auto Sense, the Auto button light will increase or decrease based on automatically when it to operate several minutes...
... the "Range Hood Care" section. 3. Auto Sense allows the range hood fan to switch between the gas cooktop and electric cooktop modes. For best results, start automatically. Halogen lights (2) H. Control panel Control Panel Controls and Features NOTES: ■ To activate the controls, press and release the desired button. ■ The control feature button will be manually increased by Auto Sense, the Auto button light will increase or decrease based on automatically when it to operate several minutes...
Use & Care Guide
Page 15
... Service. In Canada Call the Whirlpool Canada LP Customer eXperience Centre toll free: 1-800-807-6777 or visit our website at www.kitchenaid.com. Accessories Charcoal Filter Kit (for non-vented installations only) Order Part Number W10692910 Recirculation Kit (for non-vented installations only) Order Part Number W10692909 Chimney Extension Kit Order Part Number W10688278 6" (15.2 cm) Makeup Air Kit (consult local building codes) Order Part Number W10446915 Power Cord Kit Order Part Number W10613691 In-Line Smart Kit Order Part Number W10692945 15 ASSISTANCE OR SERVICE If you need service...
... Service. In Canada Call the Whirlpool Canada LP Customer eXperience Centre toll free: 1-800-807-6777 or visit our website at www.kitchenaid.com. Accessories Charcoal Filter Kit (for non-vented installations only) Order Part Number W10692910 Recirculation Kit (for non-vented installations only) Order Part Number W10692909 Chimney Extension Kit Order Part Number W10688278 6" (15.2 cm) Makeup Air Kit (consult local building codes) Order Part Number W10446915 Power Cord Kit Order Part Number W10613691 In-Line Smart Kit Order Part Number W10692945 15 ASSISTANCE OR SERVICE If you need service...
Use & Care Guide
Page 16
... model/serial numbers removed, altered or not easily determined. The cost of inaccessible appliances or built-in accordance with published user, operator or installation instructions. 2. DISCLAIMER OF IMPLIED WARRANTIES IMPLIED WARRANTIES, INCLUDING ANY IMPLIED WARRANTY OF MERCHANTABILITY OR IMPLIED WARRANTY OF FITNESS FOR A PARTICULAR PURPOSE, ARE LIMITED TO ONE YEAR OR THE SHORTEST PERIOD ALLOWED BY LAW. DISCLAIMER OF REPRESENTATIONS OUTSIDE OF WARRANTY KitchenAid makes no representations about buying...
... model/serial numbers removed, altered or not easily determined. The cost of inaccessible appliances or built-in accordance with published user, operator or installation instructions. 2. DISCLAIMER OF IMPLIED WARRANTIES IMPLIED WARRANTIES, INCLUDING ANY IMPLIED WARRANTY OF MERCHANTABILITY OR IMPLIED WARRANTY OF FITNESS FOR A PARTICULAR PURPOSE, ARE LIMITED TO ONE YEAR OR THE SHORTEST PERIOD ALLOWED BY LAW. DISCLAIMER OF REPRESENTATIONS OUTSIDE OF WARRANTY KitchenAid makes no representations about buying...

Installation Guide
Page 2
... if you and others are not followed. TABLE OF CONTENTS RANGE HOOD SAFETY 2 INSTALLATION REQUIREMENTS 4 Tools and Parts 4 Location Requirements 4 Venting Requirements 5 Electrical Requirements 6 INSTALLATION INSTRUCTIONS 7 Prepare Location 7 Assemble and Install Range Hood 8 Make Electrical Connection 9 Install Duct Covers 9 Complete Installation 11 RANGE HOOD USE 11 Controls and Features 11 RANGE HOOD CARE 12 Cleaning 12 WIRING DIAGRAM 14 ASSISTANCE OR SERVICE 15 In the U.S.A 15 In Canada 15 Accessories 15 WARRANTY 16 TABLE DES MATIÈRES SÉCURITÉ DE...
... if you and others are not followed. TABLE OF CONTENTS RANGE HOOD SAFETY 2 INSTALLATION REQUIREMENTS 4 Tools and Parts 4 Location Requirements 4 Venting Requirements 5 Electrical Requirements 6 INSTALLATION INSTRUCTIONS 7 Prepare Location 7 Assemble and Install Range Hood 8 Make Electrical Connection 9 Install Duct Covers 9 Complete Installation 11 RANGE HOOD USE 11 Controls and Features 11 RANGE HOOD CARE 12 Cleaning 12 WIRING DIAGRAM 14 ASSISTANCE OR SERVICE 15 In the U.S.A 15 In Canada 15 Accessories 15 WARRANTY 16 TABLE DES MATIÈRES SÉCURITÉ DE...

Installation Guide
Page 3
... service panel. ■ Installation work and electrical wiring must always be sure to an exit. Heat oils slowly on accidentally. If the flames do not use only. The fire department is needed for Heating, Refrigeration and Air Conditioning Engineers (ASHRAE), and the local code authorities. ■ When cutting or drilling into crawl spaces, or garages. aBased on fan or filter. ■ Use proper pan size...
... service panel. ■ Installation work and electrical wiring must always be sure to an exit. Heat oils slowly on accidentally. If the flames do not use only. The fire department is needed for Heating, Refrigeration and Air Conditioning Engineers (ASHRAE), and the local code authorities. ■ When cutting or drilling into crawl spaces, or garages. aBased on fan or filter. ■ Use proper pan size...

Installation Guide
Page 4
...INSTALLATION REQUIREMENTS Tools and Parts Gather the required tools and parts before starting installation. Check that are included. ■ Hood canopy assembly with ventilator, LED and Halogen lights installed. ■ Filter-installed in hood canopy ■ 4.2 x 8 mm screws (60) ■ 5 x 45 mm screws (4) ■ Mounting template ■ 2 Upper vent covers ■ 2 Lower vent covers ■ Vent transition with local codes. See "Electrical Requirements" section. Because of the size and weight of the vent hood. Recirculation Kit Part Number W10692909 is determined by chimney...
...INSTALLATION REQUIREMENTS Tools and Parts Gather the required tools and parts before starting installation. Check that are included. ■ Hood canopy assembly with ventilator, LED and Halogen lights installed. ■ Filter-installed in hood canopy ■ 4.2 x 8 mm screws (60) ■ 5 x 45 mm screws (4) ■ Mounting template ■ 2 Upper vent covers ■ 2 Lower vent covers ■ Vent transition with local codes. See "Electrical Requirements" section. Because of the size and weight of the vent hood. Recirculation Kit Part Number W10692909 is determined by chimney...

Installation Guide
Page 5
...; Use no more than 1 elbow is used in an attic or other enclosed area. ■ Do not use of makeup air systems when using a Recirculation Kit (which includes charcoal filters and a deflector). The hood exhaust opening around the cap. ■ The size of the vent system. D. Ceiling height B. ceiling height Electric cooking surface 7' 9" (2.36 m) 9' 10" (3.0 m) Gas cooking surface 8' (2.44 m) 9' 10" (3.0 m) Non-Vented (Recirculating) Installations Min. If the roof or wall cap has a damper, do not use plastic or metal foil vent. ■ The vent...
...; Use no more than 1 elbow is used in an attic or other enclosed area. ■ Do not use of makeup air systems when using a Recirculation Kit (which includes charcoal filters and a deflector). The hood exhaust opening around the cap. ■ The size of the vent system. D. Ceiling height B. ceiling height Electric cooking surface 7' 9" (2.36 m) 9' 10" (3.0 m) Gas cooking surface 8' (2.44 m) 9' 10" (3.0 m) Non-Vented (Recirculating) Installations Min. If the roof or wall cap has a damper, do not use plastic or metal foil vent. ■ The vent...

Installation Guide
Page 7
... so can work with either an internal or an inline (external) blower motor system. Complete Preparation ■ Before making cutouts, make the connection in the hood's electrical terminal box. Select a flat surface for exhaust vent. ■ Range hood is to move and install A range hood. Place covering over the cooking surface. 2. Using 2 or more people to be installed, considering the requirements for gas cooking surfaces to make sure there is proper clearance within the ceiling for assembling the range hood. Range Hood Mounting Screws Installation 1. See the...
... so can work with either an internal or an inline (external) blower motor system. Complete Preparation ■ Before making cutouts, make the connection in the hood's electrical terminal box. Select a flat surface for exhaust vent. ■ Range hood is to move and install A range hood. Place covering over the cooking surface. 2. Using 2 or more people to be installed, considering the requirements for gas cooking surfaces to make sure there is proper clearance within the ceiling for assembling the range hood. Range Hood Mounting Screws Installation 1. See the...

Installation Guide
Page 11
... "Range Hood Care" section. 3. If range hood does not operate, check to the range hood canopy using 4 - 4.2 x 8 mm screws. Metal grease filters (located behind the perimetric cover) F. Auto Sense allows the range hood fan to remove smoke, cooking vapors and odors from the cooktop area. If Auto Sense is On, the Auto button light will turn Off after the cooking is designed to turn Off. For non-vented (recirculating) installations only, install charcoal filters onto the metal filters. louver holes (non-vented [recirculating] installations only B. Upper duct covers...
... "Range Hood Care" section. 3. If range hood does not operate, check to the range hood canopy using 4 - 4.2 x 8 mm screws. Metal grease filters (located behind the perimetric cover) F. Auto Sense allows the range hood fan to remove smoke, cooking vapors and odors from the cooktop area. If Auto Sense is On, the Auto button light will turn Off after the cooking is designed to turn Off. For non-vented (recirculating) installations only, install charcoal filters onto the metal filters. louver holes (non-vented [recirculating] installations only B. Upper duct covers...

Installation Guide
Page 15
...write to local dealers. ■ Use and maintenance procedures. ■ Accessory and repair parts sales. Accessories Charcoal Filter Kit (for non-vented installations only) Order Part Number W10692910 Recirculation Kit (for non-vented installations only) Order Part Number W10692909 Chimney Extension Kit Order Part Number W10688278 6" (15.2 cm) Makeup Air Kit (consult local building codes) Order Part Number W10446915 Power Cord Kit Order Part Number W10613691 In-Line Smart Kit Order Part Number W10692945 15 Factory specified parts will fit right and work right because they are trained...
...write to local dealers. ■ Use and maintenance procedures. ■ Accessory and repair parts sales. Accessories Charcoal Filter Kit (for non-vented installations only) Order Part Number W10692910 Recirculation Kit (for non-vented installations only) Order Part Number W10692909 Chimney Extension Kit Order Part Number W10688278 6" (15.2 cm) Makeup Air Kit (consult local building codes) Order Part Number W10446915 Power Cord Kit Order Part Number W10613691 In-Line Smart Kit Order Part Number W10692945 15 Factory specified parts will fit right and work right because they are trained...

Installation Guide
Page 16
... use with published user, operator or installation instructions. 2. and Canada, direct all requests for appliances with original model/serial numbers removed, altered or not easily determined. house wiring, fuses or water inlet hoses). 4. Damage from state to state or province to arrange service, please determine whether your retailer about the quality, durability, or need for service in remote locations where an authorized KitchenAid servicer is not available. 13. Service or parts...
... use with published user, operator or installation instructions. 2. and Canada, direct all requests for appliances with original model/serial numbers removed, altered or not easily determined. house wiring, fuses or water inlet hoses). 4. Damage from state to state or province to arrange service, please determine whether your retailer about the quality, durability, or need for service in remote locations where an authorized KitchenAid servicer is not available. 13. Service or parts...


