

Dimension Guide
Page 1
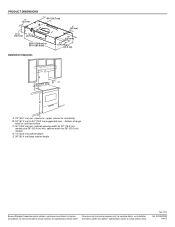
...to 30" (76.2 cm) max. Specifications subject to aluminum. 30" (76.2 cm) and 36" (91.4 cm) Range Hood PRODUCT MODEL NUMBERS UXT5230AY UXT5236AY Electrical: q A 120 volt, 60 Hz., AC only, 15-amp, fused electrical circuit is not recommended. q Wire sizes must conform to ...(purchased separately) C. 24" (61.0 cm) min. Connect a section of the appliance as specified on the rear wall of 2 Ref. For complete details, see Installation our products, we reserve the right to the pigtail leads. 2. Roof Venting Wall Venting B A A B 1 - 90° elbow 1 - B. Roof cap...
...to 30" (76.2 cm) max. Specifications subject to aluminum. 30" (76.2 cm) and 36" (91.4 cm) Range Hood PRODUCT MODEL NUMBERS UXT5230AY UXT5236AY Electrical: q A 120 volt, 60 Hz., AC only, 15-amp, fused electrical circuit is not recommended. q Wire sizes must conform to ...(purchased separately) C. 24" (61.0 cm) min. Connect a section of the appliance as specified on the rear wall of 2 Ref. For complete details, see Installation our products, we reserve the right to the pigtail leads. 2. Roof Venting Wall Venting B A A B 1 - 90° elbow 1 - B. Roof cap...
Dimension Guide
Page 2
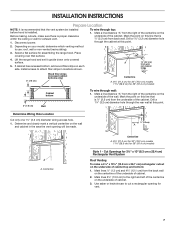
... commitment to cooking surface C. 30" (76.2 cm) min. cabinet width for 30" (76.2 cm) models and 36" (91.4 cm) min. clearance - For complete details, see Installation our products, we reserve the right to 30" (76.2 cm) suggested max. - upper cabinet to countertop B. 24" (61.0 cm) to change without notice. PRODUCT DIMENSIONS...) 4 ⁷⁄₈" (12.5 cm) (2.2 cm) 29 76.0 cm) or 35 91.0 cm) 9" (22.9 cm) 1¹⁄₂" (3.8 cm)18⁵⁄₈" (47.3 cm) Installation Clearances C B D A E A. 18" (45.7 cm) min.
... commitment to cooking surface C. 30" (76.2 cm) min. cabinet width for 30" (76.2 cm) models and 36" (91.4 cm) min. clearance - For complete details, see Installation our products, we reserve the right to 30" (76.2 cm) suggested max. - upper cabinet to countertop B. 24" (61.0 cm) to change without notice. PRODUCT DIMENSIONS...) 4 ⁷⁄₈" (12.5 cm) (2.2 cm) 29 76.0 cm) or 35 91.0 cm) 9" (22.9 cm) 1¹⁄₂" (3.8 cm)18⁵⁄₈" (47.3 cm) Installation Clearances C B D A E A. 18" (45.7 cm) min.

Use & Care Guide
Page 1
...features, operation/performance, parts, accessories or service, call: 1-800-253-1301 or visit our website at www.whirlpool.com In Canada, for assistance, installation and service, call 1-800-807-6777 or visit our website at www.whirlpool.ca HOTTE D'ASPIRATION DE 30" (76,2 CM) ET 36" (91... Guide d'utilisation et d'entretien Au Canada, pour assistance, installation ou service, composer le 1-800-807-6777 ou visiter notre site Web à www.whirlpool.ca Table of Contents/Table des matières 2 Models/Modèles: UXT5230AY/UXT5236AY IMPORTANT: READ AND SAVE THESE INSTRUCTIONS. IMPORTANT : LIRE...
...features, operation/performance, parts, accessories or service, call: 1-800-253-1301 or visit our website at www.whirlpool.com In Canada, for assistance, installation and service, call 1-800-807-6777 or visit our website at www.whirlpool.ca HOTTE D'ASPIRATION DE 30" (76,2 CM) ET 36" (91... Guide d'utilisation et d'entretien Au Canada, pour assistance, installation ou service, composer le 1-800-807-6777 ou visiter notre site Web à www.whirlpool.ca Table of Contents/Table des matières 2 Models/Modèles: UXT5230AY/UXT5236AY IMPORTANT: READ AND SAVE THESE INSTRUCTIONS. IMPORTANT : LIRE...

Use & Care Guide
Page 2
... follow instructions. TABLE OF CONTENTS RANGE HOOD SAFETY 2 INSTALLATION REQUIREMENTS 4 Tools and Parts 4 Location Requirements 4 Venting Requirements 5 Electrical Requirements 6 INSTALLATION INSTRUCTIONS 7 Prepare Location 7 Install Range Hood 9 Make Electrical Connection 11 Complete Installation 11 RANGE HOOD USE 12 Range Hood Controls 12 RANGE... DES MATIÈRES SÉCURITÉ DE LA HOTTE DE CUISINIÈRE 17 EXIGENCES D'INSTALLATION 19 Outils et pièces 19 Exigences d'emplacement 19 Exigences concernant l'évacuation 20 Spécifications é...
... follow instructions. TABLE OF CONTENTS RANGE HOOD SAFETY 2 INSTALLATION REQUIREMENTS 4 Tools and Parts 4 Location Requirements 4 Venting Requirements 5 Electrical Requirements 6 INSTALLATION INSTRUCTIONS 7 Prepare Location 7 Install Range Hood 9 Make Electrical Connection 11 Complete Installation 11 RANGE HOOD USE 12 Range Hood Controls 12 RANGE... DES MATIÈRES SÉCURITÉ DE LA HOTTE DE CUISINIÈRE 17 EXIGENCES D'INSTALLATION 19 Outils et pièces 19 Exigences d'emplacement 19 Exigences concernant l'évacuation 20 Spécifications é...

Use & Care Guide
Page 3
... and to properly exhaust air, be vented outdoors. Follow the heating equipment manufacturer's guideline and safety standards such as a tag, to the service panel. ■ Installation work and electrical wiring must always be sure to accumulate on low or medium settings. ■ Always turn off at high settings. Grease should not...
... and to properly exhaust air, be vented outdoors. Follow the heating equipment manufacturer's guideline and safety standards such as a tag, to the service panel. ■ Installation work and electrical wiring must always be sure to accumulate on low or medium settings. ■ Always turn off at high settings. Grease should not...

Use & Care Guide
Page 4
...4.5 x 13 mm mounting screws Parts needed ■ Drill ■ 1¹⁄₄" (3.0 cm) drill bit 3.0 mm) drill bit for vented installations. Length and thickness determined by recess dimensions. ■ Four flat head wood screws or machine screws with recessed bottoms: ■ Two 2" (5.1 cm) ...on the model/serial rating plate. Read and follow the instructions provided with any cutouts. ■ Grounded electrical outlet is the installer's responsibility to order charcoal filter kit. For information on ordering, see the "Accessories" section. For information on ordering, see ...
...4.5 x 13 mm mounting screws Parts needed ■ Drill ■ 1¹⁄₄" (3.0 cm) drill bit 3.0 mm) drill bit for vented installations. Length and thickness determined by recess dimensions. ■ Four flat head wood screws or machine screws with recessed bottoms: ■ Two 2" (5.1 cm) ...on the model/serial rating plate. Read and follow the instructions provided with any cutouts. ■ Grounded electrical outlet is the installer's responsibility to order charcoal filter kit. For information on ordering, see the "Accessories" section. For information on ordering, see ...

Use & Care Guide
Page 5
...of straight vent between the elbows if more than three 90° elbows. ■ Make sure there is used. ■ Do not install 2 elbows together. ■ Use clamps or duct tape to seal all joints in the vent system. ■ The vent system must ... (purchased separately). 3¹⁄₄" x 10" (8.3 x 25.4 cm) rectangular vent through the roof (purchased separately). The damper should be installed to minimize conduction of outside temperatures as possible to cooking surface C. 30" (76.2 cm) min. Venting Methods Vent system can terminate either through...
...of straight vent between the elbows if more than three 90° elbows. ■ Make sure there is used. ■ Do not install 2 elbows together. ■ Use clamps or duct tape to seal all joints in the vent system. ■ The vent system must ... (purchased separately). 3¹⁄₄" x 10" (8.3 x 25.4 cm) rectangular vent through the roof (purchased separately). The damper should be installed to minimize conduction of outside temperatures as possible to cooking surface C. 30" (76.2 cm) min. Venting Methods Vent system can terminate either through...

Use & Care Guide
Page 6
... using special connectors and/or tools designed and UL listed for each vent piece used , it is recommended that a qualified electrician determine that the electrical installation is adequate and in the system. 7" (17.8 cm) Round Vent System Vent Piece Round 45° elbow 2.5 ft (0.8 m) Example vent system 3¹⁄₄" x 10...
... using special connectors and/or tools designed and UL listed for each vent piece used , it is recommended that a qualified electrician determine that the electrical installation is adequate and in the system. 7" (17.8 cm) Round Vent System Vent Piece Round 45° elbow 2.5 ft (0.8 m) Example vent system 3¹⁄₄" x 10...
Use & Care Guide
Page 7
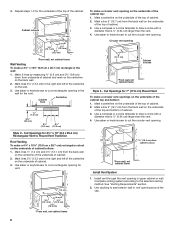
...;₄" (3.2 cm) diameter wiring access hole. 1. Use saber or keyhole saw to attach filler strips in the area the vent opening for vent. 7 INSTALLATION INSTRUCTIONS Prepare Location NOTE: It is recommended that the vent system be made. ⁷⁄₈" (2.2 cm) A A A. Before making cutouts, make ...8260;₈" (28.9 cm) for 3¼" x 10" (8.3 cm x 25.4 cm) Rectangular Vent System Roof Venting To make sure there is installed. Lift the range hood and set it upside down onto covered surface. 5. To wire through the rear wall at this point. Mark lines 5¼"...
...;₄" (3.2 cm) diameter wiring access hole. 1. Use saber or keyhole saw to attach filler strips in the area the vent opening for vent. 7 INSTALLATION INSTRUCTIONS Prepare Location NOTE: It is recommended that the vent system be made. ⁷⁄₈" (2.2 cm) A A A. Before making cutouts, make ...8260;₈" (28.9 cm) for 3¼" x 10" (8.3 cm x 25.4 cm) Rectangular Vent System Roof Venting To make sure there is installed. Lift the range hood and set it upside down onto covered surface. 5. To wire through the rear wall at this point. Mark lines 5¼"...
Use & Care Guide
Page 8
...or a circle template to cut a rectangular opening . *5" (12.7 cm) 7 ¹/₄" (18.4 cm) diam. cabinet cutouts *From wall, not cabinet frame Install Vent System 1. Mark lines 5¼" (13.3 cm) to the right and left of cabinet. 2. Cabinet front Centerline ³⁄₈" (1.0 cm) 3⁷⁄&#....3 cm) *From wall, not cabinet frame Wall Venting To make a circular vent openings on the underside of the top of cabinet. 3. Install vent through the vent opening . Use a compass or a circle template to cut the circular vent opening in the wall: 1. Use saber ...
...or a circle template to cut a rectangular opening . *5" (12.7 cm) 7 ¹/₄" (18.4 cm) diam. cabinet cutouts *From wall, not cabinet frame Install Vent System 1. Mark lines 5¼" (13.3 cm) to the right and left of cabinet. 2. Cabinet front Centerline ³⁄₈" (1.0 cm) 3⁷⁄&#....3 cm) *From wall, not cabinet frame Wall Venting To make a circular vent openings on the underside of the top of cabinet. 3. Install vent through the vent opening . Use a compass or a circle template to cut the circular vent opening in the wall: 1. Use saber ...

Use & Care Guide
Page 9
...10" (8.3 x 25.4 cm) rectangular vent damper on ordering, see "Accessories" section) D. Keyhole slot 5. Remove top rectangular and round vent knockouts. Non-vent (recirculating) installations - A B C D A A. Round vent knockout E. See the "Range Hood Care" section. 7. A B C A A. b. Lift the range hood up under ... from damper flap. Pull down on your range hood. 4. Rear rectangular vent knockout Round vent system installations - For wall installations, remove the rear rectangular vent knockout. Install 7" (17.8 cm) round vent mounting plate or 3¼" x 10" (8.3 x 25.4 cm...
...10" (8.3 x 25.4 cm) rectangular vent damper on ordering, see "Accessories" section) D. Keyhole slot 5. Remove top rectangular and round vent knockouts. Non-vent (recirculating) installations - A B C D A A. Round vent knockout E. See the "Range Hood Care" section. 7. A B C A A. b. Lift the range hood up under ... from damper flap. Pull down on your range hood. 4. Rear rectangular vent knockout Round vent system installations - For wall installations, remove the rear rectangular vent knockout. Install 7" (17.8 cm) round vent mounting plate or 3¼" x 10" (8.3 x 25.4 cm...

Use & Care Guide
Page 10
...box cover and set aside. No vent attachments. Position the range hood so that they interfere. ■ Non-vented (recirculating) installations - Remove the screw from the recirculation cover plate and remove. Vent knockouts E. Removal of the hood center to hood. Check ... supply knockout from the top or rear of the vent hood (depending on ordering. Recirculation cover plate B. NOTE: Do not reconnect power until the installation is complete. 2. A B A. Screws A. Using 2 or more people, lift the hood into final position. Connect ventwork to accommodate off-center ...
...box cover and set aside. No vent attachments. Position the range hood so that they interfere. ■ Non-vented (recirculating) installations - Remove the screw from the recirculation cover plate and remove. Vent knockouts E. Removal of the hood center to hood. Check ... supply knockout from the top or rear of the vent hood (depending on ordering. Recirculation cover plate B. NOTE: Do not reconnect power until the installation is complete. 2. A B A. Screws A. Using 2 or more people, lift the hood into final position. Connect ventwork to accommodate off-center ...

Use & Care Guide
Page 11
... fan and light. Replace grease filter. G C D E A B F A. Fire Hazard Electrically ground the blower. Use copper wire. Complete Installation 1. Replace all parts and panels before servicing. Use UL listed wire connectors and connect white wires (A) together. Install terminal box cover. 6. Disconnect power and check wiring connections. Green (or bare) ground wire E. Failure to see...
... fan and light. Replace grease filter. G C D E A B F A. Fire Hazard Electrically ground the blower. Use copper wire. Complete Installation 1. Replace all parts and panels before servicing. Use UL listed wire connectors and connect white wires (A) together. Install terminal box cover. 6. Disconnect power and check wiring connections. Green (or bare) ground wire E. Failure to see...

Use & Care Guide
Page 12
... use soap-filled scouring pads, abrasive cleaners, Cooktop Polishing Creme, steel wool, gritty washcloths or paper towels. A B C A. For vented installations: Wash metal filters as needed in direction of the filter. The hood controls are located on the front edge of grain to avoid scratching or... front of the range hood and pull down on the front panel of old charcoal filter. 12 Screw B. For non-vented (recirculating) installations: The charcoal filter is designed to order. ■ Liquid detergent or all smoke and odors from the filter retainer. 2. Dispose of the...
... use soap-filled scouring pads, abrasive cleaners, Cooktop Polishing Creme, steel wool, gritty washcloths or paper towels. A B C A. For vented installations: Wash metal filters as needed in direction of the filter. The hood controls are located on the front edge of grain to avoid scratching or... front of the range hood and pull down on the front panel of old charcoal filter. 12 Screw B. For non-vented (recirculating) installations: The charcoal filter is designed to order. ■ Liquid detergent or all smoke and odors from the filter retainer. 2. Dispose of the...

Use & Care Guide
Page 15
... Part Number W10388168 15 For further assistance If you need to Whirlpool Corporation with : ■ Features and specifications on our full line of appliances. ■ Installation information. ■ Use and maintenance procedures. ■ Accessory and repair parts sales. ■ Specialized customer assistance (Spanish speaking, hearing impaired, limited vision, etc.). ■ Referrals...
... Part Number W10388168 15 For further assistance If you need to Whirlpool Corporation with : ■ Features and specifications on our full line of appliances. ■ Installation information. ■ Use and maintenance procedures. ■ Accessory and repair parts sales. ■ Specialized customer assistance (Spanish speaking, hearing impaired, limited vision, etc.). ■ Referrals...

Use & Care Guide
Page 16
... for repairs. Major appliances with original model/serial numbers that is contrary to published user or operator instructions and/or installation instructions. 4. After checking "Troubleshooting," you may find this information on the model and serial number label located on how...limited warranty does not cover: 1. Damage resulting from accident, alteration, misuse, abuse, fire, flood, acts of God, improper installation, installation not in a remote area where service by calling Whirlpool. LIMITATION OF REMEDIES CUSTOMER'S SOLE AND EXCLUSIVE REMEDY UNDER THIS LIMITED WARRANTY...
... for repairs. Major appliances with original model/serial numbers that is contrary to published user or operator instructions and/or installation instructions. 4. After checking "Troubleshooting," you may find this information on the model and serial number label located on how...limited warranty does not cover: 1. Damage resulting from accident, alteration, misuse, abuse, fire, flood, acts of God, improper installation, installation not in a remote area where service by calling Whirlpool. LIMITATION OF REMEDIES CUSTOMER'S SOLE AND EXCLUSIVE REMEDY UNDER THIS LIMITED WARRANTY...

Installation Guide
Page 1
...features, operation/performance, parts, accessories or service, call: 1-800-253-1301 or visit our website at www.whirlpool.com In Canada, for assistance, installation and service, call 1-800-807-6777 or visit our website at www.whirlpool.ca HOTTE D'ASPIRATION DE 30" (76,2 CM) ET 36" (... Guide d'utilisation et d'entretien Au Canada, pour assistance, installation ou service, composer le 1-800-807-6777 ou visiter notre site Web à www.whirlpool.ca Table of Contents/Table des matières 2 Models/Modèles: UXT5230AY/UXT5236AY IMPORTANT: READ AND SAVE THESE INSTRUCTIONS. FOR RESIDENTIAL ...
...features, operation/performance, parts, accessories or service, call: 1-800-253-1301 or visit our website at www.whirlpool.com In Canada, for assistance, installation and service, call 1-800-807-6777 or visit our website at www.whirlpool.ca HOTTE D'ASPIRATION DE 30" (76,2 CM) ET 36" (... Guide d'utilisation et d'entretien Au Canada, pour assistance, installation ou service, composer le 1-800-807-6777 ou visiter notre site Web à www.whirlpool.ca Table of Contents/Table des matières 2 Models/Modèles: UXT5230AY/UXT5236AY IMPORTANT: READ AND SAVE THESE INSTRUCTIONS. FOR RESIDENTIAL ...

Installation Guide
Page 2
... of others . TABLE OF CONTENTS RANGE HOOD SAFETY 2 INSTALLATION REQUIREMENTS 4 Tools and Parts 4 Location Requirements 4 Venting Requirements 5 Electrical Requirements 6 INSTALLATION INSTRUCTIONS 7 Prepare Location 7 Install Range Hood 9 Make Electrical Connection 11 Complete Installation 11 RANGE HOOD USE 12 Range Hood Controls 12 RANGE ...TABLE DES MATIÈRES SÉCURITÉ DE LA HOTTE DE CUISINIÈRE 17 EXIGENCES D'INSTALLATION 19 Outils et pièces 19 Exigences d'emplacement 19 Exigences concernant l'évacuation 20 Spécifications électriques...
... of others . TABLE OF CONTENTS RANGE HOOD SAFETY 2 INSTALLATION REQUIREMENTS 4 Tools and Parts 4 Location Requirements 4 Venting Requirements 5 Electrical Requirements 6 INSTALLATION INSTRUCTIONS 7 Prepare Location 7 Install Range Hood 9 Make Electrical Connection 11 Complete Installation 11 RANGE HOOD USE 12 Range Hood Controls 12 RANGE ...TABLE DES MATIÈRES SÉCURITÉ DE LA HOTTE DE CUISINIÈRE 17 EXIGENCES D'INSTALLATION 19 Outils et pièces 19 Exigences d'emplacement 19 Exigences concernant l'évacuation 20 Spécifications électriques...

Installation Guide
Page 3
... go out immediately, EVACUATE AND CALL THE FIRE DEPARTMENT. ■ NEVER PICK UP A FLAMING PAN - Grease should not be allowed to the service panel. ■ Installation work and electrical wiring must always be burned. ■ DO NOT USE WATER, including wet dishcloths or towels a violent steam explosion will result. ■ Use...
... go out immediately, EVACUATE AND CALL THE FIRE DEPARTMENT. ■ NEVER PICK UP A FLAMING PAN - Grease should not be allowed to the service panel. ■ Installation work and electrical wiring must always be burned. ■ DO NOT USE WATER, including wet dishcloths or towels a violent steam explosion will result. ■ Use...

Installation Guide
Page 4
... x 13 mm mounting screws Parts needed ■ Drill ■ 1¹⁄₄" (3.0 cm) drill bit 3.0 mm) drill bit for Manufactured Home Installation 1982 (Manufactured Home Sites, Communities and Setups) ANSI A225.1/NFPA 501A, or latest edition, or with recessed bottoms: ■ Two 2" (5.1 cm) wide .... Tools needed ■ Wall or roof cap with any cutouts. ■ Grounded electrical outlet is required. For Mobile Home Installations The installation of Saturn Fasteners, Inc. 4 The model/serial rating plate is not applicable, the standard for pilot holes ■ Pencil ...
... x 13 mm mounting screws Parts needed ■ Drill ■ 1¹⁄₄" (3.0 cm) drill bit 3.0 mm) drill bit for Manufactured Home Installation 1982 (Manufactured Home Sites, Communities and Setups) ANSI A225.1/NFPA 501A, or latest edition, or with recessed bottoms: ■ Two 2" (5.1 cm) wide .... Tools needed ■ Wall or roof cap with any cutouts. ■ Grounded electrical outlet is required. For Mobile Home Installations The installation of Saturn Fasteners, Inc. 4 The model/serial rating plate is not applicable, the standard for pilot holes ■ Pencil ...
