User Guide
Page 2
... in the host computer 2-2 Installing the Kodak Driver software 2-2 Installing the FireWire cable 2-2 Attaching the power cord 2-3 Powering up the host computer 2-3 Scanner components 2-3 3 Using the Scanner 3-1 Turning the scanner on and off 3-1 Starting and stopping scanning 3-1 Manually pausing and resuming the scanner 3-2 Automatically pausing and resuming the scanner 3-2 Manually ending scanning 3-2 Document preparation 3-3 Adjusting the side guides...
... in the host computer 2-2 Installing the Kodak Driver software 2-2 Installing the FireWire cable 2-2 Attaching the power cord 2-3 Powering up the host computer 2-3 Scanner components 2-3 3 Using the Scanner 3-1 Turning the scanner on and off 3-1 Starting and stopping scanning 3-1 Manually pausing and resuming the scanner 3-2 Automatically pausing and resuming the scanner 3-2 Manually ending scanning 3-2 Document preparation 3-3 Adjusting the side guides...

User Guide
Page 3
Exit deflector 3-7 Adjusting the optional short document tray 3-8 Feeding documents using multi-feed detection 3-9 Automatic feeding 3-9 Continuous feeding 3-10 Manual feeding 3-10 Feeding documents that require special handling 3-11 Calibrating the scanner 3-11 Image calibration 3-12 Ultrasonics calibration 3-... Troubleshooting 6-1 Indicator lights 6-1 Accessing the Operator Log 6-3 i600 Series Scanners Message listing 6-6 i600 Series Scanners Numerical Message listing 6-11 i700 Series Scanners Message listing 6-12 i700 Series Scanenrs Numerial Message listing 6-18 Problem ...
Exit deflector 3-7 Adjusting the optional short document tray 3-8 Feeding documents using multi-feed detection 3-9 Automatic feeding 3-9 Continuous feeding 3-10 Manual feeding 3-10 Feeding documents that require special handling 3-11 Calibrating the scanner 3-11 Image calibration 3-12 Ultrasonics calibration 3-... Troubleshooting 6-1 Indicator lights 6-1 Accessing the Operator Log 6-3 i600 Series Scanners Message listing 6-6 i600 Series Scanners Numerical Message listing 6-11 i700 Series Scanners Message listing 6-12 i700 Series Scanenrs Numerial Message listing 6-18 Problem ...

User Guide
Page 4
... roller and imaging guides. 1 Introduction This User's Guide provides information and procedures for scanning, document feeder and output tray adjustments, scanner calibration and how to scan documents. includes information on how to prepare your documents for the Kodak i600/i700 Series Scanners. Chapter 4, Using the Enhanced Printer - provides a description of the LED indicators, a problem solving chart, procedures...
... roller and imaging guides. 1 Introduction This User's Guide provides information and procedures for scanning, document feeder and output tray adjustments, scanner calibration and how to scan documents. includes information on how to prepare your documents for the Kodak i600/i700 Series Scanners. Chapter 4, Using the Enhanced Printer - provides a description of the LED indicators, a problem solving chart, procedures...
User Guide
Page 7
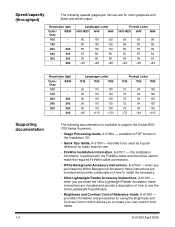
Resolution (dpi) Color/ Gray B&W 100 - 150 - 200 200 240 240 300 300 - 400 Landscape Letter i610/i620 i640 i660 80 100 120 80 100 120 80 100 120 53 66 80 53 66 80 Speed/capacity (throughput) The following speeds (pages per minute) are for color/grayscale and black and white output.
Resolution (dpi) Color/ Gray B&W 100 - 150 - 200 200 240 240 300 300 - 400 Landscape Letter i610/i620 i640 i660 80 100 120 80 100 120 80 100 120 53 66 80 53 66 80 Speed/capacity (throughput) The following speeds (pages per minute) are for color/grayscale and black and white output.

User Guide
Page 8
...website: www.eiae.org. • The product packaging is recyclable. • The i600/i700 Series Scanners are Energy Star compliant and are available on the Kodak website at: www.kodak.com/go/msds. Safety information Warning labels CAUTION: Moving parts, avoid contact. Disposal of this material may...Service for consumables and catalog numbers. Supervisors should be kept short, using a hair net if needed, or tying long hair up in the circuit board solder. Do not attempt to repair. • The Kodak i600/i700 Series Scanners contain lead in a bundle. • Remove all other loose ...
...website: www.eiae.org. • The product packaging is recyclable. • The i600/i700 Series Scanners are Energy Star compliant and are available on the Kodak website at: www.kodak.com/go/msds. Safety information Warning labels CAUTION: Moving parts, avoid contact. Disposal of this material may...Service for consumables and catalog numbers. Supervisors should be kept short, using a hair net if needed, or tying long hair up in the circuit board solder. Do not attempt to repair. • The Kodak i600/i700 Series Scanners contain lead in a bundle. • Remove all other loose ...

User Guide
Page 9
...to radio communications. In a domestic environment this product may be required to take adequate measures. This equipment generates, uses, and can radiate radio frequently energy and, if not installed and used in which case the user may cause radio interference in a commercial environment. If this equipment in a residential ...area is used in which case the user will be required to correct the interference at his own expense. When such trouble occurs, the user...
...to radio communications. In a domestic environment this product may be required to take adequate measures. This equipment generates, uses, and can radiate radio frequently energy and, if not installed and used in which case the user may cause radio interference in a commercial environment. If this equipment in a residential ...area is used in which case the user will be required to correct the interference at his own expense. When such trouble occurs, the user...

User Guide
Page 10
...your scanner so Kodak can provide you with firmware and hardware updates as they become available. The scanner must be registered before any service support can register your scanner It is the minimum recommended system configuration to Appendix B, Specifications. IMPORTANT: Only use the scanner ...RAM • Monitor • Mouse Registering your scanner's new equipment warranty online at the optimal speed, a faster computer and/or more information about Kodak's service and support options, contact your reseller of Kodak Document Imaging products or visit us provide you with the...
...your scanner so Kodak can provide you with firmware and hardware updates as they become available. The scanner must be registered before any service support can register your scanner It is the minimum recommended system configuration to Appendix B, Specifications. IMPORTANT: Only use the scanner ...RAM • Monitor • Mouse Registering your scanner's new equipment warranty online at the optimal speed, a faster computer and/or more information about Kodak's service and support options, contact your reseller of Kodak Document Imaging products or visit us provide you with the...
User Guide
Page 11
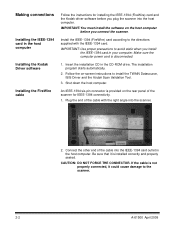
... IEEE-1394 card. Install the IEEE-1394 (FireWire) card according to the scanner. 2-2 A-61500 April 2009 Connect the other end of the scanner for installing the IEEE-1394 (FireWire) card and the Kodak driver software before you install the IEEE-1394 card in your computer. If ... the software on -screen instructions to avoid static when you connect the scanner. Insert the installation CD in the host computer. IMPORTANT: Use proper precautions to install the TWAIN Datasource, ISIS Driver and the Kodak Scan Validation Tool. 3. Making connections Installing the IEEE-1394 card in the...
... IEEE-1394 card. Install the IEEE-1394 (FireWire) card according to the scanner. 2-2 A-61500 April 2009 Connect the other end of the scanner for installing the IEEE-1394 (FireWire) card and the Kodak driver software before you install the IEEE-1394 card in your computer. If ... the software on -screen instructions to avoid static when you connect the scanner. Insert the installation CD in the host computer. IMPORTANT: Use proper precautions to install the TWAIN Datasource, ISIS Driver and the Kodak Scan Validation Tool. 3. Making connections Installing the IEEE-1394 card in the...
User Guide
Page 13
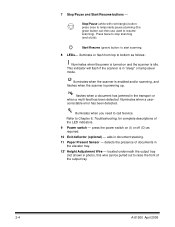
...been detected. Start/Resume (green) button: to call Service. illuminates when the scanner is enabled and/or scanning, and flashes when the scanner is in the elevator tray. 12* Height Adjustment Wire - flashes when a document has jammed in document stacking. 11 Paper Present Sensor - Illuminates when you need to start scanning.... scanning (end of the LED indicators. 9 Power switch - located underneath the output tray (not shown in photo), this wire can then use used to bottom as follows: Illuminates when the power is turned on (I) or off (O) as required. 10 Exit deflector (optional) -
...been detected. Start/Resume (green) button: to call Service. illuminates when the scanner is enabled and/or scanning, and flashes when the scanner is in the elevator tray. 12* Height Adjustment Wire - flashes when a document has jammed in document stacking. 11 Paper Present Sensor - Illuminates when you need to start scanning.... scanning (end of the LED indicators. 9 Power switch - located underneath the output tray (not shown in photo), this wire can then use used to bottom as follows: Illuminates when the power is turned on (I) or off (O) as required. 10 Exit deflector (optional) -

User Guide
Page 16
... pressing the Start/Resume button on and constant. 3 Using the Scanner This chapter provides the following operational procedures: • Turning on/off the scanner • Starting, stopping, pausing and resuming the scanner • Document preparation • Adjusting the side guides and output tray • Scanning documents • Feeding long documents • Automatic, continuous and manual feeding •...
... pressing the Start/Resume button on and constant. 3 Using the Scanner This chapter provides the following operational procedures: • Turning on/off the scanner • Starting, stopping, pausing and resuming the scanner • Document preparation • Adjusting the side guides and output tray • Scanning documents • Feeding long documents • Automatic, continuous and manual feeding •...

User Guide
Page 18
... be arranged so the leading edges of the sleeve. Kodak scanners have been tested with the folded edge of the sleeve. Optimal scanner performance is not recommended when using the gap release lever. Scanning documents outside of these specifications may damage the scanner and documents. However, no scanner can handle paper weights from 45 to 200 g/m2 (12...
... be arranged so the leading edges of the sleeve. Kodak scanners have been tested with the folded edge of the sleeve. Optimal scanner performance is not recommended when using the gap release lever. Scanning documents outside of these specifications may damage the scanner and documents. However, no scanner can handle paper weights from 45 to 200 g/m2 (12...

User Guide
Page 21
When finished using the output tray in .): 1. Adjusting the output tray for long documents up to 43 cm (17 in.) To adjust the output tray to accommodate long documents from underneath the output tray and insert it out of the output tray until in the forward detent position. Gently push down on the printer... wire back into position and lower the output tray. Swing the height adjustment wire out from 37 cm 14.5 in.) to accommodate long (or short) documents by pulling the end stop forward (or backward). 5.
When finished using the output tray in .): 1. Adjusting the output tray for long documents up to 43 cm (17 in.) To adjust the output tray to accommodate long documents from underneath the output tray and insert it out of the output tray until in the forward detent position. Gently push down on the printer... wire back into position and lower the output tray. Swing the height adjustment wire out from 37 cm 14.5 in.) to accommodate long (or short) documents by pulling the end stop forward (or backward). 5.
User Guide
Page 24
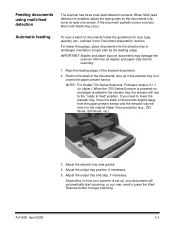
... and the elevator tray will rise to the "ready to begin scanning. NOTE: For Kodak i700 Series Scanners, Firmware Version 2.1.1 (or higher): When the i700 Series Scanner is powered-on how your documents will automatically start scanning, or you need to press the Start/ Resume button to feed..." position. If you may need to the original Paper Source position (e.g., 250 Sheet, 500 Sheet, etc.) . 3. Feeding documents using multi-feed detection The scanner has three multi-feed detection sensors. If the document partially covers a sensor, false multi-feeds may damage the...
... and the elevator tray will rise to the "ready to begin scanning. NOTE: For Kodak i700 Series Scanners, Firmware Version 2.1.1 (or higher): When the i700 Series Scanner is powered-on how your documents will automatically start scanning, or you need to press the Start/ Resume button to feed..." position. If you may need to the original Paper Source position (e.g., 250 Sheet, 500 Sheet, etc.) . 3. Feeding documents using multi-feed detection The scanner has three multi-feed detection sensors. If the document partially covers a sensor, false multi-feeds may damage the...
User Guide
Page 25
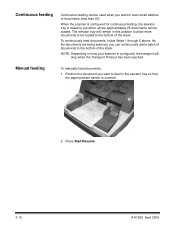
... loaded. When the scanner is configured for continuous feeding, the elevator tray is raised to a position where approximately 25 documents can continuously add a batch of documents to the bottom of the stack. Press Start/Resume. 3-10 A-61500 April 2009 Manual feeding To manually feed documents: 1. Continuous feeding Continuous feeding can be used when you want...
... loaded. When the scanner is configured for continuous feeding, the elevator tray is raised to a position where approximately 25 documents can continuously add a batch of documents to the bottom of the stack. Press Start/Resume. 3-10 A-61500 April 2009 Manual feeding To manually feed documents: 1. Continuous feeding Continuous feeding can be used when you want...

User Guide
Page 26
... one at a time. 3. After the document(s) has been fed, release the gap release lever. Press and hold the gap release lever - Frequent calibration is recommended when handling special documents. 1. i.e. A-61500 April 2009 3-11 Using the scanner in continuous feed mode is not needed or... recommended. If more than one document is to ease document feeding. If you to manually adjust the space between the...
... one at a time. 3. After the document(s) has been fed, release the gap release lever. Press and hold the gap release lever - Frequent calibration is recommended when handling special documents. 1. i.e. A-61500 April 2009 3-11 Using the scanner in continuous feed mode is not needed or... recommended. If more than one document is to ease document feeding. If you to manually adjust the space between the...

User Guide
Page 27
... Additional calibration targets can be displayed. 3-12 A-61500 April 2009 See Chapter 5, "Supplies and accessories" for 90 seconds. 3. The main Kodak Scanner window will be ordered. Be sure to the maintenance procedures in the elevator tray. 5. NOTE: The screens shown in the elevator tray and ...output tray. 4. Place the calibration target in Chapter 5. 2. Image calibration Use the calibration target provided with your system may be different. 1. The screens displayed on , allow the lamps to warm up for ordering ...
... Additional calibration targets can be displayed. 3-12 A-61500 April 2009 See Chapter 5, "Supplies and accessories" for 90 seconds. 3. The main Kodak Scanner window will be ordered. Be sure to the maintenance procedures in the elevator tray. 5. NOTE: The screens shown in the elevator tray and ...output tray. 4. Place the calibration target in Chapter 5. 2. Image calibration Use the calibration target provided with your system may be different. 1. The screens displayed on , allow the lamps to warm up for ordering ...

User Guide
Page 30
... shown in portrait orientation. 3. Center the side guides in the elevator tray and output tray. 2. You must wait at least 90 seconds before calibrating again. Use only an A4 size / 75-80 g/m2 or lettersize / 20 lb. See Chapter 6, "Accessing the Operator Log" for more information.
... shown in portrait orientation. 3. Center the side guides in the elevator tray and output tray. 2. You must wait at least 90 seconds before calibrating again. Use only an A4 size / 75-80 g/m2 or lettersize / 20 lb. See Chapter 6, "Accessing the Operator Log" for more information.
User Guide
Page 31
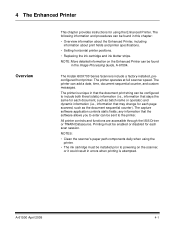
...and procedures can be found in errors when printing is unique in that the document print string can be sent to the printer. NOTES: • Clean the scanner's paper path components daily when using the Enhanced Printer. The printer can be configured to powering on the Enhanced ...batch name or operator) and dynamic information (i.e., information that the software allows you to enter can add a date, time, document sequential counter, and custom messages. The Kodak i600/i700 Series Scanners include a factory-installed, preconfigured front printer. The printer operates at full...
...and procedures can be found in errors when printing is unique in that the document print string can be sent to the printer. NOTES: • Clean the scanner's paper path components daily when using the Enhanced Printer. The printer can be configured to powering on the Enhanced ...batch name or operator) and dynamic information (i.e., information that the software allows you to enter can add a date, time, document sequential counter, and custom messages. The Kodak i600/i700 Series Scanners include a factory-installed, preconfigured front printer. The printer operates at full...
User Guide
Page 39
...the recommended Kodak cleaning procedures. After cleaning, inspect the tires for parts that are worn or damaged. Following this manual. A-61500 April 2009 5-1 Do not use air, liquid or gas spray cleaners. Tire debris does not always mean that is normal. Some document types ...frequency chart • a list of cleaning tools and materials • a list of supplies and accessories • cleaning procedures for the scanner • replacement procedures for wear and replace the separation roller or feed module if necessary. • When cleaning rollers/tires, allow the...
...the recommended Kodak cleaning procedures. After cleaning, inspect the tires for parts that are worn or damaged. Following this manual. A-61500 April 2009 5-1 Do not use air, liquid or gas spray cleaners. Tire debris does not always mean that is normal. Some document types ...frequency chart • a list of cleaning tools and materials • a list of supplies and accessories • cleaning procedures for the scanner • replacement procedures for wear and replace the separation roller or feed module if necessary. • When cleaning rollers/tires, allow the...

User Guide
Page 40
... below as a guide to how frequently you should clean your scanner. • Kodak Digital Science Transport Cleaning Sheets • Kodak Digital Science Roller Cleaning Pads • Staticide Wipes for Kodak Scanners • A vacuum cleaner and tools 5-2 A-61500 April 2009 Use of new shift shift x x x x x x x x Use only these cleaning tools and materials when performing routine maintenance on your...
... below as a guide to how frequently you should clean your scanner. • Kodak Digital Science Transport Cleaning Sheets • Kodak Digital Science Roller Cleaning Pads • Staticide Wipes for Kodak Scanners • A vacuum cleaner and tools 5-2 A-61500 April 2009 Use of new shift shift x x x x x x x x Use only these cleaning tools and materials when performing routine maintenance on your...


