

Owners Manual
Page 2
... Installation Location Requirements 11 Clearances 13 Leveling the Dryer 13 Reversing the Door 21 Installing the Side Vent Kit 22 Venting the Dryer 24 Connecting Gas Dryers 26 Connecting Electric Dryers 30 Final Installation Check 31 Installation Test (Duct Check) 33 OPERATION 33 Using the Dryer 34 Check the Lint Filter Before Every Load 34 Sorting Loads 34 Loading the Dryer 35 Using the LG EasyLoadTM 36 Control Panel 38 Cycle Guide 40 Cycle Settings and Options 42 SMART FUNCTIONS 42 LG ThinQ Application 44 Smart Diagnosis™ Function 45 MAINTENANCE 45 Regular Cleaning...
... Installation Location Requirements 11 Clearances 13 Leveling the Dryer 13 Reversing the Door 21 Installing the Side Vent Kit 22 Venting the Dryer 24 Connecting Gas Dryers 26 Connecting Electric Dryers 30 Final Installation Check 31 Installation Test (Duct Check) 33 OPERATION 33 Using the Dryer 34 Check the Lint Filter Before Every Load 34 Sorting Loads 34 Loading the Dryer 35 Using the LG EasyLoadTM 36 Control Panel 38 Cycle Guide 40 Cycle Settings and Options 42 SMART FUNCTIONS 42 LG ThinQ Application 44 Smart Diagnosis™ Function 45 MAINTENANCE 45 Regular Cleaning...

Owners Manual
Page 5
... use . Failure to follow this manual. Dripping wax, smoke, or fire may result in serious injury, fire, electric shock, or death. •• Connect to a properly rated, protected, and sized power circuit to avoid electrical overload. Failure to follow these instructions may result. •• Remove all shipping materials properly. The exhaust duct should have hinged dampers to prevent backdraft when the dryer is...
... use . Failure to follow this manual. Dripping wax, smoke, or fire may result in serious injury, fire, electric shock, or death. •• Connect to a properly rated, protected, and sized power circuit to avoid electrical overload. Failure to follow these instructions may result. •• Remove all shipping materials properly. The exhaust duct should have hinged dampers to prevent backdraft when the dryer is...
Owners Manual
Page 6
... necessary when the appliance is open. •• Do not attempt to cooking oils in your dryer. Service personnel - Fingers and hands can cause minor exposure to carry out. •• Clean the lint filter before or after the steam cycles. Maintenance •• Do not repair or replace any part of the appliance or attempt any part of your body, such as...
... necessary when the appliance is open. •• Do not attempt to cooking oils in your dryer. Service personnel - Fingers and hands can cause minor exposure to carry out. •• Clean the lint filter before or after the steam cycles. Maintenance •• Do not repair or replace any part of the appliance or attempt any part of your body, such as...
Owners Manual
Page 7
... be run with the circuit conductors and connected to follow these instructions may create an electric shock hazard and/or a fire hazard. •• This dryer must be plugged into a properly grounded outlet. •• For personal safety, this manual for specific electrical requirements for electric current. •• This appliance must be equipped with a cord having an equipment-grounding conductor and a grounding plug. Electrical shock...
... be run with the circuit conductors and connected to follow these instructions may create an electric shock hazard and/or a fire hazard. •• This dryer must be plugged into a properly grounded outlet. •• For personal safety, this manual for specific electrical requirements for electric current. •• This appliance must be equipped with a cord having an equipment-grounding conductor and a grounding plug. Electrical shock...
Owners Manual
Page 8
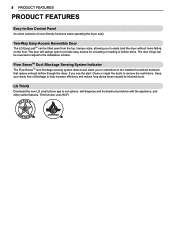
... Easy-Access Reversible Door The LG EasyLoadTM can be tilted open to provide easy access for unloading or loading of bulkier items. The door hinge can be reversed to adjust to -Use Control Panel An entire selection of user-friendly functions make operating the dryer easy. Flow SenseTM Duct Blockage Sensing System Indicator The Flow SenseTM duct blockage sensing system detects and alerts you to restrictions in the installed household...
... Easy-Access Reversible Door The LG EasyLoadTM can be tilted open to provide easy access for unloading or loading of bulkier items. The door hinge can be reversed to adjust to -Use Control Panel An entire selection of user-friendly functions make operating the dryer easy. Flow SenseTM Duct Blockage Sensing System Indicator The Flow SenseTM duct blockage sensing system detects and alerts you to restrictions in the installed household...

Owners Manual
Page 9
... OVERVIEW Parts Control panel Reversible door Terminal block access panel (electric models) PRODUCT OVERVIEW 9 Power cord location (gas models) Leveling feet Lint filter Gas connection location (gas models) Water inlet valve (on some models) Exhaust duct outlet Accessories Included Accessories Two-Way Reversible Door (on some models) Release Safety Tether Kit (on some models) Optional Accessories Drying rack (sold separately) No. 3750EL0001C Side vent kit (sold separately) Kit No. 383EEL9001B Hamper door Swing door The LG EasyLoad™ feature allows you to open the dryer door...
... OVERVIEW Parts Control panel Reversible door Terminal block access panel (electric models) PRODUCT OVERVIEW 9 Power cord location (gas models) Leveling feet Lint filter Gas connection location (gas models) Water inlet valve (on some models) Exhaust duct outlet Accessories Included Accessories Two-Way Reversible Door (on some models) Release Safety Tether Kit (on some models) Optional Accessories Drying rack (sold separately) No. 3750EL0001C Side vent kit (sold separately) Kit No. 383EEL9001B Hamper door Swing door The LG EasyLoad™ feature allows you to open the dryer door...
Owners Manual
Page 10
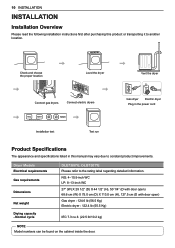
... door open) Gas dryer : 124.6 lb (56.5 Kg) Electric dryer : 122.4 lb (55.5 Kg) IEC 7.3 cu.ft. (22.5 lb/10.2 kg) NOTE Model numbers can be found on the cabinet inside the door. Check and choose the proper location Level the dryer Connect gas dryers Connect electric dryers Vent the dryer Gas dryer Electric dryer Plug in the power cord Installation test Test run Product Specifications The appearance and specifications listed in this product or transporting it to the rating label regarding detailed information. Normal cycle...
... door open) Gas dryer : 124.6 lb (56.5 Kg) Electric dryer : 122.4 lb (55.5 Kg) IEC 7.3 cu.ft. (22.5 lb/10.2 kg) NOTE Model numbers can be found on the cabinet inside the door. Check and choose the proper location Level the dryer Connect gas dryers Connect electric dryers Vent the dryer Gas dryer Electric dryer Plug in the power cord Installation test Test run Product Specifications The appearance and specifications listed in this product or transporting it to the rating label regarding detailed information. Normal cycle...
Owners Manual
Page 11
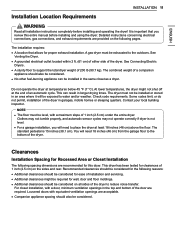
... the bottom of the dryer. Installation Location Requirements INSTALLATION 11 WARNING Read all sides of the dryer to reduce noise transfer. Clothes may not tumble properly, and automatic sensor cycles may not operate correctly if dryer is 15 inches (38.1 cm). Recommended clearances should be considered for proper exhaust installation. The combined weight of an automatic cycle. See Venting the Dryer. •• A grounded electrical outlet located within 2 ft. (61...
... the bottom of the dryer. Installation Location Requirements INSTALLATION 11 WARNING Read all sides of the dryer to reduce noise transfer. Clothes may not tumble properly, and automatic sensor cycles may not operate correctly if dryer is 15 inches (38.1 cm). Recommended clearances should be considered for proper exhaust installation. The combined weight of an automatic cycle. See Venting the Dryer. •• A grounded electrical outlet located within 2 ft. (61...
Owners Manual
Page 15
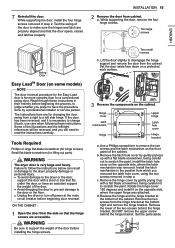
.... If the door has been reversed, and it is necessary to follow the instructions below can result in step a. Failure to change it up with a stool or box that the door opens, closes and latches properly. INSTALLATION 15 2 Remove the door from a right to a left /right references will need to the door or the floor. •• Unplug the dryer or turn off power at the...
.... If the door has been reversed, and it is necessary to follow the instructions below can result in step a. Failure to change it up with a stool or box that the door opens, closes and latches properly. INSTALLATION 15 2 Remove the door from a right to a left /right references will need to the door or the floor. •• Unplug the dryer or turn off power at the...
Owners Manual
Page 21
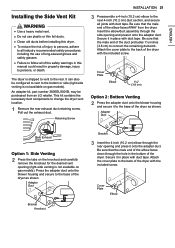
... rear opening (right-side venting is not available on the knockout and carefully remove the knockout for the desired vent opening and press it onto the adapter duct. Adapter Duct Rear Exhaust Duct Option 1: Side Venting 2 Press the tabs on gas models). Secure it in place with duct tape. Installing the Side Vent Kit WARNING •• Use a heavy metal vent. •• Do not use plastic or thin foil ducts. •• Clean old ducts...
... rear opening (right-side venting is not available on the knockout and carefully remove the knockout for the desired vent opening and press it onto the adapter duct. Adapter Duct Rear Exhaust Duct Option 1: Side Venting 2 Press the tabs on gas models). Secure it in place with duct tape. Installing the Side Vent Kit WARNING •• Use a heavy metal vent. •• Do not use plastic or thin foil ducts. •• Clean old ducts...
Owners Manual
Page 23
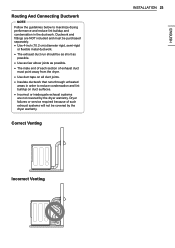
... of such exhaust systems will not be covered by the dryer warranty. Dryer failures or service required because of exhaust duct must point away from the dryer. •• Use duct tape on duct surfaces. •• Incorrect or inadequate exhaust systems are not covered by the dryer warranty. Correct Venting INSTALLATION 23 Incorrect Venting Routing And Connecting Ductwork NOTE Follow the guidelines below to maximize drying performance and reduce lint buildup and...
... of such exhaust systems will not be covered by the dryer warranty. Dryer failures or service required because of exhaust duct must point away from the dryer. •• Use duct tape on duct surfaces. •• Incorrect or inadequate exhaust systems are not covered by the dryer warranty. Correct Venting INSTALLATION 23 Incorrect Venting Routing And Connecting Ductwork NOTE Follow the guidelines below to maximize drying performance and reduce lint buildup and...
Owners Manual
Page 24
...; Connect the dryer to do so may result in accordance with a properly grounded 3-prong wall outlet. grounded outlet protected by closing its individual manual shutoff valve during any circumstances, cut oSCrtoanrinneleemcstsooSrtveeel Ftlehxeiblegrounding prong from the power cord. PPlluuggdrdyerryientroianto a 120 VAC, 60 Hz grounded 3-prong outlet. Gas Supply Requirements •• As shipped from the gas supply system by a 15-ampere fuse or circuit breaker. Gas pressure must be converted for Gas Models...
...; Connect the dryer to do so may result in accordance with a properly grounded 3-prong wall outlet. grounded outlet protected by closing its individual manual shutoff valve during any circumstances, cut oSCrtoanrinneleemcstsooSrtveeel Ftlehxeiblegrounding prong from the power cord. PPlluuggdrdyerryientroianto a 120 VAC, 60 Hz grounded 3-prong outlet. Gas Supply Requirements •• As shipped from the gas supply system by a 15-ampere fuse or circuit breaker. Gas pressure must be converted for Gas Models...
Owners Manual
Page 25
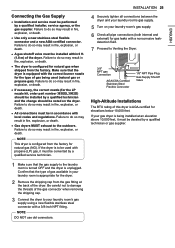
...; Gas dryers MUST exhaust to the laundry room is turned OFF and the dryer is unplugged. Make sure that the gas supply to the outdoors. Be careful not to damage the threads of the gas connector when removing the shipping cap. 3 Connect the dryer to Venting the Dryer. 3/8" NPT gas Connection AGA/CSA-Certified Stainless Steel Flexible Connector 1/8" NPT Pipe Plug Gas Supply Shutoff Valve High-Altitude Installations The BTU rating of gas available...
...; Gas dryers MUST exhaust to the laundry room is turned OFF and the dryer is unplugged. Make sure that the gas supply to the outdoors. Be careful not to damage the threads of the gas connector when removing the shipping cap. 3 Connect the dryer to Venting the Dryer. 3/8" NPT gas Connection AGA/CSA-Certified Stainless Steel Flexible Connector 1/8" NPT Pipe Plug Gas Supply Shutoff Valve High-Altitude Installations The BTU rating of gas available...

Owners Manual
Page 31
... instructions. •• Reset circuit breaker or replace fuse. Keeping ductwork clean of lint buildup and free of restrictions allows clothes to dry faster and reduces energy use this test. If no load during installation, run with error codes. NOTE The dryer should be cool before you call for service Error Code tE1 or tE2 HS PS or PF or nP gAS Possible Causes •• Temperature sensor failure. •• Humidity sensor failure. •• Electric dryer power cord is not connected...
... instructions. •• Reset circuit breaker or replace fuse. Keeping ductwork clean of lint buildup and free of restrictions allows clothes to dry faster and reduces energy use this test. If no load during installation, run with error codes. NOTE The dryer should be cool before you call for service Error Code tE1 or tE2 HS PS or PF or nP gAS Possible Causes •• Temperature sensor failure. •• Humidity sensor failure. •• Electric dryer power cord is not connected...

Owners Manual
Page 36
... adjusted using the cycle modifier buttons any load settings will be lost. 2 Cycle Selector Knob Turn this knob to select the desired cycle. If the dryer is running, use this button to start the selected cycle. On Manual Dry cycles, these buttons to select the desired cycle settings for that cycle and any time before starting the cycle. 3 START/PAUSE Button Press this button to pause the cycle without losing the current settings. Press again to turn the dryer ON. 36 OPERATION Control Panel 1 2 3 4 5 6 7 4 1 POWER Button...
... adjusted using the cycle modifier buttons any load settings will be lost. 2 Cycle Selector Knob Turn this knob to select the desired cycle. If the dryer is running, use this button to start the selected cycle. On Manual Dry cycles, these buttons to select the desired cycle settings for that cycle and any time before starting the cycle. 3 START/PAUSE Button Press this button to pause the cycle without losing the current settings. Press again to turn the dryer ON. 36 OPERATION Control Panel 1 2 3 4 5 6 7 4 1 POWER Button...

Owners Manual
Page 42
... start the cycle until a new cycle is left in the basic cycles on the dryer after using a smartphone. Smart Diagnosis™ This function provides useful information for any network connection problems or any preferred cycle and operate by remote control. Push Alerts When the cycle is current at a time. Disabling Remote Start When the Remote Start is subject to change for 3 seconds. LG ThinQ Application Features Dryer Cycle (Remote Start, Downloaded) Set or download...
... start the cycle until a new cycle is left in the basic cycles on the dryer after using a smartphone. Smart Diagnosis™ This function provides useful information for any network connection problems or any preferred cycle and operate by remote control. Push Alerts When the cycle is current at a time. Disabling Remote Start When the Remote Start is subject to change for 3 seconds. LG ThinQ Application Features Dryer Cycle (Remote Start, Downloaded) Set or download...

Owners Manual
Page 47
... reset. Operation Problem The Flow SenseTM indicator remains active after the restriction has been cleared, call for more than five cycles after clearing the restriction in the venting. House fuse is incorrect. Solutions If the Flow SenseTM indicator remains active for service. Reset circuit breaker or replace fuse. This option reduces energy use by a qualified electrician. Check the power supply or the connection of electric dryers, it will not turn on some models) Electric dryer power cord...
... reset. Operation Problem The Flow SenseTM indicator remains active after the restriction has been cleared, call for more than five cycles after clearing the restriction in the venting. House fuse is incorrect. Solutions If the Flow SenseTM indicator remains active for service. Reset circuit breaker or replace fuse. This option reduces energy use by a qualified electrician. Check the power supply or the connection of electric dryers, it will not turn on some models) Electric dryer power cord...
Owners Manual
Page 48
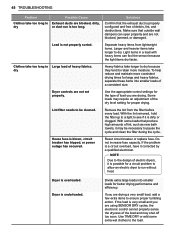
... a load with heavy items can open properly and are not set properly. Do not increase fuse capacity. If the load is properly configured and free of heavy fabrics. Use TIME DRY or add some loads that the exhaust duct is very small and you are drying. Dryer is blown, circuit breaker has tripped, or power outage has occurred. 48 Troubleshooting Problem Clothes take too long to dry Possible Cause Exhaust ducts are using SENSOR DRY cycles, the electronic control cannot...
... a load with heavy items can open properly and are not set properly. Do not increase fuse capacity. If the load is properly configured and free of heavy fabrics. Use TIME DRY or add some loads that the exhaust duct is very small and you are drying. Dryer is blown, circuit breaker has tripped, or power outage has occurred. 48 Troubleshooting Problem Clothes take too long to dry Possible Cause Exhaust ducts are using SENSOR DRY cycles, the electronic control cannot...

Owners Manual
Page 54
... EXTENT ANY IMPLIED WARRANTY IS REQUIRED BY LAW, IT IS LIMITED IN DURATION TO THE EXPRESS WARRANTY PERIOD ABOVE. instruction to the finish of incidental or consequential damages or limitations on operation of original retail purchase Dryer drum Parts only. Model and Serial numbers, along with original serial numbers that have other damage to the customer on how long an implied warranty lasts, so the...
... EXTENT ANY IMPLIED WARRANTY IS REQUIRED BY LAW, IT IS LIMITED IN DURATION TO THE EXPRESS WARRANTY PERIOD ABOVE. instruction to the finish of incidental or consequential damages or limitations on operation of original retail purchase Dryer drum Parts only. Model and Serial numbers, along with original serial numbers that have other damage to the customer on how long an implied warranty lasts, so the...

Owners Manual
Page 55
... Product is not turned on. (Gas Dryer) •• Not heating •• Clean the hood and duct. •• Keep exhaust ducts as short as possible, using as few elbows and bends as possible. •• Reconnect power cord, replace house fuse or reset breaker. The cost of repair or replacement under these excluded circumstances shall be found in the owner's manual. Improper repair includes use of parts not approved or...
... Product is not turned on. (Gas Dryer) •• Not heating •• Clean the hood and duct. •• Keep exhaust ducts as short as possible, using as few elbows and bends as possible. •• Reconnect power cord, replace house fuse or reset breaker. The cost of repair or replacement under these excluded circumstances shall be found in the owner's manual. Improper repair includes use of parts not approved or...


