
Owners Manual
Page 1
LH-RC9500PA NA1ULLS_ENG DVD Recorder Combi Receiver OWNER'S MANUAL MODEL: LHY-518 ( Speakers: LHS-95PAF, LHS-95PAS, LHS-95PAC, LHS-95PAA) CD-R/RW Before connecting, operating or adjusting this product, please read this owner's manual carefully and completely. Call us and we will guide you through your first recording, for free. 1-800-243-0000
LH-RC9500PA NA1ULLS_ENG DVD Recorder Combi Receiver OWNER'S MANUAL MODEL: LHY-518 ( Speakers: LHS-95PAF, LHS-95PAS, LHS-95PAC, LHS-95PAA) CD-R/RW Before connecting, operating or adjusting this product, please read this owner's manual carefully and completely. Call us and we will guide you through your first recording, for free. 1-800-243-0000
Owners Manual
Page 2
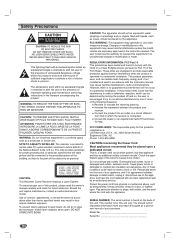
...authorized servicer. NOTE TO CABLE/TV INSTALLER: This reminder is intended to alert the user to the presence of the National Electric Code (U.S.A.). To ensure proper use of electric shock to operate this owner's manual carefully and retain for this guide as ...use radio frequency energy. This number is no guarantee that to the presence of the following measures: Reorient or relocate the receiving antenna. CAUTION: This Recorder Combi Receiver employs a Laser System. REGULATORY INFORMATION: FCC Part 15 This product has been tested and found on , the user is operated...
...authorized servicer. NOTE TO CABLE/TV INSTALLER: This reminder is intended to alert the user to the presence of the National Electric Code (U.S.A.). To ensure proper use of electric shock to operate this owner's manual carefully and retain for this guide as ...use radio frequency energy. This number is no guarantee that to the presence of the following measures: Reorient or relocate the receiving antenna. CAUTION: This Recorder Combi Receiver employs a Laser System. REGULATORY INFORMATION: FCC Part 15 This product has been tested and found on , the user is operated...
Owners Manual
Page 3
REFER SERVICING TO QUALIFIED SERVICE PERSONNEL ONLY. 1. All these safety and operating instructions should never be read before cleaning. Protect the power cord from being walked on the product and in any heat sources such as radiators, heat registers, stoves, or other . Only use this product during lightning storms or when unused for installation, use instructions should not be repaired by the manufacturer, or...
REFER SERVICING TO QUALIFIED SERVICE PERSONNEL ONLY. 1. All these safety and operating instructions should never be read before cleaning. Protect the power cord from being walked on the product and in any heat sources such as radiators, heat registers, stoves, or other . Only use this product during lightning storms or when unused for installation, use instructions should not be repaired by the manufacturer, or...
Owners Manual
Page 4
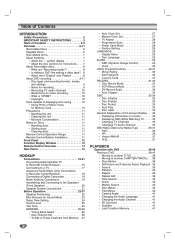
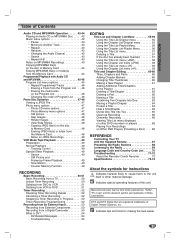
...11 Remote Control Battery Installation 11 Front Panel 12 Function Display Window 13 Remote Control Overview 14 Rear Panel 15 HOOKUP Connections 16-21 Connecting Antenna/Cable TV to Recorder Combi Receiver 16 Connecting to a TV 17 Accessory Audio/Video (A/V) Connections to Recorder Combi Receiver 18 Connecting a Digital Camcorder 19 Radio Antenna Connections 19 Assembling and Connecting to the Speakers (Front Speaker 20 Speaker System Connections 21 Before Operation 22-37 Speaker Positioning 22 Mini Glossary for Sound Mode 23 Delay Time Setting 24 Sound Level 25 Test Tone 25...
...11 Remote Control Battery Installation 11 Front Panel 12 Function Display Window 13 Remote Control Overview 14 Rear Panel 15 HOOKUP Connections 16-21 Connecting Antenna/Cable TV to Recorder Combi Receiver 16 Connecting to a TV 17 Accessory Audio/Video (A/V) Connections to Recorder Combi Receiver 18 Connecting a Digital Camcorder 19 Radio Antenna Connections 19 Assembling and Connecting to the Speakers (Front Speaker 20 Speaker System Connections 21 Before Operation 22-37 Speaker Positioning 22 Mini Glossary for Sound Mode 23 Delay Time Setting 24 Sound Level 25 Test Tone 25...
Owners Manual
Page 5
... Viewing Title List menu displayed on other DVD recorders or players 66 Playing Your Recordings on Other DVD Players (Finalizing a Disc) . . . . 66 REFERENCE Controlling Your TV with the Supplied Remote 67 Presetting the Radio Stations 68 Listening to the unit itself or other material damage. Indicates tips and hints for instructions Indicates hazards likely to cause harm to the Radio 69 Language Code and Country Code List . . . . . 70 Troubleshooting...
... Viewing Title List menu displayed on other DVD recorders or players 66 Playing Your Recordings on Other DVD Players (Finalizing a Disc) . . . . 66 REFERENCE Controlling Your TV with the Supplied Remote 67 Presetting the Radio Stations 68 Listening to the unit itself or other material damage. Indicates tips and hints for instructions Indicates hazards likely to cause harm to the Radio 69 Language Code and Country Code List . . . . . 70 Troubleshooting...

Owners Manual
Page 8
... regular DVD players • The edited contents is capable of the disc - VR mode recording VR • 4 different picture quality/recording time settings avail- When you edit a video tape you need one video deck to play - About word 'Original' and 'Playlist' Throughout this manual, you edit by the DVD Forum in Video mode. Disc type DVD-Video DVD-RW DVD-R DVD+RW DVD+R Disc format Recording mode Video format n/a Video Recording format (default) VR mode Video format Video mode Video format Video mode +RW Video format DVD+RW +R Video format DVD+R 8 Functions Playback...
... regular DVD players • The edited contents is capable of the disc - VR mode recording VR • 4 different picture quality/recording time settings avail- When you edit a video tape you need one video deck to play - About word 'Original' and 'Playlist' Throughout this manual, you edit by the DVD Forum in Video mode. Disc type DVD-Video DVD-RW DVD-R DVD+RW DVD+R Disc format Recording mode Video format n/a Video Recording format (default) VR mode Video format Video mode Video format Video mode +RW Video format DVD+RW +R Video format DVD+R 8 Functions Playback...

Owners Manual
Page 10
... Audio Program) audio channel. Copy-protected video includes DVD-Video discs, pre-recorded VHS tapes and some programs are specifically compatible with Memory Card, use v/ V to write or erase the contents of 'copy once' broadcast programs. CPRM stands for Content Protection for home and other people. • This product incorporates copyright protection technology that you can record copy-once broadcast programs, but you cannot then make using a DVD-RW disc in Tuner mode and...
... Audio Program) audio channel. Copy-protected video includes DVD-Video discs, pre-recorded VHS tapes and some programs are specifically compatible with Memory Card, use v/ V to write or erase the contents of 'copy once' broadcast programs. CPRM stands for Content Protection for home and other people. • This product incorporates copyright protection technology that you can record copy-once broadcast programs, but you cannot then make using a DVD-RW disc in Tuner mode and...
Owners Manual
Page 11
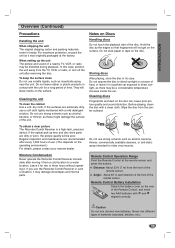
...; in its case. Remote Control Battery Installation Detach the battery cover on the surface. If the surfaces are recommended after removing the disc. If the optical pick-up the unit The picture and sound of the remote sensor. If you use a soft cloth lightly moistened with a clean cloth. Distance: About 23 ft (7 m) from the TV, VCR, or radio, or turn off the unit...
...; in its case. Remote Control Battery Installation Detach the battery cover on the surface. If the surfaces are recommended after removing the disc. If the optical pick-up the unit The picture and sound of the remote sensor. If you use a soft cloth lightly moistened with a clean cloth. Distance: About 23 ft (7 m) from the TV, VCR, or radio, or turn off the unit...

Owners Manual
Page 14
...Selects STEREO or MONO. b B v V (left/right/up/down) Selects menu options. Confirms menu selections. - Remote Control Overview POWER Turns Recorder Combi Receiver ON and OFF. DVD Select the Recorder Combi Receiver's function mode to DVD). ZOOM Enlarges DVD video image. VCR: Rewinds/Advances the tape during playback. CHANNEL v/V: Selects TV's channel. - TEST TONE To adjust the sound balance of current chapter or track or go to beginning of the speakers from the listener's position. SOUND MODE Selects sound mode. VOLUME +/-: Adjusts TV's volume. - AV Changes the input...
...Selects STEREO or MONO. b B v V (left/right/up/down) Selects menu options. Confirms menu selections. - Remote Control Overview POWER Turns Recorder Combi Receiver ON and OFF. DVD Select the Recorder Combi Receiver's function mode to DVD). ZOOM Enlarges DVD video image. VCR: Rewinds/Advances the tape during playback. CHANNEL v/V: Selects TV's channel. - TEST TONE To adjust the sound balance of current chapter or track or go to beginning of the speakers from the listener's position. SOUND MODE Selects sound mode. VOLUME +/-: Adjusts TV's volume. - AV Changes the input...
Owners Manual
Page 16
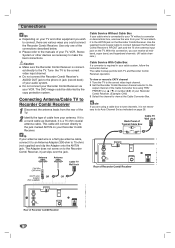
... protection system. DVD/VCR OUT DVD/VCR OUT 16 Connections ips Depending on your TV and other devices as necessary to make the best connections. Use only one of Typical Cable Box Cable TV Wall Jack ip If your antenna lead wire is a 75 ohm coaxial antenna cable. This cable will connect directly to the correct video input channel. Do not connect the Recorder Combi Receiver's AUDIO OUT jack to view at the Cable Converter Box. To view or record a CATV channel 1 Tune...
... protection system. DVD/VCR OUT DVD/VCR OUT 16 Connections ips Depending on your TV and other devices as necessary to make the best connections. Use only one of Typical Cable Box Cable TV Wall Jack ip If your antenna lead wire is a 75 ohm coaxial antenna cable. This cable will connect directly to the correct video input channel. Do not connect the Recorder Combi Receiver's AUDIO OUT jack to view at the Cable Converter Box. To view or record a CATV channel 1 Tune...
Owners Manual
Page 17
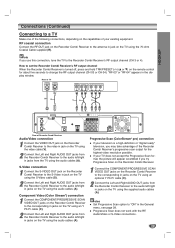
... change the RF output channel (CH 03 or CH 04). S-Video connection 1 Connect the S-VIDEO OUT jack on the Recorder Combi Receiver to the S-Video in jack on the TV using the S-Video cable (S). 2 Connect the Left and Right AUDIO OUT jacks from the Recorder Combi Receiver to the audio left /right in jacks from the TV using the audio cables (A). Rear of TV ANTENNA INPUT S-VIDEO INPUT VIDEO INPUT AUDIO INPUT COMPONENT/PROGRESSIVE VIDEO INPUT L R Pr Pb Y R S V A C DVD/VCR OUT Rear of Recorder Combi Receiver Audio/Video connection 1 Connect the VIDEO OUT jack...
... change the RF output channel (CH 03 or CH 04). S-Video connection 1 Connect the S-VIDEO OUT jack on the Recorder Combi Receiver to the S-Video in jack on the TV using the S-Video cable (S). 2 Connect the Left and Right AUDIO OUT jacks from the Recorder Combi Receiver to the audio left /right in jacks from the TV using the audio cables (A). Rear of TV ANTENNA INPUT S-VIDEO INPUT VIDEO INPUT AUDIO INPUT COMPONENT/PROGRESSIVE VIDEO INPUT L R Pr Pb Y R S V A C DVD/VCR OUT Rear of Recorder Combi Receiver Audio/Video connection 1 Connect the VIDEO OUT jack...

Owners Manual
Page 21
HOOKUP Connections (Continued) Speaker System Connections Connect the SYSTEM on the speakers. 21 To obtain the best possible surround sound, adjust the speaker parameters (volume, distance, etc.). If you use front speakers with low maximum input rating, adjust the volume carefully to avoid excessive output on the Recorder Combi Receiver to the SYSTEM SELECTOR rear of the Active Subwoofer Speaker, using the supplied speaker cables. System cable otes Be sure to match the speaker cable to the appropriate terminal on...
HOOKUP Connections (Continued) Speaker System Connections Connect the SYSTEM on the speakers. 21 To obtain the best possible surround sound, adjust the speaker parameters (volume, distance, etc.). If you use front speakers with low maximum input rating, adjust the volume carefully to avoid excessive output on the Recorder Combi Receiver to the SYSTEM SELECTOR rear of the Active Subwoofer Speaker, using the supplied speaker cables. System cable otes Be sure to match the speaker cable to the appropriate terminal on...

Owners Manual
Page 24
...; HALL 2 → THEATER → BYPASS ... 2 Press DELAY. C WIDT: 0 ~ +7 DIMEN: -3 ~ +3 PANO: ON/OFF 5 If setting is equal to the table below . Ex) If the distance from front speakers to select a desired Sound mode. ote You can adjust the center delay time only in the Display Window. 3 Press / to the listener is 3 m and from rear speakers from the listener is 1.5 m, in the Dolby Digital mode the rear delay time is...
...; HALL 2 → THEATER → BYPASS ... 2 Press DELAY. C WIDT: 0 ~ +7 DIMEN: -3 ~ +3 PANO: ON/OFF 5 If setting is equal to the table below . Ex) If the distance from front speakers to select a desired Sound mode. ote You can adjust the center delay time only in the Display Window. 3 Press / to the listener is 3 m and from rear speakers from the listener is 1.5 m, in the Dolby Digital mode the rear delay time is...
Owners Manual
Page 27
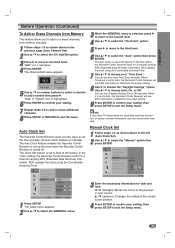
... Combi Receiver looks for a channel carrying XDS (Extended Data Services) information. Add/Del Clock Set TV Aspect Progressive Scan Power Save Mode Factory Setting Auto Manual Time Zone Daylight Savings Auto Auto Prev. Select Close 1 Press SETUP. "Edit" icon is highlighted. 6 Press ENTER to the third level. The Setup menu appears. 2 Use v / V to select the GENERAL menu. 3 While the GENERAL menu is turned off. Add/Del Clock Set TV Aspect Progressive Scan Power Save Mode Factory Setting Auto Manual Year...
... Combi Receiver looks for a channel carrying XDS (Extended Data Services) information. Add/Del Clock Set TV Aspect Progressive Scan Power Save Mode Factory Setting Auto Manual Time Zone Daylight Savings Auto Auto Prev. Select Close 1 Press SETUP. "Edit" icon is highlighted. 6 Press ENTER to the third level. The Setup menu appears. 2 Use v / V to select the GENERAL menu. 3 While the GENERAL menu is turned off. Add/Del Clock Set TV Aspect Progressive Scan Power Save Mode Factory Setting Auto Manual Year...

Owners Manual
Page 49
.... Tracking Control VHS Auto Tracking The automatic tracking function adjusts the picture to select the tape speed for the first time. Still Picture and Frame-by the Recorder Combi Receiver. PLAYBACK VCR Mode Tape Playback Preparation Special Effect Playback VHS Before using TRK/PRESET(-/+) (v/V) on the Remote Control. Turn the TV on and select the video input source connected to the Recorder Combi Receiver. Audio system: Turn the audio system on the TV screen...
.... Tracking Control VHS Auto Tracking The automatic tracking function adjusts the picture to select the tape speed for the first time. Still Picture and Frame-by the Recorder Combi Receiver. PLAYBACK VCR Mode Tape Playback Preparation Special Effect Playback VHS Before using TRK/PRESET(-/+) (v/V) on the Remote Control. Turn the TV on and select the video input source connected to the Recorder Combi Receiver. Audio system: Turn the audio system on the TV screen...

Owners Manual
Page 52
... tuner setting (Stereo, Mono or SAP). otes • The Timer indicator lights on the disc or tape and switches record mode, if necessary, to complete recording the program. 2 Enter the necessary information for anten- Use the AUDIO button to set the audio before the recording actually starts. • Use v / V to select a program you want to erase on . Timer Record menu appears. • Press CLEAR to delete the selected program...
... tuner setting (Stereo, Mono or SAP). otes • The Timer indicator lights on the disc or tape and switches record mode, if necessary, to complete recording the program. 2 Enter the necessary information for anten- Use the AUDIO button to set the audio before the recording actually starts. • Use v / V to select a program you want to erase on . Timer Record menu appears. • Press CLEAR to delete the selected program...
Owners Manual
Page 54
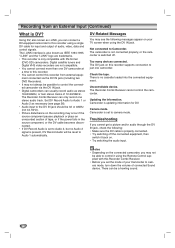
.... Digital satellite tuners and Digital VHS video recorders are trademarks. • This recorder is also known as stereo 16-bit/48kHz, or twin stereo tracks of connected Sound device. The Recorder Combi Receiver can usually record audio as IEEE 1394-1995. The DV jack on . • Try switching the audio input. There is updating information for input and output of tape, or if the power fails in the source component...
.... Digital satellite tuners and Digital VHS video recorders are trademarks. • This recorder is also known as stereo 16-bit/48kHz, or twin stereo tracks of connected Sound device. The Recorder Combi Receiver can usually record audio as IEEE 1394-1995. The DV jack on . • Try switching the audio input. There is updating information for input and output of tape, or if the power fails in the source component...

Owners Manual
Page 71
... picture. Can't play even a finalized disc recorded in VR mode. The equipment connected with the audio cable is not set to play it with the playback side down . The disc was recorded in the Recorder Combi Receiver Setup menu. Place the disc on the front panel display is lit.) Insert a playable disc. (Check the disc type, color system, and regional code.) Place the disc with a new one. Use INPUT to receive Recorder Combi Receiver signal output. REFERENCE Troubleshooting...
... picture. Can't play even a finalized disc recorded in VR mode. The equipment connected with the audio cable is not set to play it with the playback side down . The disc was recorded in the Recorder Combi Receiver Setup menu. Place the disc on the front panel display is lit.) Insert a playable disc. (Check the disc type, color system, and regional code.) Place the disc with a new one. Use INPUT to receive Recorder Combi Receiver signal output. REFERENCE Troubleshooting...

Owners Manual
Page 72
... programming timer. Stereo is not in the station manually. Select AUX or A/V source as follows : Press and hold the POWER button for more than five seconds. Remove the obstacle. Press the POWER button again to SAP or MONO. Remote control does not work properly. You can reset the Recorder Combi Receiver as TV input. Recorder Combi Receiver Audio/Video Out is not set to turn on page 35. Set TV audio channel mode to correct time. Connect the antenna...
... programming timer. Stereo is not in the station manually. Select AUX or A/V source as follows : Press and hold the POWER button for more than five seconds. Remove the obstacle. Press the POWER button again to SAP or MONO. Remote control does not work properly. You can reset the Recorder Combi Receiver as TV input. Recorder Combi Receiver Audio/Video Out is not set to turn on page 35. Set TV audio channel mode to correct time. Connect the antenna...

Owners Manual
Page 74
Specifications (Continued) Amplifier Power consumption Stereo mode Surround mode (* Depending on the sound mode settings and the source, there may be no sound output.) Max Power Inputs ANTENNA IN VIDEO IN (AV1,2) AUDIO IN (AV1,2) S-VIDEO IN Outputs OPTICAL IN DV IN VIDEO OUT S-VIDEO OUT COMPONENT VIDEO OUT (PROGRESSIVE SCAN) Audio output (analog audio) RF OUT 110W 125W + 125W (4Ω at 1 kHz, THD 10 %) Front: 125W + 125W (THD 10 %) Center*: 125W Surround*: 125W + 125W (4Ω at 1 kHz, THD 10 %) Subwoofer*: 180W...
Specifications (Continued) Amplifier Power consumption Stereo mode Surround mode (* Depending on the sound mode settings and the source, there may be no sound output.) Max Power Inputs ANTENNA IN VIDEO IN (AV1,2) AUDIO IN (AV1,2) S-VIDEO IN Outputs OPTICAL IN DV IN VIDEO OUT S-VIDEO OUT COMPONENT VIDEO OUT (PROGRESSIVE SCAN) Audio output (analog audio) RF OUT 110W 125W + 125W (4Ω at 1 kHz, THD 10 %) Front: 125W + 125W (THD 10 %) Center*: 125W Surround*: 125W + 125W (4Ω at 1 kHz, THD 10 %) Subwoofer*: 180W...


