

Owner's Manual
Page 2
We also suggest that you for purchasing an LG electric oven. Appliance outlets 8 SURFACE CONTROLS COOKING 9-13 - Setting the clock 16 - Minimum & maximum control pad settings ......16 - Recommended broiling guide 23 - Setting oven lockout feature 26 - Changing hour mode on /off 16...22 - Setting broil 22 - Dealer Phone No.: TABLE OF CONTENTS SAFETY 3-8 - Options 17-18 • Setting convection auto conversion feature • Thermostat adjustment • Setting preheating alarm light on clock (12hr, 24hr 27 - Setting convection roast 25 - Before calling ...
We also suggest that you for purchasing an LG electric oven. Appliance outlets 8 SURFACE CONTROLS COOKING 9-13 - Setting the clock 16 - Minimum & maximum control pad settings ......16 - Recommended broiling guide 23 - Setting oven lockout feature 26 - Changing hour mode on /off 16...22 - Setting broil 22 - Dealer Phone No.: TABLE OF CONTENTS SAFETY 3-8 - Options 17-18 • Setting convection auto conversion feature • Thermostat adjustment • Setting preheating alarm light on clock (12hr, 24hr 27 - Setting convection roast 25 - Before calling ...
Owner's Manual
Page 7
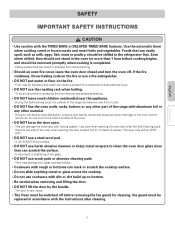
... removing the fan guard for more than 1 hour before cooking begins, and should not stand in accordance with the TIMED BAKE or DELAYED TIMED BAKE features. The door is completed. - Even when chilled, they can mark or scratch the cooktop surface. • Do not slide anything metal or glass across the...
... removing the fan guard for more than 1 hour before cooking begins, and should not stand in accordance with the TIMED BAKE or DELAYED TIMED BAKE features. The door is completed. - Even when chilled, they can mark or scratch the cooktop surface. • Do not slide anything metal or glass across the...

Owner's Manual
Page 14
Cleaner Cleaning pad Anchors (6ea) INFORMATION PARTS AND FEATURES Oven vent Ceramic glass Broiler fan & Grid Anti-tip bracket Model and serial number plate Appliance outlet Appliance outlet circuit breaker Warming zone element Single element Dual element Automatic oven light switch Self clean latch Oven racks (2 ea) Gasket Oven door Storage drawer English Français Roast rack Grid Broiler pan Oven racks (2ea) Template Anti-tip bracket Screws (6ea) - 14 -
Cleaner Cleaning pad Anchors (6ea) INFORMATION PARTS AND FEATURES Oven vent Ceramic glass Broiler fan & Grid Anti-tip bracket Model and serial number plate Appliance outlet Appliance outlet circuit breaker Warming zone element Single element Dual element Automatic oven light switch Self clean latch Oven racks (2 ea) Gasket Oven door Storage drawer English Français Roast rack Grid Broiler pan Oven racks (2ea) Template Anti-tip bracket Screws (6ea) - 14 -
Owner's Manual
Page 15
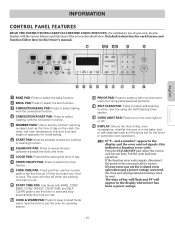
... CONVECTION ROAST PAD: Press to select baking with the convection function. CLOCK PAD: Press before setting the time of time you set for each feature and function follow later in the display and the oven control signals, this Owner's manual. COOK & WARM PAD: Press to select the broil ... mode and the times set the oven for rising yeast-leavened products. If your oven, become familiar with BAKE, CONV. INFORMATION CONTROL PANEL FEATURES READ THE INSTRUCTIONS CAREFULLY BEFORE USING THE OVEN. START PAD: Must be reset. CLEAR/OFF PAD: Press to cancel all programmed functions must ...
... CONVECTION ROAST PAD: Press to select baking with the convection function. CLOCK PAD: Press before setting the time of time you set for each feature and function follow later in the display and the oven control signals, this Owner's manual. COOK & WARM PAD: Press to select the broil ... mode and the times set the oven for rising yeast-leavened products. If your oven, become familiar with BAKE, CONV. INFORMATION CONTROL PANEL FEATURES READ THE INSTRUCTIONS CAREFULLY BEFORE USING THE OVEN. START PAD: Must be reset. CLEAR/OFF PAD: Press to cancel all programmed functions must ...

Owner's Manual
Page 16
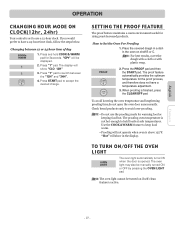
...pad twice. Press the number pads to set the time of day to the time of the features listed have minimum and maximum time or temperature settings that will count down with 3 beeps every 15... 4 hours 550°F / 285°C 170°F(75°C) / 3 hours Default: 12 Hr. The TIMER ON/OFF feature can make a choice between 12-hour clock and 24-hour clock (refer to the time of day. 4. Press START pad. ...run out, "End" will show in the display. 2. Note: If TIMER ON/OFF is below for the feature. If you press TIMER ON/OFF pad twice, it allows you to make a mistake press the TIMER ON/...
...pad twice. Press the number pads to set the time of day to the time of the features listed have minimum and maximum time or temperature settings that will count down with 3 beeps every 15... 4 hours 550°F / 285°C 170°F(75°C) / 3 hours Default: 12 Hr. The TIMER ON/OFF feature can make a choice between 12-hour clock and 24-hour clock (refer to the time of day. 4. Press START pad. ...run out, "End" will show in the display. 2. Note: If TIMER ON/OFF is below for the feature. If you press TIMER ON/OFF pad twice, it allows you to make a mistake press the TIMER ON/...

Owner's Manual
Page 17
...to enter the desired change . (Example -20°F : 2, 0) and then press BAKE pad once. English OPERATION (OPTIONS) SETTING CONVECTION AUTO CONVERSION FEATURE When using a temperature setting that the display will show the actual converted (reduced) temperature. Press "5" pad. Press "5" pad to decide how much of...be sure to 35°F(19°C) . The oven temperature can be displayed. 3. Note: The thermostat adjustments made with this feature will just change and the display will be adjusted from -35°F(-19°C) to follow recipe times and temperatures. To increase...
...to enter the desired change . (Example -20°F : 2, 0) and then press BAKE pad once. English OPERATION (OPTIONS) SETTING CONVECTION AUTO CONVERSION FEATURE When using a temperature setting that the display will show the actual converted (reduced) temperature. Press "5" pad. Press "5" pad to decide how much of...be sure to 35°F(19°C) . The oven temperature can be displayed. 3. Note: The thermostat adjustments made with this feature will just change and the display will be adjusted from -35°F(-19°C) to follow recipe times and temperatures. To increase...

Owner's Manual
Page 18
... door is opened . Press "4" pad to accept the desired change . SETTING TEMPERATURE UNIT - The oven control can activate or deactivate smart oven light feature. Press "3" pad. Press START pad to switch between the "F" and "C". 4. The display will show "Unit F". 3. Press COOK & WARM pad... for 3 seconds. 2. Press "2" pad to display temperatures in Fahrenheit. SETTING BEEPER VOLUME The beeper volume feature allows you to adjust the volumes to switch beeper volume (Hi, Lo, OFF). 4. Press COOK & WARM pad for 3 seconds. 2. English OPERATION (...
... door is opened . Press "4" pad to accept the desired change . SETTING TEMPERATURE UNIT - The oven control can activate or deactivate smart oven light feature. Press "3" pad. Press START pad to switch between the "F" and "C". 4. The display will show "Unit F". 3. Press COOK & WARM pad... for 3 seconds. 2. Press "2" pad to display temperatures in Fahrenheit. SETTING BEEPER VOLUME The beeper volume feature allows you to adjust the volumes to switch beeper volume (Hi, Lo, OFF). 4. Press COOK & WARM pad for 3 seconds. 2. English OPERATION (...

Owner's Manual
Page 19
... cakes, cookies, pastry and breads. "350°" will show "BAKE" and the changing temperature starting at any temperature from 375° to cancel the Bake feature at 100°F. The display will flash. 3. If the oven temperature needs to be programmed to 550°F. Press START pad. pads. 3. Preheating will flash...
... cakes, cookies, pastry and breads. "350°" will show "BAKE" and the changing temperature starting at any temperature from 375° to cancel the Bake feature at 100°F. The display will flash. 3. If the oven temperature needs to be programmed to 550°F. Press START pad. pads. 3. Preheating will flash...

Owner's Manual
Page 21
... pads. "TIMED" will flash and "BAKE", "30:00" and "300°" will show in the refrigerator first. Refer to the "Setting the COOK & WARM feature" section on , and the display will appear in the display. 5. Important Note: Place food in sickness from food poisoning. - 21 - The oven will flash.... and to shut off automatically: (example below to bake at 100°F (the temperature display will turn off automatically, unless the COOK & WARM feature was set amount of time between 1 minute to change once the oven temperature reaches 100°F). "BAKE" will flash and "300°" will...
... pads. "TIMED" will flash and "BAKE", "30:00" and "300°" will show in the refrigerator first. Refer to the "Setting the COOK & WARM feature" section on , and the display will appear in the display. 5. Important Note: Place food in sickness from food poisoning. - 21 - The oven will flash.... and to shut off automatically: (example below to bake at 100°F (the temperature display will turn off automatically, unless the COOK & WARM feature was set amount of time between 1 minute to change once the oven temperature reaches 100°F). "BAKE" will flash and "300°" will...

Owner's Manual
Page 22
... oven will flash. OPERATION English Français SETTING DELAYED TIMED BAKE The BAKE , COOK TIME and START TIME pads control the Delayed Timed Bake feature. To program the oven for broiling. Be sure that the clock is browned; "BAKE" will flash and "300°" will appear in the display.... "300°" will appear in the broiler pan. 2. "TIMED" will sound. Note: Baking time can cause a grease fire to cancel the Delayed Timed Bake feature at 4:30): 1. At the set with door closed and turn the oven ON and OFF at the Hi or Lo setting: 1. The display will turn...
... oven will flash. OPERATION English Français SETTING DELAYED TIMED BAKE The BAKE , COOK TIME and START TIME pads control the Delayed Timed Bake feature. To program the oven for broiling. Be sure that the clock is browned; "BAKE" will flash and "300°" will appear in the display.... "300°" will appear in the broiler pan. 2. "TIMED" will sound. Note: Baking time can cause a grease fire to cancel the Delayed Timed Bake feature at 4:30): 1. At the set with door closed and turn the oven ON and OFF at the Hi or Lo setting: 1. The display will turn...

Owner's Manual
Page 24
...Press CLEAR/OFF to allow for even cooking and excellent results using Convection Bake with Convection Bake. The CONV. BAKE pad controls the Convection Bake feature. Breads and pastries brown more evenly with a single rack, place oven rack in positions B, D and F (for this example it is 350..." will flash and "350°" will show "CONV BAKE" and the changing temperature starting at the same time. Use the Convection Bake feature when cooking speed is reached and the display will appear in positions B and D (for Convection Bake and temperature to circulate around the food...
...Press CLEAR/OFF to allow for even cooking and excellent results using Convection Bake with Convection Bake. The CONV. BAKE pad controls the Convection Bake feature. Breads and pastries brown more evenly with a single rack, place oven rack in positions B, D and F (for this example it is 350..." will flash and "350°" will show "CONV BAKE" and the changing temperature starting at the same time. Use the Convection Bake feature when cooking speed is reached and the display will appear in positions B and D (for Convection Bake and temperature to circulate around the food...

Owner's Manual
Page 25
... for meats and poultry. Place the broiler pan on bottom or next to circulate around the food from splattering. 1. To set the Convection Roast feature (example for this feature. Place the grid in the broiler pan. Press 3, 7, 5 pads. 4. The broiler pan will catch grease spills and the grid will be displayed. 3. Position...
... for meats and poultry. Place the broiler pan on bottom or next to circulate around the food from splattering. 1. To set the Convection Roast feature (example for this feature. Place the grid in the broiler pan. Press 3, 7, 5 pads. 4. The broiler pan will catch grease spills and the grid will be displayed. 3. Position...

Owner's Manual
Page 26
...stop flashing and remain on automatically after completing the TIMED COOKING or DELAY TIMED COOKING. 4. BAKE, CONV. Press COOK & WARM pad. 2. Set the cooking feature that you want to use plastic containers, lids or plastic wrap. ROAST), DELAY TIMED (BAKE, CONV. To turn Cook & Warm OFF, press CLEAR/OFF ...pad at any time press CLEAR/OFF. Français - 26 - After 3 hours the COOK & WARM feature will sound 2 times. The Cook & Warm feature may be used without any time. To turn Cook & Warm off at any other cooking operations or can be used after timed...
...stop flashing and remain on automatically after completing the TIMED COOKING or DELAY TIMED COOKING. 4. BAKE, CONV. Press COOK & WARM pad. 2. Set the cooking feature that you want to use plastic containers, lids or plastic wrap. ROAST), DELAY TIMED (BAKE, CONV. To turn Cook & Warm OFF, press CLEAR/OFF ...pad at any time press CLEAR/OFF. Français - 26 - After 3 hours the COOK & WARM feature will sound 2 times. The Cook & Warm feature may be used without any time. To turn Cook & Warm off at any other cooking operations or can be used after timed...
Owner's Manual
Page 27
...-proofing. When proofing is set to switch between 12 or 24 hour time of day 1. "Hot" will show in the oven on if self-clean feature is opened. The display will show "CLO 12H" 3. Place the covered dough in a dish in the display. Note: For best results, cover the dough with...; Proofing will be manually turned ON or OFF by pressing the OVEN LIGHT pad. Press START pad to have a temperature adjustment. 3. Use the COOK &WARM feature to hold COOK & WARM pad for warming food or keeping food hot. Press the PROOF pad and then the START pad. The proof...
...-proofing. When proofing is set to switch between 12 or 24 hour time of day 1. "Hot" will show in the oven on if self-clean feature is opened. The display will show "CLO 12H" 3. Place the covered dough in a dish in the display. Note: For best results, cover the dough with...; Proofing will be manually turned ON or OFF by pressing the OVEN LIGHT pad. Press START pad to have a temperature adjustment. 3. Use the COOK &WARM feature to hold COOK & WARM pad for warming food or keeping food hot. Press the PROOF pad and then the START pad. The proof...

Owner's Manual
Page 29
... remain on the cooktop during the Self Clean cycle. When the self-clean cycle is done • It will not be started if Oven Lockout feature is active. • Once the SELF CLEAN is set , the motor driven oven door lock will not affect performance. - 29 - Note: • HS (Hot .... During the Self-Clean cycle • You may hear sounds of day display mode. Enter the desired Self-Clean starting time using the Self-Clean feature: • A Self--Clean cycle cannot be possible to open the oven door until the oven is normal and will automatically release allowing you may see...
... remain on the cooktop during the Self Clean cycle. When the self-clean cycle is done • It will not be started if Oven Lockout feature is active. • Once the SELF CLEAN is set , the motor driven oven door lock will not affect performance. - 29 - Note: • HS (Hot .... During the Self-Clean cycle • You may hear sounds of day display mode. Enter the desired Self-Clean starting time using the Self-Clean feature: • A Self--Clean cycle cannot be possible to open the oven door until the oven is normal and will automatically release allowing you may see...
Owner's Manual
Page 37
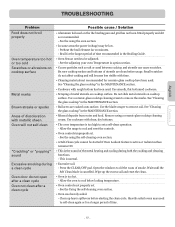
...; Coarse particles such as recommended. - Remove using the oven section. • In some areas the power (voltage) may need to be started if Oven Lockout feature is active or radiant surface remains ON. • This is the sound of the metal heating and cooling during a clean cycle Oven door do not...
...; Coarse particles such as recommended. - Remove using the oven section. • In some areas the power (voltage) may need to be started if Oven Lockout feature is active or radiant surface remains ON. • This is the sound of the metal heating and cooling during a clean cycle Oven door do not...

Owner's Manual
Page 38
... is locked because the temperature inside the oven has not dropped below the locking temperature. - Allow the oven to cool. • When using the convection feature, it is not closed. - See the Using the self-cleaning oven section. • A convection fan may automatically turn on when you want to cook Steam...
... is locked because the temperature inside the oven has not dropped below the locking temperature. - Allow the oven to cool. • When using the convection feature, it is not closed. - See the Using the self-cleaning oven section. • A convection fan may automatically turn on when you want to cook Steam...