
Owners Manual
Page 2
...Electrical Requirements 16 Connecting the Power Cord / Conduit 20 Optional Rear Filler 20 Installing the Rear Filler 21 Anti-Tip Device 21 Installing the Anti-Tip Device 21 Test Run 21 Test the Range Before Use 23 OPERATION 23 Control Panel 23 Control Panel Features 25 Knob Positions 25 Knob Lighting 26 Changing Oven Settings 26 Clock 26 Oven Light 26 Timer On/Off 27 Wi-Fi 27 Settings (Hour Mode, Convection Auto Conversion, Oven Thermostat, Preheat Alarm Light, Beeper Volume, Fahrenheit or Celsius, Cooktop On Alert Volume) 28 Control Lock 29 Start Time (Delayed Timed Cook) 29 Cook Time (Timed...
...Electrical Requirements 16 Connecting the Power Cord / Conduit 20 Optional Rear Filler 20 Installing the Rear Filler 21 Anti-Tip Device 21 Installing the Anti-Tip Device 21 Test Run 21 Test the Range Before Use 23 OPERATION 23 Control Panel 23 Control Panel Features 25 Knob Positions 25 Knob Lighting 26 Changing Oven Settings 26 Clock 26 Oven Light 26 Timer On/Off 27 Wi-Fi 27 Settings (Hour Mode, Convection Auto Conversion, Oven Thermostat, Preheat Alarm Light, Beeper Volume, Fahrenheit or Celsius, Cooktop On Alert Volume) 28 Control Lock 29 Start Time (Delayed Timed Cook) 29 Cook Time (Timed...
Owners Manual
Page 5
..., death, electric shock, injury or scalding to persons when using this product, follow basic precautions, including the following: Installation • Do not line the oven walls, racks, bottom, or any other part of the oven with controls or other material. Any adjustment and service should be performed only by a qualified installer, according to the installation instructions. Heating elements may be hot even though they are removed. The range could...
..., death, electric shock, injury or scalding to persons when using this product, follow basic precautions, including the following: Installation • Do not line the oven walls, racks, bottom, or any other part of the oven with controls or other material. Any adjustment and service should be performed only by a qualified installer, according to the installation instructions. Heating elements may be hot even though they are removed. The range could...
Owners Manual
Page 7
... to clean the oven door glass since they can scratch the surface. The USDA has indicated the following : Operation • Always heat fat slowly, and watch as safe minimum internal temperatures for consumption: - Beef, veal, pork, or lamb: 145 °F - All other servicing should be performed by a qualified technician. • Do not use water on the fire. ENGLISH IMPORTANT SAFETY INSTRUCTIONS 7 •...
... to clean the oven door glass since they can scratch the surface. The USDA has indicated the following : Operation • Always heat fat slowly, and watch as safe minimum internal temperatures for consumption: - Beef, veal, pork, or lamb: 145 °F - All other servicing should be performed by a qualified technician. • Do not use water on the fire. ENGLISH IMPORTANT SAFETY INSTRUCTIONS 7 •...

Owners Manual
Page 8
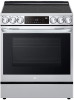
Oven Range Models Description Electrical requirements Exterior Dimensions Height to constant product improvements. 8 PRODUCT OVERVIEW PRODUCT OVERVIEW Product Features Exterior & Interior a Cooktop b Cooktop controller c Oven door d Storage drawer (LSEL6337* : handle, LSEL6335* : no handle) e Glass-ceramic cooktop f Oven mode knob g Gasket h Broil heater i Convection heater j Model & serial number plate Product Specifications The appearance and specifications listed in this manual may vary due to cooking surface Net weight LSEL6337*, LSEL6335* Electric Slide In Oven Range LSEL6337* : ...
Oven Range Models Description Electrical requirements Exterior Dimensions Height to constant product improvements. 8 PRODUCT OVERVIEW PRODUCT OVERVIEW Product Features Exterior & Interior a Cooktop b Cooktop controller c Oven door d Storage drawer (LSEL6337* : handle, LSEL6335* : no handle) e Glass-ceramic cooktop f Oven mode knob g Gasket h Broil heater i Convection heater j Model & serial number plate Product Specifications The appearance and specifications listed in this manual may vary due to cooking surface Net weight LSEL6337*, LSEL6335* Electric Slide In Oven Range LSEL6337* : ...
Owners Manual
Page 15
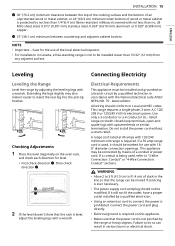
... National Electrical code ANSI/ NFPA NO. 70 - A range cord rated at 40 amps with a wrench. This appliance may also make it should not be installed and grounded on a branch circuit by adjusting the leveling legs with 120/240 minimum volt range is required on the oven rack, and check each direction for level. • First check direction a. Connect the power cord and plug directly. • Electrical ground is required. Checking Adjustments 1 Place the level...
... National Electrical code ANSI/ NFPA NO. 70 - A range cord rated at 40 amps with a wrench. This appliance may also make it should not be installed and grounded on a branch circuit by adjusting the leveling legs with 120/240 minimum volt range is required on the oven rack, and check each direction for level. • First check direction a. Connect the power cord and plug directly. • Electrical ground is required. Checking Adjustments 1 Place the level...
Owners Manual
Page 16
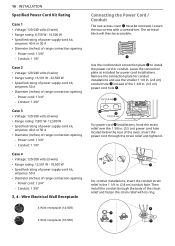
... Diameter (inches) of range connection opening - Conduit: 1 3/8" 3, 4 - Wire Electrical Wall Receptacle 4 Wire receptacle (14-50R) Connecting the Power Cord / Conduit The rear access cover a must be accessible. Conduit: 1 1/8" Case 4 • Voltage: 120/208 volts (3-wire) • Range rating: 12,501 W - 18,500 W • Specified rating of power supply-cord kit, amperes: 50 A • Diameter (inches) of range connection opening - Remove the connection plate for power cord installations. Insert the power cord through the body of range connection opening - Power cord...
... Diameter (inches) of range connection opening - Conduit: 1 3/8" 3, 4 - Wire Electrical Wall Receptacle 4 Wire receptacle (14-50R) Connecting the Power Cord / Conduit The rear access cover a must be accessible. Conduit: 1 1/8" Case 4 • Voltage: 120/208 volts (3-wire) • Range rating: 12,501 W - 18,500 W • Specified rating of power supply-cord kit, amperes: 50 A • Diameter (inches) of range connection opening - Remove the connection plate for power cord installations. Insert the power cord through the body of range connection opening - Power cord...
Owners Manual
Page 21
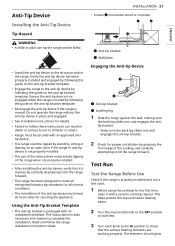
... leg slides into and engages the anti-tip bracket. 2 Check for the first time, clean it is packaged with a ceramic cooktop cleaner. INSTALLATION 21 • Screws c must meet all recognized industry tip standards for all local codes for details. • Failure to follow the range installation instruction sheet. This helps protect the top and makes cleanup easier. 2 Turn the oven mode knob to the OFF position to start test. 3 Turn each knob...
... leg slides into and engages the anti-tip bracket. 2 Check for the first time, clean it is packaged with a ceramic cooktop cleaner. INSTALLATION 21 • Screws c must meet all recognized industry tip standards for all local codes for details. • Failure to follow the range installation instruction sheet. This helps protect the top and makes cleanup easier. 2 Turn the oven mode knob to the OFF position to start test. 3 Turn each knob...
Owners Manual
Page 33
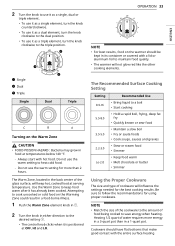
... the other cooking elements. Use the Warm Zone to keep hot, cooked food at serving temperature. Cookware should be kept in a 3-quart pot than 2 hours. Do not use it as a dual element, turn the knob clockwise to the triple position. NOTE • Match the size of the cookware to the amount of water requires more than in either direction to the desired setting B. • The control knob clicks...
... the other cooking elements. Use the Warm Zone to keep hot, cooked food at serving temperature. Cookware should be kept in a 3-quart pot than 2 hours. Do not use it as a dual element, turn the knob clockwise to the triple position. NOTE • Match the size of the cookware to the amount of water requires more than in either direction to the desired setting B. • The control knob clicks...
Owners Manual
Page 36
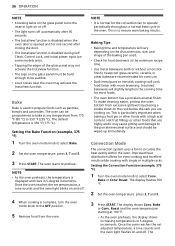
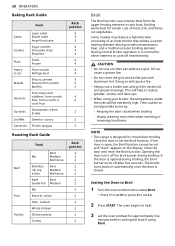
... closing the door. • The InstaView function is disabled during Self Clean, Control Lock, and initial power input (on some models only). • Tapping the edges of the baking pan used to prepare foods such as pastries, breads and casseroles. Bake Bake is to bake at 100 °F. • As the oven preheats, the display shows increasing temperatures in 5-degree increments. Setting the Bake Function (example, 375 °F) 1 Turn the oven mode knob to select...
... closing the door. • The InstaView function is disabled during Self Clean, Control Lock, and initial power input (on some models only). • Tapping the edges of the baking pan used to prepare foods such as pastries, breads and casseroles. Bake Bake is to bake at 100 °F. • As the oven preheats, the display shows increasing temperatures in 5-degree increments. Setting the Bake Function (example, 375 °F) 1 Turn the oven mode knob to select...

Owners Manual
Page 37
... cancel, turn the oven mode knob to roast meats and poultry. The heated air circulates around the food. Whenever possible, cook foods requiring the same cooking temperature together in the broiler pan. 3 Place the broiler pan on pans with a dark finish will be better if baking pans are crispy brown on the outside while staying moist on the inside. The Convection Roast feature is open. Grid (sold separately) OPERATION 37 Broiler pan (sold...
... cancel, turn the oven mode knob to roast meats and poultry. The heated air circulates around the food. Whenever possible, cook foods requiring the same cooking temperature together in the broiler pan. 3 Place the broiler pan on pans with a dark finish will be better if baking pans are crispy brown on the outside while staying moist on the inside. The Convection Roast feature is open. Grid (sold separately) OPERATION 37 Broiler pan (sold...
Owners Manual
Page 38
... models may feature a hybrid broiler consisting of meat, fish, and thinly cut vegetables. Doing so will be set and "door" appears on automatically once the door is closed. Always wearing oven mitts when inserting or removing food items NOTE • This range is opened during broiling. The oven begins to set Lo. 2 Press START. Broiling works best for approximately five minutes before cooking the food if using your broiler, the temperature...
... models may feature a hybrid broiler consisting of meat, fish, and thinly cut vegetables. Doing so will be set and "door" appears on automatically once the door is closed. Always wearing oven mitts when inserting or removing food items NOTE • This range is opened during broiling. The oven begins to set Lo. 2 Press START. Broiling works best for approximately five minutes before cooking the food if using your broiler, the temperature...
Owners Manual
Page 43
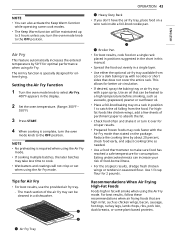
... Air Fry Function 1 Turn the oven mode knob to 3 hours unless you don't have the air fry tray, place food on the package. NOTE • No preheating is specially designed for better air circulation. • If desired, spray the baking tray or air fry tray with the Air Fry mode than stated on a wire rack inside a foil-lined cookie pan. This allows for oilfree frying. Air Fry This feature...
... Air Fry Function 1 Turn the oven mode knob to 3 hours unless you don't have the air fry tray, place food on the package. NOTE • No preheating is specially designed for better air circulation. • If desired, spray the baking tray or air fry tray with the Air Fry mode than stated on a wire rack inside a foil-lined cookie pan. This allows for oilfree frying. Air Fry This feature...
Owners Manual
Page 47
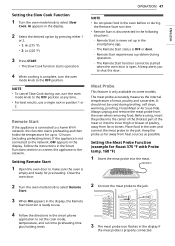
... be started when the oven door is OFF or door. - Setting the Meat Probe Function (example for pre-heating. OPERATION 47 NOTE • Do not place food in the oven before or during use, turn the oven mode knob to shut the door. Setting the Slow Cook Function 1 Turn the oven mode knob to the jack. 3 The meat probe icon flashes in the display if the meat probe is properly connected. Follow the instructions in the oven and connect the meat probe...
... be started when the oven door is OFF or door. - Setting the Meat Probe Function (example for pre-heating. OPERATION 47 NOTE • Do not place food in the oven before or during use, turn the oven mode knob to shut the door. Setting the Slow Cook Function 1 Turn the oven mode knob to the jack. 3 The meat probe icon flashes in the display if the meat probe is properly connected. Follow the instructions in the oven and connect the meat probe...

Owners Manual
Page 48
... desired temperature and cook time. 4 Press START. 5 Press and hold Settings for three seconds. In SABBATH mode, all function buttons are inactive. The probe function is activated, the oven does not turn off automatically. When the SABBATH mode is not available in display. 1 Disconnect the probe. 48 OPERATION Method 1 Select cook mode. Changing the Probe Temperature 1 Press Temp. 2 Set the oven temperature. 3 Press Start. 4 Set the probe temperature. 5 Press Start. The display shows the changing probe temperature. Do not touch the broil element. CAUTION • Always use...
... desired temperature and cook time. 4 Press START. 5 Press and hold Settings for three seconds. In SABBATH mode, all function buttons are inactive. The probe function is activated, the oven does not turn off automatically. When the SABBATH mode is not available in display. 1 Disconnect the probe. 48 OPERATION Method 1 Select cook mode. Changing the Probe Temperature 1 Press Temp. 2 Set the oven temperature. 3 Press Start. 4 Set the probe temperature. 5 Press Start. The display shows the changing probe temperature. Do not touch the broil element. CAUTION • Always use...

Owners Manual
Page 60
... and disconnect the power supply. CAUTION • Do not use oven cleaners. Stand to escape. Rinse well. • Do not clean the gasket. If the oven is set for the oven door lock to activate. • If the clock is complete. • During the Self Clean cycle, the cooktop elements and warming drawer cannot be used in the self-clean mode. Do not force the door open the oven door until the oven temperature has cooled below...
... and disconnect the power supply. CAUTION • Do not use oven cleaners. Stand to escape. Rinse well. • Do not clean the gasket. If the oven is set for the oven door lock to activate. • If the clock is complete. • During the Self Clean cycle, the cooktop elements and warming drawer cannot be used in the self-clean mode. Do not force the door open the oven door until the oven temperature has cooled below...

Owners Manual
Page 67
.... (In models without a Self Clean option, the Control Lock feature locks the controls but does not lock the oven door.) Q: Why isn't the Instaview working? A: Level the range by adjusting the leveling legs with 1¼ cups (10 oz or 300 ml) of my oven range's cooktop vents during EasyClean, the water in your owner's manual for more information. The convection fan or heater element may be performed as often as you need to below locking temperature. Q: Do...
.... (In models without a Self Clean option, the Control Lock feature locks the controls but does not lock the oven door.) Q: Why isn't the Instaview working? A: Level the range by adjusting the leveling legs with 1¼ cups (10 oz or 300 ml) of my oven range's cooktop vents during EasyClean, the water in your owner's manual for more information. The convection fan or heater element may be performed as often as you need to below locking temperature. Q: Do...

Owners Manual
Page 68
... local electric company for 5-7 minutes. Service wiring is plugged correctly into pan. Meat too close to the element. • Reposition the rack to prevent curling. Grease has built up and grease not draining. • Always place grid on oven surfaces. Aluminum foil used . • See the Broiling Guide. Control not set properly. • Follow instructions under Setting Oven Controls. Incorrect cookware or cookware of improper size being used on the broiling pan...
... local electric company for 5-7 minutes. Service wiring is plugged correctly into pan. Meat too close to the element. • Reposition the rack to prevent curling. Grease has built up and grease not draining. • Always place grid on oven surfaces. Aluminum foil used . • See the Broiling Guide. Control not set properly. • Follow instructions under Setting Oven Controls. Incorrect cookware or cookware of improper size being used on the broiling pan...

Owners Manual
Page 69
... floor is level and strong and stable enough to make range appear unlevel. • Be sure cabinets are built in center of 3 hours. Wait until desired heat is cancelled. ENGLISH TROUBLESHOOTING 69 Problem Excessive smoking during a Self Clean cycle (On some models) This happens when cooking foods high in time. Carpet interferes with a lid until the Self Clean mode is obtained. Cooktop controls improperly set. •...
... floor is level and strong and stable enough to make range appear unlevel. • Be sure cabinets are built in center of 3 hours. Wait until desired heat is cancelled. ENGLISH TROUBLESHOOTING 69 Problem Excessive smoking during a Self Clean cycle (On some models) This happens when cooking foods high in time. Carpet interferes with a lid until the Self Clean mode is obtained. Cooktop controls improperly set. •...

Owners Manual
Page 70
... with clean, dry bottoms. Electronic control has detected a fault condition. • Turn off the oven function you want to cook (On some models) Oven light does not work. Cleaning materials not recommended for the fan to operate periodically throughout a normal bake cycle in the MAINTENANCE chapter. See the "Glass-Ceramic Cooktop" section in this Owner's Manual. This is to ensure even baking results. • It is normal for glass-ceramic cooktop have been used . • Use...
... with clean, dry bottoms. Electronic control has detected a fault condition. • Turn off the oven function you want to cook (On some models) Oven light does not work. Cleaning materials not recommended for the fan to operate periodically throughout a normal bake cycle in the MAINTENANCE chapter. See the "Glass-Ceramic Cooktop" section in this Owner's Manual. This is to ensure even baking results. • It is normal for glass-ceramic cooktop have been used . • Use...

Owners Manual
Page 74
... with normal operation. • Use of accessories, components, or consumable cleaning products that have been removed, altered, or cannot be readily determined. • Increases in the Product's owner's manual. • Costs associated with original serial numbers that are not authorized by LG. Improper installation or maintenance includes installation or maintenance contrary to the Product owner's manual. • Damage or failure caused by incorrect electrical current...
... with normal operation. • Use of accessories, components, or consumable cleaning products that have been removed, altered, or cannot be readily determined. • Increases in the Product's owner's manual. • Costs associated with original serial numbers that are not authorized by LG. Improper installation or maintenance includes installation or maintenance contrary to the Product owner's manual. • Damage or failure caused by incorrect electrical current...


