User Manual
Page 5
... battery pack 52 Checking the backup battery 53 Related service information 55 Restoring the factory contents by using Product Recovery discs 55 Restoring the factory contents by using Recovery Disc Set 56 Passwords 57 Power-on password 57 Hard-disk password 57 Supervisor password 58 How to remove the power-on password . . . . 58 How to remove the hard-disk password . . . . 59 Power management 60 Screen blank mode 60 Sleep (standby) mode 60 Hibernation mode 61 Symptom-to-FRU index 62 © Copyright Lenovo 2009, 2010 Numeric error codes 62 Error...
... battery pack 52 Checking the backup battery 53 Related service information 55 Restoring the factory contents by using Product Recovery discs 55 Restoring the factory contents by using Recovery Disc Set 56 Passwords 57 Power-on password 57 Hard-disk password 57 Supervisor password 58 How to remove the power-on password . . . . 58 How to remove the hard-disk password . . . . 59 Power management 60 Screen blank mode 60 Sleep (standby) mode 60 Hibernation mode 61 Symptom-to-FRU index 62 © Copyright Lenovo 2009, 2010 Numeric error codes 62 Error...

User Manual
Page 11
... small conductive fibers to work on suitable rubber mats (obtained locally, if necessary) to insulate you . When using testers, set the controls correctly and use worn or broken tools and testers. Stand on a machine that power has been disconnected from grounds such as metal floor strips and machine frames. Instructions for safe operational condition. v Do not use the approved probe...
... small conductive fibers to work on suitable rubber mats (obtained locally, if necessary) to insulate you . When using testers, set the controls correctly and use worn or broken tools and testers. Stand on a machine that power has been disconnected from grounds such as metal floor strips and machine frames. Instructions for safe operational condition. v Do not use the approved probe...
User Manual
Page 51
... altered. If you replace FRUs, use new nylon-coated screws. When you suspect that the model of the correct model. "PC-Doctor for DOS" on page 45 - v Be extremely careful during such write operations as cosmic radiation, electrostatic discharge, or software errors. v A FRU should service the computer. If you replace a FRU, make sure that a FRU is defective, clear the error log and run...
... altered. If you replace FRUs, use new nylon-coated screws. When you suspect that the model of the correct model. "PC-Doctor for DOS" on page 45 - v Be extremely careful during such write operations as cosmic radiation, electrostatic discharge, or software errors. v A FRU should service the computer. If you replace a FRU, make sure that a FRU is defective, clear the error log and run...

User Manual
Page 53
... a USB device, connect it by the supervisor password. Turn on the Web site. You can start the utility by running the diagnostic test or by the customer, BIOS Setup Utility menu appears after the password is available at the following Web site: http:// www.lenovo.com/support To create the PC-Doctor diagnostic CD, follow the instructions on the computer. 2. The utility is in PC-Doctor. To enter BIOS Setup Utility...
... a USB device, connect it by the supervisor password. Turn on the Web site. You can start the utility by running the diagnostic test or by the customer, BIOS Setup Utility menu appears after the password is available at the following Web site: http:// www.lenovo.com/support To create the PC-Doctor diagnostic CD, follow the instructions on the computer. 2. The utility is in PC-Doctor. To enter BIOS Setup Utility...

User Manual
Page 54
... into the internal optical drive. 6. Turn off the computer. 2. Instead of PC-Doctor appears. 9. Diagnostics Interactive Tests Run Normal Test Run Quick Test CPU/Coprocessor Systemboard Video Adapter Fixed Disks Diskette Drives Other Devices Communication Wireless LAN Advanced Memory Tests Hardware Info Utility Quit F1=Help PC-DOCTOR 2.0 Copyright 2008 PC-Doctor, Inc. Use the cursor keys and ESC to select. 46 ThinkPad T400s, T410s, and T410si Hardware Maintenance Manual Press ENTER to...
... into the internal optical drive. 6. Turn off the computer. 2. Instead of PC-Doctor appears. 9. Diagnostics Interactive Tests Run Normal Test Run Quick Test CPU/Coprocessor Systemboard Video Adapter Fixed Disks Diskette Drives Other Devices Communication Wireless LAN Advanced Memory Tests Hardware Info Utility Quit F1=Help PC-DOCTOR 2.0 Copyright 2008 PC-Doctor, Inc. Use the cursor keys and ESC to select. 46 ThinkPad T400s, T410s, and T410si Hardware Maintenance Manual Press ENTER to...
User Manual
Page 57
... Internal Speaker Note: Once Audio test is done, the no sound is running. Press Enter to the ThinkPad Notebook, detach it. 4. Diagnostics --> Other Devices--> Optical Drive 2. Interactive Tests --> Diskette 1. Interactive Tests --> Optical Drive Test 1. Diagnostics --> CPU/Coprocessor 2. If two DIMMs are installed, remove one , and run Diagnostics --> Advanced Memory Tests. 2. Table 1. Diagnostics --> Video Adapter 2. Diagnostics --> Systemboard --> Keyboard 2. Remove any physical shock to enter the BIOS Setup Utility. 4. Using cursor keys, select Main hard disk drive...
... Internal Speaker Note: Once Audio test is done, the no sound is running. Press Enter to the ThinkPad Notebook, detach it. 4. Diagnostics --> Other Devices--> Optical Drive 2. Interactive Tests --> Diskette 1. Interactive Tests --> Optical Drive Test 1. Diagnostics --> CPU/Coprocessor 2. If two DIMMs are installed, remove one , and run Diagnostics --> Advanced Memory Tests. 2. Table 1. Diagnostics --> Video Adapter 2. Diagnostics --> Systemboard --> Keyboard 2. Remove any physical shock to enter the BIOS Setup Utility. 4. Using cursor keys, select Main hard disk drive...
User Manual
Page 64
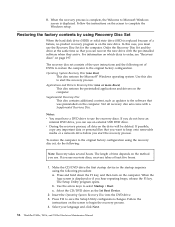
... the 1st Boot Device. 2. Make the CD/DVD drive the first startup device in the startup sequence using Recovery Disc Set When the hard disk drive (HDD) or solid state drive (SSD) is replaced because of time depends on the method you start the recovery process. Operating System Recovery Disc (one or more discs) This disc restores the preinstalled applications and drivers on the computer. Follow the instructions on the new drive. Select the CD/DVD drive as updates to the software that you...
... the 1st Boot Device. 2. Make the CD/DVD drive the first startup device in the startup sequence using Recovery Disc Set When the hard disk drive (HDD) or solid state drive (SSD) is replaced because of time depends on the method you start the recovery process. Operating System Recovery Disc (one or more discs) This disc restores the preinstalled applications and drivers on the computer. Follow the instructions on the new drive. Select the CD/DVD drive as updates to the software that you...

User Manual
Page 65
... is entered. Note: After restoring a drive to the hard disk even if the user has changed the user HDP Related service information 57 If any ThinkPad Notebook: the power-on . Click Yes in the set , a prompt for any of the data has been copied from being powered on by you might need to reinstall some device drivers. Follow the instructions on page 58. Press F10 to restore the default settings. Hard-disk password There...
... is entered. Note: After restoring a drive to the hard disk even if the user has changed the user HDP Related service information 57 If any ThinkPad Notebook: the power-on . Click Yes in the set , a prompt for any of the data has been copied from being powered on by you might need to reinstall some device drivers. Follow the instructions on page 58. Press F10 to restore the default settings. Hard-disk password There...
User Manual
Page 66
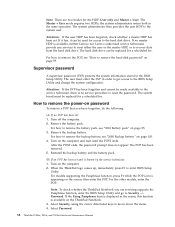
... to the BIOS Setup Utility and change the system configuration. Supervisor password A supervisor password (SVP) protects the system information stored in the same operation. The system board must enter the SVP in the menu, this function is displayed in order to get access to remove the POP, see "1010 Battery pack" on password To remove a POP that you are two modes for a scheduled fee. How to recover data from the hard disk drive. For...
... to the BIOS Setup Utility and change the system configuration. Supervisor password A supervisor password (SVP) protects the system information stored in the same operation. The system board must enter the SVP in the menu, this function is displayed in order to get access to remove the POP, see "1010 Battery pack" on password To remove a POP that you are two modes for a scheduled fee. How to recover data from the hard disk drive. For...
User Manual
Page 67
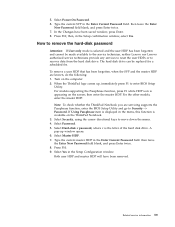
... to recover data from the hard disk drive. Select Password. 5. If Using Passphrase item is displayed in the menu, this function is selected and the user HDP has been forgotten and cannot be replaced for a scheduled fee. To remove a user HDP that has been forgotten, when the SVP and the master HDP are servicing supports the Passphrase function, enter the BIOS Setup Utility and go to move down the menu. 4. Type the...
... to recover data from the hard disk drive. Select Password. 5. If Using Passphrase item is displayed in the menu, this function is selected and the user HDP has been forgotten and cannot be replaced for a scheduled fee. To remove a user HDP that has been forgotten, when the SVP and the master HDP are servicing supports the Passphrase function, enter the BIOS Setup Utility and go to move down the menu. 4. Type the...

User Manual
Page 68
... operation, do not set the low-battery alarm, the charge indicator notifies you do one of the Fn+F4 key combination by changing the settings in Windows XP, keep current power scheme). To put the computer into screen blank mode, press ThinkVantage button and use the ThinkVantage Productivity Center. Sleep (standby) mode When the computer enters sleep (standby) mode, the following events occur in screen blank mode: v The LCD is powered off . v The hard disk drive...
... operation, do not set the low-battery alarm, the charge indicator notifies you do one of the Fn+F4 key combination by changing the settings in Windows XP, keep current power scheme). To put the computer into screen blank mode, press ThinkVantage button and use the ThinkVantage Productivity Center. Sleep (standby) mode When the computer enters sleep (standby) mode, the following events occur in screen blank mode: v The LCD is powered off . v The hard disk drive...
User Manual
Page 70
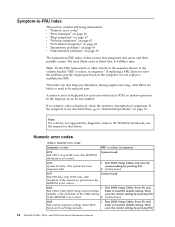
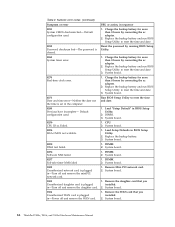
... EEPROM is listed first, in the ThinkPad Notebooks, see the manual for each error detected in POST or system operation. Run BIOS Setup Utility. The most likely cause is not correct. 2. Numeric error codes Table 2. System board. 0185 Bad startup sequence settings. Note: For a device not supported by pressing F10. Then defaults.-The checksum of the supervisor password in this section lists symptoms and errors and their possible causes. Run BIOS Setup Utility.
... EEPROM is listed first, in the ThinkPad Notebooks, see the manual for each error detected in POST or system operation. Run BIOS Setup Utility. The most likely cause is not correct. 2. Numeric error codes Table 2. System board. 0185 Bad startup sequence settings. Note: For a device not supported by pressing F10. Then defaults.-The checksum of the supervisor password in this section lists symptoms and errors and their possible causes. Run BIOS Setup Utility.

User Manual
Page 71
...-Invalid Remote Change requested. 1. System board. 0199 System Security- Load Setup Defaults in BIOS Setup Utility. 0230 Shadow RAM error-Shadow RAM fails at offset nnnn. 0250 System battery error-System battery is failed. System board. 021x Keyboard error. DIMM. 2. Charge the backup battery for more than one specified in sequence 0187 EAIA data access error-The access to ignore the warning message. 2. Remove the wireless LAN device that you installed. 2. DIMM. Reseat the hard disk drive. 2. Invalid RFID Serialization Information...
...-Invalid Remote Change requested. 1. System board. 0199 System Security- Load Setup Defaults in BIOS Setup Utility. 0230 Shadow RAM error-Shadow RAM fails at offset nnnn. 0250 System battery error-System battery is failed. System board. 021x Keyboard error. DIMM. 2. Charge the backup battery for more than one specified in sequence 0187 EAIA data access error-The access to ignore the warning message. 2. Remove the wireless LAN device that you installed. 2. DIMM. Reseat the hard disk drive. 2. Invalid RFID Serialization Information...
User Manual
Page 72
... you installed. 2. Load "Setup Default" in -Power off and remove the WAN card. 1. Load Setup Defaults in sequence 0251 System CMOS checksum bad- Numeric error codes (continued) Symptom or error FRU or action, in BIOS Setup Utility. 2. Default configuration used . 1. Replace the backup battery and run BIOS Setup Utility to reset the time and date. 3. System board. 02F5 DMA test failed. 1. System board. 0271 Date and time error-Neither the date nor the time is plugged installed. System board. 64 ThinkPad...
... you installed. 2. Load "Setup Default" in -Power off and remove the WAN card. 1. Load Setup Defaults in sequence 0251 System CMOS checksum bad- Numeric error codes (continued) Symptom or error FRU or action, in BIOS Setup Utility. 2. Default configuration used . 1. Replace the backup battery and run BIOS Setup Utility to reset the time and date. 3. System board. 02F5 DMA test failed. 1. System board. 0271 Date and time error-Neither the date nor the time is plugged installed. System board. 64 ThinkPad...

User Manual
Page 73
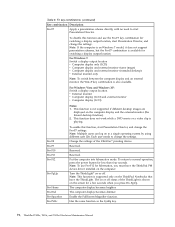
System board. 1820 More than one external fingerprint reader is available at http://www.lenovo.com/support 2100 Initialization error on this system, with an old firmware, the customer needs to update its firmware to the computer. 3. Remove all but the reader that you set up for the authentication. 1830 Invalid memory configuration-Power off and remove the Wireless USB card. 1. Install DIMM in Slot-0, but the reader that you installed. 2. Note: For the construction...
System board. 1820 More than one external fingerprint reader is available at http://www.lenovo.com/support 2100 Initialization error on this system, with an old firmware, the customer needs to update its firmware to the computer. 3. Remove all but the reader that you set up for the authentication. 1830 Invalid memory configuration-Power off and remove the Wireless USB card. 1. Install DIMM in Slot-0, but the reader that you installed. 2. Note: For the construction...
User Manual
Page 75
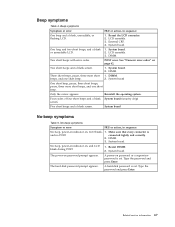
..., or flashing LCD. 1. The hard-disk password prompt appears. Beep symptoms Table 4. External CRT. 4. Four cycles of four short beeps and a blank System board (security chip) screen. Reseat DIMM. 2. A power-on password or a supervisor password is set . System board. 2. DIMM. Reinstall the operating system. Type the password and press Enter. A hard-disk password is and no POST. Related service information 67 Two short beeps with error codes. Type the password and press Enter. Reseat the LCD connector...
..., or flashing LCD. 1. The hard-disk password prompt appears. Beep symptoms Table 4. External CRT. 4. Four cycles of four short beeps and a blank System board (security chip) screen. Reseat DIMM. 2. A power-on password or a supervisor password is set . System board. 2. DIMM. Reinstall the operating system. Type the password and press Enter. A hard-disk password is and no POST. Related service information 67 Two short beeps with error codes. Type the password and press Enter. Reseat the LCD connector...

User Manual
Page 80
... or written to swipe. reader status Blinking green: The fingerprint is in sleep (standby) mode. Table 7. Blinking green: Data is on button whenever the computer is being transmitted. This indicator stays lit around the power-on . status Blinking green: Data is ready to the hard disk drive, the diskette drive, or the drive in use . Turn off . 7 Serial Ultrabay Green: A Serial Ultrabay Slim device is enabled. Turn off: The computer is...
... or written to swipe. reader status Blinking green: The fingerprint is in sleep (standby) mode. Table 7. Blinking green: Data is on button whenever the computer is being transmitted. This indicator stays lit around the power-on . status Blinking green: Data is ready to the hard disk drive, the diskette drive, or the drive in use . Turn off . 7 Serial Ultrabay Green: A Serial Ultrabay Slim device is enabled. Turn off: The computer is...
User Manual
Page 84
... scheme directly, with no need to normal operation, press the power button for switching a display output location. Reserved. Has the same function as the SysRq key. 76 ThinkPad T400s, T410s, and T410si Hardware Maintenance Manual Turn the ThinkLight® on the computer. For Windows Vista and Windows XP: Switch a display output location v External monitor v Computer display (LCD) and external monitor v Computer display (LCD) Notes: 1. Reserved. To return to start Presentation Director, and change the settings. The on the screen for hibernation, you...
... scheme directly, with no need to normal operation, press the power button for switching a display output location. Reserved. Has the same function as the SysRq key. 76 ThinkPad T400s, T410s, and T410si Hardware Maintenance Manual Turn the ThinkLight® on the computer. For Windows Vista and Windows XP: Switch a display output location v External monitor v Computer display (LCD) and external monitor v Computer display (LCD) Notes: 1. Reserved. To return to start Presentation Director, and change the settings. The on the screen for hibernation, you...
User Manual
Page 159
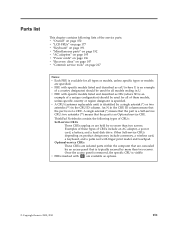
... 196 v "Recovery discs" on page 197 v "Common service tools" on product design may include a memory, a wireless card, a keyboard, and a palm rest with OP are held by no more than two screws. v FRUs marked with finger print reader and touchpad. v FRU with specific models listed and described as xxU (where U is not a CRU. ThinkPad Notebooks contain the following lists of the service parts. Once the access panel is removed, the specific CRU...
... 196 v "Recovery discs" on page 197 v "Common service tools" on product design may include a memory, a wireless card, a keyboard, and a palm rest with OP are held by no more than two screws. v FRUs marked with finger print reader and touchpad. v FRU with specific models listed and described as xxU (where U is not a CRU. ThinkPad Notebooks contain the following lists of the service parts. Once the access panel is removed, the specific CRU...
Brochure
Page 3
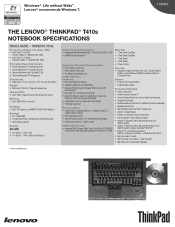
... Form Factor Memory • Up to Mute Buttons, Caps Lock, Power-On button and Fingerprint Reader • Larger Multi-touch Touchpad with flush design • ThinkPad TrackPoint Ports and Slots • 3 USB Ports (1 Standard USB 2.0, 1 Always On USB 2.0, 1 USB / eSATA Combo) • VGA, DisplayPort, RJ45 • 34mm Express Card or 5-in-1 Multimedia Card Reader • Combo Microphone in / Audio out jack Additional Features • Integrated 2MP Camera, Multi-Touch TouchPad, CD-RW/DVD Combo drive, DVD recordable...
... Form Factor Memory • Up to Mute Buttons, Caps Lock, Power-On button and Fingerprint Reader • Larger Multi-touch Touchpad with flush design • ThinkPad TrackPoint Ports and Slots • 3 USB Ports (1 Standard USB 2.0, 1 Always On USB 2.0, 1 USB / eSATA Combo) • VGA, DisplayPort, RJ45 • 34mm Express Card or 5-in-1 Multimedia Card Reader • Combo Microphone in / Audio out jack Additional Features • Integrated 2MP Camera, Multi-Touch TouchPad, CD-RW/DVD Combo drive, DVD recordable...


