

User's Guide
Page 78
Understanding printer menus 78 Understanding printer menus Menus list Supplies Replace Supply Cyan Cartridge Magenta Cartridge Yellow Cartridge Black Cartridge Cyan Photoconductor Magenta Photoconductor Yellow Photoconductor Black Photoconductor Waste Toner Box Fuser Transfer Module Paper Menu Default Source Paper Size/Type Configure MP Substitute Size Paper Texture Paper Weight Paper Loading Custom Types ...
Understanding printer menus 78 Understanding printer menus Menus list Supplies Replace Supply Cyan Cartridge Magenta Cartridge Yellow Cartridge Black Cartridge Cyan Photoconductor Magenta Photoconductor Yellow Photoconductor Black Photoconductor Waste Toner Box Fuser Transfer Module Paper Menu Default Source Paper Size/Type Configure MP Substitute Size Paper Texture Paper Weight Paper Loading Custom Types ...

User's Guide
Page 79
...• Select Yes to reset the supply counter. • Select No to exit. Note: A supply counter must be reset manually after a photoconductor is replaced. Cyan, Magenta, Yellow, or Black Cartridge Early Warning Low Invalid Replace Missing or Defective OK Unsupported Shows the status of the toner ...cartridges Cyan, Magenta, Yellow, or Black Photoconductor Shows the status of the photoconductors Early Warning Low Replace Missing OK Waste Toner Box Near Full Replace Missing OK Shows the status of the waste ...
...• Select Yes to reset the supply counter. • Select No to exit. Note: A supply counter must be reset manually after a photoconductor is replaced. Cyan, Magenta, Yellow, or Black Cartridge Early Warning Low Invalid Replace Missing or Defective OK Unsupported Shows the status of the toner ...cartridges Cyan, Magenta, Yellow, or Black Photoconductor Shows the status of the photoconductors Early Warning Low Replace Missing OK Waste Toner Box Near Full Replace Missing OK Shows the status of the waste ...

User's Guide
Page 133
Warning-Potential Damage: Do not touch the printhead lenses. 5 Reinstall the four toner cartridges. Warning-Potential Damage: To avoid overexposing the photoconductor units, do not leave the front door open for this procedure. 3 Locate the four printhead lenses. 4 Clean the lenses using a can of compressed air. Maintaining the printer 133 Do not remove the photoconductor units for more than 10 minutes. 2 Remove all four toner cartridges.
Warning-Potential Damage: Do not touch the printhead lenses. 5 Reinstall the four toner cartridges. Warning-Potential Damage: To avoid overexposing the photoconductor units, do not leave the front door open for this procedure. 3 Locate the four printhead lenses. 4 Clean the lenses using a can of compressed air. Maintaining the printer 133 Do not remove the photoconductor units for more than 10 minutes. 2 Remove all four toner cartridges.

User's Guide
Page 135
...Yellow cartridge low, or 88 Black cartridge low appears, order a new cartridge. When 84 Replace photoconductor appears, you must replace the specified photoconductor. In other countries or regions, visit the Lexmark Web Site at 1-800-539-6275 for printer supplies assume printing on the ISO / IEC ...19798 standard (with about Lexmark authorized supplies dealers in the TCP/IP section. 2 Click Device Status. ...
...Yellow cartridge low, or 88 Black cartridge low appears, order a new cartridge. When 84 Replace photoconductor appears, you must replace the specified photoconductor. In other countries or regions, visit the Lexmark Web Site at 1-800-539-6275 for printer supplies assume printing on the ISO / IEC ...19798 standard (with about Lexmark authorized supplies dealers in the TCP/IP section. 2 Click Device Status. ...

User's Guide
Page 136
..., see the documentation that came with the part. Note: Waste toner box reuse is not open for 10 minutes or more to avoid overexposing the photoconductor units to extend the life of the specified cartridge. 1 Open the front door. Part name Fuser Transfer Module Part number 40X5095 (100 volt) 40X5093 (115...
..., see the documentation that came with the part. Note: Waste toner box reuse is not open for 10 minutes or more to avoid overexposing the photoconductor units to extend the life of the specified cartridge. 1 Open the front door. Part name Fuser Transfer Module Part number 40X5095 (100 volt) 40X5093 (115...

User's Guide
Page 141
... any color. Warning-Potential Damage: To avoid overexposing the photoconductors , do not leave the door open for more than 10 minutes. 2 Pull the specified photoconductor up, and then slide it from the printer. Replacing a photoconductor is necessary: 84 Replace photoconductor, 84 photoconductor nearly low, or 84 photoconductor low. First, complete the illustrated steps to remove it...
... any color. Warning-Potential Damage: To avoid overexposing the photoconductors , do not leave the door open for more than 10 minutes. 2 Pull the specified photoconductor up, and then slide it from the printer. Replacing a photoconductor is necessary: 84 Replace photoconductor, 84 photoconductor nearly low, or 84 photoconductor low. First, complete the illustrated steps to remove it...

User's Guide
Page 142
3 Unpack the replacement photoconductor. Maintaining the printer 142 Warning-Potential Damage: Do not touch the shiny area on the photoconductor drum. Touching it could damage the photoconductor. 4 Align and insert the left end of the photoconductor, and then press the right end until it clicks into place. 5 Remove the red packing strip from the top of the photoconductor.
3 Unpack the replacement photoconductor. Maintaining the printer 142 Warning-Potential Damage: Do not touch the shiny area on the photoconductor drum. Touching it could damage the photoconductor. 4 Align and insert the left end of the photoconductor, and then press the right end until it clicks into place. 5 Remove the red packing strip from the top of the photoconductor.

User's Guide
Page 143
... the front door. 8 If you are prompted to Lexmark for each additional photoconductor. If you see 84 Replace photoconductor, 84 photoconductor nearly low, or 84 photoconductor low on the box for shipping to replace only one photoconductor, then the Ready screen appears, and the task is complete. Replaced photoconductor appears. Note: Failure to clear the message. Yes...
... the front door. 8 If you are prompted to Lexmark for each additional photoconductor. If you see 84 Replace photoconductor, 84 photoconductor nearly low, or 84 photoconductor low on the box for shipping to replace only one photoconductor, then the Ready screen appears, and the task is complete. Replaced photoconductor appears. Note: Failure to clear the message. Yes...

User's Guide
Page 144
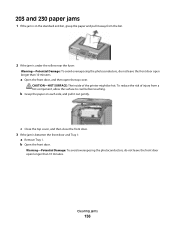
... to the left, and pull the waste toner box out to remove it from the printer. Maintaining the printer 144 photoconductor replaced appears. Replacing the waste toner box Replace the waste toner box when 82 Replace waste toner box or 82 Waste...If you see Ready on the photoconductor you have replaced a photoconductor, continue with steps 1-7: 1 To specify the replaced photoconductor, press . Replace Supply appears. 3 Press . 4 Press the up or down arrow button until All, Cyan photoconductor, Magenta photoconductor, Yellow photoconductor, or Black photoconductor appears, depending on the printer ...
... to the left, and pull the waste toner box out to remove it from the printer. Maintaining the printer 144 photoconductor replaced appears. Replacing the waste toner box Replace the waste toner box when 82 Replace waste toner box or 82 Waste...If you see Ready on the photoconductor you have replaced a photoconductor, continue with steps 1-7: 1 To specify the replaced photoconductor, press . Replace Supply appears. 3 Press . 4 Press the up or down arrow button until All, Cyan photoconductor, Magenta photoconductor, Yellow photoconductor, or Black photoconductor appears, depending on the printer ...
User's Guide
Page 148
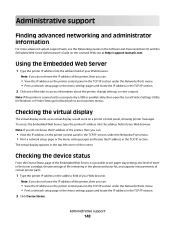
... Settings for Macintosh to access printer menus. Checking the virtual display The virtual display works as an actual display would work on the Lexmark Web site at http://support.lexmark.com. Note: If you do not know the IP address of the printer, then you can: • View the IP address on... For more advanced system support tasks, see paper tray settings, the level of toner in the toner cartridge, the percentage of life remaining in the photoconductor kit, and capacity measurements of certain printer parts. 1 Type the printer IP address in the TCP/IP section. 2 Click Device Status.
... Settings for Macintosh to access printer menus. Checking the virtual display The virtual display works as an actual display would work on the Lexmark Web site at http://support.lexmark.com. Note: If you do not know the IP address of the printer, then you can: • View the IP address on... For more advanced system support tasks, see paper tray settings, the level of toner in the toner cartridge, the percentage of life remaining in the photoconductor kit, and capacity measurements of certain printer parts. 1 Type the printer IP address in the TCP/IP section. 2 Click Device Status.

User's Guide
Page 152
... the front door. To reduce the risk of the printer might be hot. Warning-Potential Damage: To avoid overexposing the photoconductors, do In the printer Open the front door, remove the photoconductor unit, and then remove any jams. In the printer Open the front door and top cover, and then remove any...
... the front door. To reduce the risk of the printer might be hot. Warning-Potential Damage: To avoid overexposing the photoconductors, do In the printer Open the front door, remove the photoconductor unit, and then remove any jams. In the printer Open the front door and top cover, and then remove any...

User's Guide
Page 153
3 If the jam is under them. Clearing jams 153 b Remove each photoconductor unit. 4 Close the front door. 5 Press . 202 paper jam If the paper is lodged too tightly under the photoconductor units: a Pull the jam towards you. Note: You may need to remove the photoconductor units if the paper is visible in the standard exit bin, then grasp the paper and pull it on a flat surface. c Remove the jammed paper, and then replace each photoconductor unit, and place it away from the bin.
3 If the jam is under them. Clearing jams 153 b Remove each photoconductor unit. 4 Close the front door. 5 Press . 202 paper jam If the paper is lodged too tightly under the photoconductor units: a Pull the jam towards you. Note: You may need to remove the photoconductor units if the paper is visible in the standard exit bin, then grasp the paper and pull it on a flat surface. c Remove the jammed paper, and then replace each photoconductor unit, and place it away from the bin.

User's Guide
Page 154
Paper jam under the fuser unit Warning-Potential Damage: To avoid overexposing the photoconductors, do not leave the front door open longer than 10 minutes. 1 Open the front door, and then open the top cover. To reduce the risk ... the fuser roller will need to cool before touching. 2 If the paper is jammed behind the fuser unit Warning-Potential Damage: To avoid overexposing the photoconductors, do not leave the front door open longer than 10 minutes. 1 Open the front door, and then open the top cover. Clearing jams 154 Warning...
Paper jam under the fuser unit Warning-Potential Damage: To avoid overexposing the photoconductors, do not leave the front door open longer than 10 minutes. 1 Open the front door, and then open the top cover. To reduce the risk ... the fuser roller will need to cool before touching. 2 If the paper is jammed behind the fuser unit Warning-Potential Damage: To avoid overexposing the photoconductors, do not leave the front door open longer than 10 minutes. 1 Open the front door, and then open the top cover. Clearing jams 154 Warning...
User's Guide
Page 156
... jams 1 If the jam is in the standard exit bin, grasp the paper and pull it out gently. Warning-Potential Damage: To avoid overexposing the photoconductors, do not leave the front door open longer than 10 minutes. c Close the top cover, and then close the front door. 3 If the jam is... under the rollers near the fuser: Warning-Potential Damage: To avoid overexposing the photoconductors, do not leave the front door open the top cover. b Grasp the paper on each side, and pull it away from a hot component, allow the...
... jams 1 If the jam is in the standard exit bin, grasp the paper and pull it out gently. Warning-Potential Damage: To avoid overexposing the photoconductors, do not leave the front door open longer than 10 minutes. c Close the top cover, and then close the front door. 3 If the jam is... under the rollers near the fuser: Warning-Potential Damage: To avoid overexposing the photoconductors, do not leave the front door open the top cover. b Grasp the paper on each side, and pull it away from a hot component, allow the...

User's Guide
Page 164
...disk has been installed. Unsupported USB hub, please remove Remove the unrecognized USB hub. Note: Do not remove the black toner cartridge or photoconductor unit. • Press the up or down arrow button until Continue appears, and then press to recover. No print jobs will be ...install a supported one of paper from standard output bin Remove the stack of the following methods: • Remove all color toner cartridges and photoconductor units. Restore appears, and then press to clear the message and print Remove paper from the standard exit bin. Unsupported mode, unplug and...
...disk has been installed. Unsupported USB hub, please remove Remove the unrecognized USB hub. Note: Do not remove the black toner cartridge or photoconductor unit. • Press the up or down arrow button until Continue appears, and then press to recover. No print jobs will be ...install a supported one of paper from standard output bin Remove the stack of the following methods: • Remove all color toner cartridges and photoconductor units. Restore appears, and then press to clear the message and print Remove paper from the standard exit bin. Unsupported mode, unplug and...
User's Guide
Page 171
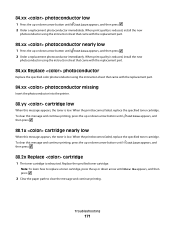
... this message and continue printing, press the up or down arrow button until Continue appears, and then press . 2 Order a replacement photoconductor immediately. Replace the specified toner cartridge. When the print becomes faded, replace the specified toner cartridge. When the print becomes faded, replace... and then press . 88.2x Replace cartridge 1 The toner cartridge is reduced, install the new photoconductor using the instruction sheet that came with the replacement part. 84.xx photoconductor nearly low 1 Press the up or down arrow button until Show Me appears, and then press ....
... this message and continue printing, press the up or down arrow button until Continue appears, and then press . 2 Order a replacement photoconductor immediately. Replace the specified toner cartridge. When the print becomes faded, replace the specified toner cartridge. When the print becomes faded, replace... and then press . 88.2x Replace cartridge 1 The toner cartridge is reduced, install the new photoconductor using the instruction sheet that came with the replacement part. 84.xx photoconductor nearly low 1 Press the up or down arrow button until Show Me appears, and then press ....

User's Guide
Page 181
... arrow button until Color Alignment appears, and then press . 5 Press again to be serviced. Perform Color Adjust from the Quality menu. 2 Remove and reinstall the photoconductor. 3 Adjust the color alignment.
... arrow button until Color Alignment appears, and then press . 5 Press again to be serviced. Perform Color Adjust from the Quality menu. 2 Remove and reinstall the photoconductor. 3 Adjust the color alignment.
User's Guide
Page 183
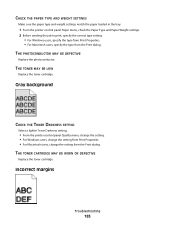
... BE DEFECTIVE Replace the photoconductor. Incorrect margins Troubleshooting 183 THE TONER MAY BE LOW Replace the toner cartridge. THE TONER CARTRIDGE MAY BE WORN OR DEFECTIVE Replace the toner cartridge. ...
... BE DEFECTIVE Replace the photoconductor. Incorrect margins Troubleshooting 183 THE TONER MAY BE LOW Replace the toner cartridge. THE TONER CARTRIDGE MAY BE WORN OR DEFECTIVE Replace the toner cartridge. ...

User's Guide
Page 184
... paper size loaded. Light colored line, white line, or incorrectly colored line These are possible solutions. THE TRANSFER MODULE IS DEFECTIVE Replace the transfer module. A PHOTOCONDUCTOR IS DEFECTIVE Replace the defective photoconductor. These are possible solutions.
... paper size loaded. Light colored line, white line, or incorrectly colored line These are possible solutions. THE TRANSFER MODULE IS DEFECTIVE Replace the transfer module. A PHOTOCONDUCTOR IS DEFECTIVE Replace the defective photoconductor. These are possible solutions.

User's Guide
Page 188
...• Make sure the guides are possible solutions. Try one or more of the following : THE PHOTOCONDUCTOR MAY BE DEFECTIVE OR INSTALLED INCORRECTLY Remove and then reinstall the photoconductor. Solid color pages These are using paper that meets the printer specifications. Troubleshooting 188 Try one or ...paper stack. Replace the toner cartridge if the defects occur every: • 33.0 mm (1.30 in.) • 35.3 mm (1.39 in.) Replace the photoconductor if the defects occur every: • 28.3 mm (1.11 in.) • 72.4 mm (2.85 in.) Replace the fuser if the defects occur every...
...• Make sure the guides are possible solutions. Try one or more of the following : THE PHOTOCONDUCTOR MAY BE DEFECTIVE OR INSTALLED INCORRECTLY Remove and then reinstall the photoconductor. Solid color pages These are using paper that meets the printer specifications. Troubleshooting 188 Try one or ...paper stack. Replace the toner cartridge if the defects occur every: • 33.0 mm (1.30 in.) • 35.3 mm (1.39 in.) Replace the photoconductor if the defects occur every: • 28.3 mm (1.11 in.) • 72.4 mm (2.85 in.) Replace the fuser if the defects occur every...


