

User's Guide
Page 2
... a wired network...42 Changing port settings after installing a new network Internal Solutions Port 45 Setting up serial printing...47 Minimizing your printer's environmental impact 49 Saving paper and toner...49 Saving energy...50 Recycling...53 Loading paper and specialty media 54 Setting the paper size and type......
... a wired network...42 Changing port settings after installing a new network Internal Solutions Port 45 Setting up serial printing...47 Minimizing your printer's environmental impact 49 Saving paper and toner...49 Saving energy...50 Recycling...53 Loading paper and specialty media 54 Setting the paper size and type......

User's Guide
Page 3
... Printing information pages...74 Canceling a print job...75 Printing in black and white...77 Using Max Speed and Max Yield...77 Understanding printer menus 78 Menus list...78 Supplies menu...79 Paper menu...80 Reports menu...90 Network/Ports menu...91 Security menu...106 Settings menu......110 Help menu...130 Maintaining the printer 132 Cleaning the exterior of the printer...132 Cleaning the printhead lenses...132 Storing supplies...134 Checking the status of supplies...134 Ordering supplies...135 Replacing ...
... Printing information pages...74 Canceling a print job...75 Printing in black and white...77 Using Max Speed and Max Yield...77 Understanding printer menus 78 Menus list...78 Supplies menu...79 Paper menu...80 Reports menu...90 Network/Ports menu...91 Security menu...106 Settings menu......110 Help menu...130 Maintaining the printer 132 Cleaning the exterior of the printer...132 Cleaning the printhead lenses...132 Storing supplies...134 Checking the status of supplies...134 Ordering supplies...135 Replacing ...

User's Guide
Page 4
...-201 paper jams...152 202 paper jam...153 203 and 230 paper jams...156 24x paper jam...158 250 paper jam...159 Troubleshooting 160 Understanding printer messages...160 Solving basic problems...172 Solving printing problems...172 Solving option problems...176 Solving paper feed problems...179 Solving print quality problems...180 Solving...
...-201 paper jams...152 202 paper jam...153 203 and 230 paper jams...156 24x paper jam...158 250 paper jam...159 Troubleshooting 160 Understanding printer messages...160 Solving basic problems...172 Solving printing problems...172 Solving option problems...176 Solving paper feed problems...179 Solving print quality problems...180 Solving...

User's Guide
Page 5
...to cool before proceeding. CAUTION-SHOCK HAZARD: To avoid the risk of electric shock when cleaning the exterior of injury from the printer before touching. Safety information 5 Inspect the power cord regularly for the use this product or the manufacturer's authorized replacement. To.... You must understand the section in ports. Do not recharge, disassemble, or incinerate a lithium battery. CAUTION-POTENTIAL INJURY: The printer weight is greater than those described in hazardous radiation exposure. This product is designed, tested, and approved to meet strict global safety...
...to cool before proceeding. CAUTION-SHOCK HAZARD: To avoid the risk of electric shock when cleaning the exterior of injury from the printer before touching. Safety information 5 Inspect the power cord regularly for the use this product or the manufacturer's authorized replacement. To.... You must understand the section in ports. Do not recharge, disassemble, or incinerate a lithium battery. CAUTION-POTENTIAL INJURY: The printer weight is greater than those described in hazardous radiation exposure. This product is designed, tested, and approved to meet strict global safety...

User's Guide
Page 6
Safety information 6 If you purchased a multifunction printer (MFP) that scans, copies, and faxes, you are using a high-capacity input tray, a duplex unit and an input option, or more information, see www.lexmark.com/multifunctionprinters. For more than one input option. CAUTION-TIPPING HAZARD: Floor-mounted configurations ... feature, power cord, or telephone, during a lightning storm. SAVE THESE INSTRUCTIONS. CAUTION-SHOCK HAZARD: Do not use either a printer stand or printer base if you may need additional furniture. You must use the fax feature during a lightning storm.
Safety information 6 If you purchased a multifunction printer (MFP) that scans, copies, and faxes, you are using a high-capacity input tray, a duplex unit and an input option, or more information, see www.lexmark.com/multifunctionprinters. For more than one input option. CAUTION-TIPPING HAZARD: Floor-mounted configurations ... feature, power cord, or telephone, during a lightning storm. SAVE THESE INSTRUCTIONS. CAUTION-SHOCK HAZARD: Do not use either a printer stand or printer base if you may need additional furniture. You must use the fax feature during a lightning storm.

User's Guide
Page 7
...and printing documents and photos • Setting up and configuring the printer on a network, depending on your printer, read the User's Guide carefully, and make sure you check the latest updates on the Lexmark Web site at http://support.lexmark.com. User's Guide-The User's Guide is also available on ...our Web site. Windows or Mac Help-Open a printer software program or application, and then click Help. Notes: • ...
...and printing documents and photos • Setting up and configuring the printer on a network, depending on your printer, read the User's Guide carefully, and make sure you check the latest updates on the Lexmark Web site at http://support.lexmark.com. User's Guide-The User's Guide is also available on ...our Web site. Windows or Mac Help-Open a printer software program or application, and then click Help. Notes: • ...

User's Guide
Page 8
... where purchased Warranty information varies by country or region: • In the US-See the Statement of Limited Warranty included with this printer, or at http://support.lexmark.com. • Rest of the ASHRAE 62 standard. • Provide a flat, sturdy, and stable surface. • Keep the... is important to install any options, leave enough room for the printer CAUTION-POTENTIAL INJURY: The printer weight is greater than 18 kg (40 lb) and requires two or more trained personnel to lift it here Lexmark Support Web site- Selecting a location for them also. Record the following ...
... where purchased Warranty information varies by country or region: • In the US-See the Statement of Limited Warranty included with this printer, or at http://support.lexmark.com. • Rest of the ASHRAE 62 standard. • Provide a flat, sturdy, and stable surface. • Keep the... is important to install any options, leave enough room for the printer CAUTION-POTENTIAL INJURY: The printer weight is greater than 18 kg (40 lb) and requires two or more trained personnel to lift it here Lexmark Support Web site- Selecting a location for them also. Record the following ...

User's Guide
Page 9
1 152.4 mm (6.0 in.) 2 101.6 mm (4.0 in.) 3 609.6 mm (24.0 in.) 4 152.4 mm (6.0 in.) 5 304.8 mm (12.0 in.) Learning about the printer 9
1 152.4 mm (6.0 in.) 2 101.6 mm (4.0 in.) 3 609.6 mm (24.0 in.) 4 152.4 mm (6.0 in.) 5 304.8 mm (12.0 in.) Learning about the printer 9
User's Guide
Page 10
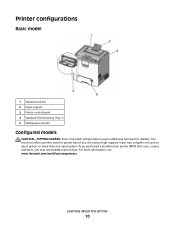
...furniture. For more than one input option. Learning about the printer 10 Printer configurations Basic model 1 Standard exit bin 2 Paper support 3 Printer control panel 4 Standard 550-sheet tray (Tray 1) 5... Multipurpose feeder Configured models CAUTION-TIPPING HAZARD: Floor-mounted configurations require additional furniture for stability. If you purchased a multifunction printer (MFP) that scans, copies, and faxes, you are using a high-capacity input tray, a duplex unit and an input option, or more information, see www.lexmark...
...furniture. For more than one input option. Learning about the printer 10 Printer configurations Basic model 1 Standard exit bin 2 Paper support 3 Printer control panel 4 Standard 550-sheet tray (Tray 1) 5... Multipurpose feeder Configured models CAUTION-TIPPING HAZARD: Floor-mounted configurations require additional furniture for stability. If you purchased a multifunction printer (MFP) that scans, copies, and faxes, you are using a high-capacity input tray, a duplex unit and an input option, or more information, see www.lexmark...

User's Guide
Page 11
1 Standard exit bin 2 Paper support 3 Printer control panel 4 Optional 550-sheet specialty media drawer 5 Optional 550-sheet tray 6 Optional 2,000-sheet tray 7 Standard 550-sheet tray (Tray 1) 8 Multipurpose feeder Learning about the printer 11
1 Standard exit bin 2 Paper support 3 Printer control panel 4 Optional 550-sheet specialty media drawer 5 Optional 550-sheet tray 6 Optional 2,000-sheet tray 7 Standard 550-sheet tray (Tray 1) 8 Multipurpose feeder Learning about the printer 11

User's Guide
Page 12
Attach a security lock to the printer in the location shown. Understanding the printer control panel Control panel item 1 Display 2 Select Description The display shows messages and pictures that communicate the status of the printer. Pressing initiates action on a menu item. Learning about the printer 12 When a lock compatible with most laptop computers is attached, the printer is equipped with a security lock feature. Using the security lock feature The printer is locked. Once locked, the metal plate and the system board cannot be removed.
Attach a security lock to the printer in the location shown. Understanding the printer control panel Control panel item 1 Display 2 Select Description The display shows messages and pictures that communicate the status of the printer. Pressing initiates action on a menu item. Learning about the printer 12 When a lock compatible with most laptop computers is attached, the printer is equipped with a security lock feature. Using the security lock feature The printer is locked. Once locked, the metal plate and the system board cannot be removed.

User's Guide
Page 13
...options is offered once Stopped appears on , but idle. • Solid red-Operator intervention is in Eco Mode. • Blinking green-The printer is warming up or down arrow button to another screen. Note: The button functions as Caps Lock, and includes the # character. Insert ...through values or text that rolls to scroll through Z, an , and a backspace button. Opens the menus index Note: These menus are available only when the printer is needed. enabled digital camera. Control panel item 3 Navigation buttons 4 Numeric keypad 5 Back 6 Indicator light 7 Stop 8 Menus 9 USB Direct port ...
...options is offered once Stopped appears on , but idle. • Solid red-Operator intervention is in Eco Mode. • Blinking green-The printer is warming up or down arrow button to another screen. Note: The button functions as Caps Lock, and includes the # character. Insert ...through values or text that rolls to scroll through Z, an , and a backspace button. Opens the menus index Note: These menus are available only when the printer is needed. enabled digital camera. Control panel item 3 Navigation buttons 4 Numeric keypad 5 Back 6 Indicator light 7 Stop 8 Menus 9 USB Direct port ...
User's Guide
Page 14
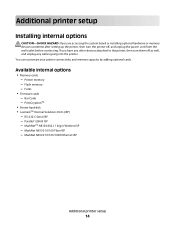
...-SHOCK HAZARD: If you have any other devices attached to the printer, then turn the printer off as well, and unplug any cables going into the printer. Printer memory - MarkNet N8130 10/100 Fiber ISP - PrintCryptionTM • Printer hard disk • LexmarkTM Internal Solutions Ports (ISP) - MarkNet...Code - Parallel 1284-B ISP - If you are accessing the system board or installing optional hardware or memory devices sometime after setting up the printer, then turn them off , and unplug the power cord from the wall outlet before continuing. Flash memory - RS-232-C Serial ISP -...
...-SHOCK HAZARD: If you have any other devices attached to the printer, then turn the printer off as well, and unplug any cables going into the printer. Printer memory - MarkNet N8130 10/100 Fiber ISP - PrintCryptionTM • Printer hard disk • LexmarkTM Internal Solutions Ports (ISP) - MarkNet...Code - Parallel 1284-B ISP - If you are accessing the system board or installing optional hardware or memory devices sometime after setting up the printer, then turn them off , and unplug the power cord from the wall outlet before continuing. Flash memory - RS-232-C Serial ISP -...

User's Guide
Page 15
Accessing the system board to install internal options CAUTION-SHOCK HAZARD: If you have any cables going into the printer. Note: This operation requires a flathead screwdriver. 1 Remove the cover. If you are accessing the system board or installing optional hardware or memory ...do not remove them off , and unplug the power cord from the wall outlet before continuing. Additional printer setup 15 c Pull the cover forward to the printer, then turn them . b Slide the cover up the printer, then turn the printer off as well, and unplug any other devices attached to remove it.
Accessing the system board to install internal options CAUTION-SHOCK HAZARD: If you have any cables going into the printer. Note: This operation requires a flathead screwdriver. 1 Remove the cover. If you are accessing the system board or installing optional hardware or memory ...do not remove them off , and unplug the power cord from the wall outlet before continuing. Additional printer setup 15 c Pull the cover forward to the printer, then turn them . b Slide the cover up the printer, then turn the printer off as well, and unplug any other devices attached to remove it.

User's Guide
Page 16
...system board or installing optional hardware or memory devices sometime after setting up the printer, then turn them off as well, and unplug any other devices attached to the printer, then turn the printer off, and unplug the power cord from the wall outlet before touching any system... 5 Dust cover Installing a memory card CAUTION-SHOCK HAZARD: If you have any cables going into the printer. 2 Use the following illustration to the system board. Touch something metal on the printer before continuing. If you are easily damaged by static electricity. To install the memory card: 1 Access...
...system board or installing optional hardware or memory devices sometime after setting up the printer, then turn them off as well, and unplug any other devices attached to the printer, then turn the printer off, and unplug the power cord from the wall outlet before touching any system... 5 Dust cover Installing a memory card CAUTION-SHOCK HAZARD: If you have any cables going into the printer. 2 Use the following illustration to the system board. Touch something metal on the printer before continuing. If you are easily damaged by static electricity. To install the memory card: 1 Access...

User's Guide
Page 17
3 Open the memory card connector latches. 4 Align the notch on the memory card with the ridge on the connector. 1 Notch 2 Ridge Additional printer setup 17
3 Open the memory card connector latches. 4 Align the notch on the memory card with the ridge on the connector. 1 Notch 2 Ridge Additional printer setup 17

User's Guide
Page 18
... or connectors. 1 Access the system board. 2 Unpack the card. Additional printer setup 18 5 Push the memory card straight into the connector until it snaps into the printer. Touch something metal on the printer before continuing. Note: Avoid touching the connection points along the edge of each...damaged by static electricity. If you are accessing the system board or installing optional hardware or memory devices sometime after setting up the printer, then turn them off , and unplug the power cord from the wall outlet before touching any cables going into place. 6 Reattach...
... or connectors. 1 Access the system board. 2 Unpack the card. Additional printer setup 18 5 Push the memory card straight into the connector until it snaps into the printer. Touch something metal on the printer before continuing. Note: Avoid touching the connection points along the edge of each...damaged by static electricity. If you are accessing the system board or installing optional hardware or memory devices sometime after setting up the printer, then turn them off , and unplug the power cord from the wall outlet before touching any cables going into place. 6 Reattach...

User's Guide
Page 19
3 Holding the card by its sides, align the plastic pins on the card with the holes on the card must touch and be flush against the system board. • Be careful not to damage the connectors. 5 Reattach the system board cover. Notes: • The entire length of the connector on the system board. 1 Plastic pins 2 Metal pins 4 Push the card firmly into place. Additional printer setup 19
3 Holding the card by its sides, align the plastic pins on the card with the holes on the card must touch and be flush against the system board. • Be careful not to damage the connectors. 5 Reattach the system board cover. Notes: • The entire length of the connector on the system board. 1 Plastic pins 2 Metal pins 4 Push the card firmly into place. Additional printer setup 19

User's Guide
Page 20
Note: This task requires a flathead screwdriver. Touch something metal on the system board. To remove the printer hard disk: Additional printer setup 20 Installing an Internal Solutions Port The system board supports one optional Lexmark Internal Solutions Port (ISP). Warning-Potential Damage: System board electronic components are accessing the system board or installing optional...
Note: This task requires a flathead screwdriver. Touch something metal on the system board. To remove the printer hard disk: Additional printer setup 20 Installing an Internal Solutions Port The system board supports one optional Lexmark Internal Solutions Port (ISP). Warning-Potential Damage: System board electronic components are accessing the system board or installing optional...

User's Guide
Page 21
a Unplug the printer hard disk interface cable from the system board, leaving the cable attached to disengage the latch before pulling the cable out. Additional printer setup 21 To unplug the cable, squeeze the paddle at the plug of the interface cable to the printer hard disk. b Remove the screws holding the printer hard disk in place.
a Unplug the printer hard disk interface cable from the system board, leaving the cable attached to disengage the latch before pulling the cable out. Additional printer setup 21 To unplug the cable, squeeze the paddle at the plug of the interface cable to the printer hard disk. b Remove the screws holding the printer hard disk in place.

