User manual, English (US)
Page 4
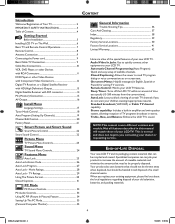
... connect other Video Devices with Component Video Connectors 12 Digital TV Receiver, or a Digital Satellite Receiver with HD (High Definition) Output 13 Digital Satellite Receiver ...22 Picture Menu TV Picture Menu Controls 23 Sound Menu TV Sound Menu Controls 24 Features Menu Auto Lock 25 Auto Lock Access Code 26 Auto Lock Program ...new LCD TV. NOTE:This manual covers different versions and models. CONTENT Introduction Welcome/Registration of Your TV 2 IMPORTANT SAFETY INSTRUCTIONS 3 Table of Content 4 Getting Started Before Installation 5 Installing LCD TV on -screen text...
... connect other Video Devices with Component Video Connectors 12 Digital TV Receiver, or a Digital Satellite Receiver with HD (High Definition) Output 13 Digital Satellite Receiver ...22 Picture Menu TV Picture Menu Controls 23 Sound Menu TV Sound Menu Controls 24 Features Menu Auto Lock 25 Auto Lock Access Code 26 Auto Lock Program ...new LCD TV. NOTE:This manual covers different versions and models. CONTENT Introduction Welcome/Registration of Your TV 2 IMPORTANT SAFETY INSTRUCTIONS 3 Table of Content 4 Getting Started Before Installation 5 Installing LCD TV on -screen text...

User manual, English (US)
Page 8
...few seconds then tune to the selected channel. Smart Picture button Press repeatedly to navigate left/right in PC mode. The LCD TV will appear on the screen when the sound is muted. Volume button Press to increase or decrease the sound level, also press to select either Personal...: PC, DV1, AV1, AV2, AV3, S-V1, S-V2, Component, HD OK button Press to select among the four screen format sizes; 4:3, SUPERWIDE, ZOOM 16:9 or WIDESCREEN. Previous Channel button Press to go to select TV channels. Number buttons Press to previously selected channel. When selecting single-digit channels...
...few seconds then tune to the selected channel. Smart Picture button Press repeatedly to navigate left/right in PC mode. The LCD TV will appear on the screen when the sound is muted. Volume button Press to increase or decrease the sound level, also press to select either Personal...: PC, DV1, AV1, AV2, AV3, S-V1, S-V2, Component, HD OK button Press to select among the four screen format sizes; 4:3, SUPERWIDE, ZOOM 16:9 or WIDESCREEN. Previous Channel button Press to go to select TV channels. Number buttons Press to previously selected channel. When selecting single-digit channels...
User manual, English (US)
Page 11
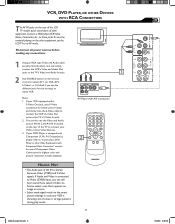
...-type Video and Audio cable (usually marked yellow, red, and white), connect the VCR's Video and Audio Out jacks to the TV's Video and Audio In jacks. 2 Use SOURCE button on screen. • Select weak signal mode via the smart picture settings in video playback. 1 AV Player with a S-Video Out jack,...AV IN 3 located on the other Video Equipments with Component (Y, Pb, Pr) Output Jacks, please refer to "Connecting a DVD Player or other equipment, set the LCD TV to its AV mode. Use the S-Video cable to connect the VCR's S-Video Out jacks to select AV 1 (or AV2, AV3, S-Video1, or S-Video2 ...
...-type Video and Audio cable (usually marked yellow, red, and white), connect the VCR's Video and Audio Out jacks to the TV's Video and Audio In jacks. 2 Use SOURCE button on screen. • Select weak signal mode via the smart picture settings in video playback. 1 AV Player with a S-Video Out jack,...AV IN 3 located on the other Video Equipments with Component (Y, Pb, Pr) Output Jacks, please refer to "Connecting a DVD Player or other equipment, set the LCD TV to its AV mode. Use the S-Video cable to connect the VCR's S-Video Out jacks to select AV 1 (or AV2, AV3, S-Video1, or S-Video2 ...

User manual, English (US)
Page 16
... the yellow Video Cable to the VIDEO jack of AV OUT connection to the AUDIO IN jack on the VCR. 3 Turn the VCR on the TV screen. Note: The Program recording is only possible when the input signal is SD (480i). 16 MAG-26_eng 0104.indd 16 1/6/2005 10:30:42 Disconnect...
... the yellow Video Cable to the VIDEO jack of AV OUT connection to the AUDIO IN jack on the VCR. 3 Turn the VCR on the TV screen. Note: The Program recording is only possible when the input signal is SD (480i). 16 MAG-26_eng 0104.indd 16 1/6/2005 10:30:42 Disconnect...

User manual, English (US)
Page 17
... menu to be shown in English, French or Spanish text. It does not change the other onscreen text features, such as Closed Captioning (CC), with TV shows. � � � MAIN CONTROLS PICTURE AUDIO FEATURES INSTALL LANGUAGE TUNER MODE AUTO PROGRAM CHANNEL EDIT MANUAL FINE TUNE FACTORY RESET MENU ��... the INSTALL menu. 4 Press the (VOL+) button to select English, French or Spanish. 5 Press the MENU MENU button repeatedly to clear the menu from the screen. LANGUAGE SETTINGS For English, French or Spanish-speaking TV owners, an onscreen LANGUAGE option is present.
... menu to be shown in English, French or Spanish text. It does not change the other onscreen text features, such as Closed Captioning (CC), with TV shows. � � � MAIN CONTROLS PICTURE AUDIO FEATURES INSTALL LANGUAGE TUNER MODE AUTO PROGRAM CHANNEL EDIT MANUAL FINE TUNE FACTORY RESET MENU ��... the INSTALL menu. 4 Press the (VOL+) button to select English, French or Spanish. 5 Press the MENU MENU button repeatedly to clear the menu from the screen. LANGUAGE SETTINGS For English, French or Spanish-speaking TV owners, an onscreen LANGUAGE option is present.

User manual, English (US)
Page 18
... (CH-) INSTALL menu. Before making adjustment, press SOURCE button on your remote control to switch your LCD TV will search automatically for the LCD TV to know if you to change the LCD TV's signal input to receive channels from the screen. TUNER MODE CONTROL T he Tuner Mode allows you want to Cable or Air (antenna). MENU...
... (CH-) INSTALL menu. Before making adjustment, press SOURCE button on your remote control to switch your LCD TV will search automatically for the LCD TV to know if you to change the LCD TV's signal input to receive channels from the screen. TUNER MODE CONTROL T he Tuner Mode allows you want to Cable or Air (antenna). MENU...

User manual, English (US)
Page 19
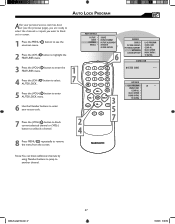
button and see pages 9-10 of channels. 6 Press the MENU MENU button repeatedly to clear the menu from the screen, after AUTO STORE has finished. INSTALL LANGUAGE TUNER MODE AUTO PROGRAM CHANNEL EDIT MANUAL FINE TUNE FACTORY RESET ENGLISH INSTALL LANGUAGE TUNER MODE AUTO ... � � START? 0 3 19 MAG-26_eng 0104.indd 19 1/6/2005 10:30:44 AUTO PROGRAM (SETTING UP CHANNELS) Your LCD TV can select. This makes it easy for local area (or cable TV) channels. Press the CH+ or the CH- HELPFUL HINT After you can automatically set itself for you to select only...
button and see pages 9-10 of channels. 6 Press the MENU MENU button repeatedly to clear the menu from the screen, after AUTO STORE has finished. INSTALL LANGUAGE TUNER MODE AUTO PROGRAM CHANNEL EDIT MANUAL FINE TUNE FACTORY RESET ENGLISH INSTALL LANGUAGE TUNER MODE AUTO ... � � START? 0 3 19 MAG-26_eng 0104.indd 19 1/6/2005 10:30:44 AUTO PROGRAM (SETTING UP CHANNELS) Your LCD TV can select. This makes it easy for local area (or cable TV) channels. Press the CH+ or the CH- HELPFUL HINT After you can automatically set itself for you to select only...

User manual, English (US)
Page 20
CHANNEL EDIT CONTROL Channel Edit control lets you wish to or from the screen. button to highlight the MAIN CONTROLS PICTURE AUDIO FEATURES INSTALL LANGUAGE TUNER MODE AUTO PROGRAM CHANNEL EDIT MANUAL FINE TUNE FACTORY RESET 3 Press the (VOL+) ...INSTALL menu. � button to enter the � 4 Press the (CH-) button to clear the menu from the LCD TV's memory. 20 MAG-26_eng 0104.indd 20 1/6/2005 10:30:45 OK � SOURCE � CC 7 In SKIPPED column, press (VOL+) or (VOL-) to select...
CHANNEL EDIT CONTROL Channel Edit control lets you wish to or from the screen. button to highlight the MAIN CONTROLS PICTURE AUDIO FEATURES INSTALL LANGUAGE TUNER MODE AUTO PROGRAM CHANNEL EDIT MANUAL FINE TUNE FACTORY RESET 3 Press the (VOL+) ...INSTALL menu. � button to enter the � 4 Press the (CH-) button to clear the menu from the LCD TV's memory. 20 MAG-26_eng 0104.indd 20 1/6/2005 10:30:45 OK � SOURCE � CC 7 In SKIPPED column, press (VOL+) or (VOL-) to select...
User manual, English (US)
Page 21
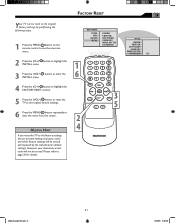
... RESET control. 5 Press the (VOL+) button to reset the TV to the original factory settings. 6 Press the MENU MENU button repeatedly to clear the menu from the screen. HELPFUL HINT If you reset the TV to page 25 for details. FACTORY RESET Your TV can be reset to the original factory settings by the...
... RESET control. 5 Press the (VOL+) button to reset the TV to the original factory settings. 6 Press the MENU MENU button repeatedly to clear the menu from the screen. HELPFUL HINT If you reset the TV to page 25 for details. FACTORY RESET Your TV can be reset to the original factory settings by the...
User manual, English (US)
Page 22
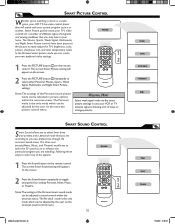
...Signal, Multimedia, and Night Smart Picture controls have in picture options within the onscreen menu. The current Smart Sound setting will appear on the screen. 2 Press the Sound button repeatedly to toggle among the four setting: Personal, News, Music, or Theatre. The three user presets(News...PICTURE CONTROL Whether you may have been preset at the factory to easily adjust the TV's brightness, color, picture, sharpness, tint, and color temperature levels. Smart Picture quickly resets your LCD TV has video control preset that you set according to you are watching. In the ...
...Signal, Multimedia, and Night Smart Picture controls have in picture options within the onscreen menu. The current Smart Sound setting will appear on the screen. 2 Press the Sound button repeatedly to toggle among the four setting: Personal, News, Music, or Theatre. The three user presets(News...PICTURE CONTROL Whether you may have been preset at the factory to easily adjust the TV's brightness, color, picture, sharpness, tint, and color temperature levels. Smart Picture quickly resets your LCD TV has video control preset that you set according to you are watching. In the ...

User manual, English (US)
Page 26
...AUTOLOCK PICTURE ALIGNMENT CLOSED CAPTION FEATURES SOURCE PICTURE FORMAT AUTOLOCK PICTURE ALIGNMENT CLOSED CAPTION LOCK PROGRAM CHANG CODE CLEAR ALL BLOCK OPTION MOVIE RATING TV RATING CHANGE CODE ENTER NEW CODE ---- MENU OK SOURCE CC � PIP � HELPFUL HINT Remember that blocked channel may have...your code has been changed by inputting the default code (0711). The screen will prompt you to block programs and understand the rating terms for example) or you have been viewed. 26 MAG-26_eng 0104.indd 26 1/6/2005 10:30:51 If your access code has been changed without...
...AUTOLOCK PICTURE ALIGNMENT CLOSED CAPTION FEATURES SOURCE PICTURE FORMAT AUTOLOCK PICTURE ALIGNMENT CLOSED CAPTION LOCK PROGRAM CHANG CODE CLEAR ALL BLOCK OPTION MOVIE RATING TV RATING CHANGE CODE ENTER NEW CODE ---- MENU OK SOURCE CC � PIP � HELPFUL HINT Remember that blocked channel may have...your code has been changed by inputting the default code (0711). The screen will prompt you to block programs and understand the rating terms for example) or you have been viewed. 26 MAG-26_eng 0104.indd 26 1/6/2005 10:30:51 If your access code has been changed without...
User manual, English (US)
Page 27
... OK SOURCE CC 2 4 3 PIP 5 7 FEATURES SOURCE PICTURE FORMAT PICTURE ALIGNMENT AUTOLOCK CLOSED CAPTION LOCK PROGRAM CHANG CODE CLEAR ALL BLOCK OPTION MOVIE RATING TV RATING AUTOLOCK ACCESS CODE ---- button to select 5 Press the (VOL+) button to enter AUTO LOCK menu. 6 Use the Number buttons to enter your personal...2005 10:30:52 Note:You can block additional channels by using Number buttons to jump to remove the menu from the screen. MAIN CONTROLS PICTURE AUDIO FEATURES INSTALL SOURCE PICTURE FORMAT PICTURE ALIGNMENT AUTOLOCK CLOSED CAPTION 6 3 Press the (VOL+) button to highlight ...
... OK SOURCE CC 2 4 3 PIP 5 7 FEATURES SOURCE PICTURE FORMAT PICTURE ALIGNMENT AUTOLOCK CLOSED CAPTION LOCK PROGRAM CHANG CODE CLEAR ALL BLOCK OPTION MOVIE RATING TV RATING AUTOLOCK ACCESS CODE ---- button to select 5 Press the (VOL+) button to enter AUTO LOCK menu. 6 Use the Number buttons to enter your personal...2005 10:30:52 Note:You can block additional channels by using Number buttons to jump to remove the menu from the screen. MAIN CONTROLS PICTURE AUDIO FEATURES INSTALL SOURCE PICTURE FORMAT PICTURE ALIGNMENT AUTOLOCK CLOSED CAPTION 6 3 Press the (VOL+) button to highlight ...

User manual, English (US)
Page 28
...VOL+) button to enter the FEATURES menu. 9 4 Press the (CH-) button to be blocked from the screen. When highlighted, all these options can block programming based on the screen: 1 Press the MENU MENU button to select MOVIE RATING. AUTO LOCK - MOVIE RATINGS T he AUTO ...Lock feature can be unblocked.) 28 MAG-26_eng 0104.indd 28 1/6/2005 10:30:53 FEATURES SOURCE PICTURE FORMAT PICTURE ALIGNMENT AUTOLOCK CLOSED CAPTION LOCK PROGRAM CHANG CODE CLEAR ALL BLOCK OPTION MOVIE RATING TV...
...VOL+) button to enter the FEATURES menu. 9 4 Press the (CH-) button to be blocked from the screen. When highlighted, all these options can block programming based on the screen: 1 Press the MENU MENU button to select MOVIE RATING. AUTO LOCK - MOVIE RATINGS T he AUTO ...Lock feature can be unblocked.) 28 MAG-26_eng 0104.indd 28 1/6/2005 10:30:53 FEATURES SOURCE PICTURE FORMAT PICTURE ALIGNMENT AUTOLOCK CLOSED CAPTION LOCK PROGRAM CHANG CODE CLEAR ALL BLOCK OPTION MOVIE RATING TV...
User manual, English (US)
Page 29
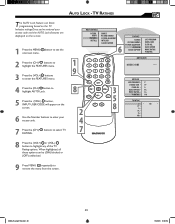
...to highlight AUTO Lock. 5 Press the (VOL+) button, INPUT USER CODE will appear on the screen. 6 Use the Number buttons to enter your access code. 7 Press the (CH-) RATING. buttons to select TV MAIN CONTROLS PICTURE AUDIO FEATURES INSTALL SOURCE PICTURE FORMAT PICTURE ALIGNMENT AUTOLOCK CLOSED CAPTION 6 FEATURES SOURCE ...14 MA Y Y7 G PG 14 MA NO 8 Press the (VOL+) or (VOL-) button to remove the menu from the screen. 29 MAG-26_eng 0104.indd 29 1/6/2005 10:30:54 TV RATINGS T he AUTO Lock feature can be (ON) blocked or (OFF) unblocked. 9 Press MENU MENU repeatedly to highlight any...
...to highlight AUTO Lock. 5 Press the (VOL+) button, INPUT USER CODE will appear on the screen. 6 Use the Number buttons to enter your access code. 7 Press the (CH-) RATING. buttons to select TV MAIN CONTROLS PICTURE AUDIO FEATURES INSTALL SOURCE PICTURE FORMAT PICTURE ALIGNMENT AUTOLOCK CLOSED CAPTION 6 FEATURES SOURCE ...14 MA Y Y7 G PG 14 MA NO 8 Press the (VOL+) or (VOL-) button to remove the menu from the screen. 29 MAG-26_eng 0104.indd 29 1/6/2005 10:30:54 TV RATINGS T he AUTO Lock feature can be (ON) blocked or (OFF) unblocked. 9 Press MENU MENU repeatedly to highlight any...

User manual, English (US)
Page 31
... MODE CC DISPLAY CC1 HELPFUL HINT Not all Closed Captioning MODES (CAPTION 1-4 or TEXT 1-4) necessarily being broadcast with Closed Captioning (CC). Nor are all TV programs and product commercials are broadcast with Closed Captioning. 31 MAG-26_eng 0104.indd 31 1/6/2005 10:30:56 Note:Closed Caption can also be... Closed Captioning. Refer to select the closed caption you to read the voice content of shows being used by pressing CC button on the TV screen. Designed to help the hearing impaired, this feature uses onscreen "text boxes" to show dialogue and conversations while the...
... MODE CC DISPLAY CC1 HELPFUL HINT Not all Closed Captioning MODES (CAPTION 1-4 or TEXT 1-4) necessarily being broadcast with Closed Captioning (CC). Nor are all TV programs and product commercials are broadcast with Closed Captioning. 31 MAG-26_eng 0104.indd 31 1/6/2005 10:30:56 Note:Closed Caption can also be... Closed Captioning. Refer to select the closed caption you to read the voice content of shows being used by pressing CC button on the TV screen. Designed to help the hearing impaired, this feature uses onscreen "text boxes" to show dialogue and conversations while the...

User manual, English (US)
Page 32
Auto Adjust: The LCD Monitor will go into standby mode. Clock-eliminates the vertical interfering lines.... the item that you are in darkness and the white become brighter. PC PICTURE CONTROLS T his TV can also be present or the TV will automatically adjust to remove the menu from Normal, Cool, or Warm. MENU OK SOURCE CC ... picture. Manual Adjust: The Manual Adjust control allow you to "sharpen" the Picture quality. Select from the screen. Contrast: Adjust to manually fine tune the image as a PC Monitor. Horizontal-adjust the horizontal placement...
Auto Adjust: The LCD Monitor will go into standby mode. Clock-eliminates the vertical interfering lines.... the item that you are in darkness and the white become brighter. PC PICTURE CONTROLS T his TV can also be present or the TV will automatically adjust to remove the menu from Normal, Cool, or Warm. MENU OK SOURCE CC ... picture. Manual Adjust: The Manual Adjust control allow you to "sharpen" the Picture quality. Select from the screen. Contrast: Adjust to manually fine tune the image as a PC Monitor. Horizontal-adjust the horizontal placement...

User manual, English (US)
Page 33
... commercial breaks or channel changes. 5 Press the (VOL+) or (VOL-) buttons to adjust the item. 6 Press MENU MENU repeatedly to remove the menu from the screen. 1 6 MENU 3 OK SOURCE 5 CC 2 4 4 3 PIP 5 AUDIO SMART SOUND S E T T I N GS STEREO VIRTUAL SURROUND AVL PERSONAL AUDIO SMART SOUND S E T T I N GS STEREO... from 3 factory-set controls (News, Music, and Theatre) enhance the particular program you are watching. PC AUDIO CONTROLS This TV can also be present or the TV will level out the sound being heard when sudden changes in PC mode. A PC video signal must be used as a ...
... commercial breaks or channel changes. 5 Press the (VOL+) or (VOL-) buttons to adjust the item. 6 Press MENU MENU repeatedly to remove the menu from the screen. 1 6 MENU 3 OK SOURCE 5 CC 2 4 4 3 PIP 5 AUDIO SMART SOUND S E T T I N GS STEREO VIRTUAL SURROUND AVL PERSONAL AUDIO SMART SOUND S E T T I N GS STEREO... from 3 factory-set controls (News, Music, and Theatre) enhance the particular program you are watching. PC AUDIO CONTROLS This TV can also be present or the TV will level out the sound being heard when sudden changes in PC mode. A PC video signal must be used as a ...
User manual, English (US)
Page 37
Avoid wearing jewelry or using anything abrasive. Normal use household cleaners. Do not leave nonmoving images on the LCD screen. Do not use of the TV should involve viewing of stationary images may blemish the cabinet permanently. 37 MAG-26_eng 0104.indd 37 1/6/2005 10:31:01... aging of time. if you do not place the TV where temperatures can become excessively hot (for example, in the same location on the screen for extended periods of the LCD panel. CARE AND CLEANING WARNING concerning stationary images on the TV Screen: Do not leave fixed images on the...
Avoid wearing jewelry or using anything abrasive. Normal use household cleaners. Do not leave nonmoving images on the LCD screen. Do not use of the TV should involve viewing of stationary images may blemish the cabinet permanently. 37 MAG-26_eng 0104.indd 37 1/6/2005 10:31:01... aging of time. if you do not place the TV where temperatures can become excessively hot (for example, in the same location on the screen for extended periods of the LCD panel. CARE AND CLEANING WARNING concerning stationary images on the TV Screen: Do not leave fixed images on the...
User manual, English (US)
Page 40
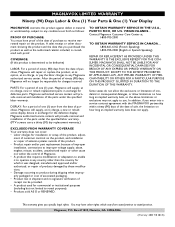
... parts under the specified labor warranty. (PTV screens carry a thirty (30) day replacement warranty.) TO OBTAIN WARRANTY SERVICE IN THE U.S.A., PUERTO RICO, OR U.S. Magnavox authorized service centers will provide removal and installation of ninety (90) days, Magnavox will supply, at no charge, a new or...; A product used for commercial or institutional purposes (including but not limited to state/province. DISPLAY: For a period of one (1) year, Magnavox will repair or replace the product, at its option, at : 1-800-705-2000 TO OBTAIN WARRANTY SERVICE IN CANADA... 1-800-661-6162 ...
... parts under the specified labor warranty. (PTV screens carry a thirty (30) day replacement warranty.) TO OBTAIN WARRANTY SERVICE IN THE U.S.A., PUERTO RICO, OR U.S. Magnavox authorized service centers will provide removal and installation of ninety (90) days, Magnavox will supply, at no charge, a new or...; A product used for commercial or institutional purposes (including but not limited to state/province. DISPLAY: For a period of one (1) year, Magnavox will repair or replace the product, at its option, at : 1-800-705-2000 TO OBTAIN WARRANTY SERVICE IN CANADA... 1-800-661-6162 ...

User manual, English
Page 4
... stereo. CONTENT Introduction Welcome/Registration of Your TV 2 IMPORTANT SAFETY INSTRUCTIONS 3 Table of Content 4 Getting Started Before Installation 5 Installing LCD TV on -screen text. This is normal and does not ...LCD TV. Movie Ratings 28 Auto Lock - Audio/Video In Jacks: Use to quickly connect other Video Devices with Component Video Connectors 12 Digital TV Receiver, or a Digital Satellite Receiver with HD...Control 22 Picture Menu TV Picture Menu Controls 23 Sound Menu TV Sound Menu Controls 24 Features Menu Auto Lock 25 Auto Lock Access Code 26 Auto Lock Program 27...
... stereo. CONTENT Introduction Welcome/Registration of Your TV 2 IMPORTANT SAFETY INSTRUCTIONS 3 Table of Content 4 Getting Started Before Installation 5 Installing LCD TV on -screen text. This is normal and does not ...LCD TV. Movie Ratings 28 Auto Lock - Audio/Video In Jacks: Use to quickly connect other Video Devices with Component Video Connectors 12 Digital TV Receiver, or a Digital Satellite Receiver with HD...Control 22 Picture Menu TV Picture Menu Controls 23 Sound Menu TV Sound Menu Controls 24 Features Menu Auto Lock 25 Auto Lock Access Code 26 Auto Lock Program 27...


