

Owners Manual
Page 2
..., gases or dust. Contain long hair. Be sure switch is unstable and may result in the presence of fire when used for the battery. Carrying tools with the specified charger for appropriate conditions. Cluttered benches and dark areas invite accidents. Power tools create sparks which it is left attached to a rotating part of fire. Remove adjusting keys or wrenches before inserting battery pack. Electrical Safety 10. Keep...
..., gases or dust. Contain long hair. Be sure switch is unstable and may result in the presence of fire when used for the battery. Carrying tools with the specified charger for appropriate conditions. Cluttered benches and dark areas invite accidents. Power tools create sparks which it is left attached to a rotating part of fire. Remove adjusting keys or wrenches before inserting battery pack. Electrical Safety 10. Keep...

Owners Manual
Page 3
... qualified repair personnel. Check the wheel carefully for flying sparks. Run the tool (with the switch is flawed, it will make a connection from tool or place the switch in wheel breakage. 9. Damage to damage the spindle, the flange (especially the installing surface) or the lock nut. Keep hands away from broken wheel fragments. 2. Such preventive safety measures reduce the risk of untrained users. 17. When servicing a tool, use safety...
... qualified repair personnel. Check the wheel carefully for flying sparks. Run the tool (with the switch is flawed, it will make a connection from tool or place the switch in wheel breakage. 9. Damage to damage the spindle, the flange (especially the installing surface) or the lock nut. Keep hands away from broken wheel fragments. 2. Such preventive safety measures reduce the risk of untrained users. 17. When servicing a tool, use safety...

Owners Manual
Page 4
... when you notice less tool power. 2. Be careful not to drop or strike battery. Always stop operating immediately. Charge the battery cartridge with the groove in easily, it is removed before insertion or removal of the battery cartridge. • To remove the battery cartridge, withdraw it into your eyesight. 5. Insert it fully until it may result in a fire. 8. V volts direct current no load speed .../min revolutions or...
... when you notice less tool power. 2. Be careful not to drop or strike battery. Always stop operating immediately. Charge the battery cartridge with the groove in easily, it is removed before insertion or removal of the battery cartridge. • To remove the battery cartridge, withdraw it into your eyesight. 5. Insert it fully until it may result in a fire. 8. V volts direct current no load speed .../min revolutions or...
Owners Manual
Page 5
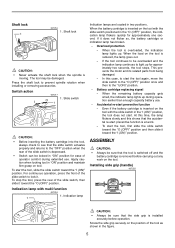
... enough capacity battery use . Shaft lock CAUTION: • Never actuate the shaft lock when the spindle is reduced, the lamp goes out. - Press the shaft lock to the "I (ON)" position. To start the tool again, move the slide switch to the "O (OFF)" position once and then to prevent spindle rotation when installing or removing accessories. If it . Accidental re-start preventive function is removed before operation. Screw the...
... enough capacity battery use . Shaft lock CAUTION: • Never actuate the shaft lock when the spindle is reduced, the lamp goes out. - Press the shaft lock to the "I (ON)" position. To start the tool again, move the slide switch to the "O (OFF)" position once and then to prevent spindle rotation when installing or removing accessories. If it . Accidental re-start preventive function is removed before operation. Screw the...

Owners Manual
Page 6
... tighten clockwise. 4 Installing or removing flex wheel (optional accessory) 007241 1 1. To remove wheel guard, follow the installation procedure in the same direction as the arrow for rotation provided on tool. Lock nut 2. Mount the inner flange onto the spindle so that the closed side of the wheel. Wheel guard 1 2. Installing or removing depressed center grind- ing wheel/Multi-disc 007219 1 1. Shaft lock CAUTION: • When using a depressed center grinding wheel/ Multi-disc, flex wheel, wire wheel brush, cut-off wheel...
... tighten clockwise. 4 Installing or removing flex wheel (optional accessory) 007241 1 1. To remove wheel guard, follow the installation procedure in the same direction as the arrow for rotation provided on tool. Lock nut 2. Mount the inner flange onto the spindle so that the closed side of the wheel. Wheel guard 1 2. Installing or removing depressed center grind- ing wheel/Multi-disc 007219 1 1. Shaft lock CAUTION: • When using a depressed center grinding wheel/ Multi-disc, flex wheel, wire wheel brush, cut-off wheel...

Owners Manual
Page 7
... also use the lock nut wrench and securely tighten clockwise. To remove the disc, follow the installation procedure in this manual. In general, keep the edge of the wheel or disc at an angle of the wheel in both A and B direction. Adjust pressure on the rubber pad and screw the lock nut onto the spindle. Do not attempt to make an excessive depth of cut up or kickback if the power tool is operated continuously...
... also use the lock nut wrench and securely tighten clockwise. To remove the disc, follow the installation procedure in this manual. In general, keep the edge of the wheel or disc at an angle of the wheel in both A and B direction. Adjust pressure on the rubber pad and screw the lock nut onto the spindle. Do not attempt to make an excessive depth of cut up or kickback if the power tool is operated continuously...

Owners Manual
Page 8
Lock nut 1 2. Inner flange 3 4. Operation with wire cup brush (optional accessory) 007242 1. Overstressing the wheel increases the loading and susceptibility to spindle. Remove the battery cartridge from the tool and place it upside down allowing easy access to use only the special wheel guard designed for use with cut -off wheel for side grinding. • Do not "jam" the wheel or apply excessive pressure. Abrasive cut -off wheels. • NEVER use wire wheel brush that the tool is...
Lock nut 1 2. Inner flange 3 4. Operation with wire cup brush (optional accessory) 007242 1. Overstressing the wheel increases the loading and susceptibility to spindle. Remove the battery cartridge from the tool and place it upside down allowing easy access to use only the special wheel guard designed for use with cut -off wheel for side grinding. • Do not "jam" the wheel or apply excessive pressure. Abrasive cut -off wheels. • NEVER use wire wheel brush that the tool is...

Owners Manual
Page 9
... with a guard for use with a depressed center grinding wheel, multi-disc, diamond wheel, flex wheel and wire wheel brush. Replace when they wear down to obtain and use of any other maintenance or adjustment should be used with your local Makita Service Center. • Various type of Makita genuine batteries and chargers 1 2 Use a screwdriver to you need any other accessories or attachments might present a risk of slotted bit screwdriver into the notch in this manual. Insert the...
... with a guard for use with a depressed center grinding wheel, multi-disc, diamond wheel, flex wheel and wire wheel brush. Replace when they wear down to obtain and use of any other maintenance or adjustment should be used with your local Makita Service Center. • Various type of Makita genuine batteries and chargers 1 2 Use a screwdriver to you need any other accessories or attachments might present a risk of slotted bit screwdriver into the notch in this manual. Insert the...

Owners Manual
Page 10
007245 1 2 2 8 2 12 13 3 3 9 11 3 4 46 10 14 5 7 5 5 1 Grip 36 2 Wheel gurad 3 Inner flange 45 4 4-1/2" Depressed center grinding wheel/4-1/2" Multi-disc/4-1/2"Diamond wheel 5 Lock nut 5/8-45 6 N/A 7 N/A 8 Rubber pad 100 9 Abrasive disc 10 Sanding lock nut 5/8-48 11 Wire wheel brush 12 Wire cup brush 13 Wheel guard (For cut-off wheel) 14 Cut-off wheel - Lock nut wrench 28 10
007245 1 2 2 8 2 12 13 3 3 9 11 3 4 46 10 14 5 7 5 5 1 Grip 36 2 Wheel gurad 3 Inner flange 45 4 4-1/2" Depressed center grinding wheel/4-1/2" Multi-disc/4-1/2"Diamond wheel 5 Lock nut 5/8-45 6 N/A 7 N/A 8 Rubber pad 100 9 Abrasive disc 10 Sanding lock nut 5/8-48 11 Wire wheel brush 12 Wire cup brush 13 Wheel guard (For cut-off wheel) 14 Cut-off wheel - Lock nut wrench 28 10

Owners Manual
Page 11
... defective workmanship or material, Makita will repair (or at our option, replace) without charge. THIS DISCLAIMER APPLIES BOTH DURING AND AFTER THE TERM OF THIS WARRANTY. This Warranty gives you specific legal rights, and you . 11 Should any trouble develop during this one of Makita's Factory or Authorized Service Centers. IN NO EVENT SHALL MAKITA BE LIABLE FOR ANY INDIRECT...
... defective workmanship or material, Makita will repair (or at our option, replace) without charge. THIS DISCLAIMER APPLIES BOTH DURING AND AFTER THE TERM OF THIS WARRANTY. This Warranty gives you specific legal rights, and you . 11 Should any trouble develop during this one of Makita's Factory or Authorized Service Centers. IN NO EVENT SHALL MAKITA BE LIABLE FOR ANY INDIRECT...
Parts Breakdown
Page 2
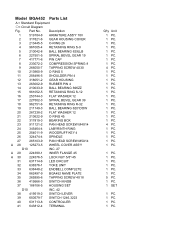
...-9 WOODRUFF KEY 4 26 324474-4 SPINDLE 27 265103-9 PAN HEAD SCREW M5X14 A 28 125273-5 WHEEL COVER ASS'Y 28 D10 INC. 27 A 29 224399-1 INNER FLANGE 45 A 30 31 32 224576-5 631714-6 638376-1 LOCK NUT 5/8"-45 LED CIRCUIT YOKE UNIT 33 638448-2 ENDBELL COMPLETE 34 862497-9 BGA452 NAME PLATE 35 265995-6 TAPPING SCREW 4X18 36 419566-3 SWITCH KNOB 37 188106-5 HOUSING SET 37 D10...
...-9 WOODRUFF KEY 4 26 324474-4 SPINDLE 27 265103-9 PAN HEAD SCREW M5X14 A 28 125273-5 WHEEL COVER ASS'Y 28 D10 INC. 27 A 29 224399-1 INNER FLANGE 45 A 30 31 32 224576-5 631714-6 638376-1 LOCK NUT 5/8"-45 LED CIRCUIT YOKE UNIT 33 638448-2 ENDBELL COMPLETE 34 862497-9 BGA452 NAME PLATE 35 265995-6 TAPPING SCREW 4X18 36 419566-3 SWITCH KNOB 37 188106-5 HOUSING SET 37 D10...
Parts Breakdown
Page 3
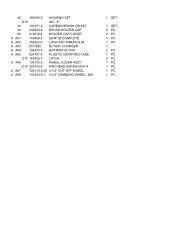
42 188106-5 HOUSING SET 42 D10 INC. 37 43 191971-3 CARBON BRUSH CB-430 44 643954-4 BRUSH HOLDER CAP 45 419518-4 HOLDER CAP COVER A A01 153489-2 GRIP 36 COMPLETE A A02 782422-3 LOCK NUT WRENCH 28 A A03 DC18SC DC18SC CHARGER A A04 194205-3 BATTERY BL1830 A A05 824767-4 PLASTIC CARRYING CASE A05 C10 163455-1 LATCH A A06 135103-2 WHEEL COVER ASS'Y A06 C10 265103-9 PAN HEAD SCREW M5X14 A A07 724115-A-25 4-1/2" CUT-OFF WHEEL A A08 741424-8-1 4-1/2" GRINDING WHEEL, #36 1 SET 0 1 SET 2 PC. 2 PC. 1 PC. 1 PC. 1 2 PC. 1 PC. 2 PC. 1 PC. 1 PC. 1 PC. 1 PC.
42 188106-5 HOUSING SET 42 D10 INC. 37 43 191971-3 CARBON BRUSH CB-430 44 643954-4 BRUSH HOLDER CAP 45 419518-4 HOLDER CAP COVER A A01 153489-2 GRIP 36 COMPLETE A A02 782422-3 LOCK NUT WRENCH 28 A A03 DC18SC DC18SC CHARGER A A04 194205-3 BATTERY BL1830 A A05 824767-4 PLASTIC CARRYING CASE A05 C10 163455-1 LATCH A A06 135103-2 WHEEL COVER ASS'Y A06 C10 265103-9 PAN HEAD SCREW M5X14 A A07 724115-A-25 4-1/2" CUT-OFF WHEEL A A08 741424-8-1 4-1/2" GRINDING WHEEL, #36 1 SET 0 1 SET 2 PC. 2 PC. 1 PC. 1 PC. 1 2 PC. 1 PC. 2 PC. 1 PC. 1 PC. 1 PC. 1 PC.


