Instruction Manual
Page 35
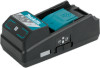
... settings. Registration lamp 3. NFC contact point 1 6. Install the adapter to the adapter. Installation screw holes 9. Battery compartment cover 8 6 7 9 8 WHAT YOU CAN DO WITH THE BPS01 The Battery Timer Setting Adapter (hereinafter referred to as "adapter" in "B" or "C" PIN code authentication feature A PIN code security feature is finished. Applicable lithium-ion battery cartridges BL1830B, BL1850B, BL1430B, and other battery cartridges with model numbers ending in this document) provides an antitheft solution for Makita-brand battery...
... settings. Registration lamp 3. NFC contact point 1 6. Install the adapter to the adapter. Installation screw holes 9. Battery compartment cover 8 6 7 9 8 WHAT YOU CAN DO WITH THE BPS01 The Battery Timer Setting Adapter (hereinafter referred to as "adapter" in "B" or "C" PIN code authentication feature A PIN code security feature is finished. Applicable lithium-ion battery cartridges BL1830B, BL1850B, BL1430B, and other battery cartridges with model numbers ending in this document) provides an antitheft solution for Makita-brand battery...
Instruction Manual
Page 36
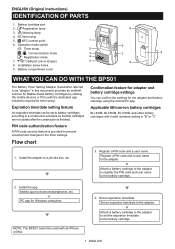
... the following list are included in the package. • Coin cell (CR2450) battery (x1, pre-installed) • Spanners (x4) • Spanner bit (x1) • Instruction manual (x1) • Quick start guide (x1) • CD-ROM (x1, incl. READ ALL INSTRUCTIONS BEFORE USING THIS APPLIANCE....adapter. • Do not expose the adapter to rain or snow. • Do not install the adapter in locations higher than specified. • Do not place the coin cell battery inside a pocket, bag, etc. Instruction manual and PC app) IMPORTANT SAFETY INSTRUCTIONS When using an electrical...
... the following list are included in the package. • Coin cell (CR2450) battery (x1, pre-installed) • Spanners (x4) • Spanner bit (x1) • Instruction manual (x1) • Quick start guide (x1) • CD-ROM (x1, incl. READ ALL INSTRUCTIONS BEFORE USING THIS APPLIANCE....adapter. • Do not expose the adapter to rain or snow. • Do not install the adapter in locations higher than specified. • Do not place the coin cell battery inside a pocket, bag, etc. Instruction manual and PC app) IMPORTANT SAFETY INSTRUCTIONS When using an electrical...
Instruction Manual
Page 37
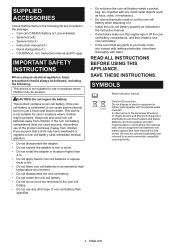
....) across. Installing the mobile app Supported mobile devices Mobile device OS NFC-enabled Android devices Android 4.2 or later Note that support for damages resulting from the Google Play Store. A Google account is only downloadable from the creation or use the Google ...USE Installing the adapter The adapter can be connected to the Google account sign-in page and create 1. Installing the mobile app The app is needed to 8 mm (5/16 in.) 3 ENGLISH NOTE: The mobile device must be installed to a board (up to a Wi-Fi network in thickness) such as the inner wall of Service...
....) across. Installing the mobile app Supported mobile devices Mobile device OS NFC-enabled Android devices Android 4.2 or later Note that support for damages resulting from the Google Play Store. A Google account is only downloadable from the creation or use the Google ...USE Installing the adapter The adapter can be connected to the Google account sign-in page and create 1. Installing the mobile app The app is needed to 8 mm (5/16 in.) 3 ENGLISH NOTE: The mobile device must be installed to a board (up to a Wi-Fi network in thickness) such as the inner wall of Service...
Instruction Manual
Page 38
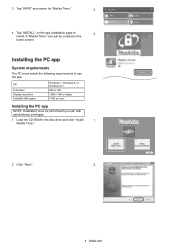
... or more Installing the PC app NOTE: Installation must satisfy the following requirements to 4. Click "Next." 2. 4 ENGLISH Makita Timer." 2. install. 3. A "Makita Timer" icon will be performed by a user with administrator privileges. 1. Load the CD-ROM in the disc drive and click "Install 1. Installing the PC app System requirements The PC must be created on the app installation page to use the app...
... or more Installing the PC app NOTE: Installation must satisfy the following requirements to 4. Click "Next." 2. 4 ENGLISH Makita Timer." 2. install. 3. A "Makita Timer" icon will be performed by a user with administrator privileges. 1. Load the CD-ROM in the disc drive and click "Install 1. Installing the PC app System requirements The PC must be created on the app installation page to use the app...
Instruction Manual
Page 40
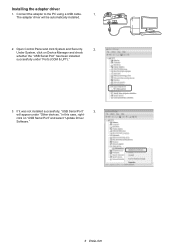
Connect the adapter to the PC using a USB cable. 1. If it was not installed successfully, "USB Serial Port" 3. will be automatically installed. 2. click on Device Manager and check whether the "USB Serial Port" has been installed successfully under "Other devices." In this case, right- The adapter driver will appear under "Ports (COM & LPT)." 3. Open Control Panel and click System and Security. 2. Under System, click on "USB Serial Port" and select "Update Driver Software." 6 ENGLISH Installing the adapter driver 1.
Connect the adapter to the PC using a USB cable. 1. If it was not installed successfully, "USB Serial Port" 3. will be automatically installed. 2. click on Device Manager and check whether the "USB Serial Port" has been installed successfully under "Other devices." In this case, right- The adapter driver will appear under "Ports (COM & LPT)." 3. Open Control Panel and click System and Security. 2. Under System, click on "USB Serial Port" and select "Update Driver Software." 6 ENGLISH Installing the adapter driver 1.
Instruction Manual
Page 42
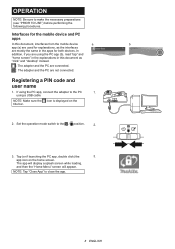
Set the operation mode switch to make the necessary preparations (see "PRIOR TO USE") before performing the following procedures. Interfaces for the mobile device and PC apps In this document as the interfaces are not connected. Tap (or if launching the PC app, double click) the 3. Registering a PIN code and user name 1. using the PC app, connect the adapter to...
Set the operation mode switch to make the necessary preparations (see "PRIOR TO USE") before performing the following procedures. Interfaces for the mobile device and PC apps In this document as the interfaces are not connected. Tap (or if launching the PC app, double click) the 3. Registering a PIN code and user name 1. using the PC app, connect the adapter to...
Instruction Manual
Page 43
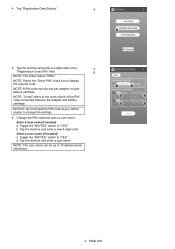
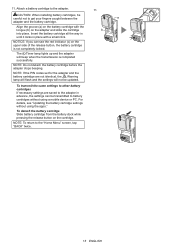
... "NO/YES" switch to display the entered code. Tap the text box and enter a new 4-digit code. 4. NOTE: A PIN code must be up to change the settings. 6. b. d. Tap the text box and enter a user name. NOTE: The initial code is "0000." NOTE: The user name can be set per adapter, not per battery cartridge. Enter a user name (if needed ) a. NOTE: Select the "Show PIN" check box...
... "NO/YES" switch to display the entered code. Tap the text box and enter a new 4-digit code. 4. NOTE: A PIN code must be up to change the settings. 6. b. d. Tap the text box and enter a user name. NOTE: The initial code is "0000." NOTE: The user name can be set per adapter, not per battery cartridge. Enter a user name (if needed ) a. NOTE: Select the "Show PIN" check box...
Instruction Manual
Page 45
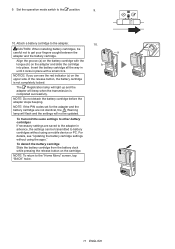
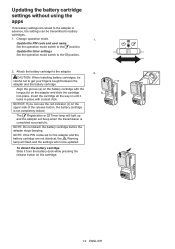
... in until it locks in advance, the settings can see "Updating the battery cartridge settings without using the apps." NOTE: If the PIN codes set for the adapter and the battery cartridge are saved to the adapter. 10. c CAUTION: When installing battery cartridges, be updated. NOTICE: If you can be transmitted to get your fingers caught between the a adapter and the battery cartridge. Set the operation mode switch to the...
... in until it locks in advance, the settings can see "Updating the battery cartridge settings without using the apps." NOTE: If the PIN codes set for the adapter and the battery cartridge are saved to the adapter. 10. c CAUTION: When installing battery cartridges, be updated. NOTICE: If you can be transmitted to get your fingers caught between the a adapter and the battery cartridge. Set the operation mode switch to the...
Instruction Manual
Page 46
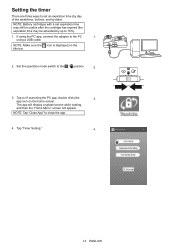
... a splash screen while loading, and then the "Home Menu" screen will appear. app icon on the title bar. 2. Set the operation mode switch to 10%). 1. Tap (or if launching the PC app, double click) the 3. Tap "Timer Setting." 4. 12 ENGLISH using the PC app, connect the adapter to the PC 1. NOTE: Battery cartridges with a set an expiration time (by...
... a splash screen while loading, and then the "Home Menu" screen will appear. app icon on the title bar. 2. Set the operation mode switch to 10%). 1. Tap (or if launching the PC app, double click) the 3. Tap "Timer Setting." 4. 12 ENGLISH using the PC app, connect the adapter to the PC 1. NOTE: Battery cartridges with a set an expiration time (by...
Instruction Manual
Page 49
... it locks in advance, the settings can see "Updating the battery cartridge settings without using the apps." NOTE: Do not detach the battery cartridge before the adapter stops beeping. To detach the battery cartridge Slide battery cartridge from the battery dock while pressing the release button on the upper side of the release button, the battery cartridge is completed successfully. c CAUTION: When installing battery cartridges, be updated. The Timer lamp lights up...
... it locks in advance, the settings can see "Updating the battery cartridge settings without using the apps." NOTE: Do not detach the battery cartridge before the adapter stops beeping. To detach the battery cartridge Slide battery cartridge from the battery dock while pressing the release button on the upper side of the release button, the battery cartridge is completed successfully. c CAUTION: When installing battery cartridges, be updated. The Timer lamp lights up...
Instruction Manual
Page 50
... loading, and then the "Home Menu" screen will flash. If the battery cartridge is past its expiration date, all segments of the level b indicator (a) on the upper side of the release button, the battery cartridge is displayed on the home screen. using the PC app, connect the adapter to the / position. 2. 3. Set the operation mode switch to the PC 1. Insert the battery...
... loading, and then the "Home Menu" screen will flash. If the battery cartridge is past its expiration date, all segments of the level b indicator (a) on the upper side of the release button, the battery cartridge is displayed on the home screen. using the PC app, connect the adapter to the / position. 2. 3. Set the operation mode switch to the PC 1. Insert the battery...

Instruction Manual
Page 52
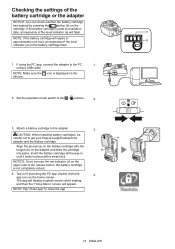
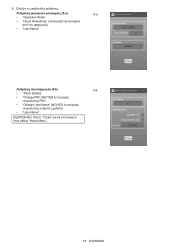
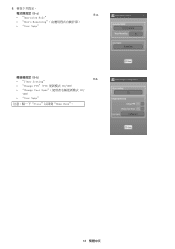
Check the following settings. 8. Battery cartridge settings (8-a) 8-a. • Operation Mode • Hours Remaining (automatically calculated by the app) • User Name Adapter settings (8-b) 8-b. • Timer Setting • Change PIN (PIN update mode NO/YES) • Change User Name (user name update mode NO/YES) • User Name NOTICE: Tap "Close" to return to the "Home Menu" screen. 18 ENGLISH
Check the following settings. 8. Battery cartridge settings (8-a) 8-a. • Operation Mode • Hours Remaining (automatically calculated by the app) • User Name Adapter settings (8-b) 8-b. • Timer Setting • Change PIN (PIN update mode NO/YES) • Change User Name (user name update mode NO/YES) • User Name NOTICE: Tap "Close" to return to the "Home Menu" screen. 18 ENGLISH
Instruction Manual
Page 53
... adapter and the battery cartridge are saved to the position. Change operation mode. 1. Update the PIN code and user name Set the operation mode switch to the adapter in advance, the settings can see the red indicator (c) on the battery cartridge with a small click. Insert the cartridge all the way in place with the tongue (b) on the cartridge. 19 ENGLISH To detach the battery cartridge Slide it locks...
... adapter and the battery cartridge are saved to the position. Change operation mode. 1. Update the PIN code and user name Set the operation mode switch to the adapter in advance, the settings can see the red indicator (c) on the battery cartridge with a small click. Insert the cartridge all the way in place with the tongue (b) on the cartridge. 19 ENGLISH To detach the battery cartridge Slide it locks...
Instruction Manual
Page 54
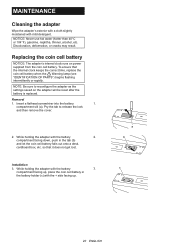
... release the lock and then remove the cover. 2. Pry the tab to reconfigure the adapter as the settings saved on power supplied from the coin cell battery. MAINTENANCE Cleaning the adapter Wipe the adapter's exterior with a cloth slightly moistened with the battery 2. NOTICE: Never use hot water (hotter than 40°C or 104°F), gasoline, naphtha, thinner, alcohol, etc. Insert a flathead screwdriver into the battery 1. Removal...
... release the lock and then remove the cover. 2. Pry the tab to reconfigure the adapter as the settings saved on power supplied from the coin cell battery. MAINTENANCE Cleaning the adapter Wipe the adapter's exterior with a cloth slightly moistened with the battery 2. NOTICE: Never use hot water (hotter than 40°C or 104°F), gasoline, naphtha, thinner, alcohol, etc. Insert a flathead screwdriver into the battery 1. Removal...
Instruction Manual
Page 56
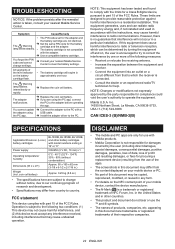
... PC. • No part of research and development. • Specifications may cause undesired operation. Set the same PIN code for help. If this document may cause harmful interference to the adapter before operating the app. You cannot update the adapter using the PC app, connect the PC to radio communications. Reorient or relocate the receiving antenna. - Install the adapter driver to radio or television...
... PC. • No part of research and development. • Specifications may cause undesired operation. Set the same PIN code for help. If this document may cause harmful interference to the adapter before operating the app. You cannot update the adapter using the PC app, connect the PC to radio communications. Reorient or relocate the receiving antenna. - Install the adapter driver to radio or television...
Instruction Manual
Page 228
8 8-a) 8-a. • "Operation Mode" • "Hours Remaining • "User Name" 8-b) 8-b. • "Timer Setting" • "Change PIN" (NO/YES PIN) • "Change User Name" (NO/YES • "User Name" Close Home Menu". 18
8 8-a) 8-a. • "Operation Mode" • "Hours Remaining • "User Name" 8-b) 8-b. • "Timer Setting" • "Change PIN" (NO/YES PIN) • "Change User Name" (NO/YES • "User Name" Close Home Menu". 18

Instruction Manual
Page 690
8 8-a) 8-a. • "Operation Mode" • "Hours Remaining • "User Name" 8-b) 8-b. • "Timer Setting" • "Change PIN NO/YES) • "Change User Name NO/YES) • "User Name" Close"返回到"Home Menu"画面。 18
8 8-a) 8-a. • "Operation Mode" • "Hours Remaining • "User Name" 8-b) 8-b. • "Timer Setting" • "Change PIN NO/YES) • "Change User Name NO/YES) • "User Name" Close"返回到"Home Menu"画面。 18
Instruction Manual
Page 712
8 8-a) 8-a. • "Operation Mode" • "Hours Remaining • "User Name" 8-b) 8-b. • "Timer Setting" • "Change PIN"(PIN NO/YES) • "Change User Name NO/ YES) • "User Name" Close"以回到"Home Menu"。 18
8 8-a) 8-a. • "Operation Mode" • "Hours Remaining • "User Name" 8-b) 8-b. • "Timer Setting" • "Change PIN"(PIN NO/YES) • "Change User Name NO/ YES) • "User Name" Close"以回到"Home Menu"。 18
Parts Breakdown
Page 2
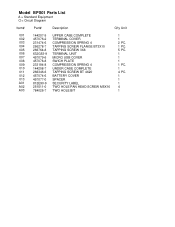
Model BPS01 Parts List A = Standard Equipment 〇= Circuit Diagram Item# Part# Description Q'ty Unit 001 144207-9 UPPER CASE COMPLETE 1 002 457076-2 TERMINAL COVER 1 003 231474-6 COMPRESSION SPRING 4 2 PC. 004 266278-7 TAPPING SCREW FLANGE BT3X10 1 PC. 005 266764-8 TAPPING SCREW 3X8 5 PC. 006 632G53-9 TERMINAL UNIT 1 007 457079-6 MICRO USB COVER 1 008 457078-8 SWICH PLATE 1 009 233194-8 COMPRESSION SPRING 4 1 PC. 010 144208-7 UNDER CASE COMPLETE...
Model BPS01 Parts List A = Standard Equipment 〇= Circuit Diagram Item# Part# Description Q'ty Unit 001 144207-9 UPPER CASE COMPLETE 1 002 457076-2 TERMINAL COVER 1 003 231474-6 COMPRESSION SPRING 4 2 PC. 004 266278-7 TAPPING SCREW FLANGE BT3X10 1 PC. 005 266764-8 TAPPING SCREW 3X8 5 PC. 006 632G53-9 TERMINAL UNIT 1 007 457079-6 MICRO USB COVER 1 008 457078-8 SWICH PLATE 1 009 233194-8 COMPRESSION SPRING 4 1 PC. 010 144208-7 UNDER CASE COMPLETE...
SYNC LOCKtm Quick Start Guide
Page 1
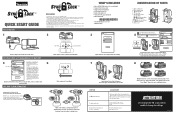
...) battery (x1, pre-installed) • Tamper Proof Screws (x4) • Tamper Proof Screw bit (x1) • Instruction manual (x1) • Quick start guide (x1) • Flash Drive (PC app / Software) • Micro USB Cable REQUIREMENTS • PC with micro USB cable. Click Registration Data Setting. 7 IDENTIFICATION OF PARTS 1. Operation mode switch 1 Timer Mode / Communication Mode 2 Registration Mode 3 6. Set PIN and User Name. Repeat for when you are using...
...) battery (x1, pre-installed) • Tamper Proof Screws (x4) • Tamper Proof Screw bit (x1) • Instruction manual (x1) • Quick start guide (x1) • Flash Drive (PC app / Software) • Micro USB Cable REQUIREMENTS • PC with micro USB cable. Click Registration Data Setting. 7 IDENTIFICATION OF PARTS 1. Operation mode switch 1 Timer Mode / Communication Mode 2 Registration Mode 3 6. Set PIN and User Name. Repeat for when you are using...


