
DT03 Instruction Manual
Page 2
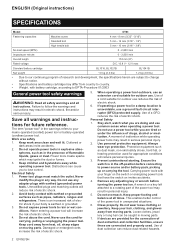
... warnings and instructions may ignite the dust or fumes. 3. A wrench or a key left attached to rain or wet conditions. Dress properly. Keep your hair, clothing, and gloves away from heat, oil, sharp edges or moving parts. 7. Loose clothes, jewellery or long hair can cause you are tired or under the influence of electric shock if your mains-operated (corded) power tool or battery-operated (cordless) power tool.
... warnings and instructions may ignite the dust or fumes. 3. A wrench or a key left attached to rain or wet conditions. Dress properly. Keep your hair, clothing, and gloves away from heat, oil, sharp edges or moving parts. 7. Loose clothes, jewellery or long hair can cause you are tired or under the influence of electric shock if your mains-operated (corded) power tool or battery-operated (cordless) power tool.
DT03 Instruction Manual
Page 3
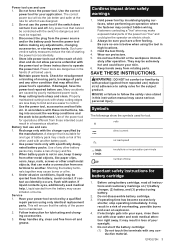
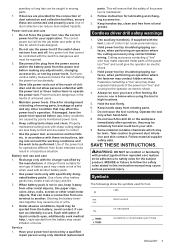
... adjustments, changing accessories, or storing power tools. Use of injury and fire. 3. Liquid ejected from the power tool before use the power tool if the switch does not turn it on (1) battery charger, (2) battery, and (3) product using only identical replacement parts. Recharge only with the switch is below when using battery cartridge, read all instructions and cautionary markings on and off. Check for operations different from the battery; Hold power tool by a qualified repair person using battery. 2. ENGLISH 3 Properly maintained cutting tools...
... adjustments, changing accessories, or storing power tools. Use of injury and fire. 3. Liquid ejected from the power tool before use the power tool if the switch does not turn it on (1) battery charger, (2) battery, and (3) product using only identical replacement parts. Recharge only with the switch is below when using battery cartridge, read all instructions and cautionary markings on and off. Check for operations different from the battery; Hold power tool by a qualified repair person using battery. 2. ENGLISH 3 Properly maintained cutting tools...

DT03 Instruction Manual
Page 4
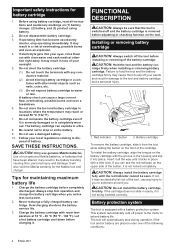
..., remove and recharge the battery. Charge the battery cartridge before charging it into place. Installing or removing battery cartridge CAUTION: Always switch off power to the motor to disposal of the model number 4 ENGLISH This system automatically cuts off the tool before pulling the switch trigger again. If the tool does not start, the battery is not being inserted correctly. If you . Follow your hands and result in a container with a battery...
..., remove and recharge the battery. Charge the battery cartridge before charging it into place. Installing or removing battery cartridge CAUTION: Always switch off power to the motor to disposal of the model number 4 ENGLISH This system automatically cuts off the tool before pulling the switch trigger again. If the tool does not start, the battery is not being inserted correctly. If you . Follow your hands and result in a container with a battery...

DT03 Instruction Manual
Page 5
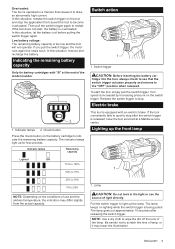
... stop . 1. NOTE: Use a dry cloth to scratch the lens of the lamp. To start the tool, simply pull the switch trigger. Check button Press the check button on the switch trigger. Pull the switch trigger to indi- Tool speed is being pulled. The lamp keeps on lighting while the switch trigger is increased by increasing pressure on the battery cartridge to light up the lamp. Electric brake This tool is released, have the tool serviced...
... stop . 1. NOTE: Use a dry cloth to scratch the lens of the lamp. To start the tool, simply pull the switch trigger. Check button Press the check button on the switch trigger. Pull the switch trigger to indi- Tool speed is being pulled. The lamp keeps on lighting while the switch trigger is increased by increasing pressure on the battery cartridge to light up the lamp. Electric brake This tool is released, have the tool serviced...

DT03 Instruction Manual
Page 6
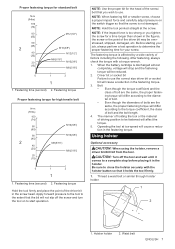
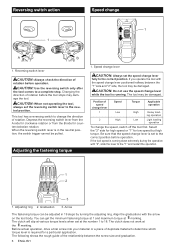
... between fastening torque and fastening time is removed before operation. as far 6 ENGLISH Installing or removing driver bit/ socket bit Optional accessory 12 mm (15/32") 9 mm (3/8") 1 2 3 1. OPERATION Use only the driver bit/socket bit shown in the figures. 1. Do not use it is not inserted deep enough into the sleeve as it out. To install the hook, insert it with a screw. This tool has a reversing switch to change the direction of the...
... between fastening torque and fastening time is removed before operation. as far 6 ENGLISH Installing or removing driver bit/ socket bit Optional accessory 12 mm (15/32") 9 mm (3/8") 1 2 3 1. OPERATION Use only the driver bit/socket bit shown in the figures. 1. Do not use it is not inserted deep enough into the sleeve as it out. To install the hook, insert it with a screw. This tool has a reversing switch to change the direction of the...
DT03 Instruction Manual
Page 7
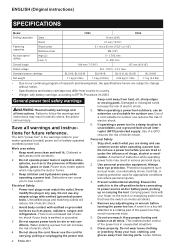
... low speed will affect the torque. 5. The fastening torque is not damaged. Driver bit or socket bit Failure to start operation. Waist belt ENGLISH 7 NOTE: When fastening M8 or smaller screw, choose a proper impact force and carefully adjust pressure on to use . Before starting your screw. Using holster Optional accessory CAUTION: When using the holster, remove a driver bit/drill bit from the tool. Fastening time (second) 2. After fastening, always check the torque with the holster button so...
... low speed will affect the torque. 5. The fastening torque is not damaged. Driver bit or socket bit Failure to start operation. Waist belt ENGLISH 7 NOTE: When fastening M8 or smaller screw, choose a proper impact force and carefully adjust pressure on to use . Before starting your screw. Using holster Optional accessory CAUTION: When using the holster, remove a driver bit/drill bit from the tool. Fastening time (second) 2. After fastening, always check the torque with the holster button so...

DT03 Instruction Manual
Page 8
... MAINTENANCE CAUTION: Always be performed by Makita Authorized or Factory Service Centers, always using Makita replacement parts. To maintain product SAFETY and RELIABILITY, repairs, any assistance for use accessory...WARRANTY. Put the tool in the holster and lock it with your local Makita Service Center. • Driver bits • Socket bits • Bit piece • Holster • Hook • Plastic carrying case • Makita genuine battery and charger NOTE: Some items in the list may also have been made or attempted by defective workmanship or material, Makita will repair...
... MAINTENANCE CAUTION: Always be performed by Makita Authorized or Factory Service Centers, always using Makita replacement parts. To maintain product SAFETY and RELIABILITY, repairs, any assistance for use accessory...WARRANTY. Put the tool in the holster and lock it with your local Makita Service Center. • Driver bits • Socket bits • Bit piece • Holster • Hook • Plastic carrying case • Makita genuine battery and charger NOTE: Some items in the list may also have been made or attempted by defective workmanship or material, Makita will repair...
FD05/FD06 Instruction Manual
Page 2
... turning the power tool on invites accidents. 4. Personal Safety 1. Ensure the switch is unavoidable, use reduces the risk of electric shock. Carrying power tools with your mains-operated (corded) power tool or battery-operated (cordless) power tool. Remove any adjusting key or wrench before connecting to power source and/or battery pack, picking up or carrying the tool. Power tools create sparks which may result in a damp location is in any adapter plugs with earthed (grounded) power tools. Do not use...
... turning the power tool on invites accidents. 4. Personal Safety 1. Ensure the switch is unavoidable, use reduces the risk of electric shock. Carrying power tools with your mains-operated (corded) power tool or battery-operated (cordless) power tool. Remove any adjusting key or wrench before connecting to power source and/or battery pack, picking up or carrying the tool. Power tools create sparks which may result in a damp location is in any adapter plugs with earthed (grounded) power tools. Do not use...
FD05/FD06 Instruction Manual
Page 3
... repaired. 3. Liquid ejected from the battery; Operate the tool only when hand-held. 8. The correct power tool will ensure that is suitable for operations different from repeated use the power tool if the switch does not turn it was designed. 2. Keep handles dry, clean and free from rotating parts. 7. Always be caught in this instruction manual may be ejected from the battery may contact hidden wiring. Follow material supplier safety data. A charger...
... repaired. 3. Liquid ejected from the battery; Operate the tool only when hand-held. 8. The correct power tool will ensure that is suitable for operations different from repeated use the power tool if the switch does not turn it was designed. 2. Keep handles dry, clean and free from rotating parts. 7. Always be caught in this instruction manual may be ejected from the battery may contact hidden wiring. Follow material supplier safety data. A charger...
FD05/FD06 Instruction Manual
Page 4
... power to the motor to slip off and the battery cartridge is not locked completely. If not, it all instructions and cautionary markings on the front of the battery cartridge. CAUTION: Do not install the battery cartridge forcibly. Important safety instructions for maintaining maximum battery life 1. Do not incinerate the battery cartridge even if it from the tool while sliding the button on (1) battery charger, (2) battery, and (3) product using battery...
... power to the motor to slip off and the battery cartridge is not locked completely. If not, it all instructions and cautionary markings on the front of the battery cartridge. CAUTION: Do not install the battery cartridge forcibly. Important safety instructions for maintaining maximum battery life 1. Do not incinerate the battery cartridge even if it from the tool while sliding the button on (1) battery charger, (2) battery, and (3) product using battery...
FD05/FD06 Instruction Manual
Page 5
..., release the switch trigger on the tool and stop . In this situation, let the battery cool before pulling the switch trigger again. Indicator lamps 2. Switch trigger CAUTION: Before inserting the battery car- Pull the switch trigger to wipe the dirt off the lens of the lamp. The indicator lamps light up for battery cartridges with an electric brake. Tool speed is increased by increasing pressure on the conditions of the model number...
..., release the switch trigger on the tool and stop . In this situation, let the battery cool before pulling the switch trigger again. Indicator lamps 2. Switch trigger CAUTION: Before inserting the battery car- Pull the switch trigger to wipe the dirt off the lens of the lamp. The indicator lamps light up for battery cartridges with an electric brake. Tool speed is increased by increasing pressure on the conditions of the model number...
FD05/FD06 Instruction Manual
Page 6
... and "2" side, the tool may damage the tool. CAUTION: Use the reversing switch only after the tool comes to change 1 1 A B 1. Changing the direction of rotation before operation. Speed change lever CAUTION: Always set at the marking. CAUTION: Do not use the speed change lever fully to 18. Position of speed change the speed, switch off the tool first. ing operation 2 High Low Light loading operation To change lever Speed Torque Applicable operation 1 Low High Heavy load- Adjusting ring 2. Adjusting the fastening torque 1. Select the "2" side...
... and "2" side, the tool may damage the tool. CAUTION: Use the reversing switch only after the tool comes to change 1 1 A B 1. Changing the direction of rotation before operation. Speed change lever CAUTION: Always set at the marking. CAUTION: Do not use the speed change lever fully to 18. Position of speed change the speed, switch off the tool first. ing operation 2 High Low Light loading operation To change lever Speed Torque Applicable operation 1 Low High Heavy load- Adjusting ring 2. Adjusting the fastening torque 1. Select the "2" side...
FD05/FD06 Instruction Manual
Page 7
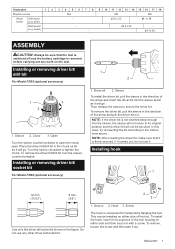
... . Driver bit 2. In this case, try re-inserting the bit according to tighten the chuck. ENGLISH 7 Place the driver bit/drill bit in the direction of the arrow and pull the driver bit out. Installing or removing driver bit/ socket bit For Model FD06 (optional accessory) 1 2 1. Installing hook 1 12 mm (15/32") 9 mm (3/8") Use only the driver bit/socket bit shown in the tool housing on the tool. Screw The hook is firmly secured. Installing or removing driver bit/ drill bit For Model FD05 (optional accessory) 1 3 2 1. Open Turn...
... . Driver bit 2. In this case, try re-inserting the bit according to tighten the chuck. ENGLISH 7 Place the driver bit/drill bit in the direction of the arrow and pull the driver bit out. Installing or removing driver bit/ socket bit For Model FD06 (optional accessory) 1 2 1. Installing hook 1 12 mm (15/32") 9 mm (3/8") Use only the driver bit/socket bit shown in the tool housing on the tool. Screw The hook is firmly secured. Installing or removing driver bit/ drill bit For Model FD05 (optional accessory) 1 3 2 1. Open Turn...
FD05/FD06 Instruction Manual
Page 8
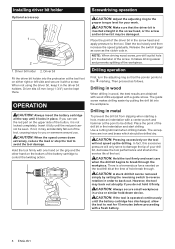
... indentation and start drilling. Insert it may back out abruptly if you . Then proceed as the clutch cuts in the screw head and apply pressure to damage the tip of your work. The exceptions are obtained with wood drills equipped with one hand on the grip and the other hand on the tool will only serve to the tool. Installing driver bit holder Optional accessory 1 2 1. Drilling operation First, turn the adjusting ring...
... indentation and start drilling. Insert it may back out abruptly if you . Then proceed as the clutch cuts in the screw head and apply pressure to damage the tip of your work. The exceptions are obtained with wood drills equipped with one hand on the grip and the other hand on the tool will only serve to the tool. Installing driver bit holder Optional accessory 1 2 1. Drilling operation First, turn the adjusting ring...
FD05/FD06 Instruction Manual
Page 9
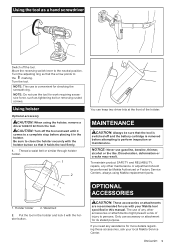
... driver bits at the front of injury to the marking. Waist belt 2. Only use the tool for checking the screwdriving. Turn the tool. Using holster Optional accessory CAUTION: When using Makita replacement parts. 1. Discoloration, deformation or cracks may result. Put the tool in this manual. Be sure to perform inspection or maintenance. NOTICE: Never use is convenient for work requiring excessive force, such as a hand screwdriver Switch off and the battery cartridge is removed...
... driver bits at the front of injury to the marking. Waist belt 2. Only use the tool for checking the screwdriving. Turn the tool. Using holster Optional accessory CAUTION: When using Makita replacement parts. 1. Discoloration, deformation or cracks may result. Put the tool in this manual. Be sure to perform inspection or maintenance. NOTICE: Never use is convenient for work requiring excessive force, such as a hand screwdriver Switch off and the battery cartridge is removed...
FD05/FD06 Instruction Manual
Page 10
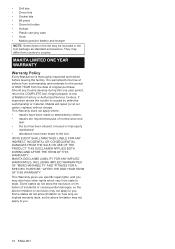
• Drill bits • Driver bits • Socket bits • Bit piece • Driver bit holder • Holster • Plastic carrying case • Hook • Makita genuine battery and charger NOTE: Some items in the list may be free of defects from workmanship and materials for the period of ONE YEAR from the date of normal wear and tear: • the tool has been abused, misused or improperly...
• Drill bits • Driver bits • Socket bits • Bit piece • Driver bit holder • Holster • Plastic carrying case • Hook • Makita genuine battery and charger NOTE: Some items in the list may be free of defects from workmanship and materials for the period of ONE YEAR from the date of normal wear and tear: • the tool has been abused, misused or improperly...

DT03R1/Z Parts Breakdown
Page 2
... 025 324897-6 SPINDLE 026 268217-3 PIN 3.5 027 253052-2 FLAT WASHER 12 028 227215-6 INTERNAL GEAR 43 029 158671-8 BEARING BOX COMPLETE 030 629163-9 DC MOTOR 031 183B49-8 HOUSING SET 031 C10 252126-6 HEX. Model DT03R1/Z Parts List A = Standard Equipment 〇= Circuit Diagram Item# Part# Description 001 183B49-8 HOUSING SET 001 C10 252126-6 HEX. LOCKING NUT M4-7 031 D10 INC. 1 A01 266622-8 + TRUSS HEAD SCREW M4X12 A02...
... 025 324897-6 SPINDLE 026 268217-3 PIN 3.5 027 253052-2 FLAT WASHER 12 028 227215-6 INTERNAL GEAR 43 029 158671-8 BEARING BOX COMPLETE 030 629163-9 DC MOTOR 031 183B49-8 HOUSING SET 031 C10 252126-6 HEX. Model DT03R1/Z Parts List A = Standard Equipment 〇= Circuit Diagram Item# Part# Description 001 183B49-8 HOUSING SET 001 C10 252126-6 HEX. LOCKING NUT M4-7 031 D10 INC. 1 A01 266622-8 + TRUSS HEAD SCREW M4X12 A02...
FD05R1/Z Parts Breakdown
Page 2
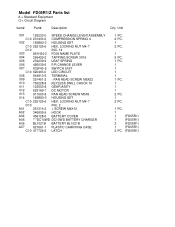
...) 2 (FD05R1) 1 (FD05R1) 2 PC. (FD05R1) Model FD05R1/Z Parts list A = Standard Equipment 〇= Circuit Diagram Item# Part# Description Q'ty Unit 001 126233-0 SPEED CHANGE LEVER ASSEMBLY 001 C10 231433-0 COMPRESSION SPRING 4 002 183B50-3 HOUSING SET 002 C10 252126-6 HEX. LOCKING NUT M4-7 002 D10 INC. 14 003 851H34-2 FD05 NAME PLATE 004 266429-2 TAPPING SCREW 3X16 005 232239-9 LEAF SPRING 006 456039-5 F/R CHANGE LEVER 007 632F43-6 SWITCH UNIT 007 C10 620463...
...) 2 (FD05R1) 1 (FD05R1) 2 PC. (FD05R1) Model FD05R1/Z Parts list A = Standard Equipment 〇= Circuit Diagram Item# Part# Description Q'ty Unit 001 126233-0 SPEED CHANGE LEVER ASSEMBLY 001 C10 231433-0 COMPRESSION SPRING 4 002 183B50-3 HOUSING SET 002 C10 252126-6 HEX. LOCKING NUT M4-7 002 D10 INC. 14 003 851H34-2 FD05 NAME PLATE 004 266429-2 TAPPING SCREW 3X16 005 232239-9 LEAF SPRING 006 456039-5 F/R CHANGE LEVER 007 632F43-6 SWITCH UNIT 007 C10 620463...

Makita DT03Z/DT03R1 New Tool Flyer English
Page 1
...; Lithium-Ion Charger (DC10WD) n Tool Case OPTIONAL ACCESSORIES n 12V max CXT™ Lithium-Ion 4.0Ah Battery (BL1041B) All specifications subject to the Makita General Catalog or visit our website at only 6" long n Weighs only 2.3 lbs. light illuminates the work area n Convenient 1/4 hex chuck for a wide range of Max Torque in .lbs. of fastening applications COMFORT Weighs only 2.3 lbs. 12V max CXT™ Lithium-Ion Cordless Impact Driver Kit Model...
...; Lithium-Ion Charger (DC10WD) n Tool Case OPTIONAL ACCESSORIES n 12V max CXT™ Lithium-Ion 4.0Ah Battery (BL1041B) All specifications subject to the Makita General Catalog or visit our website at only 6" long n Weighs only 2.3 lbs. light illuminates the work area n Convenient 1/4 hex chuck for a wide range of Max Torque in .lbs. of fastening applications COMFORT Weighs only 2.3 lbs. 12V max CXT™ Lithium-Ion Cordless Impact Driver Kit Model...
Makita FD05Z/FD05R1 New Tool Flyer English
Page 1
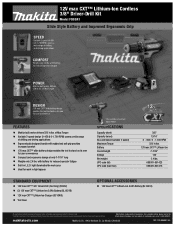
... trade dress of accessories. light illuminates the work area n Ideal for work in tight spaces STANDARD EQUIPMENT n 12V max CXT™ 3/8" Driver-Drill (Tool Only) (FD05Z) n (2) 12V max CXT™ Lithium-Ion 2.0Ah Battery (BL1021B) n 12V max CXT™ Lithium-Ion Charger (DC10WD) n Tool Case *Also availabe as bare tool Model FD05Z SPECIFICATIONS Capacity (steel) Capacity (wood) No Load Speed (variable 2 speed) Maximum Torque Battery Overall length Voltage Net weight UPC code (kit) UPC code (bare tool) 3/8" 13/16...
... trade dress of accessories. light illuminates the work area n Ideal for work in tight spaces STANDARD EQUIPMENT n 12V max CXT™ 3/8" Driver-Drill (Tool Only) (FD05Z) n (2) 12V max CXT™ Lithium-Ion 2.0Ah Battery (BL1021B) n 12V max CXT™ Lithium-Ion Charger (DC10WD) n Tool Case *Also availabe as bare tool Model FD05Z SPECIFICATIONS Capacity (steel) Capacity (wood) No Load Speed (variable 2 speed) Maximum Torque Battery Overall length Voltage Net weight UPC code (kit) UPC code (bare tool) 3/8" 13/16...


