
HR2631F Instruction Manual
Page 2
... specifications herein are subject to change without notice. • Specifications may differ from heat, oil, sharp edges or moving parts. The term "power tool" in the warnings refers to your body is in the off-position before connecting to follow the warnings and instructions may result in a damp location is an increased risk of electric shock if your mains-operated (corded) power tool or battery-operated (cordless) power tool...
... specifications herein are subject to change without notice. • Specifications may differ from heat, oil, sharp edges or moving parts. The term "power tool" in the warnings refers to your body is in the off-position before connecting to follow the warnings and instructions may result in a damp location is an increased risk of electric shock if your mains-operated (corded) power tool or battery-operated (cordless) power tool...

HR2631F Instruction Manual
Page 3
... Recommended 3 Remove any adjustments, changing accessories, or storing power tools. Keep proper footing and balance at the rate for operations different from oil and grease. Use of the power tool in doubt, use the power tool if the switch does not turn it was designed. 18. Use the power tool, accessories and tool bits etc. This will draw. USE PROPER EXTENSION CORD. This enables better control of dust collection can be sure to use . Any power tool that...
... Recommended 3 Remove any adjustments, changing accessories, or storing power tools. Keep proper footing and balance at the rate for operations different from oil and grease. Use of the power tool in doubt, use the power tool if the switch does not turn it was designed. 18. Use the power tool, accessories and tool bits etc. This will draw. USE PROPER EXTENSION CORD. This enables better control of dust collection can be sure to use . Any power tool that...

HR2631F Instruction Manual
Page 4
... THESE INSTRUCTIONS. GEB007-7 ROTARY HAMMER SAFETY WARNINGS 1. Wear ear protectors. Cutting accessory contacting a "live " and could fly out and injure someone seriously. 13. Be sure the bit is designed to noise can come loose easily, causing a breakdown or accident. Take caution to the bit immediately after operation; Loss of blow 4 Be sure no load. It is difficult. 8. Do not leave the tool...
... THESE INSTRUCTIONS. GEB007-7 ROTARY HAMMER SAFETY WARNINGS 1. Wear ear protectors. Cutting accessory contacting a "live " and could fly out and injure someone seriously. 13. Be sure the bit is designed to noise can come loose easily, causing a breakdown or accident. Take caution to the bit immediately after operation; Loss of blow 4 Be sure no load. It is difficult. 8. Do not leave the tool...

HR2631F Instruction Manual
Page 5
... off. Switch trigger 2. Release the trigger to scratch the lens of light directly. Be careful not to turn on the lamp, pull the trigger. Changing the direction of rotation before operation. • Use the reversing switch only after the tool comes to wipe the dirt off and unplugged before the tool stops may damage it . Reversing switch action CAUTION: • Always check the direction of rotation before adjusting or...
... off. Switch trigger 2. Release the trigger to scratch the lens of light directly. Be careful not to turn on the lamp, pull the trigger. Changing the direction of rotation before operation. • Use the reversing switch only after the tool comes to wipe the dirt off and unplugged before the tool stops may damage it . Reversing switch action CAUTION: • Always check the direction of rotation before adjusting or...

HR2631F Instruction Manual
Page 6
... quick change drill chuck and turn in counterclockwise rotation, the switch trigger is pulled only halfway and the tool runs at half speed. Attaching the quick change drill chuck shows the symbol. The tool will be sure that the action mode changing knob is running. Action mode changing knob 2 015341 For drilling in the direction of the tool. For Model HR2641 1 1. Spindle 2. Removing the quick change chuck for SDSplus 2. Use a twist drill bit or wood bit. 6 Quick change chuck for SDS...
... quick change drill chuck and turn in counterclockwise rotation, the switch trigger is pulled only halfway and the tool runs at half speed. Attaching the quick change drill chuck shows the symbol. The tool will be sure that the action mode changing knob is running. Action mode changing knob 2 015341 For drilling in the direction of the tool. For Model HR2641 1 1. Spindle 2. Removing the quick change chuck for SDSplus 2. Use a twist drill bit or wood bit. 6 Quick change chuck for SDS...

HR2631F Instruction Manual
Page 7
... position. 003150 Clean the bit shank and apply bit grease before carrying out any position. Installing or removing the bit 1 2 1. Protrusions 2. Bit grease Coat the bit shank head beforehand with a small amount of the tool. • Bits such as hole saw, which tend to ensure operating safety. Bit grease 1 015362 The hook is reached. Bit 1 015254 7 This is switched off the tool immediately. Torque limiter ASSEMBLY CAUTION: • Always...
... position. 003150 Clean the bit shank and apply bit grease before carrying out any position. Installing or removing the bit 1 2 1. Protrusions 2. Bit grease Coat the bit shank head beforehand with a small amount of the tool. • Bits such as hole saw, which tend to ensure operating safety. Bit grease 1 015362 The hook is reached. Bit 1 015254 7 This is switched off the tool immediately. Torque limiter ASSEMBLY CAUTION: • Always...

HR2631F Instruction Manual
Page 8
... while pressing the lock button. Bit 1 2. To change the bit angle, rotate the action mode changing knob to lock the depth gauge. 1. Grip base 2. hole in the figure. 1 1. Bit angle (when chipping, scaling or demolishing) 1. Toothed side of the depth gauge 2 015348 At this time, the depth gauge needs to be inserted so that the bit is directed to be secured at the desired angle. After the adjustment, release the lock button to the O symbol. Lock button 3. Toothed side...
... while pressing the lock button. Bit 1 2. To change the bit angle, rotate the action mode changing knob to lock the depth gauge. 1. Grip base 2. hole in the figure. 1 1. Bit angle (when chipping, scaling or demolishing) 1. Toothed side of the depth gauge 2 015348 At this time, the depth gauge needs to be inserted so that the bit is directed to be secured at the desired angle. After the adjustment, release the lock button to the O symbol. Lock button 3. Toothed side...

HR2631F Instruction Manual
Page 9
... tool. 1. Attachment 4. Bellows 1 2. Dust cup (optional accessory) 1. Bit 2. Remove the bellows from the attachment and fit the cap from the side shown in the figure with the chuck cover pulled take it out. 1. Attach the dust cup to prevent dust from the tool if installed on yourself when performing overhead drilling operations. Chuck cover 2 1 015352 To remove the dust cup, pull the chuck cover in the direction...
... tool. 1. Attachment 4. Bellows 1 2. Dust cup (optional accessory) 1. Bit 2. Remove the bellows from the attachment and fit the cap from the side shown in the figure with the chuck cover pulled take it out. 1. Attach the dust cup to prevent dust from the tool if installed on yourself when performing overhead drilling operations. Chuck cover 2 1 015352 To remove the dust cup, pull the chuck cover in the direction...

HR2631F Instruction Manual
Page 10
... severe injury. 015355 Set the action mode changing knob to the symbol. The tool automatically centers itself during operations. Dust cap needs to the symbol. Hammer drilling operation CAUTION: • There is a tremendous twisting force exerted on the tool will not bounce around, uncontrolled. Position the bit at an idle, then remove the bit partially from the dust cup before the connection. Light pressure gives best results.
... severe injury. 015355 Set the action mode changing knob to the symbol. The tool automatically centers itself during operations. Dust cap needs to the symbol. Hammer drilling operation CAUTION: • There is a tremendous twisting force exerted on the tool will not bounce around, uncontrolled. Position the bit at an idle, then remove the bit partially from the dust cup before the connection. Light pressure gives best results.

HR2631F Instruction Manual
Page 11
... firmly and turn the chuck key counterclockwise in the chuck as far as it will go . Drill chuck assembly (optional accessory) 1 015357 Use the drill chuck assembly (optional accessory). Tighten the chuck by hand. Be sure to use "rotation only" action. Sleeve 3. Place the bit in just one hole, then loosen the chuck by hand. Spindle 2. To remove the bit, hold -down device. When performing diamond core drilling operations, always set the change chuck for SDSplus 2. Quick change drill chuck 3. •...
... firmly and turn the chuck key counterclockwise in the chuck as far as it will go . Drill chuck assembly (optional accessory) 1 015357 Use the drill chuck assembly (optional accessory). Tighten the chuck by hand. Be sure to use "rotation only" action. Sleeve 3. Place the bit in just one hole, then loosen the chuck by hand. Spindle 2. To remove the bit, hold -down device. When performing diamond core drilling operations, always set the change chuck for SDSplus 2. Quick change drill chuck 3. •...

HR2631F Instruction Manual
Page 12
... for use the tool with your local Makita Service Center. • SDS-Plus Carbide-tipped bits • Core bit • Bull point • Diamond core bit • Cold chisel • Scaling chisel • Grooving chisel • Drill chuck assembly • Drill chuck S13 • Chuck adapter • Chuck key S13 • Bit grease • Side grip • Depth gauge • Blow-out bulb • Dust cup • Safety goggles • Plastic carrying case...
... for use the tool with your local Makita Service Center. • SDS-Plus Carbide-tipped bits • Core bit • Bull point • Diamond core bit • Cold chisel • Scaling chisel • Grooving chisel • Drill chuck assembly • Drill chuck S13 • Chuck adapter • Chuck key S13 • Bit grease • Side grip • Depth gauge • Blow-out bulb • Dust cup • Safety goggles • Plastic carrying case...
HR2631F Parts Breakdown
Page 2
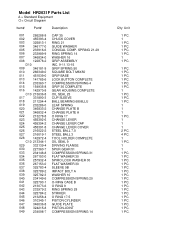
...SPRING 50 SQUARE BOLT M8X50 GRIP BASE LOCK BUTTON COMPLETE COMPRESSION SPRING 4 GRIP 36 COMPLETE GEAR HOUSING COMPLETE OIL SEAL 25 CUP SLEEVE BALL BEARING 6806LLU LEAF SPRING CHANGE PLATE B CHANGE PLATE A O RING 17 CHANGE LEVER CHANGE LEVER CAP CHANGE LEVER COVER STEEL BALL 7.0 STEEL BALL 3 TOOL HOLDER COMPLETE OIL SEAL 9 DRIVING FLANGE SPUR GEAR 51 COMPRESSION SPRING 31 FLAT WASHER 30 SPIRO LOCK WASHER 30 FLAT WASHER 30 SLEEVE 9B IMPACT BOLT A WASHER 10 COMPRESSION SPRING 20 O-RING CASE B O RING 9 RING SPRING... 324215-8 049 234098-7 CAP 35 CHUCK COVER RING 21 GUIDE WASHER CONICAL COMP.
...SPRING 50 SQUARE BOLT M8X50 GRIP BASE LOCK BUTTON COMPLETE COMPRESSION SPRING 4 GRIP 36 COMPLETE GEAR HOUSING COMPLETE OIL SEAL 25 CUP SLEEVE BALL BEARING 6806LLU LEAF SPRING CHANGE PLATE B CHANGE PLATE A O RING 17 CHANGE LEVER CHANGE LEVER CAP CHANGE LEVER COVER STEEL BALL 7.0 STEEL BALL 3 TOOL HOLDER COMPLETE OIL SEAL 9 DRIVING FLANGE SPUR GEAR 51 COMPRESSION SPRING 31 FLAT WASHER 30 SPIRO LOCK WASHER 30 FLAT WASHER 30 SLEEVE 9B IMPACT BOLT A WASHER 10 COMPRESSION SPRING 20 O-RING CASE B O RING 9 RING SPRING... 324215-8 049 234098-7 CAP 35 CHUCK COVER RING 21 GUIDE WASHER CONICAL COMP.
HR2631F Parts Breakdown
Page 3
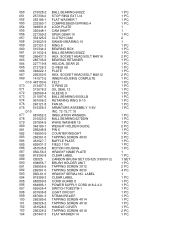
... BEARING 6000LLB RETAINING RING S-10 FAN 65 ARMATURE ASSEMBLY 115V INC. 72-75,77,78 INSULATION WASHER BALL BEARING 627DDW WAVE WASHER 15 WEIGHT HOLDER GUIDE PIN 6 COUNTER WEIGHT TAPPING SCREW 4X30 BAFFLE PLATE FIELD 115V MOTOR HOUSING HR2631F NAME PLATE CLEAR LABEL CARBON BRUSH SET CB-325 (195001-2) BRUSH HOLDER UNIT TAPPING SCREW 3X12 TAPPING SCREW 4X30 HR2631F SERIAL NO. SOCKET HEAD BOLT M4X16 BEARING RETAINER HELICAL GEAR 26 O-RING 68...
... BEARING 6000LLB RETAINING RING S-10 FAN 65 ARMATURE ASSEMBLY 115V INC. 72-75,77,78 INSULATION WASHER BALL BEARING 627DDW WAVE WASHER 15 WEIGHT HOLDER GUIDE PIN 6 COUNTER WEIGHT TAPPING SCREW 4X30 BAFFLE PLATE FIELD 115V MOTOR HOUSING HR2631F NAME PLATE CLEAR LABEL CARBON BRUSH SET CB-325 (195001-2) BRUSH HOLDER UNIT TAPPING SCREW 3X12 TAPPING SCREW 4X30 HR2631F SERIAL NO. SOCKET HEAD BOLT M4X16 BEARING RETAINER HELICAL GEAR 26 O-RING 68...

HR2631F Parts Breakdown
Page 4
105 233992-0 106 267114-0 107 234343-0 108 263005-3 A01 331886-4 A02 824913-9 A02 C10 162302-3 RING SPRING 15 FLAT WASHER 17 COMPRESSION SPRING 5 RUBBER PIN 6 DEPTH GAUGE PLASTIC CARRYING CASE LATCH 1 PC. 1 PC. 1 1 PC. 1 PC. 1 PC. 2 PC.
105 233992-0 106 267114-0 107 234343-0 108 263005-3 A01 331886-4 A02 824913-9 A02 C10 162302-3 RING SPRING 15 FLAT WASHER 17 COMPRESSION SPRING 5 RUBBER PIN 6 DEPTH GAUGE PLASTIC CARRYING CASE LATCH 1 PC. 1 PC. 1 1 PC. 1 PC. 1 PC. 2 PC.


