
Owners Manual
Page 1
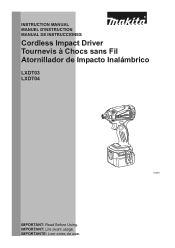
IMPORTANT: Lire avant usage. IMPORTANTE: Leer antes de usar. 1 INSTRUCTION MANUAL MANUEL D'INSTRUCTION MANUAL DE INSTRUCCIONES Cordless Impact Driver Tournevis à Chocs sans Fil Atornillador de Impacto Inalámbrico LXDT03 LXDT04 012011 IMPORTANT: Read Before Using.
IMPORTANT: Lire avant usage. IMPORTANTE: Leer antes de usar. 1 INSTRUCTION MANUAL MANUEL D'INSTRUCTION MANUAL DE INSTRUCCIONES Cordless Impact Driver Tournevis à Chocs sans Fil Atornillador de Impacto Inalámbrico LXDT03 LXDT04 012011 IMPORTANT: Read Before Using.
Owners Manual
Page 2
... starting. Ensure the switch is an increased risk of electric shock if your mains-operated (corded) power tool or battery-operated (cordless) power tool. Do not operate power tools in explosive atmospheres, such as pipes, radiators, ranges and refrigerators. There is in the off-position before connecting to lose control. When operating a power tool outdoors, use common sense when operating a power tool. Always wear eye protection. Save all instructions. Electrical Safety 4. Avoid body contact with battery...
... starting. Ensure the switch is an increased risk of electric shock if your mains-operated (corded) power tool or battery-operated (cordless) power tool. Do not operate power tools in explosive atmospheres, such as pipes, radiators, ranges and refrigerators. There is in the off-position before connecting to lose control. When operating a power tool outdoors, use common sense when operating a power tool. Always wear eye protection. Save all instructions. Electrical Safety 4. Avoid body contact with battery...
Owners Manual
Page 3
... of parts and any adjustments, changing accessories, or storing power tools. Follow instruction for your power tool serviced by the manufacturer. GEB054-1 CORDLESS IMPACT DRIVER SAFETY WARNINGS 1. Keep proper footing and balance at the rate for one terminal to safety rules for operations different from one type of battery pack may be caught in a hazardous situation. Dress properly. Power tool use and care 24. If damaged, have a firm footing. Battery tool use and care...
... of parts and any adjustments, changing accessories, or storing power tools. Follow instruction for your power tool serviced by the manufacturer. GEB054-1 CORDLESS IMPACT DRIVER SAFETY WARNINGS 1. Keep proper footing and balance at the rate for one terminal to safety rules for operations different from one type of battery pack may be caught in a hazardous situation. Dress properly. Power tool use and care 24. If damaged, have a firm footing. Battery tool use and care...
Owners Manual
Page 4
... excessively shorter, stop tool operation and charge the battery cartridge when you do not use a damaged battery. SAVE THESE INSTRUCTIONS. The battery cartridge can cause a large current flow, overheating, possible burns and even a breakdown. 6. Be careful not to water or rain. If electrolyte gets into your eyesight. 5. A battery short can explode in loss of blow IMPORTANT SAFETY INSTRUCTIONS ENC007-7 FOR BATTERY CARTRIDGE 1. Charge...
... excessively shorter, stop tool operation and charge the battery cartridge when you do not use a damaged battery. SAVE THESE INSTRUCTIONS. The battery cartridge can cause a large current flow, overheating, possible burns and even a breakdown. 6. Be careful not to water or rain. If electrolyte gets into your eyesight. 5. A battery short can explode in loss of blow IMPORTANT SAFETY INSTRUCTIONS ENC007-7 FOR BATTERY CARTRIDGE 1. Charge...
Owners Manual
Page 5
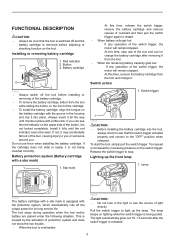
... stop use force when installing the battery cartridge. The lamp keeps on the upper side of the switch trigger, the motor will remain stopped. Release the switch trigger to light up the front lamp 1. Install it fully until it is equipped with a little click. At this time, remove the battery cartridge from the tool. • When the remaining battery capacity gets low: If any operation of the button, it locks...
... stop use force when installing the battery cartridge. The lamp keeps on the upper side of the switch trigger, the motor will remain stopped. Release the switch trigger to light up the front lamp 1. Install it fully until it is equipped with a little click. At this time, remove the battery cartridge from the tool. • When the remaining battery capacity gets low: If any operation of the button, it locks...
Owners Manual
Page 6
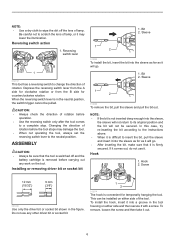
... it is removed before operation. • Use the reversing switch only after the tool comes to its original position and the bit will not return to a complete stop. Sleeve 1 2 012009 To install the bit, insert the bit into the sleeve, the sleeve will not be pulled. NOTE: • If the bit is in the neutral position, the switch trigger cannot be secured. Changing the direction of...
... it is removed before operation. • Use the reversing switch only after the tool comes to its original position and the bit will not return to a complete stop. Sleeve 1 2 012009 To install the bit, insert the bit into the sleeve, the sleeve will not be pulled. NOTE: • If the bit is in the neutral position, the switch trigger cannot be secured. Changing the direction of...

Owners Manual
Page 7
... overstressed, stripped, damaged, etc. Apply forward pressure to the tool to the extent that the bit will affect the torque. 5. When the battery cartridge is removed before attempting to perform inspection or maintenance. • Never use . • When fastening screw M8 or smaller, carefully adjust pressure on to start operation. Operating the tool at least 15 min. Fastening torque Proper fastening torque Standard bolt N m (kgf cm) 120...
... overstressed, stripped, damaged, etc. Apply forward pressure to the tool to the extent that the bit will affect the torque. 5. When the battery cartridge is removed before attempting to perform inspection or maintenance. • Never use . • When fastening screw M8 or smaller, carefully adjust pressure on to start operation. Operating the tool at least 15 min. Fastening torque Proper fastening torque Standard bolt N m (kgf cm) 120...
Owners Manual
Page 8
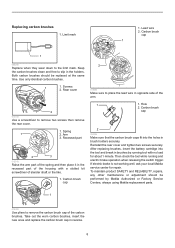
... electric brake operation when releasing the switch trigger. Arm 3. Take out the worn carbon brushes, insert the new ones and replace the carbon brush cap in brush holders securely. Rear cover 2 012018 Use a screwdriver to the limit mark. Hole 2. Carbon brush cap 1 1 006258 Replace when they wear down to remove two screws then remove the rear cover. 1. Then check the tool while running tool with a slotted bit screwdriver of the housing with no load for repair. After replacing brushes, insert...
... electric brake operation when releasing the switch trigger. Arm 3. Take out the worn carbon brushes, insert the new ones and replace the carbon brush cap in brush holders securely. Rear cover 2 012018 Use a screwdriver to the limit mark. Hole 2. Carbon brush cap 1 1 006258 Replace when they wear down to remove two screws then remove the rear cover. 1. Then check the tool while running tool with a slotted bit screwdriver of the housing with no load for repair. After replacing brushes, insert...
Owners Manual
Page 9
... Every Makita tool is caused by others: repairs are recommended for its stated purpose. Some states do not allow limitation on how long an implied warranty lasts, so the above limitation or exclusion may not apply to country. The use accessory or attachment for use with your local Makita Service Center. • Screw bits • Hook • Plastic carrying case • Various type...
... Every Makita tool is caused by others: repairs are recommended for its stated purpose. Some states do not allow limitation on how long an implied warranty lasts, so the above limitation or exclusion may not apply to country. The use accessory or attachment for use with your local Makita Service Center. • Screw bits • Hook • Plastic carrying case • Various type...

Parts Breakdown
Page 2
... A F/R CHANGE LEVER SWITCH TG573FSB-2 +PAN HEAD SCREW M3.5X5 TERMINAL RING SPRING 11 FLAT WASHER 12 COMPRESSION SPRING 13 BIT SLEEVE BUMPER HAMMER CASE COVER HAMMER CASE COMPLETE NYLON WASHER 19 STEEL BALL 3.5 ANVIL M HAMMER STEEL BALL 3.5 FLAT WASHER 24 COMPRESSION SPRING 24 PLATE STEEL BALL 5.6 SPUR GEAR 22 SPINDLE PIN 5 THIN WASHER 12 INTERNAL GEAR 51 BALL BEARING 6901LLB O RING 40 BEARING BOX COMPLETE INC. 31 YOKE UNIT ARMATURE CARBON BRUSH CB-440 195021-6 BRUSH HOLDER...
... A F/R CHANGE LEVER SWITCH TG573FSB-2 +PAN HEAD SCREW M3.5X5 TERMINAL RING SPRING 11 FLAT WASHER 12 COMPRESSION SPRING 13 BIT SLEEVE BUMPER HAMMER CASE COVER HAMMER CASE COMPLETE NYLON WASHER 19 STEEL BALL 3.5 ANVIL M HAMMER STEEL BALL 3.5 FLAT WASHER 24 COMPRESSION SPRING 24 PLATE STEEL BALL 5.6 SPUR GEAR 22 SPINDLE PIN 5 THIN WASHER 12 INTERNAL GEAR 51 BALL BEARING 6901LLB O RING 40 BEARING BOX COMPLETE INC. 31 YOKE UNIT ARMATURE CARBON BRUSH CB-440 195021-6 BRUSH HOLDER...

Parts Breakdown
Page 3
... A05 BL1830 A05 BL1815 A06 824812-5 A06 140756-4 A06 C10 162302-3 A06 C20 324207-7 A06 C30 451749-9 E01 893889-1 INC. 1 SEAL + TRUSS HEAD SCREW M4X12 HOOK HOOK BATTERY COVER DC18RA FAST CHARGER BATTERY BL1830 SET BATTERY BL1815 SET PLASTIC CARRYING CASE PLASTIC CARRYING CASE COMPLETE LATCH SHAFT HANDLE CAUTION LABEL 0 1 1 PC. 1 PC. (LXDT04,LXDT04Z) 1 (LXDT04CW) 1 PC. (LXDT04,LXDT04CW) 1 PC. (LXDT04,LXDT04CW...
... A05 BL1830 A05 BL1815 A06 824812-5 A06 140756-4 A06 C10 162302-3 A06 C20 324207-7 A06 C30 451749-9 E01 893889-1 INC. 1 SEAL + TRUSS HEAD SCREW M4X12 HOOK HOOK BATTERY COVER DC18RA FAST CHARGER BATTERY BL1830 SET BATTERY BL1815 SET PLASTIC CARRYING CASE PLASTIC CARRYING CASE COMPLETE LATCH SHAFT HANDLE CAUTION LABEL 0 1 1 PC. 1 PC. (LXDT04,LXDT04Z) 1 (LXDT04CW) 1 PC. (LXDT04,LXDT04CW) 1 PC. (LXDT04,LXDT04CW...


