Owners Manual
Page 3
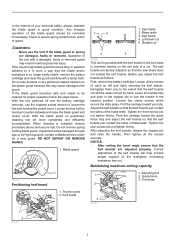
...times. 14. It can make a connection from tool or place the switch in place. Check blade guard for which may cause risk of saw without guards in the locked or off position before inserting battery cartridge. It will operate properly and perform its operation. ALWAYS USE SAFETY GLASSES.... gases. 6. If liquid contacts eyes, additionally seek medical help. Have your hand and it away from the battery; Do not operate saw blade. Do not operate saw safety rules. All visitors should be kept safe distance from repeated use , keep it frees both hands to slide compound...
...times. 14. It can make a connection from tool or place the switch in place. Check blade guard for which may cause risk of saw without guards in the locked or off position before inserting battery cartridge. It will operate properly and perform its operation. ALWAYS USE SAFETY GLASSES.... gases. 6. If liquid contacts eyes, additionally seek medical help. Have your hand and it away from the battery; Do not operate saw blade. Do not operate saw safety rules. All visitors should be kept safe distance from repeated use , keep it frees both hands to slide compound...
Owners Manual
Page 4
...gases. 13. Make sure the blade is not contacting the workpiece before operation. 20. Blades are extremely unforgiving. 29. Never reach around saw to clean blade. 14. Remove battery from the workpiece before the switch is for carrying and storage purposes only and not for a while.... secure all operations. from tool, then cleaning it does not have to stop before cutting. 26. Avoid cutting nails. Be aware that the saw blade is turned on right side of injury, return carriage to secure the workpiece. 5. NEVER hold workpiece on . 21. Stop operation immediately ...
...gases. 13. Make sure the blade is not contacting the workpiece before operation. 20. Blades are extremely unforgiving. 29. Never reach around saw to clean blade. 14. Remove battery from the workpiece before the switch is for carrying and storage purposes only and not for a while.... secure all operations. from tool, then cleaning it does not have to stop before cutting. 26. Avoid cutting nails. Be aware that the saw blade is turned on right side of injury, return carriage to secure the workpiece. 5. NEVER hold workpiece on . 21. Stop operation immediately ...
Owners Manual
Page 5
... injury. Do not short the battery cartridge: (1) Do not touch the terminals with any conductive material. (2) Avoid storing battery cartridge in loss of the miter saw on (1) battery charger, (2) battery, and (3) product using the bolt holes provided in a fire. 8. The battery cartridge can cause a large current flow, overheating, possible burns and...
... injury. Do not short the battery cartridge: (1) Do not touch the terminals with any conductive material. (2) Avoid storing battery cartridge in loss of the miter saw on (1) battery charger, (2) battery, and (3) product using the bolt holes provided in a fire. 8. The battery cartridge can cause a large current flow, overheating, possible burns and...
Owners Manual
Page 7
... of a cut. When cleaning is no longer easily visible, remove the battery cartridge and clean the guard carefully with a damp cloth. Kerf board 1 2 1. Saw blade 2. Left bevel cut 3 4 5 001800 This tool is provided with a damaged, faulty or removed guard may cause damage to the extent that the kerf...blade teeth. Operation of the tool with the kerf boards in such a way that the saw blade does not contact the kerf boards. If the see-through age or UV light exposure, contact a Makita service center for proper operation follow the steps below: With the tool switched off and ...
... of a cut. When cleaning is no longer easily visible, remove the battery cartridge and clean the guard carefully with a damp cloth. Kerf board 1 2 1. Saw blade 2. Left bevel cut 3 4 5 001800 This tool is provided with a damaged, faulty or removed guard may cause damage to the extent that the kerf...blade teeth. Operation of the tool with the kerf boards in such a way that the saw blade does not contact the kerf boards. If the see-through age or UV light exposure, contact a Makita service center for proper operation follow the steps below: With the tool switched off and ...
Owners Manual
Page 8
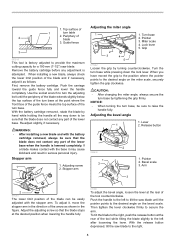
... the lever. NOTICE: • When turning the turn base while pressing down to provide the maximum cutting capacity for a 190 mm (7-1/2") saw blade. Then tighten the lever clockwise firmly to raise the handle fully. Remove the battery cartridge before any part of the lower base. Re... new blade, always check the lower limit position of the tool counterclockwise. Lock lever 5. Lever 1 2. With the release button depressed, tilt the saw blade until the periphery of the blade extends slightly below the top surface of the turn base at the point where the front face of...
... the lever. NOTICE: • When turning the turn base while pressing down to provide the maximum cutting capacity for a 190 mm (7-1/2") saw blade. Then tighten the lever clockwise firmly to raise the handle fully. Remove the battery cartridge before any part of the lower base. Re... new blade, always check the lower limit position of the tool counterclockwise. Lock lever 5. Lever 1 2. With the release button depressed, tilt the saw blade until the periphery of the blade extends slightly below the top surface of the turn base at the point where the front face of...
Owners Manual
Page 9
... further usage or serious personal injury may result in serious personal injury. Return tool to quickly stop . If the tool consistently fails to a Makita service center for the blade guard. An unguarded blade may occur resulting in the switch trigger for insertion of the tool. NOTICE: • ...When tilting the saw blade be sure the handle is equipped with an inoperative switch is HIGHLY DANGEROUS and must be sure that the switch trigger actuates properly and...
... further usage or serious personal injury may result in serious personal injury. Return tool to quickly stop . If the tool consistently fails to a Makita service center for the blade guard. An unguarded blade may occur resulting in the switch trigger for insertion of the tool. NOTICE: • ...When tilting the saw blade be sure the handle is equipped with an inoperative switch is HIGHLY DANGEROUS and must be sure that the switch trigger actuates properly and...
Owners Manual
Page 10
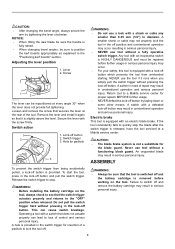
...mount it can be sure that the direction of the arrow on the surface of the blade matches the direction of the wrench holder. Saw blade 5. Saw blade 2 3 4 003934 Press the shaft lock to lock the spindle and use the socket wrench to 10 Arrow 3. Hex bolt (.... Socket wrench storage 1 2 1. Accidental start up of the hex bolt. Blade case 2. Spindle 4. Arrow 3. CAUTION: • Use only the Makita socket wrench provided to do so may result in overtightening or insufficient tightening of the tool may result in serious personal injury. Safety cover 4 5 011303...
...mount it can be sure that the direction of the arrow on the surface of the blade matches the direction of the wrench holder. Saw blade 5. Saw blade 2 3 4 003934 Press the shaft lock to lock the spindle and use the socket wrench to 10 Arrow 3. Hex bolt (.... Socket wrench storage 1 2 1. Accidental start up of the hex bolt. Blade case 2. Spindle 4. Arrow 3. CAUTION: • Use only the Makita socket wrench provided to do so may result in overtightening or insufficient tightening of the tool may result in serious personal injury. Safety cover 4 5 011303...
Owners Manual
Page 11
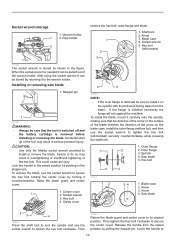
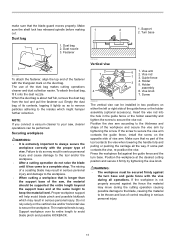
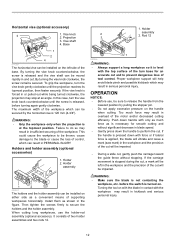
... KICKBACK. 001549 Vertical vise 2 7 6 1. Insert the vise rod into the hole in serious personal injury. 11 Make sure that no part of the saw, the material should be supported the entire length beyond the support base and at the desired cutting position and secure it onto the dust nozzle... sag. Position the workpiece at the same height to do not raise the blade until it lightly so as to remove particles adhering to your saw, cleaner operations can be performed. To attach the dust bag, fit it firmly by tightening the screw. Guide fence 3 4. The raising of the...
... KICKBACK. 001549 Vertical vise 2 7 6 1. Insert the vise rod into the hole in serious personal injury. 11 Make sure that no part of the saw, the material should be supported the entire length beyond the support base and at the desired cutting position and secure it onto the dust nozzle... sag. Position the workpiece at the same height to do not raise the blade until it lightly so as to remove particles adhering to your saw, cleaner operations can be performed. To attach the dust bag, fit it firmly by tightening the screw. Guide fence 3 4. The raising of the...
Owners Manual
Page 12
... this case, turn the vise knob gently clockwise until the screw is released, before the switch is applied, the blade will vibrate and leave a mark (saw mark) in PERSONAL INJURY. The maximum width of the base. When cutting long workpieces, use , be impaired. • During a slide cut will be sure to...
... this case, turn the vise knob gently clockwise until the screw is released, before the switch is applied, the blade will vibrate and leave a mark (saw mark) in PERSONAL INJURY. The maximum width of the base. When cutting long workpieces, use , be impaired. • During a slide cut will be sure to...
Owners Manual
Page 13
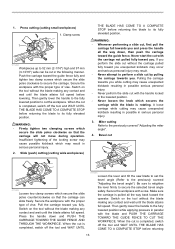
... clamp screws which secures the carriage while the blade is completed, switch off the tool and WAIT UNTIL 011246 Loosen the lever and tilt the saw blade to set the bevel angle (Refer to 52 mm (2-1/16") high and 97 mm (3-13/16") wide can slide freely. Bevel cut in serious...
... clamp screws which secures the carriage while the blade is completed, switch off the tool and WAIT UNTIL 011246 Loosen the lever and tilt the saw blade to set the bevel angle (Refer to 52 mm (2-1/16") high and 97 mm (3-13/16") wide can slide freely. Bevel cut in serious...
Owners Manual
Page 14
...the blade. If the blade is raised while it has come to rest against the blade. Compound cutting Compound cutting is made to check the saw base as wall length. Compound cutting can be performed at the angle shown in Fig. Cutting crown and cove moldings Crown and cove moldings can... a complete stop. Interruption of the carriage or blade travel throughout the entire range of the intended cut keep hands out of the path of the saw angles. During a bevel cut the piece cut off piece maybe ejected by the blade causing the material to fragment which may result in which a ...
...the blade. If the blade is raised while it has come to rest against the blade. Compound cutting Compound cutting is made to check the saw base as wall length. Compound cutting can be performed at the angle shown in Fig. Cutting crown and cove moldings Crown and cove moldings can... a complete stop. Interruption of the carriage or blade travel throughout the entire range of the intended cut keep hands out of the path of the saw angles. During a bevel cut the piece cut off piece maybe ejected by the blade causing the material to fragment which may result in which a ...
Owners Manual
Page 15
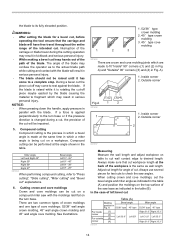
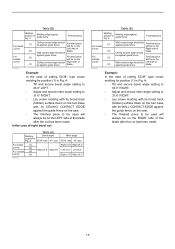
... used will be on the corner Right side of the blade after the cut has been made . 15 Wall contact edge should be on the saw . • The finished piece to 31.6° RIGHT. • Lay crown molding with its broad back (hidden) surface down on the turn base with ...; type crown molding for position (1) in Fig. Table (B) Molding position in Fig. In the case of (2) blade. A Molding edge against the guide fence on the saw . • The finished piece to 31.6° RIGHT. • Lay crown molding with its broad back (hidden) surface down on the turn base with its...
... used will be on the corner Right side of the blade after the cut has been made . 15 Wall contact edge should be on the saw . • The finished piece to 31.6° RIGHT. • Lay crown molding with its broad back (hidden) surface down on the turn base with ...; type crown molding for position (1) in Fig. Table (B) Molding position in Fig. In the case of (2) blade. A Molding edge against the guide fence on the saw . • The finished piece to 31.6° RIGHT. • Lay crown molding with its broad back (hidden) surface down on the turn base with its...
Owners Manual
Page 16
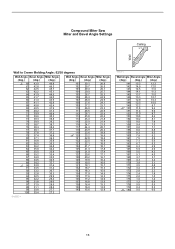
Compound Miter Saw Miter and Bevel Angle Settings Ceiling 52° 38° Wall Wall to Crown Molding Angle: 52/38 degrees Wall Angle Bevel Angle Miter Angle (...
Compound Miter Saw Miter and Bevel Angle Settings Ceiling 52° 38° Wall Wall to Crown Molding Angle: 52/38 degrees Wall Angle Bevel Angle Miter Angle (...

Owners Manual
Page 17
Compound Miter Saw Miter and Bevel Angle Settings Ceiling 45° 45° Wall Wall to Crown Molding Angle: 45 degrees Wall Angle Bevel Angle Miter Angle (deg.) (...
Compound Miter Saw Miter and Bevel Angle Settings Ceiling 45° 45° Wall Wall to Crown Molding Angle: 45 degrees Wall Angle Bevel Angle Miter Angle (deg.) (...

Owners Manual
Page 19
... seat the turn base so that the battery cartridge is not aligned properly, perform the following: 1. Carry the tool by holding both sides of the saw blade resulting in the stopper pin. If you remove the holders, dust bag, etc., you can carry the tool more easily. Triangular rule 1 002209 Make...
... seat the turn base so that the battery cartridge is not aligned properly, perform the following: 1. Carry the tool by holding both sides of the saw blade resulting in the stopper pin. If you remove the holders, dust bag, etc., you can carry the tool more easily. Triangular rule 1 002209 Make...
Owners Manual
Page 20
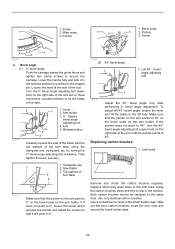
... and secure the brush holder caps. 20 Bevel scale 1 2. Miter scale 3. Pointer 3. Screw 3 2 003942 2. Arm holder 3. 0 ゚ degree bevel angle adjusting bolt 4. Arm 5. Triangular rule 1 2. Saw blade 3. Left 45 ゚ bevel angle adjusting bolt 1 003945 Adjust the 45° bevel angle only after performing 0° bevel angle adjustment. Make sure that...
... and secure the brush holder caps. 20 Bevel scale 1 2. Miter scale 3. Pointer 3. Screw 3 2 003942 2. Arm holder 3. 0 ゚ degree bevel angle adjusting bolt 4. Arm 5. Triangular rule 1 2. Saw blade 3. Left 45 ゚ bevel angle adjusting bolt 1 003945 Adjust the 45° bevel angle only after performing 0° bevel angle adjustment. Make sure that...
Owners Manual
Page 21
Then check the tool while running tool with your local Makita Service Center. • Carbide-tipped saw blades • Vise assembly (Horizontal vise) • Vertical vise • Socket wrench 10 • Holder set • Holder assembly • Holder rod assembly ...by others: repairs are recommended for use , wipe off chips and dust adhering to the tool with machine oil to be performed by a Makita service center. MAKITA DISCLAIMS LIABILITY FOR ANY IMPLIED WARRANTIES, INCLUDING IMPLIED WARRANTIES OF "MERCHANTABILITY" AND "FITNESS FOR A SPECIFIC PURPOSE," AFTER THE ONE YEAR TERM OF...
Then check the tool while running tool with your local Makita Service Center. • Carbide-tipped saw blades • Vise assembly (Horizontal vise) • Vertical vise • Socket wrench 10 • Holder set • Holder assembly • Holder rod assembly ...by others: repairs are recommended for use , wipe off chips and dust adhering to the tool with machine oil to be performed by a Makita service center. MAKITA DISCLAIMS LIABILITY FOR ANY IMPLIED WARRANTIES, INCLUDING IMPLIED WARRANTIES OF "MERCHANTABILITY" AND "FITNESS FOR A SPECIFIC PURPOSE," AFTER THE ONE YEAR TERM OF...

Flyer (English)
Page 1
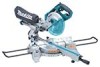
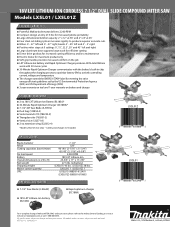
... LXSL01 LXSL01Z 18V LXT Li-Ion batteries charge in 30 minutes, run longer and deliver 3X more cycles JOBSITE PORTABILITY. 18V LXT LITHIUM-ION CORDLESS 7-1/2'' DUAL SLIDE COMPOUND MITER SAW LARGE CUTTING CAPACITY UP TO 2-1/16'' AND 11-3/4'' CROSSCUTS AT 90° Powerful Makita-built ... bearings and a 4-steel rail sliding system for dead-on cuts PORTABILITY Compact design at Only 27.5 lbs. for jobsite portability POWER Makita-built motor delivers 2,200 RPM for Increased Jobsite Portability Four Steel Rail Sliding System Increases Rigidity to Produce Superior Accurate Cuts Miters 0°...
... LXSL01 LXSL01Z 18V LXT Li-Ion batteries charge in 30 minutes, run longer and deliver 3X more cycles JOBSITE PORTABILITY. 18V LXT LITHIUM-ION CORDLESS 7-1/2'' DUAL SLIDE COMPOUND MITER SAW LARGE CUTTING CAPACITY UP TO 2-1/16'' AND 11-3/4'' CROSSCUTS AT 90° Powerful Makita-built ... bearings and a 4-steel rail sliding system for dead-on cuts PORTABILITY Compact design at Only 27.5 lbs. for jobsite portability POWER Makita-built motor delivers 2,200 RPM for Increased Jobsite Portability Four Steel Rail Sliding System Increases Rigidity to Produce Superior Accurate Cuts Miters 0°...
Flyer (English)
Page 2
... RPM 18V LXT Lithium-Ion 25-3/4'' x 17'' x 17-7/8'' 27.5 lbs. (w/battery) (LXSL01) 43 lbs. (LXSL01Z) 38 lbs. (LXSL01) 1 (LXSL01Z) 1 (LXSL01) 088381-612401 (LXSL01Z) 088381-610605 OPTIONAL ACCESSORIES n 7-1/2'' Saw blade (A-90629) n 18V LXT Lithium-Ion battery (BL1830) n Rapid optimum charger (DC18RA) LXSL01 For a complete listing... on tool and 1-year warranty on hand. 18V LXT LITHIUM-ION CORDLESS 7-1/2'' DUAL SLIDE COMPOUND MITER SAW Models LXSL01 / LXSL01Z FEATURES & BENEFITS n Powerful Makita-built motor delivers 2,200 RPM n Compact design at 45° n Four steel rail sliding system ...
... RPM 18V LXT Lithium-Ion 25-3/4'' x 17'' x 17-7/8'' 27.5 lbs. (w/battery) (LXSL01) 43 lbs. (LXSL01Z) 38 lbs. (LXSL01) 1 (LXSL01Z) 1 (LXSL01) 088381-612401 (LXSL01Z) 088381-610605 OPTIONAL ACCESSORIES n 7-1/2'' Saw blade (A-90629) n 18V LXT Lithium-Ion battery (BL1830) n Rapid optimum charger (DC18RA) LXSL01 For a complete listing... on tool and 1-year warranty on hand. 18V LXT LITHIUM-ION CORDLESS 7-1/2'' DUAL SLIDE COMPOUND MITER SAW Models LXSL01 / LXSL01Z FEATURES & BENEFITS n Powerful Makita-built motor delivers 2,200 RPM n Compact design at 45° n Four steel rail sliding system ...


