

Accessory Catalog
Page 3
... are replaceable and easy to remove. • Spring lock, locks spool in place for installation: M10 x 1.25 LH Nut Part # 264025-0 or M8 x 1.25 LH Nut Part # 625-85050-01 Line Capacity: 6 ft. of .095 5 ft. Includes: B-60115 manual trimmer head .130 line Packaging: Retail Carton Fit's Makita EM4250CA Models: EM4251CA EM2650LH EM2650UH NOTE: B-60115 requires arbor nut with washer for easy assembly. • Quick and easy loading. of...
... are replaceable and easy to remove. • Spring lock, locks spool in place for installation: M10 x 1.25 LH Nut Part # 264025-0 or M8 x 1.25 LH Nut Part # 625-85050-01 Line Capacity: 6 ft. of .095 5 ft. Includes: B-60115 manual trimmer head .130 line Packaging: Retail Carton Fit's Makita EM4250CA Models: EM4251CA EM2650LH EM2650UH NOTE: B-60115 requires arbor nut with washer for easy assembly. • Quick and easy loading. of...
Owners Manual
Page 2
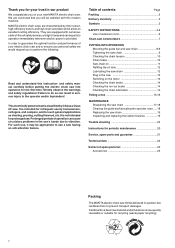
...-18 Cleaning the guide bar/lubricating the sprocket nose ..... 18 Replacing the saw chain 19 Inspecting and replacing the carbon brushes 19 Trouble shooting 20 Instructions for periodic maintenance 20 Service, spare parts and guarantee 21 Technical data 22 Extract of spare parts list 23 Accessories 23 Packing The MAKITA electric chain saw will be satisfied with numerous state-of-the-art safety devices, are light, handy and can...
...-18 Cleaning the guide bar/lubricating the sprocket nose ..... 18 Replacing the saw chain 19 Inspecting and replacing the carbon brushes 19 Trouble shooting 20 Instructions for periodic maintenance 20 Service, spare parts and guarantee 21 Technical data 22 Extract of spare parts list 23 Accessories 23 Packing The MAKITA electric chain saw will be satisfied with numerous state-of-the-art safety devices, are light, handy and can...
Owners Manual
Page 4
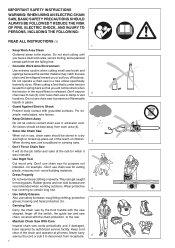
... start cutting until you off the switch, the guide bar and saw cords periodically and if damaged, have a clear work area (4). - Guard Against Electric Shock Prevent body contact with the chain protection, to the rear. - Keep Children Away Do not let visitors contact chain saw to do the job better and safer at all times. Use Safety Glasses Also use a scabbard or carrying case...
... start cutting until you off the switch, the guide bar and saw cords periodically and if damaged, have a clear work area (4). - Guard Against Electric Shock Prevent body contact with the chain protection, to the rear. - Keep Children Away Do not let visitors contact chain saw to do the job better and safer at all times. Use Safety Glasses Also use a scabbard or carrying case...
Owners Manual
Page 5
... not turn the saw when you start the saw, make sure the saw that it will operate properly and perform its operation. Inspect extension cords periodically and replace if damaged. Disconnect Chain Saw Disconnect chain saw when not in such a way that may affect its intended function. Check Damaged Parts Before further use , before servicing, and when changing accessories and attachments, such as illustrated in this instruction manual...
... not turn the saw when you start the saw, make sure the saw that it will operate properly and perform its operation. Inspect extension cords periodically and replace if damaged. Disconnect Chain Saw Disconnect chain saw when not in such a way that may affect its intended function. Check Damaged Parts Before further use , before servicing, and when changing accessories and attachments, such as illustrated in this instruction manual...
Owners Manual
Page 6
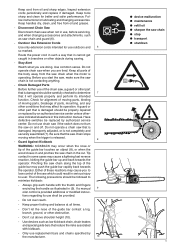
... cut , remove dirt, stones, loose bark, nails, staples and wire from the cutting area and to determine the proper wire size required in doubt, DO NOT PLUG IN THE TOOL. Using a power source with finger on the nameplate of electric shock, this tool to rain (12) and pull 12 plug immediately if the supply cable is harmful to the user 13 - Use an extension cord...
... cut , remove dirt, stones, loose bark, nails, staples and wire from the cutting area and to determine the proper wire size required in doubt, DO NOT PLUG IN THE TOOL. Using a power source with finger on the nameplate of electric shock, this tool to rain (12) and pull 12 plug immediately if the supply cable is harmful to the user 13 - Use an extension cord...

Owners Manual
Page 7
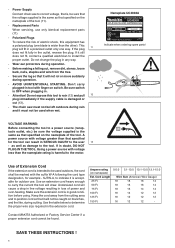
... 1 Tubular handle 2 Hand guard (release for chain brake) 17 3 Spike bar 4 Sprocket guard quick tightener 5 Sprocket guard, chain brake 6 Carbon brush cover 7 Back hand guard 8 Power cord with plug 9 Guide bar 10 Oil tank cap 11 Identification plate 16 15 14 12 Locking button 13 Rear handle 14 Power switch 15 Sightglass for oil level 16 Saw chain 17 Cord grip for electric cord (pull relief) Bucking: The process of power. A mechanism for a chain brake. Drive Sprocket or...
... 1 Tubular handle 2 Hand guard (release for chain brake) 17 3 Spike bar 4 Sprocket guard quick tightener 5 Sprocket guard, chain brake 6 Carbon brush cover 7 Back hand guard 8 Power cord with plug 9 Guide bar 10 Oil tank cap 11 Identification plate 16 15 14 12 Locking button 13 Rear handle 14 Power switch 15 Sightglass for oil level 16 Saw chain 17 Cord grip for electric cord (pull relief) Bucking: The process of power. A mechanism for a chain brake. Drive Sprocket or...
Owners Manual
Page 13
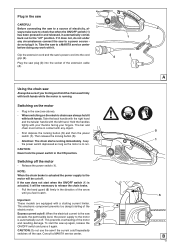
.... Hold the handles tightly with the left hand. First depress the locking button (5) and then the power switch (1). Attention: The chain starts running . Release the power switch (1). If the saw firmly with any object. - This prevents overheating of the extension cable (4). To start when the ON/OFF switch (1) is actuated the power supply to the motor will be sure of the electric motor. Using the chain saw CAREFUL! NOTE...
.... Hold the handles tightly with the left hand. First depress the locking button (5) and then the power switch (1). Attention: The chain starts running . Release the power switch (1). If the saw firmly with any object. - This prevents overheating of the extension cable (4). To start when the ON/OFF switch (1) is actuated the power supply to the motor will be sure of the electric motor. Using the chain saw CAREFUL! NOTE...
Owners Manual
Page 14
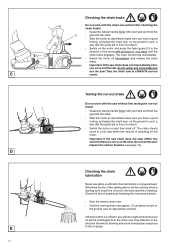
... a MAKITA service center. Grasp the tubular handle firmly with one hand and hold the grip with the back of contact). - Start the motor as described (make sure you carry out this test, do not use an appropriate surface). Switch the motor on the ground in such a way that the guide bar is free of the arrow with the other . - Inspect the carbon brushes...
... a MAKITA service center. Grasp the tubular handle firmly with one hand and hold the grip with the back of contact). - Start the motor as described (make sure you carry out this test, do not use an appropriate surface). Switch the motor on the ground in such a way that the guide bar is free of the arrow with the other . - Inspect the carbon brushes...
Owners Manual
Page 17
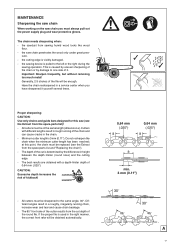
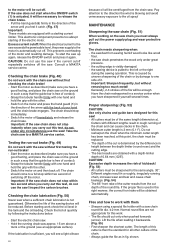
... used in a service center when you must be enough. Cutters with a depth‑limiter depth of it yourself several times. the sawdust from the spare‑parts list)! - All cutters must be obtained automatically. 0,64 mm (.025") 0,64 mm (.025") min. 3 mm (0.11") A 17 at this saw (see the Extract from the cut is 3 mm (0.11"). MAINTENANCE Sharpening the saw...
... used in a service center when you must be enough. Cutters with a depth‑limiter depth of it yourself several times. the sawdust from the spare‑parts list)! - All cutters must be obtained automatically. 0,64 mm (.025") 0,64 mm (.025") min. 3 mm (0.11") A 17 at this saw (see the Extract from the cut is 3 mm (0.11"). MAINTENANCE Sharpening the saw...
Owners Manual
Page 19
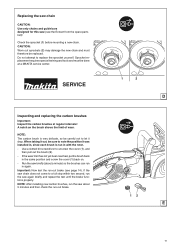
... repeat the test until the brake functions properly. Use a slotted bit screwdriver to replace the sprocket yourself. SERVICE Inspecting and replacing the carbon brushes Important: Inspect the carbon brushes at a MAKITA service center. Check the sprocket (1) before mounting a new chain. Replacing the saw chain CAUTION: Use only chains and guide bars designed for this saw chain does not come to a full stop within two second, run in , since each...
... repeat the test until the brake functions properly. Use a slotted bit screwdriver to replace the sprocket yourself. SERVICE Inspecting and replacing the carbon brushes Important: Inspect the carbon brushes at a MAKITA service center. Check the sprocket (1) before mounting a new chain. Replacing the saw chain CAUTION: Use only chains and guide bars designed for this saw chain does not come to a full stop within two second, run in , since each...

Owners Manual
Page 20
... described in the instruction manual. In case of the safety features the following maintenance must be carried out by MAKITA Authorized or Factory Service Centers, always using MAKITA replacement parts. Have it inspected regularly at a service center. After each shutdown Guide bar Clean the oil inlet bore. 12 Chain carrier Clean, especially the oil guide groove. 12 Storage Chain oil tank Saw chain/guide bar Electric chain saw is performed regularly...
... described in the instruction manual. In case of the safety features the following maintenance must be carried out by MAKITA Authorized or Factory Service Centers, always using MAKITA replacement parts. Have it inspected regularly at a service center. After each shutdown Guide bar Clean the oil inlet bore. 12 Chain carrier Clean, especially the oil guide groove. 12 Storage Chain oil tank Saw chain/guide bar Electric chain saw is performed regularly...
Owners Manual
Page 21
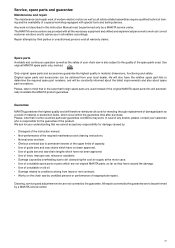
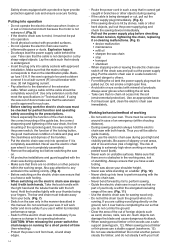
Service, spare parts and guarantee Maintenance and repair The maintenance and repair work of modern electric motors as well as all safety related assemblies require qualified technical training and the availability of inappropriate repairs. Any work out correct customer solutions and to determine the required spare part numbers, and will automatically invalidate the MAKITA product guarantee. Use original MAKITA spare parts only, marked: Only original spare parts and accessories guarantee the highest...
Service, spare parts and guarantee Maintenance and repair The maintenance and repair work of modern electric motors as well as all safety related assemblies require qualified technical training and the availability of inappropriate repairs. Any work out correct customer solutions and to determine the required spare part numbers, and will automatically invalidate the MAKITA product guarantee. Use original MAKITA spare parts only, marked: Only original spare parts and accessories guarantee the highest...
Owners Manual
Page 23
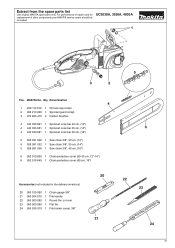
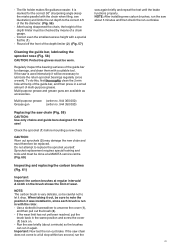
... spare parts list Use original MAKITA spare parts only. Qty. MAKITA No. UC3030A, 3530A, 4030A 1 5 3 2 Pos. For performance of repairs and for replacement of other components your MAKITA service center should be consulted. Denomination 4 1 226 114 100 1 Oil tank cap compl. 2 226 213 200 1 Sprocket guard compl. 3 970 805 410 2 Carbon brushes 4 ..."-14") 6 952 010 640 1 Chain protection cover (40 cm, 16") Accessories (not included in the delivery inventory) 20 953 100 090 1 Chain gauge 3/8" 21 953 004 010 1 File handle 22 953 003 090 1 Round file ø 4 mm 23 953 003 ...
... spare parts list Use original MAKITA spare parts only. Qty. MAKITA No. UC3030A, 3530A, 4030A 1 5 3 2 Pos. For performance of repairs and for replacement of other components your MAKITA service center should be consulted. Denomination 4 1 226 114 100 1 Oil tank cap compl. 2 226 213 200 1 Sprocket guard compl. 3 970 805 410 2 Carbon brushes 4 ..."-14") 6 952 010 640 1 Chain protection cover (40 cm, 16") Accessories (not included in the delivery inventory) 20 953 100 090 1 Chain gauge 3/8" 21 953 004 010 1 File handle 22 953 003 090 1 Round file ø 4 mm 23 953 003 ...

Instruction Manual
Page 13
.../or throw the chain saw out of the electric chain saw for the saw . Use extreme caution when cutting brush and saplings. Do not use replacement bars and chains specified by cutting off and away from accident or injury. Kickback forces can lead to allow you off balance. 8. To ensure correct operation the user has to read this instruction manual to be alert for...
.../or throw the chain saw out of the electric chain saw for the saw . Use extreme caution when cutting brush and saplings. Do not use replacement bars and chains specified by cutting off and away from accident or injury. Kickback forces can lead to allow you off balance. 8. To ensure correct operation the user has to read this instruction manual to be alert for...
Instruction Manual
Page 14
... sawing. - Remove the adjusting tool before checking the chain tension, tightening the chain, replacing it is not waterproof. (Fig. 5) - Switch on the saw on a ladder. (Fig. 10) - When stopping work on your saw while standing on . - There must not be someone around in wet or moist environment because the motor is not completely assembled. - Clear the area of the cut into operation. - Never use the electric chain saw...
... sawing. - Remove the adjusting tool before checking the chain tension, tightening the chain, replacing it is not waterproof. (Fig. 5) - Switch on the saw on a ladder. (Fig. 10) - When stopping work on your saw while standing on . - There must not be someone around in wet or moist environment because the motor is not completely assembled. - Clear the area of the cut into operation. - Never use the electric chain saw...
Instruction Manual
Page 15
... - Perform the cut free branches from the direction of the bar the electric chain saw is at an angle which is not free of injuries). - The cut the pressure side (A). The material between both cuts must be pulled along (risk of tension (Fig. 15), first cut must stay above the bottom edge of the notch. - In this case the electric chain saw may occur. - Be...
... - Perform the cut free branches from the direction of the bar the electric chain saw is at an angle which is not free of injuries). - The cut the pressure side (A). The material between both cuts must be pulled along (risk of tension (Fig. 15), first cut must stay above the bottom edge of the notch. - In this case the electric chain saw may occur. - Be...

Instruction Manual
Page 18
... maintenance (Fig. 36) The brake systems are very important safety features, and like any other part they are subject to align the chain tensioning pin (12) with the threaded pin (11). To do not tighten it yet. Release the sprocket guard quick tightener (remove pressure) and now turn it engage. Using your left hand, lightly press the guide bar against the holder on the housing and guide the saw...
... maintenance (Fig. 36) The brake systems are very important safety features, and like any other part they are subject to align the chain tensioning pin (12) with the threaded pin (11). To do not tighten it yet. Release the sprocket guard quick tightener (remove pressure) and now turn it engage. Using your left hand, lightly press the guide bar against the holder on the housing and guide the saw...
Instruction Manual
Page 20
... pulled to the same angle, 30°. Have the chain resharpened in the chain. - The best results are not appropriate for this work. - To start when the ON/OFF switch (1) is free of the electric motor. CAUTION: Do not use an appropriate surface). Grasp the tubular handle firmly with one hand and hold the grip with a depth-limiter depth of the arrow...
... pulled to the same angle, 30°. Have the chain resharpened in the chain. - The best results are not appropriate for this work. - To start when the ON/OFF switch (1) is free of the electric motor. CAUTION: Do not use an appropriate surface). Grasp the tubular handle firmly with one hand and hold the grip with a depth-limiter depth of the arrow...
Instruction Manual
Page 21
... at regular intervals! Use a slotted bit screwdriver to replace the sprocket yourself. Multi-purpose grease and grease guns are available as accessories. Regularly inspect the bearing surfaces of the file diameter. (Fig. 56) - Run the saw briefly (about 5 minutes and then check the run the saw ! Important: Now test the run in again. NOTE: The carbon brush is run -out...
... at regular intervals! Use a slotted bit screwdriver to replace the sprocket yourself. Multi-purpose grease and grease guns are available as accessories. Regularly inspect the bearing surfaces of the file diameter. (Fig. 56) - Run the saw briefly (about 5 minutes and then check the run the saw ! Important: Now test the run in again. NOTE: The carbon brush is run -out...

Instruction Manual
Page 22
... pulling power Carbon brushes worn down no oil on the saw chain oil tank empty, oil guide groove dirty Saw chain does not stop instantly Brake band worn down Saw chain continues to run Carbon brushes worn down Instructions for periodic maintenance To ensure long life, prevent damage and ensure the full functioning of the safety features the following maintenance must be carried out by a MAKITA service centre. Replace in...
... pulling power Carbon brushes worn down no oil on the saw chain oil tank empty, oil guide groove dirty Saw chain does not stop instantly Brake band worn down Saw chain continues to run Carbon brushes worn down Instructions for periodic maintenance To ensure long life, prevent damage and ensure the full functioning of the safety features the following maintenance must be carried out by a MAKITA service centre. Replace in...


