

VC4710 Instruction Manual
Page 3
Contents Makita VC4710 1 Safety instructions 2 Before starting the cleaner 3 Control /Operation 4 Applications and techniques 5 After finishing work 6 Maintenance 7 Troubleshooting 8 Technical data 4 2.1 Assembling the vacuum cleaner 10 2.1.1 Taking accessories out of the packaging 10 2.2 Preparing for dust pick-up 11 2.3 Preparing for wet pick-up liquids 16 5.1 Switching the vacuum cleaner off and storage 17 6.1 Maintenance plan 18 6.2 Maintenance work 18 6.2.1 Emptying the tank 18 6.2.2 Wet suction 19...
Contents Makita VC4710 1 Safety instructions 2 Before starting the cleaner 3 Control /Operation 4 Applications and techniques 5 After finishing work 6 Maintenance 7 Troubleshooting 8 Technical data 4 2.1 Assembling the vacuum cleaner 10 2.1.1 Taking accessories out of the packaging 10 2.2 Preparing for dust pick-up 11 2.3 Preparing for wet pick-up liquids 16 5.1 Switching the vacuum cleaner off and storage 17 6.1 Maintenance plan 18 6.2 Maintenance work 18 6.2.1 Emptying the tank 18 6.2.2 Wet suction 19...

VC4710 Instruction Manual
Page 4
... wet hands. • Do not put any opening blocked; Original Instruction Close attention is plugged in this vacuum, basic precautions should be, has been dropped, damaged, left outdoors or dropped into openings. Do not use with damaged cord or plug. Makita VC4710 1 Safety instructions Instructions for use 4 Prior to using this manual. For further information call 18004MAKITA or contact your local Makita factory service...
... wet hands. • Do not put any opening blocked; Original Instruction Close attention is plugged in this vacuum, basic precautions should be, has been dropped, damaged, left outdoors or dropped into openings. Do not use with damaged cord or plug. Makita VC4710 1 Safety instructions Instructions for use 4 Prior to using this manual. For further information call 18004MAKITA or contact your local Makita factory service...

VC4710 Instruction Manual
Page 5
... filters in place for safety and proper use in areas where they may be found in chapter 2.3. • Connect to this Receptacle. SAVE THESE INSTRUCTIONS Besides the operating instructions observe recognised regulations for dry dust pickup. Makita VC4710 WARNING • Keep loose clothing, hair, fingers, and all parts of body away from openings and moving parts. • Turn off before unplugging...
... filters in place for safety and proper use in areas where they may be found in chapter 2.3. • Connect to this Receptacle. SAVE THESE INSTRUCTIONS Besides the operating instructions observe recognised regulations for dry dust pickup. Makita VC4710 WARNING • Keep loose clothing, hair, fingers, and all parts of body away from openings and moving parts. • Turn off before unplugging...

VC4710 Instruction Manual
Page 6
... with a qualified electrician or service person if you are in a risk of electric shock. Makita VC4710 Purpose and intended use This vaccum is equipped with a cord having an equipment-grounding conductor and grounding plug. Do not use . This vacuum is designed for electric current to reduce the risk of electric shock. if it should malfunction or breakdown, grounding provides a path...
... with a qualified electrician or service person if you are in a risk of electric shock. Makita VC4710 Purpose and intended use This vaccum is equipped with a cord having an equipment-grounding conductor and grounding plug. Do not use . This vacuum is designed for electric current to reduce the risk of electric shock. if it should malfunction or breakdown, grounding provides a path...

VC4710 Instruction Manual
Page 7
... AWG > 50 feet Not recommended Maintenance, cleaning and repair Only carry out maintenance work described in the operating instructions. No adaptor should be used with this appliance. As an extension cord, only use on the vacuum corresponds with the main voltage. Electrical connection Extension cord Make sure that looks like the plug illustrated. See operating instructions. 2. If the issue persists, contact Makita factory service center.
... AWG > 50 feet Not recommended Maintenance, cleaning and repair Only carry out maintenance work described in the operating instructions. No adaptor should be used with this appliance. As an extension cord, only use on the vacuum corresponds with the main voltage. Electrical connection Extension cord Make sure that looks like the plug illustrated. See operating instructions. 2. If the issue persists, contact Makita factory service center.
VC4710 Instruction Manual
Page 8
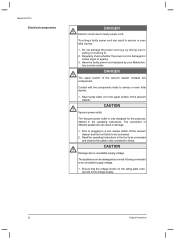
... to serious or even fatal injuries. 1. by your Makita factory service center. Read the operating instructions to the tool to faulty power cord. Makita VC4710 Electrical components DANGER Electric shock due to be connected and observe the safety notes contained in these. Do not damage the power cord (e.g. The connection of ageing. 3. Have the faulty power cord replaced by driving over it, pulling or crushing it). 2. CAUTION Damage...
... to serious or even fatal injuries. 1. by your Makita factory service center. Read the operating instructions to the tool to faulty power cord. Makita VC4710 Electrical components DANGER Electric shock due to be connected and observe the safety notes contained in these. Do not damage the power cord (e.g. The connection of ageing. 3. Have the faulty power cord replaced by driving over it, pulling or crushing it). 2. CAUTION Damage...

VC4710 Instruction Manual
Page 9
... operating manual. Materials picked up liquids Spare parts and accessories Emptying tank Original Instruction Makita VC4710 WARNING Hazardous materials. Hazardous materials Picking up can present a hazard to the environment. 1. The following materials must be picked up hazardous materials can impair the safety of non-Makita spare parts and accessories can lead to applicable regulations and consult your local Makita sales representative. hazardous dust...
... operating manual. Materials picked up liquids Spare parts and accessories Emptying tank Original Instruction Makita VC4710 WARNING Hazardous materials. Hazardous materials Picking up can present a hazard to the environment. 1. The following materials must be picked up hazardous materials can impair the safety of non-Makita spare parts and accessories can lead to applicable regulations and consult your local Makita sales representative. hazardous dust...
VC4710 Instruction Manual
Page 13
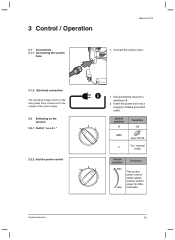
.... 3 Control / Operation Makita VC4710 3.1 Connections 3.1.1 Connecting the suction hose 1. Original Instruction 13 Insert the power cord into a properly installed grounded outlet. Connect the suction hose. 3.1.2 Electrical connection The operating voltage shown on the rating plate must correspond to the voltage of the power supply. 3.2 Switching on the vacuum 3.2.1 Switch "auto-0-I Auto On/Off On / manual mode Switch position Function max The suction power control switch allows precise suction power for diffe-
.... 3 Control / Operation Makita VC4710 3.1 Connections 3.1.1 Connecting the suction hose 1. Original Instruction 13 Insert the power cord into a properly installed grounded outlet. Connect the suction hose. 3.1.2 Electrical connection The operating voltage shown on the rating plate must correspond to the voltage of the power supply. 3.2 Switching on the vacuum 3.2.1 Switch "auto-0-I Auto On/Off On / manual mode Switch position Function max The suction power control switch allows precise suction power for diffe-

VC4710 Instruction Manual
Page 14
... is switched off by the power tool connected. Switch on and off , the vacuum continues to "auto" position. 6. When the power tool is switched on the power tool. Makita VC4710 3.2.3 Auto-On/Off-Operation - To comply with a suction hose. 4. Before setting the switch to "auto" position, ensure that any dust in the suction hose is switched on the operating panel of the power tool into the filter bag. 14 Original Instruction Switch on...
... is switched off by the power tool connected. Switch on and off , the vacuum continues to "auto" position. 6. When the power tool is switched on the power tool. Makita VC4710 3.2.3 Auto-On/Off-Operation - To comply with a suction hose. 4. Before setting the switch to "auto" position, ensure that any dust in the suction hose is switched on the operating panel of the power tool into the filter bag. 14 Original Instruction Switch on...
VC4710 Instruction Manual
Page 15
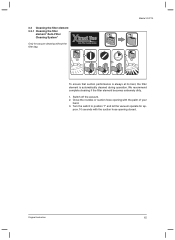
... the vacuum operate for vacuum cleaning without the filter bag. 3.3 Cleaning the filter element 3.3.1 Cleaning the filter element "Auto-Filter Cleaning System" Only for ap- Close the nozzles or suction hose opening closed. Switch off the vacuum. 2. Original Instruction 15 prox. 10 seconds with the suction hose opening with the palm of your hand. 3. Makita VC4710 10 sec...
... the vacuum operate for vacuum cleaning without the filter bag. 3.3 Cleaning the filter element 3.3.1 Cleaning the filter element "Auto-Filter Cleaning System" Only for ap- Close the nozzles or suction hose opening closed. Switch off the vacuum. 2. Original Instruction 15 prox. 10 seconds with the suction hose opening with the palm of your hand. 3. Makita VC4710 10 sec...
VC4710 Instruction Manual
Page 16
... or replaced by a dry element before dry substances are some basic tips. Here are picked up liquids If used correctly, additional accessories, suction nozzles and suction hoses can enhance the cleaning action and reduce the cleaning effort. Makita VC4710 4 Applications and techniques 4.1 Techniques 4.1.1 Picking up dry substances 4.1.2 Picking up . If foam appears at exhaust vents, stop work immediately...
... or replaced by a dry element before dry substances are some basic tips. Here are picked up liquids If used correctly, additional accessories, suction nozzles and suction hoses can enhance the cleaning action and reduce the cleaning effort. Makita VC4710 4 Applications and techniques 4.1 Techniques 4.1.1 Picking up dry substances 4.1.2 Picking up . If foam appears at exhaust vents, stop work immediately...
VC4710 Instruction Manual
Page 17
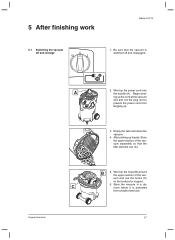
... the upper section of the vac- B 5. Wind up the power cord onto the handle (A). Begin winding up the cord at the vacuum end and not the plug end to prevent the power cord from unauthorized use the hooks (C) on the toolbox for support. 6. uum and use . 17 5 After finishing work Makita VC4710 5.1 Switching the vacuum off and unplugged. Empty the tank and clean...
... the upper section of the vac- B 5. Wind up the power cord onto the handle (A). Begin winding up the cord at the vacuum end and not the plug end to prevent the power cord from unauthorized use the hooks (C) on the toolbox for support. 6. uum and use . 17 5 After finishing work Makita VC4710 5.1 Switching the vacuum off and unplugged. Empty the tank and clean...
VC4710 Instruction Manual
Page 18
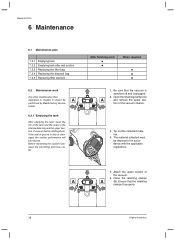
... seals in accordance with the applicable regulations. 5. Open the retaining clamps (A) A and remove the upper sec- Before reinserting the suction hose: clean the inlet fitting and hose collar. Makita VC4710 6 Maintenance 6.1 Maintenance plan 7.2.1 Emptying tank 7.2.2 Emptying tank after wet suction 7.2.3 Replacing the filter bag 7.2.4 Replacing the disposal bag 7.2.5 Replacing filter element 6.2 Maintenance work When required 1. Attach the upper...
... seals in accordance with the applicable regulations. 5. Open the retaining clamps (A) A and remove the upper sec- Before reinserting the suction hose: clean the inlet fitting and hose collar. Makita VC4710 6 Maintenance 6.1 Maintenance plan 7.2.1 Emptying tank 7.2.2 Emptying tank after wet suction 7.2.3 Replacing the filter bag 7.2.4 Replacing the disposal bag 7.2.5 Replacing filter element 6.2 Maintenance work When required 1. Attach the upper...
VC4710 Instruction Manual
Page 20
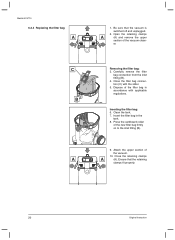
... the upper section of the vacuum clean- Close the retaining clamps A (A). Close the filter bag connection (C) with applicable regulations. Be sure that the retaining clamps fit properly. 20 Original Instruction Inserting the filter bag: 6. er. Dispose of the new filter...switched off and unplugged. 2. Open the retaining clamps A (A) and remove the upper section of the vacuum. 10. Insert the filter bag in accordance with the slider. 5. Press the cardboard collar of the filter bag in the tank. 8. C B A Removing the filter bag: 3. Makita VC4710 6.2.4 Replacing...
... the upper section of the vacuum clean- Close the retaining clamps A (A). Close the filter bag connection (C) with applicable regulations. Be sure that the retaining clamps fit properly. 20 Original Instruction Inserting the filter bag: 6. er. Dispose of the new filter...switched off and unplugged. 2. Open the retaining clamps A (A) and remove the upper section of the vacuum. 10. Insert the filter bag in accordance with the slider. 5. Press the cardboard collar of the filter bag in the tank. 8. C B A Removing the filter bag: 3. Makita VC4710 6.2.4 Replacing...
VC4710 Instruction Manual
Page 21
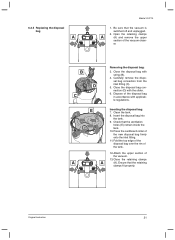
... the disposal bag in accordance with the slider. 6. 6.2.5 Replacing the disposal bag A Makita VC4710 1. B D C Removing the disposal bag: 3. Ensure that the vacuum is switched off and unplugged. 2. Carefully remove the disposal bag connection from the inlet fitting (C). 5. Clean the tank. 8. Be sure that the retaining clamps fit properly. E Inserting the disposal bag: 7. Close the disposal bag with string...
... the disposal bag in accordance with the slider. 6. 6.2.5 Replacing the disposal bag A Makita VC4710 1. B D C Removing the disposal bag: 3. Ensure that the vacuum is switched off and unplugged. 2. Carefully remove the disposal bag connection from the inlet fitting (C). 5. Clean the tank. 8. Be sure that the retaining clamps fit properly. E Inserting the disposal bag: 7. Close the disposal bag with string...

VC4710 Instruction Manual
Page 22
.... Makita VC4710 6.2.6 Replacing filter element (Auto-Filter Cleaning System) A Never use the vacuum without a filter. Insert new filter elements (C) into the cassettes (D). 6. Dispose of main filter elements we strongly recommend using filter bag when unit is switched off and unplugged. 2. Ensure that the vacuum is operated with applicable regulations. 9. Removing the filter elements: 3. B C D B Inserting the filter elements: 5. For safety and...
.... Makita VC4710 6.2.6 Replacing filter element (Auto-Filter Cleaning System) A Never use the vacuum without a filter. Insert new filter elements (C) into the cassettes (D). 6. Dispose of main filter elements we strongly recommend using filter bag when unit is switched off and unplugged. 2. Ensure that the vacuum is operated with applicable regulations. 9. Removing the filter elements: 3. B C D B Inserting the filter elements: 5. For safety and...

VC4710 Instruction Manual
Page 23
... full. eration". • Clogged suction hose/nozzle. • Clean suction hose/nozzle • Tank, disposal bag or filter bag • See "Wet suction" or "Replace- Original Instruction 23 works or that the power tool tic mode connected properly. and allow it to repair vacuum by Makita or authorized service centers, always using Makita replacement parts. 7 Troubleshooting Makita VC4710 Fault • Motor does not start Cause Remedy • Check the...
... full. eration". • Clogged suction hose/nozzle. • Clean suction hose/nozzle • Tank, disposal bag or filter bag • See "Wet suction" or "Replace- Original Instruction 23 works or that the power tool tic mode connected properly. and allow it to repair vacuum by Makita or authorized service centers, always using Makita replacement parts. 7 Troubleshooting Makita VC4710 Fault • Motor does not start Cause Remedy • Check the...
VC4710 Instruction Manual
Page 24
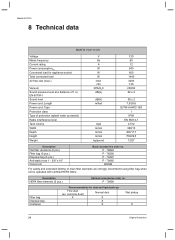
... socket Total connected load Air flow rate (max.) Vacuum Sound pressure level at a distance of 1 m, EN 60704-1 Sound level Power cord: Length Power cord: Type Protection class Type of main filter elements we strongly recommend using filter bag when unit is operated with certified HEPA filters. concrete dust) Normal dust X X X X Wet pickup X 24 Original Instruction P - 79843 P - 78293 P - 70297 P - 79865 W6084 For safety and extended lifetime...
... socket Total connected load Air flow rate (max.) Vacuum Sound pressure level at a distance of 1 m, EN 60704-1 Sound level Power cord: Length Power cord: Type Protection class Type of main filter elements we strongly recommend using filter bag when unit is operated with certified HEPA filters. concrete dust) Normal dust X X X X Wet pickup X 24 Original Instruction P - 79843 P - 78293 P - 70297 P - 79865 W6084 For safety and extended lifetime...

VC4710 Parts Breakdown
Page 1
... 1 pc ROTARY KNOB 7 W9868 1 pc O-RING 8 W107406161 1 pc AUTO ON-OFF PCB 120V - Spare parts QTY Description 1 W107406157 1 pc COVER 2 W302004019 1 pc HANDLE 3 W107401369 1 pc HANDLE COVER 4 W107406158 1 pc SWITCHBOARD MAKITA -Type21 5 W302004338 1 pc OUTLET *US* - SHUTOFF 41 W107406159 1 pc CONTAINER 42 W302004059 2 pcs CASTER Ø 75x100 43 W107400063 1 pc SCREW 5X35 44 W302004022 1 pc WHEEL AXLE 45...
... 1 pc ROTARY KNOB 7 W9868 1 pc O-RING 8 W107406161 1 pc AUTO ON-OFF PCB 120V - Spare parts QTY Description 1 W107406157 1 pc COVER 2 W302004019 1 pc HANDLE 3 W107401369 1 pc HANDLE COVER 4 W107406158 1 pc SWITCHBOARD MAKITA -Type21 5 W302004338 1 pc OUTLET *US* - SHUTOFF 41 W107406159 1 pc CONTAINER 42 W302004059 2 pcs CASTER Ø 75x100 43 W107400063 1 pc SCREW 5X35 44 W302004022 1 pc WHEEL AXLE 45...

VC4710 Flyer English
Page 2
... cord reel and hose rack for operator convenience n Variable speed control dial for a variety of applications n Wide-set (P-70312) n Crevis nozzle (W6084) n Cuff adapter (P-70421) Makita offers a wide variety of 2 microns Peak horse power** 4 HP Gross container size 12 gal. 12 GALLON WET/DRY VACUUM Model VC4710 FEATURES & BENEFITS n Onboard tool-activated outlet starts and stops vacuum with power tool usage n Soft start function for lower AMP-draw...
... cord reel and hose rack for operator convenience n Variable speed control dial for a variety of applications n Wide-set (P-70312) n Crevis nozzle (W6084) n Cuff adapter (P-70421) Makita offers a wide variety of 2 microns Peak horse power** 4 HP Gross container size 12 gal. 12 GALLON WET/DRY VACUUM Model VC4710 FEATURES & BENEFITS n Onboard tool-activated outlet starts and stops vacuum with power tool usage n Soft start function for lower AMP-draw...


