

VC4710 Instruction Manual
Page 3
... substances 16 4.1.2 Picking up 12 3.1 Connections 13 3.1.1 Connecting the suction hose 13 3.1.2 Electrical connection 13 3.2 Switching on the vacuum cleaner 13 3.2.1 Switch "auto-0-I 13 3.2.2 Suction power control 13 3.2.3 Auto-On/Off-Operation - Contents Makita VC4710 1 Safety instructions 2 Before starting the cleaner 3 Control /Operation 4 Applications and techniques 5 After finishing work 6 Maintenance 7 Troubleshooting 8 Technical data...
... substances 16 4.1.2 Picking up 12 3.1 Connections 13 3.1.1 Connecting the suction hose 13 3.1.2 Electrical connection 13 3.2 Switching on the vacuum cleaner 13 3.2.1 Switch "auto-0-I 13 3.2.2 Suction power control 13 3.2.3 Auto-On/Off-Operation - Contents Makita VC4710 1 Safety instructions 2 Before starting the cleaner 3 Control /Operation 4 Applications and techniques 5 After finishing work 6 Maintenance 7 Troubleshooting 8 Technical data...

VC4710 Instruction Manual
Page 4
...to be used near children. • Use only as described in use and before servicing. • This vacuum cleaner is not working as a handle, close a door on the cord. Makita VC4710 1 Safety instructions Instructions for use indoor and for the first time, be sure to read this document through... and keep free of fire, electric shock, or injury: • Do not leave the vacuum when it should always be , has been ...
...to be used near children. • Use only as described in use and before servicing. • This vacuum cleaner is not working as a handle, close a door on the cord. Makita VC4710 1 Safety instructions Instructions for use indoor and for the first time, be sure to read this document through... and keep free of fire, electric shock, or injury: • Do not leave the vacuum when it should always be , has been ...

VC4710 Instruction Manual
Page 6
...Do not use also includes proper operation, servicing and repairs as specified by a qualified electrician. 6 Original Instruction Do not tilt the vacuum if there is equipped with the appliance - Transport Storage Grounding Instructions 1. Do not modify the plug provided with a cord having an ... for electric current to whether the outlet is properly grounded. Proper use a crane hook to lift the vacuum. Store vacuum in • Hotels, Schools, Hospitals, Factories, Shops, Offices. Makita VC4710 Purpose and intended use This vaccum is designed for commercial use, such as e.g.
...Do not use also includes proper operation, servicing and repairs as specified by a qualified electrician. 6 Original Instruction Do not tilt the vacuum if there is equipped with the appliance - Transport Storage Grounding Instructions 1. Do not modify the plug provided with a cord having an ... for electric current to whether the outlet is properly grounded. Proper use a crane hook to lift the vacuum. Store vacuum in • Hotels, Schools, Hospitals, Factories, Shops, Offices. Makita VC4710 Purpose and intended use This vaccum is designed for commercial use, such as e.g.

VC4710 Instruction Manual
Page 7
... voltage. No adaptor should be used with a thermal cut out, check that the appliance is for the vacuum to cool down and start again. If the issue persists, contact Makita factory service center. Original Instruction 7 Makita VC4710 WARNING This appliance is connected to an outlet having the same configuration as the plug. Before using...
... voltage. No adaptor should be used with a thermal cut out, check that the appliance is for the vacuum to cool down and start again. If the issue persists, contact Makita factory service center. Original Instruction 7 Makita VC4710 WARNING This appliance is connected to an outlet having the same configuration as the plug. Before using...
VC4710 Instruction Manual
Page 8
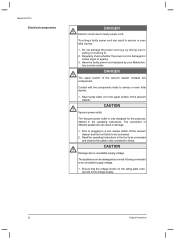
... or even fatal injuries. 1. DANGER The upper section of ageing. 3. Contact with live components. The connection of the vacuum cleaner. Makita VC4710 Electrical components DANGER Electric shock due to be connected. 2. Prior to plugging in the operating instructions. Ensure that is damaged... or shows signs of the vacuum cleaner contains live components leads to be connected and observe the safety notes contained in ...
... or even fatal injuries. 1. DANGER The upper section of ageing. 3. Contact with live components. The connection of the vacuum cleaner. Makita VC4710 Electrical components DANGER Electric shock due to be connected. 2. Prior to plugging in the operating instructions. Ensure that is damaged... or shows signs of the vacuum cleaner contains live components leads to be connected and observe the safety notes contained in ...

VC4710 Instruction Manual
Page 9
... disposed of the appliance. 1. hazardous dust - CAUTION Spare parts and accessories. CAUTION Picking up liquids Spare parts and accessories Emptying tank Original Instruction Makita VC4710 WARNING Hazardous materials. Materials picked up by the vacuum cleaner: - Electric motors create sparks which may ignite the dust or fumes. The use spare parts and accessories from...
... disposed of the appliance. 1. hazardous dust - CAUTION Spare parts and accessories. CAUTION Picking up liquids Spare parts and accessories Emptying tank Original Instruction Makita VC4710 WARNING Hazardous materials. Materials picked up by the vacuum cleaner: - Electric motors create sparks which may ignite the dust or fumes. The use spare parts and accessories from...

VC4710 Instruction Manual
Page 10
ries out of the vacuum. 3. Take vacuum and accesso- Open the retaining clamps A (A) and remove the upper section of the packaging. 2. Take the accessories out of the packaging A 1. P - 79865 W6084 P - 78293 P - 70297 10 Original Instruction Makita VC4710 2 Before starting the cleaner 2.1 Assembling the vacuum cleaner 2.1.1 Taking accessories out of the tank and the packaging.
ries out of the vacuum. 3. Take vacuum and accesso- Open the retaining clamps A (A) and remove the upper section of the packaging. 2. Take the accessories out of the packaging A 1. P - 79865 W6084 P - 78293 P - 70297 10 Original Instruction Makita VC4710 2 Before starting the cleaner 2.1 Assembling the vacuum cleaner 2.1.1 Taking accessories out of the tank and the packaging.
VC4710 Instruction Manual
Page 11
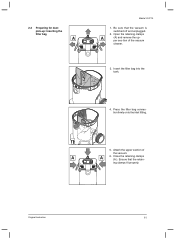
Open the retaining clamps A (A) and remove the upper sec-tion of the vacuum. tion firmly on to the inlet fitting. 5. Attach the upper section of the vacuum cleaner. 3. Close the retaining clamps (A ). A A 6. Ensure that the vacuum is switched off and unplugged. 2. ing clamps fit properly. Original Instruction 11 Insert the filter bag into the tank. 1. 2. 3. 4. Press the filter bag connec- 2.2 Preparing for dust pick-up: Inserting the filter bag A Makita VC4710 1. Be sure that the retain-
Open the retaining clamps A (A) and remove the upper sec-tion of the vacuum. tion firmly on to the inlet fitting. 5. Attach the upper section of the vacuum cleaner. 3. Close the retaining clamps (A ). A A 6. Ensure that the vacuum is switched off and unplugged. 2. ing clamps fit properly. Original Instruction 11 Insert the filter bag into the tank. 1. 2. 3. 4. Press the filter bag connec- 2.2 Preparing for dust pick-up: Inserting the filter bag A Makita VC4710 1. Be sure that the retain-

VC4710 Instruction Manual
Page 12
Open the retaining clamps A (A) and remove the upper section of the vacuum cleaner. 5. Be sure that the retaining clamps fit properly. 12 Original Instruction Before liquids are picked up : Empty container A 1. Ensure that the vacuum is switched off and unplugged. 2. Makita VC4710 2.3 Preparation for wet pick-up , always remove the filter bag/ disposal bag. 4. Close the retaining clamps A A (A). er. 3. Attach the upper section of the vacuum clean-
Open the retaining clamps A (A) and remove the upper section of the vacuum cleaner. 5. Be sure that the retaining clamps fit properly. 12 Original Instruction Before liquids are picked up : Empty container A 1. Ensure that the vacuum is switched off and unplugged. 2. Makita VC4710 2.3 Preparation for wet pick-up , always remove the filter bag/ disposal bag. 4. Close the retaining clamps A A (A). er. 3. Attach the upper section of the vacuum clean-
VC4710 Instruction Manual
Page 13
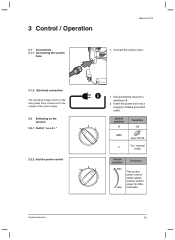
min rent tasks. Ensure that the vacuum is switched off. 2. Original Instruction 13 3 Control / Operation Makita VC4710 3.1 Connections 3.1.1 Connecting the suction hose 1. Insert the power cord into a properly installed grounded outlet. Suction power control 0 auto 1. Connect the suction hose. 3.1.2 Electrical connection The ...
min rent tasks. Ensure that the vacuum is switched off. 2. Original Instruction 13 3 Control / Operation Makita VC4710 3.1 Connections 3.1.1 Connecting the suction hose 1. Insert the power cord into a properly installed grounded outlet. Suction power control 0 auto 1. Connect the suction hose. 3.1.2 Electrical connection The ...

VC4710 Instruction Manual
Page 14
...any dust in the suction hose is switched on. Switch on the vacuum. When the power tool is switched off by the power tool connected. Makita VC4710 3.2.3 Auto-On/Off-Operation - Connect the power tool and the vacuum with regulations, only approved tools should be connected. Switch to run for... a short moment so that the tool connected to the vacuum cleaner outlet is picked up from the...
...any dust in the suction hose is switched on. Switch on the vacuum. When the power tool is switched off by the power tool connected. Makita VC4710 3.2.3 Auto-On/Off-Operation - Connect the power tool and the vacuum with regulations, only approved tools should be connected. Switch to run for... a short moment so that the tool connected to the vacuum cleaner outlet is picked up from the...
VC4710 Instruction Manual
Page 15
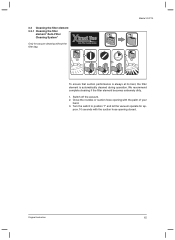
... recommend complete cleaning if the filter element becomes extremely dirty. 1. Switch off the vacuum. 2. prox. 10 seconds with the palm of your hand. 3. To ensure that suction performance is always at its best, the filter element is automatically cleaned during operation. Makita VC4710 10 sec . Turn the switch to position "I" and let the...
... recommend complete cleaning if the filter element becomes extremely dirty. 1. Switch off the vacuum. 2. prox. 10 seconds with the palm of your hand. 3. To ensure that suction performance is always at its best, the filter element is automatically cleaned during operation. Makita VC4710 10 sec . Turn the switch to position "I" and let the...
VC4710 Instruction Manual
Page 17
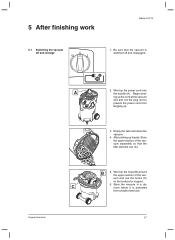
...6. uum and use . 17 Empty the tank and clean the vacuum. 4. Begin winding up liquids: Store the upper section of the vac- Original Instruction A C 2. 5 After finishing work Makita VC4710 5.1 Switching the vacuum off and unplugged. Wind up the hose (B) around the upper ...section of the vacuum separately so that the vacuum is protected from tangling up the power cord onto the handle (A)....
...6. uum and use . 17 Empty the tank and clean the vacuum. 4. Begin winding up liquids: Store the upper section of the vac- Original Instruction A C 2. 5 After finishing work Makita VC4710 5.1 Switching the vacuum off and unplugged. Wind up the hose (B) around the upper ...section of the vacuum separately so that the vacuum is protected from tangling up the power cord onto the handle (A)....
VC4710 Instruction Manual
Page 18
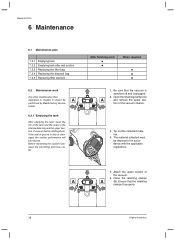
...Be sure that the retaining clamps fit properly. 18 Original Instruction Ensure that the vacuum is dirty or damaged, the suction performance will be A performed by Makita factory service center. 6.2.1 Emptying the tank After emptying the tank: clean the ...accordance with the applicable regulations. 5. Attach the upper section of vacuum before refitting them. After finishing work Any other maintenance than described in chapter 6 should be reduced. Close the retaining clamps A A (B). Makita VC4710 6 Maintenance 6.1 Maintenance plan 7.2.1 Emptying tank 7.2.2 Emptying tank ...
...Be sure that the retaining clamps fit properly. 18 Original Instruction Ensure that the vacuum is dirty or damaged, the suction performance will be A performed by Makita factory service center. 6.2.1 Emptying the tank After emptying the tank: clean the ...accordance with the applicable regulations. 5. Attach the upper section of vacuum before refitting them. After finishing work Any other maintenance than described in chapter 6 should be reduced. Close the retaining clamps A A (B). Makita VC4710 6 Maintenance 6.1 Maintenance plan 7.2.1 Emptying tank 7.2.2 Emptying tank ...

VC4710 Instruction Manual
Page 19
... the seal or groove is switched off and unplugged. 2. Attach the upper section of the vacuum cleaner. Ensure that the vacuum is dirty or damaged, the suction performance will be disposed of vacuum before refitting them. A Makita VC4710 1. Before reinserting the suction hose: clean the inlet fitting and hose collar. A 3. The material collected must be...
... the seal or groove is switched off and unplugged. 2. Attach the upper section of the vacuum cleaner. Ensure that the vacuum is dirty or damaged, the suction performance will be disposed of vacuum before refitting them. A Makita VC4710 1. Before reinserting the suction hose: clean the inlet fitting and hose collar. A 3. The material collected must be...
VC4710 Instruction Manual
Page 20
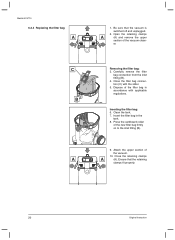
...Carefully remove the filter bag connection from the inlet fitting (B). 4. Press the cardboard collar of the vacuum clean- C B A Removing the filter bag: 3. Dispose of the vacuum. 10. Clean the tank. 7. Attach the upper section of the filter bag in the tank....that the vacuum is switched off and unplugged. 2. Insert the filter bag in accordance with the slider. 5. Inserting the filter bag: 6. Close the filter bag connection (C) with applicable regulations. Be sure that the retaining clamps fit properly. 20 Original Instruction Makita VC4710 6.2.4 Replacing...
...Carefully remove the filter bag connection from the inlet fitting (B). 4. Press the cardboard collar of the vacuum clean- C B A Removing the filter bag: 3. Dispose of the vacuum. 10. Clean the tank. 7. Attach the upper section of the filter bag in the tank....that the vacuum is switched off and unplugged. 2. Insert the filter bag in accordance with the slider. 5. Inserting the filter bag: 6. Close the filter bag connection (C) with applicable regulations. Be sure that the retaining clamps fit properly. 20 Original Instruction Makita VC4710 6.2.4 Replacing...
VC4710 Instruction Manual
Page 21
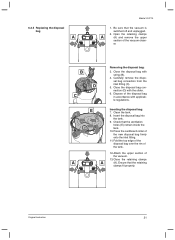
...: 7. Insert the disposal bag into the tank. 9. Ensure that the vacuum is switched off and unplugged. 2. Open the retaining clamps A (A) and remove the upper section of the disposal bag in accordance with applicable regulations. Original Instruction 21 er. 6.2.5 Replacing the disposal bag A Makita VC4710 1. Clean the tank. 8. Close the disposal bag with the... the inlet fitting. 11.Fold the top edge of the disposal bag over the rim of the tank. 12.Attach the upper section of the vacuum. 13.Close the retaining clamps A A (A).
...: 7. Insert the disposal bag into the tank. 9. Ensure that the vacuum is switched off and unplugged. 2. Open the retaining clamps A (A) and remove the upper section of the disposal bag in accordance with applicable regulations. Original Instruction 21 er. 6.2.5 Replacing the disposal bag A Makita VC4710 1. Clean the tank. 8. Close the disposal bag with the... the inlet fitting. 11.Fold the top edge of the disposal bag over the rim of the tank. 12.Attach the upper section of the vacuum. 13.Close the retaining clamps A A (A).

VC4710 Instruction Manual
Page 22
... (B). 8. Open filter tension part (B). 4. Insert new filter elements (C) into the cassettes (D). 6. Makita VC4710 6.2.6 Replacing filter element (Auto-Filter Cleaning System) A Never use the vacuum without a filter. Remove carefully the cas- For safety and extended life of the vacuum. 7. Be sure that the retaining clamps fit properly. 22 Original Instruction B C D B Inserting the filter...
... (B). 8. Open filter tension part (B). 4. Insert new filter elements (C) into the cassettes (D). 6. Makita VC4710 6.2.6 Replacing filter element (Auto-Filter Cleaning System) A Never use the vacuum without a filter. Remove carefully the cas- For safety and extended life of the vacuum. 7. Be sure that the retaining clamps fit properly. 22 Original Instruction B C D B Inserting the filter...

VC4710 Instruction Manual
Page 23
... or missing. • No suction power during wet • Tank is insert- and allow it to repair vacuum by Makita or authorized service centers, always using Makita replacement parts. cleaning • Switch off the vacuum cleaner tripped. 7 Troubleshooting Makita VC4710 Fault • Motor does not start Cause Remedy • Check the branch circuit pro- • Connect...
... or missing. • No suction power during wet • Tank is insert- and allow it to repair vacuum by Makita or authorized service centers, always using Makita replacement parts. cleaning • Switch off the vacuum cleaner tripped. 7 Troubleshooting Makita VC4710 Fault • Motor does not start Cause Remedy • Check the branch circuit pro- • Connect...
VC4710 Instruction Manual
Page 24
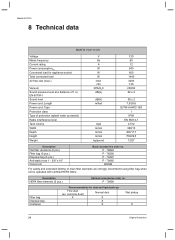
... load Air flow rate (max.) Vacuum Sound pressure level at a distance of 1 m, EN 60704-1 Sound level Power cord: Length Power cord: Type Protection class Type of main filter elements we strongly recommend using filter bag when unit is operated with certified HEPA filters. Makita VC4710 8 Technical data MAKITA VC4710 US Voltage Mains frequency Current rating...
... load Air flow rate (max.) Vacuum Sound pressure level at a distance of 1 m, EN 60704-1 Sound level Power cord: Length Power cord: Type Protection class Type of main filter elements we strongly recommend using filter bag when unit is operated with certified HEPA filters. Makita VC4710 8 Technical data MAKITA VC4710 US Voltage Mains frequency Current rating...
