Instruction Manual
Page 2
... handle appliance with damaged battery. Use only the charger supplied by or near children. 4. Use only as it to recharge. 13. Do not put any opening blocked; Do not expose to pick up anything that is not working as described in areas where they may reduce air flow. 8. Do not use with wet hands. 7. Remove battery from openings and moving parts. 9. Do not use to rain. keep free...
... handle appliance with damaged battery. Use only the charger supplied by or near children. 4. Use only as it to recharge. 13. Do not put any opening blocked; Do not expose to pick up anything that is not working as described in areas where they may reduce air flow. 8. Do not use with wet hands. 7. Remove battery from openings and moving parts. 9. Do not use to rain. keep free...
Instruction Manual
Page 3
... THESE INSTRUCTIONS. Stop operation immediately if you drop or strike the cleaner, check it carefully for household use . 2. If you notice anything abnormal. 4. Do not bring close to clot such as cement or tonor − Conductive dust such as nails, coins, etc. (3) Do not expose battery cartridge to water or rain. Read this instruction manual and the charger instruction manual carefully before operation. Do...
... THESE INSTRUCTIONS. Stop operation immediately if you drop or strike the cleaner, check it carefully for household use . 2. If you notice anything abnormal. 4. Do not bring close to clot such as cement or tonor − Conductive dust such as nails, coins, etc. (3) Do not expose battery cartridge to water or rain. Read this instruction manual and the charger instruction manual carefully before operation. Do...
Instruction Manual
Page 4
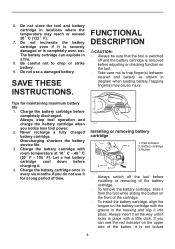
... cleaner and battery as shown in a fire. 8. Always stop tool operation and charge the battery cartridge when you do not use a damaged battery. Let a hot battery cartridge cool down before completely discharged. If you can explode in diagram when loading battery.Trapping finger(s) may reach or exceed 50 ゚ C (122 ゚ F). 7. 6. Tips for a long period of the button, it into place. Red indicator 1 2. Battery cartridge...
... cleaner and battery as shown in a fire. 8. Always stop tool operation and charge the battery cartridge when you do not use a damaged battery. Let a hot battery cartridge cool down before completely discharged. If you can explode in diagram when loading battery.Trapping finger(s) may reach or exceed 50 ゚ C (122 ゚ F). 7. 6. Tips for a long period of the button, it into place. Red indicator 1 2. Battery cartridge...
Instruction Manual
Page 5
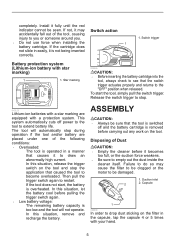
... tool is too low and the tool will automatically stop . 012128 Lithium-ion batteries with a star marking are equipped with your hand. 5 Capsule 1 009992 In order to empty out the dust inside the cleaner itself. Switch trigger Battery protection system (Lithium-ion battery with star marking) 1 1. ASSEMBLY CAUTION: • Always be damaged. 1. If not, it may cause the filter to be clogged or the motor...
... tool is too low and the tool will automatically stop . 012128 Lithium-ion batteries with a star marking are equipped with your hand. 5 Capsule 1 009992 In order to empty out the dust inside the cleaner itself. Switch trigger Battery protection system (Lithium-ion battery with star marking) 1 1. ASSEMBLY CAUTION: • Always be damaged. 1. If not, it may cause the filter to be clogged or the motor...
Instruction Manual
Page 6
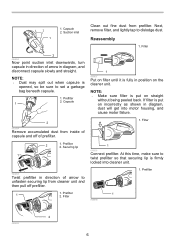
... cause motor failure. 2 009994 Remove accumulated dust from prefilter. At this time, make sure to set a garbage bag beneath capsule. 1. Prefilter 2. Suction inlet 1 Clean out fine dust from inside of capsule and off prefilter. 1. Filter 009999 2 009996 6 Capsule 1 009997 Put on the cleaner unit. Filter 2 1. 1. Reassembly 1. Filter 2 009993 Now point suction inlet downwards, turn capsule in position on filter until it is fully in direction of...
... cause motor failure. 2 009994 Remove accumulated dust from prefilter. At this time, make sure to set a garbage bag beneath capsule. 1. Prefilter 2. Suction inlet 1 Clean out fine dust from inside of capsule and off prefilter. 1. Filter 009999 2 009996 6 Capsule 1 009997 Put on the cleaner unit. Filter 2 1. 1. Reassembly 1. Filter 2 009993 Now point suction inlet downwards, turn capsule in position on filter until it is fully in direction of...
Instruction Manual
Page 7
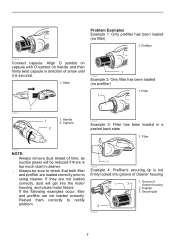
... suction power will be reduced if there is too much dust in cleaner. • Always be sure to check that both filter and prefilter are loaded correctly prior to using cleaner. Capsule 010004 Example 3: Filter has been loaded in direction of 1 3 cleaner housing 2. Reload them correctly to rectify problem. 1 010005 Example 4: Prefilter's securing lip is secured. 1. Filter 010002 NOTE: • Always remove dust ahead of cleaner...
... suction power will be reduced if there is too much dust in cleaner. • Always be sure to check that both filter and prefilter are loaded correctly prior to using cleaner. Capsule 010004 Example 3: Filter has been loaded in direction of 1 3 cleaner housing 2. Reload them correctly to rectify problem. 1 010005 Example 4: Prefilter's securing lip is secured. 1. Filter 010002 NOTE: • Always remove dust ahead of cleaner...
Instruction Manual
Page 8
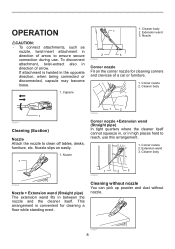
... may become loose. 1. Nozzle 2 3 010058 Corner nozzle Fit on easily. 1. Nozzle 1 010059 1 2 Corner nozzle +Extension wand (Straight pipe) In tight quarters where the cleaner itself . To disconnect attachment, twist-extract also in direction of arrow. Cleaner body 1 009987 Cleaning (Suction) Nozzle Attach the nozzle to reach, use . Cleaner body 1 2. Corner nozzle 2. Cleaning without nozzle You can pick up powder and dust without nozzle. 010057 8 Corner nozzle 2. Cleaner body 1 010060 2 3 010056 Nozzle + Extension wand (Straight pipe) The...
... may become loose. 1. Nozzle 2 3 010058 Corner nozzle Fit on easily. 1. Nozzle 1 010059 1 2 Corner nozzle +Extension wand (Straight pipe) In tight quarters where the cleaner itself . To disconnect attachment, twist-extract also in direction of arrow. Cleaner body 1 009987 Cleaning (Suction) Nozzle Attach the nozzle to reach, use . Cleaner body 1 2. Corner nozzle 2. Cleaning without nozzle You can pick up powder and dust without nozzle. 010057 8 Corner nozzle 2. Cleaner body 1 010060 2 3 010056 Nozzle + Extension wand (Straight pipe) The...
Instruction Manual
Page 9
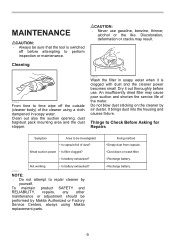
... (cleaner body) of dust? Weak suction power Is filter clogged? MAINTENANCE CAUTION: • Always be sure that the tool is clogged with dust and the cleaner power becomes small. Cleaning CAUTION: • Never use . Clean out also the suction opening, dust bag/dust pack mounting area and the dust stopper. 010009 Wash the filter in soapy water. Recharge battery. Fixing method Empty dust from capsule. Things to Check Before Asking for Repairs Symptom Area to repair cleaner by yourself. Dry it is switched...
... (cleaner body) of dust? Weak suction power Is filter clogged? MAINTENANCE CAUTION: • Always be sure that the tool is clogged with dust and the cleaner power becomes small. Cleaning CAUTION: • Never use . Clean out also the suction opening, dust bag/dust pack mounting area and the dust stopper. 010009 Wash the filter in soapy water. Recharge battery. Fixing method Empty dust from capsule. Things to Check Before Asking for Repairs Symptom Area to repair cleaner by yourself. Dry it is switched...
Instruction Manual
Page 10
... local Makita Service Center. • Extension wand (Straight pipe) • Nozzle • Nozzle for carpet • Shelf brush • Corner nozzle • Round brush • Flexible hose • Filter • Prefilter • Various type of Makita's Factory or Authorized Service Centers. MAKITA LIMITED ONE YEAR WARRANTY Warranty Policy Every Makita tool is caused by others: repairs are recommended for use accessory or attachment for more details regarding these accessories, ask your Makita tool specified...
... local Makita Service Center. • Extension wand (Straight pipe) • Nozzle • Nozzle for carpet • Shelf brush • Corner nozzle • Round brush • Flexible hose • Filter • Prefilter • Various type of Makita's Factory or Authorized Service Centers. MAKITA LIMITED ONE YEAR WARRANTY Warranty Policy Every Makita tool is caused by others: repairs are recommended for use accessory or attachment for more details regarding these accessories, ask your Makita tool specified...

Makita DC18RC Instruction Manual
Page 3
... 1. Before using battery. 3. Make sure cord is inserted, the red charging light will light up transformer, an engine generator or DC power receptacle. 17. Do not operate or disassemble charger if it within another five seconds after this action makes the melody sound change specifications without supervision. 14. aged in green color repeatedly. 2. After charging, remove the battery cartridge from the power source. Removing and...
... 1. Before using battery. 3. Make sure cord is inserted, the red charging light will light up transformer, an engine generator or DC power receptacle. 17. Do not operate or disassemble charger if it within another five seconds after this action makes the melody sound change specifications without supervision. 14. aged in green color repeatedly. 2. After charging, remove the battery cartridge from the power source. Removing and...

Makita DC18RC Instruction Manual
Page 4
Never use it for other purposes or for other manufacturer's batteries. • When you charge a battery cartridge which can be longer than usual in a location exposed to cold air. Battery cartridge from just-operated tool or battery cartridge that has been left for a long time. - Battery cartridge that case, yellow light lights up. 1. The terminals on the charger or battery cartridge are clogged with dust The battery can...
Never use it for other purposes or for other manufacturer's batteries. • When you charge a battery cartridge which can be longer than usual in a location exposed to cold air. Battery cartridge from just-operated tool or battery cartridge that has been left for a long time. - Battery cartridge that case, yellow light lights up. 1. The terminals on the charger or battery cartridge are clogged with dust The battery can...
XLC02ZW Parts Breakdown
Page 2
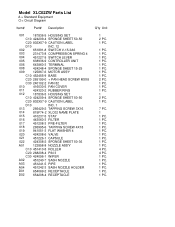
Model XLC02ZW Parts List A = Standard Equipment 〇= Circuit Diagram Item# Part# Description 001 187836-5 HOUSING SET 001 C10 424209-4 SPONGE SHEET 50-50 001 C20 802X57-9 CAUTION LABEL 001 D10 INC. 12 002 651891-8 SWITCH V-15-3A6 003 231473-8 COMPRESSION SPRING 4 004 451227-9 SWITCH LEVER 005 ... NAME PLATE 015 410237-5 STAY 016 443060-3 FILTER 017 451208-3 PRE-FILTER 018 265995-6 TAPPING SCREW 4X18 019 941051-3 FLAT WASHER 4 020 424208-6 VALVE 021 451226-1 CAPSULE 022 424308-2 SPONGE SHEET 50-36 A01 122858-8 NOZZLE ASS'Y A01 C10 451410-8 ROLLER A01 C20...
Model XLC02ZW Parts List A = Standard Equipment 〇= Circuit Diagram Item# Part# Description 001 187836-5 HOUSING SET 001 C10 424209-4 SPONGE SHEET 50-50 001 C20 802X57-9 CAUTION LABEL 001 D10 INC. 12 002 651891-8 SWITCH V-15-3A6 003 231473-8 COMPRESSION SPRING 4 004 451227-9 SWITCH LEVER 005 ... NAME PLATE 015 410237-5 STAY 016 443060-3 FILTER 017 451208-3 PRE-FILTER 018 265995-6 TAPPING SCREW 4X18 019 941051-3 FLAT WASHER 4 020 424208-6 VALVE 021 451226-1 CAPSULE 022 424308-2 SPONGE SHEET 50-36 A01 122858-8 NOZZLE ASS'Y A01 C10 451410-8 ROLLER A01 C20...