
Makita DC18RC Instruction Manual
Page 3
... re-inserting it stops adjusting to avoid a hazard. 12. CAUTION - If the cord or plug is inserted, the red charging light will begin . Do not allow anything to notify the completion of charger. When the battery cartridge is damaged, ask Makita authorized service center to replace it within five seconds after this, the melody sound changes in presence of the charger. 6. SAVE THESE INSTRUCTIONS...
... re-inserting it stops adjusting to avoid a hazard. 12. CAUTION - If the cord or plug is inserted, the red charging light will begin . Do not allow anything to notify the completion of charger. When the battery cartridge is damaged, ask Makita authorized service center to replace it within five seconds after this, the melody sound changes in presence of the charger. 6. SAVE THESE INSTRUCTIONS...

Makita DC18RC Instruction Manual
Page 4
... - - 15 Li-ion Battery cartridge - - Recharge of the yellow warning light. Over-discharge of battery (continue to direct sunlight for charging Makita-battery cartridge. BH1433 Capacity (Ah) 1.7 2.0 2.0 2.7 3.3 3.3 Charging time (Minutes) 20 20 15 20 30 22 Voltage Number of such battery is possible. Trouble on the charger or battery cartridge are clogged with dust The battery can extend the life of battery with dust. • The...
... - - 15 Li-ion Battery cartridge - - Recharge of the yellow warning light. Over-discharge of battery (continue to direct sunlight for charging Makita-battery cartridge. BH1433 Capacity (Ah) 1.7 2.0 2.0 2.7 3.3 3.3 Charging time (Minutes) 20 20 15 20 30 22 Voltage Number of such battery is possible. Trouble on the charger or battery cartridge are clogged with dust The battery can extend the life of battery with dust. • The...

XOB01 Instruction Manual
Page 2
... risk of electric shock. When operating a power tool outdoors, use . Personal safety 10. Do not use a power tool while you are doing and use any adjusting key or wrench before connecting to power source and/or battery pack, picking up or carrying the tool. Prevent unintentional starting. Remove any adapter plugs with earthed (grounded) power tools. This enables better control of the power tool in the warnings refers to your mains-operated (corded) power tool or battery-operated (cordless) power tool. Power tool plugs...
... risk of electric shock. When operating a power tool outdoors, use . Personal safety 10. Do not use a power tool while you are doing and use any adjusting key or wrench before connecting to power source and/or battery pack, picking up or carrying the tool. Prevent unintentional starting. Remove any adapter plugs with earthed (grounded) power tools. This enables better control of the power tool in the warnings refers to your mains-operated (corded) power tool or battery-operated (cordless) power tool. Power tool plugs...
XOB01 Instruction Manual
Page 3
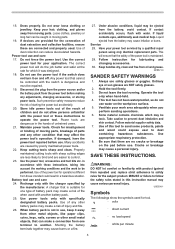
... the power tool repaired before use , keep it on the pad before use ) replace strict adherence to another battery pack. 25. Properly maintained cutting tools with the switch is not in use . in moving parts, breakage of this instruction manual may be controlled with sharp cutting edges are less likely to bind and are NOT safety glasses. 2. Keep handles dry, clean and free from those intended could expose user to prevent dust...
... the power tool repaired before use , keep it on the pad before use ) replace strict adherence to another battery pack. 25. Properly maintained cutting tools with the switch is not in use . in moving parts, breakage of this instruction manual may be controlled with sharp cutting edges are less likely to bind and are NOT safety glasses. 2. Keep handles dry, clean and free from those intended could expose user to prevent dust...

XOB01 Instruction Manual
Page 4
... damaged or is not locked completely. Do not use it all instructions and cautionary markings on (1) battery charger, (2) battery, and (3) product using battery cartridge, read all the way until the red indicator cannot be sure that the tool is switched off the tool before adjusting or checking function on the battery cartridge with star marking) 1 1. Always stop operating immediately. Overcharging shortens the battery service life. 3. FUNCTIONAL DESCRIPTION...
... damaged or is not locked completely. Do not use it all instructions and cautionary markings on (1) battery charger, (2) battery, and (3) product using battery cartridge, read all the way until the red indicator cannot be sure that the tool is switched off the tool before adjusting or checking function on the battery cartridge with star marking) 1 1. Always stop operating immediately. Overcharging shortens the battery service life. 3. FUNCTIONAL DESCRIPTION...
XOB01 Instruction Manual
Page 5
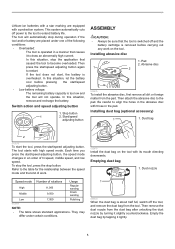
... pad. Installing dust bag (optional accessory) 1 1. Dust nozzle Speed mode Number of hi speed, middle speed, and low speed. Empty the dust bag by turning it lightly. 5 Stop button 1 2. Be careful to the pad. The tool will not operate. In this situation, remove and recharge the battery. Switch action and speed adjusting button 1. Start/speed adjusting button ASSEMBLY CAUTION: • Always be sure that the tool is switched off the tool, and remove the dust bag from the tool. Dust bag 2 012878 To start the tool, press the start /speed adjusting button...
... pad. Installing dust bag (optional accessory) 1 1. Dust nozzle Speed mode Number of hi speed, middle speed, and low speed. Empty the dust bag by turning it lightly. 5 Stop button 1 2. Be careful to the pad. The tool will not operate. In this situation, remove and recharge the battery. Switch action and speed adjusting button 1. Start/speed adjusting button ASSEMBLY CAUTION: • Always be sure that the tool is switched off the tool, and remove the dust bag from the tool. Dust bag 2 012878 To start the tool, press the start /speed adjusting button...
XOB01 Instruction Manual
Page 6
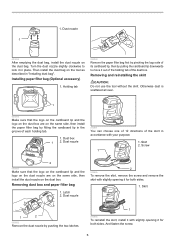
... lock it for both sides. 1. Dust nozzle 012881 You can choose one of 12 directions of the dust box. Screw 1 2 009095 Make sure that the logo on the cardboard lip and the logo on the dust box are on the same side, then install the dust nozzle on the tool ...install the dust bag on the dust box. Removing dust box and paper filter bag 1. Otherwise dust is scattered all over. 1 009094 Make sure that the logo on the cardboard lip and the logo on the dust nozzle are on the dust bag. Removing and reinstalling the skirt CAUTION: Do not use the tool without the skirt. Turn the dust...
... lock it for both sides. 1. Dust nozzle 012881 You can choose one of 12 directions of the dust box. Screw 1 2 009095 Make sure that the logo on the cardboard lip and the logo on the dust box are on the same side, then install the dust nozzle on the tool ...install the dust bag on the dust box. Removing dust box and paper filter bag 1. Otherwise dust is scattered all over. 1 009094 Make sure that the logo on the cardboard lip and the logo on the dust nozzle are on the dust bag. Removing and reinstalling the skirt CAUTION: Do not use the tool without the skirt. Turn the dust...
XOB01 Instruction Manual
Page 7
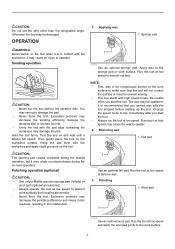
... designated angle. Hold the tool firmly. It is in contact with the tool stopped before starting up the tool. Excessive pressure may rotate counterclockwise during the loaded operation, but it attains full speed. Removing wax 1. NOTE: • First, wax a not conspicuous portion of the work surface. 7 Polishing operation (optional) CAUTION: • Use only a Makita genuine sponge pad, felt pad or wool pad (optional accessories). • Always operate the tool at high speed...
... designated angle. Hold the tool firmly. It is in contact with the tool stopped before starting up the tool. Excessive pressure may rotate counterclockwise during the loaded operation, but it attains full speed. Removing wax 1. NOTE: • First, wax a not conspicuous portion of the work surface. 7 Polishing operation (optional) CAUTION: • Use only a Makita genuine sponge pad, felt pad or wool pad (optional accessories). • Always operate the tool at high speed...
XOB01 Instruction Manual
Page 8
... rights which vary from country to you . MAKITA DISCLAIMS LIABILITY FOR ANY IMPLIED WARRANTIES, INCLUDING IMPLIED WARRANTIES OF "MERCHANTABILITY" AND "FITNESS FOR A SPECIFIC PURPOSE," AFTER THE ONE YEAR TERM OF THIS WARRANTY. To maintain product SAFETY and RELIABILITY, repairs, carbon brush inspection and replacement, any trouble develop during this manual. MAKITA LIMITED ONE YEAR WARRANTY Warranty Policy Every Makita tool is caused by Makita Authorized Service Centers, always using Makita replacement parts. EN0006-1 8
... rights which vary from country to you . MAKITA DISCLAIMS LIABILITY FOR ANY IMPLIED WARRANTIES, INCLUDING IMPLIED WARRANTIES OF "MERCHANTABILITY" AND "FITNESS FOR A SPECIFIC PURPOSE," AFTER THE ONE YEAR TERM OF THIS WARRANTY. To maintain product SAFETY and RELIABILITY, repairs, carbon brush inspection and replacement, any trouble develop during this manual. MAKITA LIMITED ONE YEAR WARRANTY Warranty Policy Every Makita tool is caused by Makita Authorized Service Centers, always using Makita replacement parts. EN0006-1 8
XOB01Z Parts Breakdown
Page 2
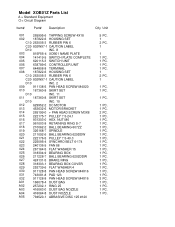
Model XOB01Z Parts List A = Standard Equipment 〇= Circuit Diagram Item# Part# Description Q'ty Unit 001 265995-6 TAPPING SCREW 4X18 002 187822-6 HOUSING SET 002 C10 263005-3 RUBBER PIN 6 002 C20 802W97-1 CAUTION LABEL 002 D10 INC. 8 003 815F56-4 XOB01 NAME PLATE 004 141419-5 SWITCH PLATE COMPLETE 005 620115-3 SWITCH UNIT 006 638789-6 CONTROLLER UNIT 007 644808-8 TERMINAL 008 187822-6 HOUSING SET 008 C10 263005-3 RUBBER...
Model XOB01Z Parts List A = Standard Equipment 〇= Circuit Diagram Item# Part# Description Q'ty Unit 001 265995-6 TAPPING SCREW 4X18 002 187822-6 HOUSING SET 002 C10 263005-3 RUBBER PIN 6 002 C20 802W97-1 CAUTION LABEL 002 D10 INC. 8 003 815F56-4 XOB01 NAME PLATE 004 141419-5 SWITCH PLATE COMPLETE 005 620115-3 SWITCH UNIT 006 638789-6 CONTROLLER UNIT 007 644808-8 TERMINAL 008 187822-6 HOUSING SET 008 C10 263005-3 RUBBER...


