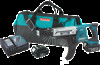

Makita DC18RC Instruction Manual
Page 3
.... 11. This manual contains important safety and operating instructions for use by cord or yank it within another five seconds after this battery charger. 5. aged in a risk of charger. Insert the battery cartridge into charger until it will not be supervised to rain or snow. 8. With finish of charge, the charging light will light up transformer, an engine generator or DC power receptacle. 17. After...
.... 11. This manual contains important safety and operating instructions for use by cord or yank it within another five seconds after this battery charger. 5. aged in a risk of charger. Insert the battery cartridge into charger until it will not be supervised to rain or snow. 8. With finish of charge, the charging light will light up transformer, an engine generator or DC power receptacle. 17. After...

Makita DC18RC Instruction Manual
Page 4
... to repair or maintenance, if the yellow warning light will begin after the cooling fan installed in red color, battery condition is in this case. Recharge of battery with dust The battery can extend the life of battery by ...battery charger is unplugged. Trouble on the charger or battery cartridge are clogged with its own performance. Incomplete cool down of power.) The charging time of battery (continue to discharge battery in the following cases. - Charging will flash for charging Makita-battery cartridge. BL1430 BL1830 22 Note: • It may not start...
... to repair or maintenance, if the yellow warning light will begin after the cooling fan installed in red color, battery condition is in this case. Recharge of battery with dust The battery can extend the life of battery by ...battery charger is unplugged. Trouble on the charger or battery cartridge are clogged with its own performance. Incomplete cool down of power.) The charging time of battery (continue to discharge battery in the following cases. - Charging will flash for charging Makita-battery cartridge. BL1430 BL1830 22 Note: • It may not start...
XRF01 XRF02 Instruction Manual
Page 2
... to follow the warnings and instructions may result in the off-position before turning the power tool on invites accidents. 13. Do not operate power tools in moving parts. 2 Electrical safety 4. Do not use the cord for carrying, pulling or unplugging the power tool. Never use any adapter plugs with your mains-operated (corded) power tool or battery-operated (cordless) power tool. Keep cord away from heat, oil, sharp edges or moving parts. Use of a cord suitable for future reference. Stay...
... to follow the warnings and instructions may result in the off-position before turning the power tool on invites accidents. 13. Do not operate power tools in moving parts. 2 Electrical safety 4. Do not use the cord for carrying, pulling or unplugging the power tool. Never use any adapter plugs with your mains-operated (corded) power tool or battery-operated (cordless) power tool. Keep cord away from heat, oil, sharp edges or moving parts. Use of a cord suitable for future reference. Stay...
XRF01 XRF02 Instruction Manual
Page 3
... burns. 16. Power tools are caused by a qualified repair person using the tool in use ) replace strict adherence to operate the power tool. Check for one type of untrained users. 21. Properly maintained cutting tools with the power tool or these instructions to safety rules for the connection of fire when used . GEB050-2 CORDLESS SCREWDRIVER SAFETY WARNINGS 1. ENC007-8 IMPORTANT SAFETY INSTRUCTIONS FOR BATTERY CARTRIDGE 1. Use of dust collection can make exposed metal parts of the power tool "live " wire may create...
... burns. 16. Power tools are caused by a qualified repair person using the tool in use ) replace strict adherence to operate the power tool. Check for one type of untrained users. 21. Properly maintained cutting tools with the power tool or these instructions to safety rules for the connection of fire when used . GEB050-2 CORDLESS SCREWDRIVER SAFETY WARNINGS 1. ENC007-8 IMPORTANT SAFETY INSTRUCTIONS FOR BATTERY CARTRIDGE 1. Use of dust collection can make exposed metal parts of the power tool "live " wire may create...
XRF01 XRF02 Instruction Manual
Page 4
... not use a damaged battery. 10. Let a hot battery cartridge cool down before charging it is removed before adjusting or checking function on the front of battery. To install the battery cartridge, align the tongue on the upper side of the battery cartridge. • Hold the tool and the battery cartridge firmly when installing or removing battery cartridge. Star marking ・ direct current ・ no load speed ・...
... not use a damaged battery. 10. Let a hot battery cartridge cool down before charging it is removed before adjusting or checking function on the front of battery. To install the battery cartridge, align the tongue on the upper side of the battery cartridge. • Hold the tool and the battery cartridge firmly when installing or removing battery cartridge. Star marking ・ direct current ・ no load speed ・...
XRF01 XRF02 Instruction Manual
Page 5
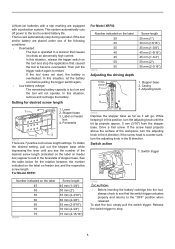
... screw. Lithium-ion batteries with a protection system. If the screw head projects above the surface of the following conditions: • Overloaded: The tool is counter-sunk, turn the adjusting knob in the fenestella of stopper base. For Model XRF01 For Model XRF02 Number indicated on feeder box 4. This system automatically cuts off power to the tool to restart. Fenestella 2 3 008123 There are equipped with a star marking are 7 positive-lock screw...
... screw. Lithium-ion batteries with a protection system. If the screw head projects above the surface of the following conditions: • Overloaded: The tool is counter-sunk, turn the adjusting knob in the fenestella of stopper base. For Model XRF01 For Model XRF02 Number indicated on feeder box 4. This system automatically cuts off power to the tool to restart. Fenestella 2 3 008123 There are equipped with a star marking are 7 positive-lock screw...
XRF01 XRF02 Instruction Manual
Page 6
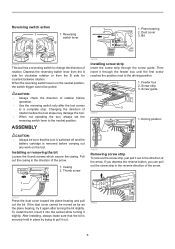
... installing, always make sure that the tool is switched off and the battery cartridge is securely held in place by trying to a complete stop. Casing 2. To install the bit, insert it into the socket while turning it through the screw guide. ASSEMBLY CAUTION: • Always be sure that the bit is removed before operation. • Use the reversing switch only after turning the bit slightly. Pull out the casing in the direction...
... installing, always make sure that the tool is switched off and the battery cartridge is securely held in place by trying to a complete stop. Casing 2. To install the bit, insert it into the socket while turning it through the screw guide. ASSEMBLY CAUTION: • Always be sure that the bit is removed before operation. • Use the reversing switch only after turning the bit slightly. Pull out the casing in the direction...

XRF01 XRF02 Instruction Manual
Page 7
... switched off and the battery cartridge is over. MAINTENANCE 014074 CAUTION: • Always be minimal. Reverse button 1 008128 Folding screw guide 014064 Screw guide is convenient for storage to perform inspection or maintenance. • Never use gasoline, benzine, thinner, alcohol or the like. 1. Wall 2. It can be used for temporarily hooking the tool. Replace a worn bit or poor fastening may result. 7 It will be installed...
... switched off and the battery cartridge is over. MAINTENANCE 014074 CAUTION: • Always be minimal. Reverse button 1 008128 Folding screw guide 014064 Screw guide is convenient for storage to perform inspection or maintenance. • Never use gasoline, benzine, thinner, alcohol or the like. 1. Wall 2. It can be used for temporarily hooking the tool. Replace a worn bit or poor fastening may result. 7 It will be installed...
XRF01 XRF02 Instruction Manual
Page 8
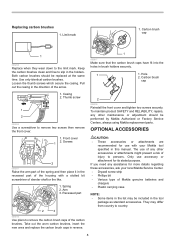
... regarding these accessories, ask your Makita tool specified in brush holders securely. 1 1. Pull out the casing in the direction of Makita genuine batteries and chargers • Plastic carrying case NOTE: • Some items in the tool package as standard accessories. Carbon brush cap 2 006304 Reinstall the front cover and tighten two screws securely. If you need any other maintenance or adjustment should be performed by Makita Authorized or Factory Service Centers, always using Makita replacement parts.
... regarding these accessories, ask your Makita tool specified in brush holders securely. 1 1. Pull out the casing in the direction of Makita genuine batteries and chargers • Plastic carrying case NOTE: • Some items in the tool package as standard accessories. Carbon brush cap 2 006304 Reinstall the front cover and tighten two screws securely. If you need any other maintenance or adjustment should be performed by Makita Authorized or Factory Service Centers, always using Makita replacement parts.

XRF01 XRF02 Instruction Manual
Page 9
... OR USE OF THE PRODUCT. MAKITA LIMITED ONE YEAR WARRANTY Warranty Policy Every Makita tool is caused by others: repairs are required because of normal wear and tear: the tool has been abused, misused or improperly maintained: alterations have been made or attempted by defective workmanship or material, Makita will repair (or at our option, replace) without charge. Should any trouble develop...
... OR USE OF THE PRODUCT. MAKITA LIMITED ONE YEAR WARRANTY Warranty Policy Every Makita tool is caused by others: repairs are required because of normal wear and tear: the tool has been abused, misused or improperly maintained: alterations have been made or attempted by defective workmanship or material, Makita will repair (or at our option, replace) without charge. Should any trouble develop...
XRF01Z Parts Breakdown
Page 2
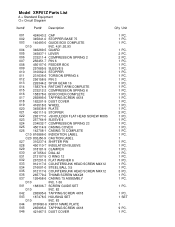
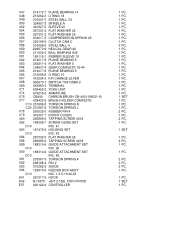
... 231636-6 TORSION SPRING 4 012 256158-5 PIN 3 013 226344-2 SPUR GEAR 16 014 158374-4 RATCHET ARM COMPLETE 015 233212-2 COMPRESSION SPRING 6 016 158378-6 BOXCOVER COMPLETE 017 265995-6 TAPPING SCREW 4X18 018 162201-9 DUST COVER 019 416518-5 WHEEL 020 345838-9 PLATE 021 450111-5 STOPPER 022 265177-0 +SHOULDER FLAT HEAD SCREW M3X5 023 257764-9 SLEEVE 4 024 234032-7 COMPRESSION SPRING 23 025 450114-9 CASING COVER 026...
... 231636-6 TORSION SPRING 4 012 256158-5 PIN 3 013 226344-2 SPUR GEAR 16 014 158374-4 RATCHET ARM COMPLETE 015 233212-2 COMPRESSION SPRING 6 016 158378-6 BOXCOVER COMPLETE 017 265995-6 TAPPING SCREW 4X18 018 162201-9 DUST COVER 019 416518-5 WHEEL 020 345838-9 PLATE 021 450111-5 STOPPER 022 265177-0 +SHOULDER FLAT HEAD SCREW M3X5 023 257764-9 SLEEVE 4 024 234032-7 COMPRESSION SPRING 23 025 450114-9 CASING COVER 026...
XRF01Z Parts Breakdown
Page 3
...-8 O RING 10 067 419304-3 F/R CHANGE LEVER 068 650670-1 SWITCH TG513SBA-2 069 643860-3 TERMINAL 071 638426-2 YOKE UNIT 074 619216-2 ARMATURE 076 CB440 CARBON BRUSH CB-440 (195021-6) 077 638433-5 BRUSH HOLDER COMPLETE 077 C10 231696-8 TORSION SPRING R 077 C20 231697-6 TORSION SPRING L 078 263032-0 RUBBER PIN 4 079 419307-7 FRONT COVER 080 265995-6 TAPPING SCREW 4X18 082 188306-7 SCREW GUIDE SET 082 D10 INC. 41...
...-8 O RING 10 067 419304-3 F/R CHANGE LEVER 068 650670-1 SWITCH TG513SBA-2 069 643860-3 TERMINAL 071 638426-2 YOKE UNIT 074 619216-2 ARMATURE 076 CB440 CARBON BRUSH CB-440 (195021-6) 077 638433-5 BRUSH HOLDER COMPLETE 077 C10 231696-8 TORSION SPRING R 077 C20 231697-6 TORSION SPRING L 078 263032-0 RUBBER PIN 4 079 419307-7 FRONT COVER 080 265995-6 TAPPING SCREW 4X18 082 188306-7 SCREW GUIDE SET 082 D10 INC. 41...


