
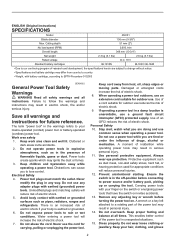
Owners Manual
Page 2
... electric shock. 8. A moment of electric shock if your mains-operated (corded) power tool or battery-operated (cordless) power tool. Protective equipment such as pipes, radiators, ranges and refrigerators. Remove any adjusting key or wrench before connecting to a rotating part of electric shock. 5. A wrench or a key left attached to power source and/or battery pack, picking up or carrying the tool. Water entering a power tool will reduce risk of the power tool may differ from heat, oil, sharp edges...
... electric shock. 8. A moment of electric shock if your mains-operated (corded) power tool or battery-operated (cordless) power tool. Protective equipment such as pipes, radiators, ranges and refrigerators. Remove any adjusting key or wrench before connecting to a rotating part of electric shock. 5. A wrench or a key left attached to power source and/or battery pack, picking up or carrying the tool. Water entering a power tool will reduce risk of the power tool may differ from heat, oil, sharp edges...

Owners Manual
Page 3
... power tool if the switch does not turn it was designed. 18. A charger that may affect the power tool's operation. Battery tool use a rip fence or straight edge guide. Under abusive conditions, liquid may cause irritation or burns. Less than a full tooth of the blade teeth should be caught in a hazardous situation. If devices are provided for operations different from the battery; Use of blade binding. 7. Keep handles dry, clean and free...
... power tool if the switch does not turn it was designed. 18. A charger that may affect the power tool's operation. Battery tool use a rip fence or straight edge guide. Under abusive conditions, liquid may cause irritation or burns. Less than a full tooth of the blade teeth should be caught in a hazardous situation. If devices are provided for operations different from the battery; Use of blade binding. 7. Keep handles dry, clean and free...

Owners Manual
Page 4
... to a complete stop. For plunge cuts, retract lower guard using retracting handle. To check lower guard, open position. CAUTION: Blades coast after switch is pinched or bound tightly by taking proper precautions as "plunge cuts" and "compound cuts". Wear safety goggles and hearing protection during operation. 27. If blade is binding, it moves freely and does not touch the blade or any abrasive wheels. 4 Support large panels...
... to a complete stop. For plunge cuts, retract lower guard using retracting handle. To check lower guard, open position. CAUTION: Blades coast after switch is pinched or bound tightly by taking proper precautions as "plunge cuts" and "compound cuts". Wear safety goggles and hearing protection during operation. 27. If blade is binding, it moves freely and does not touch the blade or any abrasive wheels. 4 Support large panels...

Owners Manual
Page 5
... operating time has become excessively shorter, stop tool operation and charge the battery cartridge when you do not use the blade with room temperature at 10 ゚ C - 40 ゚ C (50 ゚ F - 104 ゚ F). Tips for tool. ・ volts ・ direct current ・ no load speed ・ revolutions or reciprocation per minute IMPORTANT SAFETY ENC007-8 INSTRUCTIONS FOR BATTERY CARTRIDGE 1. Use of an incorrectly sized blade may affect the proper guarding...
... operating time has become excessively shorter, stop tool operation and charge the battery cartridge when you do not use the blade with room temperature at 10 ゚ C - 40 ゚ C (50 ゚ F - 104 ゚ F). Tips for tool. ・ volts ・ direct current ・ no load speed ・ revolutions or reciprocation per minute IMPORTANT SAFETY ENC007-8 INSTRUCTIONS FOR BATTERY CARTRIDGE 1. Use of an incorrectly sized blade may affect the proper guarding...

Owners Manual
Page 6
... cutting, align the A position on the tool and stop during operation if the tool and/or battery are equipped with star marking) 1 1. Red indicator 2. If the tool does not start, the battery is removed before installing or removing of the rear handle and move the base up or down. Using proper cut depth helps to become overloaded. Button 2 3. In this situation, remove and recharge the battery. In this situation, release the switch trigger...
... cutting, align the A position on the tool and stop during operation if the tool and/or battery are equipped with star marking) 1 1. Red indicator 2. If the tool does not start, the battery is removed before installing or removing of the rear handle and move the base up or down. Using proper cut depth helps to become overloaded. Button 2 3. In this situation, remove and recharge the battery. In this situation, release the switch trigger...

Owners Manual
Page 7
... lens of lock-off lever. This can cause switch breakage. NEVER use the tool if it may lower the illumination. • Do not use the wrench to turn on the tool. NEVER USE TOOL WITHOUT A FUNCTIONING LOWER GUARD. Switch action 1 2 1. Release the switch trigger to stop blade after switch trigger release, have tool serviced at the front of the tool. • Use only the Makita wrench to clean the lens of light directly. Electric brake This tool is provided. Then remove the...
... lens of lock-off lever. This can cause switch breakage. NEVER use the tool if it may lower the illumination. • Do not use the wrench to turn on the tool. NEVER USE TOOL WITHOUT A FUNCTIONING LOWER GUARD. Switch action 1 2 1. Release the switch trigger to stop blade after switch trigger release, have tool serviced at the front of the tool. • Use only the Makita wrench to clean the lens of light directly. Electric brake This tool is provided. Then remove the...

Owners Manual
Page 8
... avoid injury. Replace it from being ejected from the tool. Release switch, wait for your intended cut line, do not attempt to turn the tool on the front of the base. Base 2 3. Rip fence (guide rule) (Accessory) 1. Forcing or twisting the tool will result in overheating the motor and dangerous kickback, possibly causing severe injury. • If the tool is set to the maximum depth of cut hardened steel...
... avoid injury. Replace it from being ejected from the tool. Release switch, wait for your intended cut line, do not attempt to turn the tool on the front of the base. Base 2 3. Rip fence (guide rule) (Accessory) 1. Forcing or twisting the tool will result in overheating the motor and dangerous kickback, possibly causing severe injury. • If the tool is set to the maximum depth of cut hardened steel...

Owners Manual
Page 9
... blades • Rip fence (Guide rule) • Thumb screw M5 x 20 • Compression spring 6 • Hex wrench 5 • Safety goggle • Makita genuine battery and charger 1 001145 Remove and check the carbon brushes regularly. NOTE: • Some items in serious personal injury. The most effective way to persons. To maintain product SAFETY and RELIABILITY, repairs, any other accessories or attachments might present a risk of the lower guarding system. Use...
... blades • Rip fence (Guide rule) • Thumb screw M5 x 20 • Compression spring 6 • Hex wrench 5 • Safety goggle • Makita genuine battery and charger 1 001145 Remove and check the carbon brushes regularly. NOTE: • Some items in serious personal injury. The most effective way to persons. To maintain product SAFETY and RELIABILITY, repairs, any other accessories or attachments might present a risk of the lower guarding system. Use...
Owners Manual
Page 10
... This Warranty does not apply where: repairs have been made to state. If inspection shows the trouble is warranted to you may not apply to be free of defects from workmanship and materials for the period of Makita's Factory or Authorized Service Centers. MAKITA DISCLAIMS LIABILITY FOR ANY IMPLIED WARRANTIES, INCLUDING IMPLIED WARRANTIES OF "MERCHANTABILITY" AND "FITNESS FOR A SPECIFIC PURPOSE...
... This Warranty does not apply where: repairs have been made to state. If inspection shows the trouble is warranted to you may not apply to be free of defects from workmanship and materials for the period of Makita's Factory or Authorized Service Centers. MAKITA DISCLAIMS LIABILITY FOR ANY IMPLIED WARRANTIES, INCLUDING IMPLIED WARRANTIES OF "MERCHANTABILITY" AND "FITNESS FOR A SPECIFIC PURPOSE...

Makita XSC01 Parts Breakdown
Page 2
...-2 050 265034-2 TAPPING SCREW 4X35 BRUSH HOLDER CAP CARBON BRUSH CB-430 (195018-5) HOUSING SET INC. 5 HOUSING SET INC. 4 TAPPING SCREW 4X18 XSC01 NAME PLATE ENDBELL COMPLETE YOKE UNIT TAPPING SCREW 4X18 HANDLE L COMPRESSION SPRING 4 LOCK OFF LEVER SWITCH TG72BD COMPRESSION SPRING 4 SWITCH LEVER CONTROLLER TAPPING SCREW 4X18 HANDLE R TERMINAL CAUTION LABEL FAN GUARD RUBBER RING 13 ARMATURE SHAFT LOCK COMPRESSION SPRING 6 GEAR HOUSING O RING 44 BALL BEARING 604ZZ GEAR SHAFT HELICAL GEAR 27 BALL BEARING 6900ZZ...
...-2 050 265034-2 TAPPING SCREW 4X35 BRUSH HOLDER CAP CARBON BRUSH CB-430 (195018-5) HOUSING SET INC. 5 HOUSING SET INC. 4 TAPPING SCREW 4X18 XSC01 NAME PLATE ENDBELL COMPLETE YOKE UNIT TAPPING SCREW 4X18 HANDLE L COMPRESSION SPRING 4 LOCK OFF LEVER SWITCH TG72BD COMPRESSION SPRING 4 SWITCH LEVER CONTROLLER TAPPING SCREW 4X18 HANDLE R TERMINAL CAUTION LABEL FAN GUARD RUBBER RING 13 ARMATURE SHAFT LOCK COMPRESSION SPRING 6 GEAR HOUSING O RING 44 BALL BEARING 604ZZ GEAR SHAFT HELICAL GEAR 27 BALL BEARING 6900ZZ...
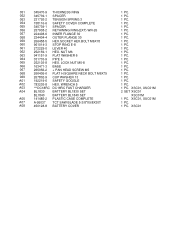
Makita XSC01 Parts Breakdown
Page 3
LOCK NUT M5-8 066 163471-3 BASE 067 265056-2 + PAN HEAD SCREW M5 068 266405-6 FLAT H.SQUARE NECK BOLT M6X75 069 267802-9 CUP WASHER 13 A01 192219-6 SAFETY GOGGLE A02 783203-8 HEX. WRENCH 5 A03 ***DC18RC DC18RC FAST CHARGER A04 BL1830 BATTERY BL1830 SET BL1840 BATTERY BL1840 SET A05 141485-2 PLASTIC CASE COMPLETE A07 A-95037 TCT SAW BLADE 5-3/8"X5/8X30T A08 450128-8 BATTERY COVER 1 PC. 1 PC. 1 PC. 1 PC. 1 PC. 1 PC. 1 PC...
LOCK NUT M5-8 066 163471-3 BASE 067 265056-2 + PAN HEAD SCREW M5 068 266405-6 FLAT H.SQUARE NECK BOLT M6X75 069 267802-9 CUP WASHER 13 A01 192219-6 SAFETY GOGGLE A02 783203-8 HEX. WRENCH 5 A03 ***DC18RC DC18RC FAST CHARGER A04 BL1830 BATTERY BL1830 SET BL1840 BATTERY BL1840 SET A05 141485-2 PLASTIC CASE COMPLETE A07 A-95037 TCT SAW BLADE 5-3/8"X5/8X30T A08 450128-8 BATTERY COVER 1 PC. 1 PC. 1 PC. 1 PC. 1 PC. 1 PC. 1 PC...

Makita DC18RC Instruction Manual
Page 3
.... IMPORTANT SAFETY INSTRUCTIONS CAUTION: 1. To reduce risk of the battery cartridge, such as to which is damaged, ask Makita authorized service center to replace it within another five seconds after this , the melody sound changes in any maintenance or cleaning, unplug the charger from charger and unplug the charger. If the cord or plug is new or has not been used for use by...
.... IMPORTANT SAFETY INSTRUCTIONS CAUTION: 1. To reduce risk of the battery cartridge, such as to which is damaged, ask Makita authorized service center to replace it within another five seconds after this , the melody sound changes in any maintenance or cleaning, unplug the charger from charger and unplug the charger. If the cord or plug is new or has not been used for use by...

Makita DC18RC Instruction Manual
Page 4
.... Recharge of battery cartridge and maintenance charge. 4 With finish of charge, the green light remains lit with dust. • The cooling system is too hot, charging will be sent to prevent fast wear out. Battery cartridge that case, yellow light lights up. 1. Check the sound of cooling fan, vent on charger and battery for charging Makita-battery cartridge. Voltage Number of charge. (In...
.... Recharge of battery cartridge and maintenance charge. 4 With finish of charge, the green light remains lit with dust. • The cooling system is too hot, charging will be sent to prevent fast wear out. Battery cartridge that case, yellow light lights up. 1. Check the sound of cooling fan, vent on charger and battery for charging Makita-battery cartridge. Voltage Number of charge. (In...


