Instruction Manual
Page 2
..., use a power tool while you are tired or under the influence of electric shock if your body is an increased risk of drugs, alcohol or medication. Keep children and bystanders away while operating a power tool. Water entering a power tool will reduce personal injuries. 12. If operating a power tool in a damp location is in the presence of electric shock. 9. ENGLISH (Original instructions) SPECIFICATIONS Model Blade diameter Max. cutting depth No load speed...
..., use a power tool while you are tired or under the influence of electric shock if your body is an increased risk of drugs, alcohol or medication. Keep children and bystanders away while operating a power tool. Water entering a power tool will reduce personal injuries. 12. If operating a power tool in a damp location is in the presence of electric shock. 9. ENGLISH (Original instructions) SPECIFICATIONS Model Blade diameter Max. cutting depth No load speed...
Instruction Manual
Page 3
... parts. 16. The guard cannot protect you from the blade below the workpiece. 4. It is suitable for the connection of untrained users. 21. Remove any adjustments, changing accessories, or storing power tools. If devices are provided for one terminal to operate the power tool. Do not use . Power tools are holding the saw, they cannot be cut in accordance with the switch is not in a hazardous situation. in your hands...
... parts. 16. The guard cannot protect you from the blade below the workpiece. 4. It is suitable for the connection of untrained users. 21. Remove any adjustments, changing accessories, or storing power tools. If devices are provided for one terminal to operate the power tool. Do not use . Power tools are holding the saw, they cannot be cut in accordance with the switch is not in a hazardous situation. in your hands...
Instruction Manual
Page 4
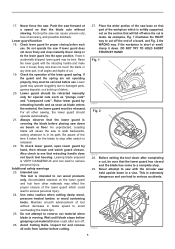
... can be tight and secure before making cut for optimum performance and safety of blade binding. 11. If blade adjustment shifts while cutting, it may walk up and out of the power tool "live " wire will run eccentrically, causing loss of saw . Use extra caution when sawing into the material. Never use a rip fence or straight edge guide. Do not use blades with both sides, near the line of...
... can be tight and secure before making cut for optimum performance and safety of blade binding. 11. If blade adjustment shifts while cutting, it may walk up and out of the power tool "live " wire will run eccentrically, causing loss of saw . Use extra caution when sawing into the material. Never use a rip fence or straight edge guide. Do not use blades with both sides, near the line of...
Instruction Manual
Page 5
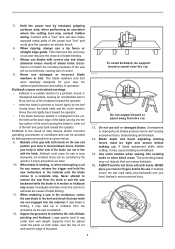
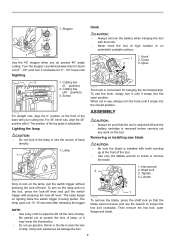
... damaged parts, gummy deposits, or a build-up of the lower guard spring. If the guard and the spring are not operating properly, they must be retracted manually only for and remove all angles and depths of a board, and Fig. 2 the WRONG way. Avoid Cutting Nails. If saw to stop . 29. Lower guard may be serviced before cutting. 27. Raise the lower guard with the circular saw with the retracting handle and...
... damaged parts, gummy deposits, or a build-up of the lower guard spring. If the guard and the spring are not operating properly, they must be retracted manually only for and remove all angles and depths of a board, and Fig. 2 the WRONG way. Avoid Cutting Nails. If saw to stop . 29. Lower guard may be serviced before cutting. 27. Raise the lower guard with the circular saw with the retracting handle and...
Instruction Manual
Page 6
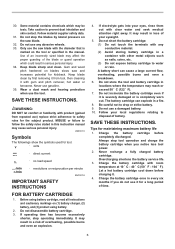
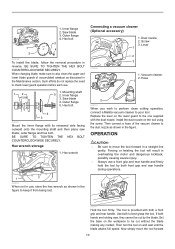
... wheels. 33. Always stop the blades by first removing it from repeated use any conductive material. (2) Avoid storing battery cartridge in every six months if you notice less tool power. 2. Overcharging shortens the battery service life. 3. Charge the battery cartridge once in a container with product (gained from tool, then cleaning it is severely damaged or is marked on (1) battery charger, (2) battery, and (3) product using battery. 2. Do not use ) replace...
... wheels. 33. Always stop the blades by first removing it from repeated use any conductive material. (2) Avoid storing battery cartridge in every six months if you notice less tool power. 2. Overcharging shortens the battery service life. 3. Charge the battery cartridge once in a container with product (gained from tool, then cleaning it is severely damaged or is marked on (1) battery charger, (2) battery, and (3) product using battery. 2. Do not use ) replace...
Instruction Manual
Page 7
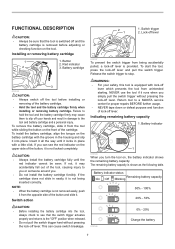
... remaining battery capacity. The remaining battery capacity is removed before installing or removing of lock-off lever is equipped with a little click. Red indicator 2 3. CAUTION: • Always install the battery cartridge fully until it locks in easily, it runs when you turn the tool on the tool. Battery indicator 1 015143 When you simply pull the switch trigger without pressing the lock-off your safety, this tool is provided. Insert it...
... remaining battery capacity. The remaining battery capacity is removed before installing or removing of lock-off lever is equipped with a little click. Red indicator 2 3. CAUTION: • Always install the battery cartridge fully until it locks in easily, it runs when you turn the tool on the tool. Battery indicator 1 015143 When you simply pull the switch trigger without pressing the lock-off your safety, this tool is provided. Insert it...
Instruction Manual
Page 8
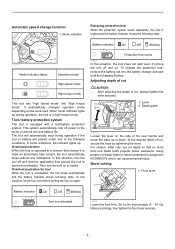
... automatically cuts off power to the motor to restart. Then turn the tool off and on. Battery indicator On Off Blinking Protection lock works 015201 In this situation, the tool does not start even if turning the tool off and stop during operation, the tool is overheated 015105 Loosen the front lever. Set for the desired angle (0° - 50°) by tightening the lever. Automatic speed change function 1. It automatically changes operation mode depending...
... automatically cuts off power to the motor to restart. Then turn the tool off and on. Battery indicator On Off Blinking Protection lock works 015201 In this situation, the tool does not start even if turning the tool off and stop during operation, the tool is overheated 015105 Loosen the front lever. Set for the desired angle (0° - 50°) by tightening the lever. Automatic speed change function 1. It automatically changes operation mode depending...
Instruction Manual
Page 9
... turn on lighting while the switch trigger is adjustable. For 45° bevel cuts, align the 45° position with pressing the lock-off lever and pull the switch trigger with it may lower the illumination. • Do not use the wrench to clean the lens of the tool. • Use only the Makita wrench to install or remove the blade. 015154 Only to wipe the dirt off and the battery...
... turn on lighting while the switch trigger is adjustable. For 45° bevel cuts, align the 45° position with pressing the lock-off lever and pull the switch trigger with it may lower the illumination. • Do not use the wrench to clean the lens of the tool. • Use only the Makita wrench to install or remove the blade. 015154 Only to wipe the dirt off and the battery...
Instruction Manual
Page 10
... check lower guard operation before each use , store the hex wrench as shown in the Maintenance section. The tool is provided with both hands are holding saw blade, outer flange and hex bolt. Now simply move the tool forward in reverse. Set the base on the lower guard to your tool. When changing blade, make sure to move the tool forward 10 Inner flange 3. Then connect a hose of...
... check lower guard operation before each use , store the hex wrench as shown in the Maintenance section. The tool is provided with both hands are holding saw blade, outer flange and hex bolt. Now simply move the tool forward in reverse. Set the base on the lower guard to your tool. When changing blade, make sure to move the tool forward 10 Inner flange 3. Then connect a hose of...
Instruction Manual
Page 11
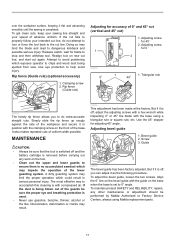
... bevel guide, loosen the two screws. Attempt to 0° angle. Rip fence (Guide rule) (optional accessory) 1. MAINTENANCE CAUTION: • Always be performed by Makita Authorized or Factory Service Centers, always using a triangular rule or square rule, etc. But if it in serious personal injury. Use the 45° stopper for 45 ゚ 2. To maintain product SAFETY and RELIABILITY, repairs, any work on the front of the lower guarding...
... bevel guide, loosen the two screws. Attempt to 0° angle. Rip fence (Guide rule) (optional accessory) 1. MAINTENANCE CAUTION: • Always be performed by Makita Authorized or Factory Service Centers, always using a triangular rule or square rule, etc. But if it in serious personal injury. Use the 45° stopper for 45 ゚ 2. To maintain product SAFETY and RELIABILITY, repairs, any work on the front of the lower guarding...
Instruction Manual
Page 12
.... MAKITA LIMITED ONE YEAR WARRANTY Warranty Policy Every Makita tool is caused by others: repairs are recommended for use with your local Makita Service Center. • Saw blades • Rip fence (Guide rule) • Guide rail • Guide rail adapter • Rule bar • Dust nozzle • Hex wrench • Makita genuine battery and charger NOTE: • Some items in the tool package as standard accessories. It is warranted to be included in the list...
.... MAKITA LIMITED ONE YEAR WARRANTY Warranty Policy Every Makita tool is caused by others: repairs are recommended for use with your local Makita Service Center. • Saw blades • Rip fence (Guide rule) • Guide rail • Guide rail adapter • Rule bar • Dust nozzle • Hex wrench • Makita genuine battery and charger NOTE: • Some items in the tool package as standard accessories. It is warranted to be included in the list...
Makita XSH03 Parts Breakdown
Page 2
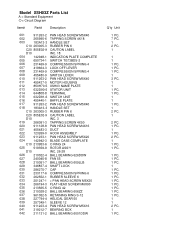
... Parts List A = Standard Equipment 〇= Circuit Diagram Item# Part# Description 001 911263-2 PAN HEAD SCREW M5X40 002 265995-6 TAPPING SCREW 4X18 003 183A13-3 HANDLE SET 003 C10 263005-3 RUBBER PIN 6 003 C20 805E02-9 CAUTION LABEL 003 D10 INC. 18 004 142948-1 INDICATION PLATE COMPLETE 005 650734-1 SWITCH TG73BDS-2 006 231469-9 COMPRESSION SPRING 4 007 419664-3 LOCK OFF LEVER 008 231469-9 COMPRESSION SPRING 4 009 455480-9 SWITCH LEVER 010 911263-2 PAN HEAD SCREW...
... Parts List A = Standard Equipment 〇= Circuit Diagram Item# Part# Description 001 911263-2 PAN HEAD SCREW M5X40 002 265995-6 TAPPING SCREW 4X18 003 183A13-3 HANDLE SET 003 C10 263005-3 RUBBER PIN 6 003 C20 805E02-9 CAUTION LABEL 003 D10 INC. 18 004 142948-1 INDICATION PLATE COMPLETE 005 650734-1 SWITCH TG73BDS-2 006 231469-9 COMPRESSION SPRING 4 007 419664-3 LOCK OFF LEVER 008 231469-9 COMPRESSION SPRING 4 009 455480-9 SWITCH LEVER 010 911263-2 PAN HEAD SCREW...
Makita XSH03 Parts Breakdown
Page 3
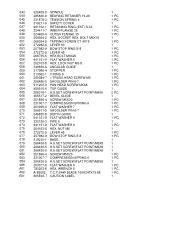
...-2 BEVEL GUIDE 1 067 251896-4 SCREW M5X20 1 PC. 068 231007-7 COMPRESSION SPRING 6 1 PC. 069 253058-0 FLAT WASHER 7 1 PC. 070 256511-5 SHOULDER PIN 6-7 1 PC. 071 346835-8 DEPTH GUIDE 1 072 941151-9 FLAT WASHER 6 1 PC. 073 332126-3 PIPE 6 1 074 941151-9 FLAT WASHER 6 1 PC. 075 264103-6 HEX. E01 805E03-7 CAUTION LABEL 1 NUT M6 1 076 272272-9 LEVER 45 1 PC. 077 257982-9 BOW STOP RING E-8 1 PC. 078 319210-1 BASE 1 079 266436-5 H.S.SET SCREW...
...-2 BEVEL GUIDE 1 067 251896-4 SCREW M5X20 1 PC. 068 231007-7 COMPRESSION SPRING 6 1 PC. 069 253058-0 FLAT WASHER 7 1 PC. 070 256511-5 SHOULDER PIN 6-7 1 PC. 071 346835-8 DEPTH GUIDE 1 072 941151-9 FLAT WASHER 6 1 PC. 073 332126-3 PIPE 6 1 074 941151-9 FLAT WASHER 6 1 PC. 075 264103-6 HEX. E01 805E03-7 CAUTION LABEL 1 NUT M6 1 076 272272-9 LEVER 45 1 PC. 077 257982-9 BOW STOP RING E-8 1 PC. 078 319210-1 BASE 1 079 266436-5 H.S.SET SCREW...

Makita XSH03T New Tool Flyer English
Page 1
...;ciently uses energy to match torque and RPM to the Makita General Catalog or visit our website at 90°) and bevel capacity (0°- 50°) n Die-cast magnesium base, blade guard and safety cover provide a lightweight, durable design SPECIFICATIONS Blade Diameter Arbor Max. gauge indicates battery charge level ERGONOMICS Weighs only 7.3 lbs. with the U.S. All models and accessories subject to change without prior notice. Cutting Capacity...
...;ciently uses energy to match torque and RPM to the Makita General Catalog or visit our website at 90°) and bevel capacity (0°- 50°) n Die-cast magnesium base, blade guard and safety cover provide a lightweight, durable design SPECIFICATIONS Blade Diameter Arbor Max. gauge indicates battery charge level ERGONOMICS Weighs only 7.3 lbs. with the U.S. All models and accessories subject to change without prior notice. Cutting Capacity...


