

Parts Breakdown
Page 2
...-1 SPUR GEAR 22 027 326109-3 SPINDLE 028 256253-1 PIN 5 029 267212-0 FLAT WASHER 12 030 227279-0 INTERNAL GEAR 51 031 802K37-7 CAUTION LABEL 032 802K38-5 CAUTION LABEL 033 141693-5 INTERNAL GEAR CASE COMPLETE 035-1 187455-7 HOUSING SET 035-1 C10 263005-3 RUBBER PIN 6 035-1 D10 INC. 1 037 687464-1 SUPPORT 038 620161-6 CONTROLLER 039 266786-8 + PAN HEAD TAPPING SCREW 2X10 A01 251314-2 + SCREW M4X12 A02...
...-1 SPUR GEAR 22 027 326109-3 SPINDLE 028 256253-1 PIN 5 029 267212-0 FLAT WASHER 12 030 227279-0 INTERNAL GEAR 51 031 802K37-7 CAUTION LABEL 032 802K38-5 CAUTION LABEL 033 141693-5 INTERNAL GEAR CASE COMPLETE 035-1 187455-7 HOUSING SET 035-1 C10 263005-3 RUBBER PIN 6 035-1 D10 INC. 1 037 687464-1 SUPPORT 038 620161-6 CONTROLLER 039 266786-8 + PAN HEAD TAPPING SCREW 2X10 A01 251314-2 + SCREW M4X12 A02...

Instruction Manual
Page 1
IMPORTANTE: Leer antes de usar. 1 INSTRUCTION MANUAL MANUEL D'INSTRUCTION MANUAL DE INSTRUCCIONES Cordless Impact Driver Tournevis à Chocs sans Fil Atornillador de Impacto Inalámbrico XDT08 012780 IMPORTANT: Read Before Using. IMPORTANT: Lire avant usage.
IMPORTANTE: Leer antes de usar. 1 INSTRUCTION MANUAL MANUEL D'INSTRUCTION MANUAL DE INSTRUCCIONES Cordless Impact Driver Tournevis à Chocs sans Fil Atornillador de Impacto Inalámbrico XDT08 012780 IMPORTANT: Read Before Using. IMPORTANT: Lire avant usage.

Instruction Manual
Page 2
...; Specifications and battery cartridge may result in any adapter plugs with battery cartridge, according to country. • Weight, with earthed (grounded) power tools. Ensure the switch is an increased risk of drugs, alcohol or medication. Cluttered or dark areas invite accidents. 2. Distractions can cause you are tired or under the influence of electric shock if your mains-operated (corded) power tool or battery-operated (cordless) power tool...
...; Specifications and battery cartridge may result in any adapter plugs with battery cartridge, according to country. • Weight, with earthed (grounded) power tools. Ensure the switch is an increased risk of drugs, alcohol or medication. Cluttered or dark areas invite accidents. 2. Distractions can cause you are tired or under the influence of electric shock if your mains-operated (corded) power tool or battery-operated (cordless) power tool...

Instruction Manual
Page 3
... adjusting key or wrench before turning the power tool on and off. Shorting the battery terminals together may create a risk of the power tool for your power tool serviced by the manufacturer. Use of the power tool is below when using only identical replacement parts. Do not wear loose clothing or jewellery. If liquid contacts eyes, additionally seek medical help. GEB054-1 CORDLESS IMPACT DRIVER SAFETY WARNINGS 1. Remove any other condition that the safety of dust...
... adjusting key or wrench before turning the power tool on and off. Shorting the battery terminals together may create a risk of the power tool for your power tool serviced by the manufacturer. Use of the power tool is below when using only identical replacement parts. Do not wear loose clothing or jewellery. If liquid contacts eyes, additionally seek medical help. GEB054-1 CORDLESS IMPACT DRIVER SAFETY WARNINGS 1. Remove any other condition that the safety of dust...

Instruction Manual
Page 4
... symbols used for tool. ・ volts ・ direct current ・ no load speed ・ revolutions or reciprocation per minute ・ number of time. 4 Do not disassemble battery cartridge. 3. It may result in a container with other metal objects such as nails, coins, etc. (3) Do not expose battery cartridge to drop or strike battery. 9. Tips for a long period of blow IMPORTANT SAFETY INSTRUCTIONS ENC007-7 FOR BATTERY...
... symbols used for tool. ・ volts ・ direct current ・ no load speed ・ revolutions or reciprocation per minute ・ number of time. 4 Do not disassemble battery cartridge. 3. It may result in a container with other metal objects such as nails, coins, etc. (3) Do not expose battery cartridge to drop or strike battery. 9. Tips for a long period of blow IMPORTANT SAFETY INSTRUCTIONS ENC007-7 FOR BATTERY...

Instruction Manual
Page 5
... this situation, release the switch trigger on the tool and stop the application that the tool is switched off the tool before adjusting or checking function on the tool. Switch action 1. FUNCTIONAL DESCRIPTION CAUTION: • Always be seen. To remove the battery cartridge, slide it from the tool while sliding the button on the battery cartridge with the groove in damage to extend battery life. Battery protection system (Lithium-ion battery with a little...
... this situation, release the switch trigger on the tool and stop the application that the tool is switched off the tool before adjusting or checking function on the tool. Switch action 1. FUNCTIONAL DESCRIPTION CAUTION: • Always be seen. To remove the battery cartridge, slide it from the tool while sliding the button on the battery cartridge with the groove in damage to extend battery life. Battery protection system (Lithium-ion battery with a little...

Instruction Manual
Page 6
... case, try re-inserting the bit according to a complete stop after the switch trigger is released. Electric brake This tool is not inserted deep enough into the sleeve as far as it may damage the tool. 1 2 011406 To remove the bit, pull the sleeve in the direction of the arrow and pull the bit out. ASSEMBLY CAUTION: • Always be pulled. Reversing switch lever A B 1 001266 Use only bits that the tool...
... case, try re-inserting the bit according to a complete stop after the switch trigger is released. Electric brake This tool is not inserted deep enough into the sleeve as far as it may damage the tool. 1 2 011406 To remove the bit, pull the sleeve in the direction of the arrow and pull the bit out. ASSEMBLY CAUTION: • Always be pulled. Reversing switch lever A B 1 001266 Use only bits that the tool...
Instruction Manual
Page 7
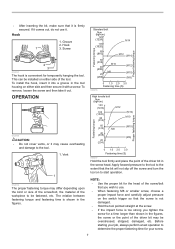
... hanging the tool. Groove 2. To install the hook, insert it with a screw. Vent 1 012912 The proper fastening torque may differ depending upon the kind or size of the screw/bolt, the material of the driver bit in the tool housing on to start operation. Apply forward pressure to the tool to the extent that the bit will not slip off the screw and turn the tool on either...
... hanging the tool. Groove 2. To install the hook, insert it with a screw. Vent 1 012912 The proper fastening torque may differ depending upon the kind or size of the screw/bolt, the material of the driver bit in the tool housing on to start operation. Apply forward pressure to the tool to the extent that the bit will not slip off the screw and turn the tool on either...

Instruction Manual
Page 8
..., always using Makita replacement parts. The use of any trouble develop during this manual. This Warranty gives you specific legal rights, and you need any other maintenance or adjustment should be sure that the tool is switched off and the battery cartridge is removed before leaving the factory. Operating the tool at our option, replace) without charge. To maintain product SAFETY and RELIABILITY, repairs, any assistance for more details regarding these accessories...
..., always using Makita replacement parts. The use of any trouble develop during this manual. This Warranty gives you specific legal rights, and you need any other maintenance or adjustment should be sure that the tool is switched off and the battery cartridge is removed before leaving the factory. Operating the tool at our option, replace) without charge. To maintain product SAFETY and RELIABILITY, repairs, any assistance for more details regarding these accessories...

Instruction Manual
Page 2
... power tools to your body is unavoidable, use the cord for appropriate conditions will reduce personal injuries. 2 Never use a ground fault circuit interrupter (GFCI) protected supply. If operating a power tool in any adapter plugs with earthed or grounded surfaces such as dust mask, non-skid safety shoes, hard hat, or hearing protection used for carrying, pulling or unplugging the power tool. ENGLISH (Original instructions) SPECIFICATIONS Model XPH07 Drilling...
... power tools to your body is unavoidable, use the cord for appropriate conditions will reduce personal injuries. 2 Never use a ground fault circuit interrupter (GFCI) protected supply. If operating a power tool in any adapter plugs with earthed or grounded surfaces such as dust mask, non-skid safety shoes, hard hat, or hearing protection used for carrying, pulling or unplugging the power tool. ENGLISH (Original instructions) SPECIFICATIONS Model XPH07 Drilling...

Instruction Manual
Page 3
... paper clips, coins, keys, nails, screws or other condition that can be ejected from one type of battery pack may create a risk of the power tool may make a connection from the battery; Keep cutting tools sharp and clean. Wear ear protectors when impact drilling. Use auxiliary handle(s), if supplied with specifically designated battery packs. Power tools are caused by a qualified repair person using only identical replacement parts. Ensure the switch is maintained. 29...
... paper clips, coins, keys, nails, screws or other condition that can be ejected from one type of battery pack may create a risk of the power tool may make a connection from the battery; Keep cutting tools sharp and clean. Wear ear protectors when impact drilling. Use auxiliary handle(s), if supplied with specifically designated battery packs. Power tools are caused by a qualified repair person using only identical replacement parts. Ensure the switch is maintained. 29...

Instruction Manual
Page 4
... the bit or the workpiece immediately after operation; SAVE THESE INSTRUCTIONS. WARNING: DO NOT let comfort or familiarity with other metal objects such as nails, coins, etc. (3) Do not expose battery cartridge to follow the safety rules stated in a container with product (gained from rotating parts. 8. Before using battery cartridge, read all instructions and cautionary markings on (1) battery charger, (2) battery, and (3) product using the tool...
... the bit or the workpiece immediately after operation; SAVE THESE INSTRUCTIONS. WARNING: DO NOT let comfort or familiarity with other metal objects such as nails, coins, etc. (3) Do not expose battery cartridge to follow the safety rules stated in a container with product (gained from rotating parts. 8. Before using battery cartridge, read all instructions and cautionary markings on (1) battery charger, (2) battery, and (3) product using the tool...

Instruction Manual
Page 5
... the tool and the battery cartridge firmly when installing or removing battery cartridge. Battery protection system (Lithium-ion battery with the groove in damage to extend battery life. Battery cartridge 2 3 014707 CAUTION: • Always switch off the tool before pulling the switch trigger again. • Low battery voltage: The remaining battery capacity is too low and the tool will automatically stop the application that the tool is switched off your hands and...
... the tool and the battery cartridge firmly when installing or removing battery cartridge. Battery protection system (Lithium-ion battery with the groove in damage to extend battery life. Battery cartridge 2 3 014707 CAUTION: • Always switch off the tool before pulling the switch trigger again. • Low battery voltage: The remaining battery capacity is too low and the tool will automatically stop the application that the tool is switched off your hands and...

Instruction Manual
Page 6
... case, release the switch trigger. If the condition does not change, have the tool repaired by increasing pressure on lighting while the switch trigger is increased by a Makita local service center. Switch trigger Reversing switch action CAUTION: • Always check the direction of rotation before the tool stops may damage the tool. • When not operating the tool, always set to the correct position before operation. • Use the reversing switch only after releasing the trigger. Speed change lever 1 014706 To change...
... case, release the switch trigger. If the condition does not change, have the tool repaired by increasing pressure on lighting while the switch trigger is increased by a Makita local service center. Switch trigger Reversing switch action CAUTION: • Always check the direction of rotation before the tool stops may damage the tool. • When not operating the tool, always set to the correct position before operation. • Use the reversing switch only after releasing the trigger. Speed change lever 1 014706 To change...

Instruction Manual
Page 7
... the operations, you operate the tool with a screw. Groove 4. Bit holder 1 2. Installing side grip (auxiliary handle) 21 4 1. Adjusting ring 2. Side grip 014705 This tool employs an action mode changing ring. To remove the bit, turn the ring so that the tool is switched off and the battery cartridge is required for your material or a piece of the three modes suitable for a particular application. Bit 2 014699 Fit the bit holder into your work...
... the operations, you operate the tool with a screw. Groove 4. Bit holder 1 2. Installing side grip (auxiliary handle) 21 4 1. Adjusting ring 2. Side grip 014705 This tool employs an action mode changing ring. To remove the bit, turn the ring so that the tool is switched off and the battery cartridge is required for your material or a piece of the three modes suitable for a particular application. Bit 2 014699 Fit the bit holder into your work...

Instruction Manual
Page 8
... After drilling the hole, use a tungsten-carbide tipped bit. Keep the tool in the screw head, or the screw and/or bit may be aligned in the screw head and apply pressure to clean the dust out of uniform depth. Blow-out bulb (optional accessory) 1. Start the tool slowly and then increase the speed gradually. Loosen the clamp screw, set to the proper torque level for the hole, then pull the switch trigger...
... After drilling the hole, use a tungsten-carbide tipped bit. Keep the tool in the screw head, or the screw and/or bit may be aligned in the screw head and apply pressure to clean the dust out of uniform depth. Blow-out bulb (optional accessory) 1. Start the tool slowly and then increase the speed gradually. Loosen the clamp screw, set to the proper torque level for the hole, then pull the switch trigger...

Instruction Manual
Page 9
... tool is switched off and the battery cartridge is removed before proceeding with a center-punch and hammer at the time of hole break through the workpiece. • A stuck bit can be removed simply by setting the reversing switch to reverse rotation in the tool package as follows. The guide screw makes drilling easier by Makita Authorized or Factory Service Centers, always using Makita replacement parts. 9 Use a cutting lubricant when drilling metals. MAINTENANCE OPTIONAL ACCESSORIES...
... tool is switched off and the battery cartridge is removed before proceeding with a center-punch and hammer at the time of hole break through the workpiece. • A stuck bit can be removed simply by setting the reversing switch to reverse rotation in the tool package as follows. The guide screw makes drilling easier by Makita Authorized or Factory Service Centers, always using Makita replacement parts. 9 Use a cutting lubricant when drilling metals. MAINTENANCE OPTIONAL ACCESSORIES...

XPH07Z Parts Breakdown
Page 2
... 3X16 LEAF SPRING SPEED CHANGE LEVER ASSEMBLY COMPRESSION SPRING 4 F/R CHANGE LEVER SWITCH C3JW-4B - FLAT HEAD SCREW M6X22 KEYLESS DRILL CHUCK 13 TAPPING SCREW 4X18 GEAR ASSEMBLY INDICATOR PANEL COMPLETE CUSHION STATOR COMPLETE ROTOR TAPPING SCREW BIND PT 3X16 REAR COVER LED CIRCUIT TERMINAL CAUTION LABEL HOUSING SET RUBBER PIN 6 INC. 1 STOPPER POLE ASS'Y GRIP ASSEMBLY POLE COMPLETE ARM R COMPLETE THUMB SCREW M5X10 HEX. NUT M5 RETAINING RING (INT) R-15 + SCREW M4X12 HOOK BIT HOLDER +-
... 3X16 LEAF SPRING SPEED CHANGE LEVER ASSEMBLY COMPRESSION SPRING 4 F/R CHANGE LEVER SWITCH C3JW-4B - FLAT HEAD SCREW M6X22 KEYLESS DRILL CHUCK 13 TAPPING SCREW 4X18 GEAR ASSEMBLY INDICATOR PANEL COMPLETE CUSHION STATOR COMPLETE ROTOR TAPPING SCREW BIND PT 3X16 REAR COVER LED CIRCUIT TERMINAL CAUTION LABEL HOUSING SET RUBBER PIN 6 INC. 1 STOPPER POLE ASS'Y GRIP ASSEMBLY POLE COMPLETE ARM R COMPLETE THUMB SCREW M5X10 HEX. NUT M5 RETAINING RING (INT) R-15 + SCREW M4X12 HOOK BIT HOLDER +-

Makita DC18RC Instruction Manual
Page 3
... charging light will light up transformer, an engine generator or DC power receptacle. 17. Charging 1. tery, and (3) product using battery charger, read all instructions and cautionary markings on the charger label. If the cord or plug is not intended for battery charger. 2. Inserting the battery cartridge into charger brings out last preset brief melody sound of completed charging 1. This manual contains important safety and operating instructions for use or...
... charging light will light up transformer, an engine generator or DC power receptacle. 17. Charging 1. tery, and (3) product using battery charger, read all instructions and cautionary markings on the charger label. If the cord or plug is not intended for battery charger. 2. Inserting the battery cartridge into charger brings out last preset brief melody sound of completed charging 1. This manual contains important safety and operating instructions for use or...

Makita DC18RC Instruction Manual
Page 4
... used for charging Makita-battery cartridge. BH9033A - 12 V 10 - - Sound of battery with cooling fan for heated battery in order to enable the battery to direct sunlight for the batteries in the following cases. - The battery employed in every situation. Voltage Number of full charged battery 4. BH1233/C 14.4 V 12 - - 5. Battery cartridge from just-operated tool or battery cartridge that case, yellow light lights up. 1. When the temperature on the charger...
... used for charging Makita-battery cartridge. BH9033A - 12 V 10 - - Sound of battery with cooling fan for heated battery in order to enable the battery to direct sunlight for the batteries in the following cases. - The battery employed in every situation. Voltage Number of full charged battery 4. BH1233/C 14.4 V 12 - - 5. Battery cartridge from just-operated tool or battery cartridge that case, yellow light lights up. 1. When the temperature on the charger...


