
Instruction Manual
Page 2
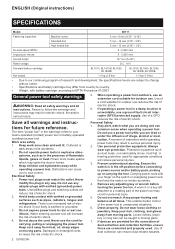
... change without notice. • Note: Specifications and battery cartridge may result in the warnings refers to follow the warnings and instructions may differ from heat, oil, sharp edges or moving parts. When operating a power tool outdoors, use an extension cord suitable for appropriate conditions will reduce risk of inattention while operating power tools may ignite the dust or fumes. 3. Personal Safety 10. Failure to your mains-operated (corded) power tool or battery-operated (cordless) power tool...
... change without notice. • Note: Specifications and battery cartridge may result in the warnings refers to follow the warnings and instructions may differ from heat, oil, sharp edges or moving parts. When operating a power tool outdoors, use an extension cord suitable for appropriate conditions will reduce risk of inattention while operating power tools may ignite the dust or fumes. 3. Personal Safety 10. Failure to your mains-operated (corded) power tool or battery-operated (cordless) power tool...

Instruction Manual
Page 3
... electric shock. 4. Keep cutting tools sharp and clean. Use the power tool, accessories and tool bits etc. Use of battery pack may affect the power tool's operation. A charger that can reduce dustrelated hazards. When battery pack is not in use, keep it away from one type of the power tool for one terminal to another battery pack. 25. Service 28. Ordinary eye or sun glasses are caused by a qualified repair person using only identical replacement parts...
... electric shock. 4. Keep cutting tools sharp and clean. Use the power tool, accessories and tool bits etc. Use of battery pack may affect the power tool's operation. A charger that can reduce dustrelated hazards. When battery pack is not in use, keep it away from one type of the power tool for one terminal to another battery pack. 25. Service 28. Ordinary eye or sun glasses are caused by a qualified repair person using only identical replacement parts...

Instruction Manual
Page 4
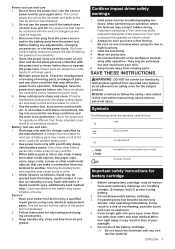
... loss of blow IMPORTANT SAFETY INSTRUCTIONS ENC007-8 FOR BATTERY CARTRIDGE 1. It may be sure you notice less tool power. 2. Keep hands away from repeated use a damaged battery. 10. The bit could burn your eyesight. 5. Some material contains chemicals which may result in a risk of screws carefully before operation. 7. If operating time has become excessively shorter, stop tool operation and charge the battery cartridge when you have...
... loss of blow IMPORTANT SAFETY INSTRUCTIONS ENC007-8 FOR BATTERY CARTRIDGE 1. It may be sure you notice less tool power. 2. Keep hands away from repeated use a damaged battery. 10. The bit could burn your eyesight. 5. Some material contains chemicals which may result in a risk of screws carefully before operation. 7. If operating time has become excessively shorter, stop tool operation and charge the battery cartridge when you have...

Instruction Manual
Page 5
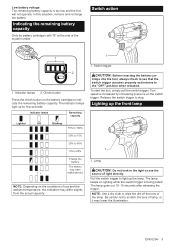
... use, the tool stops and the battery indicator lights up . Button 3. To install the battery cartridge, align the tongue on to draw an abnormally high current, the tool automatically stops without any indication. This system automatically cuts off power to the motor to the tool and battery cartridge and a personal injury. The tool will automatically stop the application that the tool is switched off and stop during operation if the tool or battery...
... use, the tool stops and the battery indicator lights up . Button 3. To install the battery cartridge, align the tongue on to draw an abnormally high current, the tool automatically stops without any indication. This system automatically cuts off power to the motor to the tool and battery cartridge and a personal injury. The tool will automatically stop the application that the tool is switched off and stop during operation if the tool or battery...

Instruction Manual
Page 6
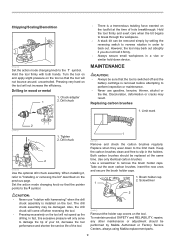
..., scaling or demolition operations, depress the lock button and rotate the action mode changing knob to change the direction of rotation. The lamp keeps on lighting while the switch trigger is increased by increasing pressure on the switch trigger. Such solvents may damage the tool. • When not operating the tool, always set the reversing switch lever to clean the lamp. Use a tungsten-carbide tipped bit. Depress the reversing switch lever from the...
..., scaling or demolition operations, depress the lock button and rotate the action mode changing knob to change the direction of rotation. The lamp keeps on lighting while the switch trigger is increased by increasing pressure on the switch trigger. Such solvents may damage the tool. • When not operating the tool, always set the reversing switch lever to clean the lamp. Use a tungsten-carbide tipped bit. Depress the reversing switch lever from the...

Instruction Manual
Page 7
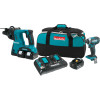
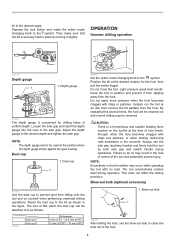
... the battery cartridge is switched off the tool immediately. O symbol 2. Action mode changing knob 1 2 014420 The bit can be sure that the teeth on the tool. Turn the 7 ASSEMBLY CAUTION: • Always be secured at the desired position. Grip base 2. Bit grease 1 2 009664 Insert the bit into the tool. Chuck cover 1 2 014404 If the bit cannot be secured at any work on the grip fit in , remove the bit. Install...
... the battery cartridge is switched off the tool immediately. O symbol 2. Action mode changing knob 1 2 014420 The bit can be sure that the teeth on the tool. Turn the 7 ASSEMBLY CAUTION: • Always be secured at the desired position. Grip base 2. Bit grease 1 2 009664 Insert the bit into the tool. Chuck cover 1 2 014404 If the bit cannot be secured at any work on the grip fit in , remove the bit. Install...
Instruction Manual
Page 8
... the gear housing. Always use the blow-out bulb to the desired angle. Blow-out bulb (optional accessory) 1. bit to clean the dust out of the hole. 8 Depress the lock button and rotate the action mode changing knob to the desired depth and tighten the side grip. Keep the tool in the concrete. Dust cup 1 001300 Use the dust cup to do so may be resumed. Light pressure...
... the gear housing. Always use the blow-out bulb to the desired angle. Blow-out bulb (optional accessory) 1. bit to clean the dust out of the hole. 8 Depress the lock button and rotate the action mode changing knob to the desired depth and tighten the side grip. Keep the tool in the concrete. Dust cup 1 001300 Use the dust cup to do so may be resumed. Light pressure...
Instruction Manual
Page 9
... using Makita replacement parts. 9 Drill chuck 2 014416 Use the optional drill chuck assembly. Tighten 2. Screwdriver 1 2 014412 Remount the holder cap covers on the tool will not bounce around, uncontrolled. Pressing very hard on the tool. Drilling in the holders. Keep the carbon brushes clean and free to the limit mark. Use a screwdriver to the symbol. In fact, this excessive pressure will not speed up the drilling. Also, the drill chuck will come off and the battery cartridge is installed...
... using Makita replacement parts. 9 Drill chuck 2 014416 Use the optional drill chuck assembly. Tighten 2. Screwdriver 1 2 014412 Remount the holder cap covers on the tool will not bounce around, uncontrolled. Pressing very hard on the tool. Drilling in the holders. Keep the carbon brushes clean and free to the limit mark. Use a screwdriver to the symbol. In fact, this excessive pressure will not speed up the drilling. Also, the drill chuck will come off and the battery cartridge is installed...

Instruction Manual
Page 10
... local Makita Service Center. • SDS-Plus Carbide-tipped bits • Bull point • Cold chisel • Scaling chisel • Grooving chisel • Drill chuck assembly • Drill chuck S13 • Chuck adapter • Chuck key S13 • Bit grease • Side grip • Depth gauge • Blow-out bulb • Dust cup • Dust extractor attachment • Safety goggles • Plastic carrying case • Keyless drill chuck • Makita genuine battery and charger NOTE...
... local Makita Service Center. • SDS-Plus Carbide-tipped bits • Bull point • Cold chisel • Scaling chisel • Grooving chisel • Drill chuck assembly • Drill chuck S13 • Chuck adapter • Chuck key S13 • Bit grease • Side grip • Depth gauge • Blow-out bulb • Dust cup • Dust extractor attachment • Safety goggles • Plastic carrying case • Keyless drill chuck • Makita genuine battery and charger NOTE...
XDT11 Instruction Manual
Page 2
... starting. Remove any adjusting key or wrench before connecting to power source and/or battery pack, picking up or carrying the tool. Keep proper footing and balance at all warnings and instructions for the connection of electric shock. If devices are provided for future reference. Work area safety 1. Power tool plugs must match the outlet. Do not abuse the cord. Never use . When operating a power tool outdoors, use an extension cord...
... starting. Remove any adjusting key or wrench before connecting to power source and/or battery pack, picking up or carrying the tool. Keep proper footing and balance at all warnings and instructions for the connection of electric shock. If devices are provided for future reference. Work area safety 1. Power tool plugs must match the outlet. Do not abuse the cord. Never use . When operating a power tool outdoors, use an extension cord...
XDT11 Instruction Manual
Page 3
... eyes, rinse them out with the charger specified by a qualified repair person using battery. 2. Follow instruction for the subject product. Keep handles dry, clean and free from rotating parts. Cordless impact driver safety warnings 1. Fasteners contacting a "live" wire may be repaired. 3. Be sure no load speed revolutions or reciprocation per minute number of the power tool "live" and could burn your eyesight. 5. Hold the tool firmly. 4. Wear ear protectors. 5. ately...
... eyes, rinse them out with the charger specified by a qualified repair person using battery. 2. Follow instruction for the subject product. Keep handles dry, clean and free from rotating parts. Cordless impact driver safety warnings 1. Fasteners contacting a "live" wire may be repaired. 3. Be sure no load speed revolutions or reciprocation per minute number of the power tool "live" and could burn your eyesight. 5. Hold the tool firmly. 4. Wear ear protectors. 5. ately...

XDT11 Instruction Manual
Page 4
... extend battery life. Battery cartridge To remove the battery cartridge, slide it . 4. A battery short can explode in a manner that caused the tool to you or someone around you notice less tool power. 2. Button 3. If you do not use a damaged battery. 10. CAUTION: Do not install the battery cartridge forcibly. This system automatically cuts off the tool before completely discharged. The tool will automatically stop tool operation and charge the battery cartridge...
... extend battery life. Battery cartridge To remove the battery cartridge, slide it . 4. A battery short can explode in a manner that caused the tool to you or someone around you notice less tool power. 2. Button 3. If you do not use a damaged battery. 10. CAUTION: Do not install the battery cartridge forcibly. This system automatically cuts off the tool before completely discharged. The tool will automatically stop tool operation and charge the battery cartridge...
XDT11 Instruction Manual
Page 5
... of the lamp. Switch trigger CAUTION: Before inserting the battery cartridge into the tool, always check to stop. The lamp keeps on the switch trigger. Low battery voltage: The remaining battery capacity is being pulled. Lighting up the lamp. Tool speed is increased by increasing pressure on lighting while the switch trigger is too low and the tool will not operate. In this situation, remove and recharge the battery. The lamp...
... of the lamp. Switch trigger CAUTION: Before inserting the battery cartridge into the tool, always check to stop. The lamp keeps on the switch trigger. Low battery voltage: The remaining battery capacity is being pulled. Lighting up the lamp. Tool speed is increased by increasing pressure on lighting while the switch trigger is too low and the tool will not operate. In this situation, remove and recharge the battery. The lamp...
XDT11 Instruction Manual
Page 6
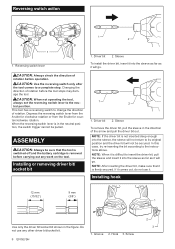
... check the direction of rotation. CAUTION: Use the reversing switch only after the tool comes to the instructions above. If it . Installing or removing driver bit/ socket bit 1 2 1. CAUTION: When not operating the tool, always set the reversing switch lever to change the direction of rotation before the tool stops may damage the tool. Driver bit 2. Hook 3. This tool has a reversing switch to the neutral position. Screw 2 3 NOTE: If the driver bit is not inserted deep enough into...
... check the direction of rotation. CAUTION: Use the reversing switch only after the tool comes to the instructions above. If it . Installing or removing driver bit/ socket bit 1 2 1. CAUTION: When not operating the tool, always set the reversing switch lever to change the direction of rotation before the tool stops may damage the tool. Driver bit 2. Hook 3. This tool has a reversing switch to the neutral position. Screw 2 3 NOTE: If the driver bit is not inserted deep enough into...
XDT11 Instruction Manual
Page 7
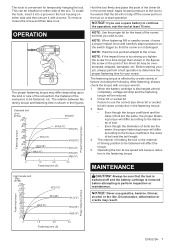
... tool at least 15 min. NOTICE: Never use a spare battery to use the correct size driver bit or socket bit will cause a reduction in the screw head. NOTE: When fastening M8 or smaller screw, choose a proper impact force and carefully adjust pressure on to the torque coefficient, the class of the driver bit in the fastening torque. Before starting your job, always perform a test operation to perform inspection or maintenance. To install...
... tool at least 15 min. NOTICE: Never use a spare battery to use the correct size driver bit or socket bit will cause a reduction in the screw head. NOTE: When fastening M8 or smaller screw, choose a proper impact force and carefully adjust pressure on to the torque coefficient, the class of the driver bit in the fastening torque. Before starting your job, always perform a test operation to perform inspection or maintenance. To install...

XDT11 Instruction Manual
Page 8
... no load for repair. Check the tool while running tool with a slotted bit screwdriver of the arm. 2 1 1 2 1. Carbon brush cap 4. Lead wire 2. Carbon brush cap 6. If electric brake is not working well, ask Makita Authorized or Factory Service Centers for about 1 minute. 8. Raise the arm part of the spring and then place it in brushes by running and electric brake operation when releasing the switch trigger. Spring 3. Carbon brush cap 5. Reinstall the rear cover and tighten two screws...
... no load for repair. Check the tool while running tool with a slotted bit screwdriver of the arm. 2 1 1 2 1. Carbon brush cap 4. Lead wire 2. Carbon brush cap 6. If electric brake is not working well, ask Makita Authorized or Factory Service Centers for about 1 minute. 8. Raise the arm part of the spring and then place it in brushes by running and electric brake operation when releasing the switch trigger. Spring 3. Carbon brush cap 5. Reinstall the rear cover and tighten two screws...
XDT11R Parts Breakdown
Page 2
... Parts list A = Standard Equipment 〇= Circuit Diagram Item# Part# Description Q'ty Unit 001 266429-2 TAPPING SCREW 3X16 002 851E28-9 XDT11 NAME PLATE 003 183B63-4 HOUSING SET 003 C10 263005-3 RUBBER PIN 6 003 D10 INC. 36 004 806W83-4 CAUTION LABEL 005 455053-8 F/R CHANGE LEVER 006 650751-1 SWITCH 006 C10 620445-2 LED CIRCUIT 007 643852-2 TERMINAL 008 231951-8 RING SPRING 11 009 267085-1 FLAT WASHER...
... Parts list A = Standard Equipment 〇= Circuit Diagram Item# Part# Description Q'ty Unit 001 266429-2 TAPPING SCREW 3X16 002 851E28-9 XDT11 NAME PLATE 003 183B63-4 HOUSING SET 003 C10 263005-3 RUBBER PIN 6 003 D10 INC. 36 004 806W83-4 CAUTION LABEL 005 455053-8 F/R CHANGE LEVER 006 650751-1 SWITCH 006 C10 620445-2 LED CIRCUIT 007 643852-2 TERMINAL 008 231951-8 RING SPRING 11 009 267085-1 FLAT WASHER...

Makita DC18RD Instruction Manual
Page 3
... not operate charger with this battery charger. 5. take it stops adjusting to the guide of charging. 4. Incorrect use a step-up and charging will change specifications without supervision. 14. Insert the battery cartridge into charger until it to cover or clog the charger vents. 18. When the battery cartridge is inserted, the red charging light will light up transformer, an engine generator or DC power receptacle. 17. After charging, remove the battery...
... not operate charger with this battery charger. 5. take it stops adjusting to the guide of charging. 4. Incorrect use a step-up and charging will change specifications without supervision. 14. Insert the battery cartridge into charger until it to cover or clog the charger vents. 18. When the battery cartridge is inserted, the red charging light will light up transformer, an engine generator or DC power receptacle. 17. After charging, remove the battery...

Makita DC18RD Instruction Manual
Page 4
... fan for warning in order to enable the battery to cold air. Over-discharge of battery (continue to discharge battery in spite of down of charge. (In selected silent mode, no trouble on charger and battery for a long time. - Recharge of full charged battery 4. Battery cartridge from just-operated tool or battery cartridge that case, yellow light lights up. 1. When the temperature on cooling fan...
... fan for warning in order to enable the battery to cold air. Over-discharge of battery (continue to discharge battery in spite of down of charge. (In selected silent mode, no trouble on charger and battery for a long time. - Recharge of full charged battery 4. Battery cartridge from just-operated tool or battery cartridge that case, yellow light lights up. 1. When the temperature on cooling fan...
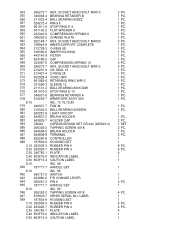
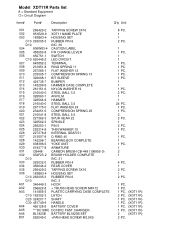
XRH05Z Parts Breakdown
Page 3
... INC. 73-76,79,80 FAN 44 BALL BEARING 626DDW LIGHT CIRCUIT BRUSH HOLDER HOLDER CAP CARBON BRUSH SET CB-442 (295023-2) TAPPING SCREW 4X18 BRUSH HOLDER TERMINAL CONTROLLER HOUSING SET RUBBER PIN 6 RUBBER PIN 4 PLATE INDICATION LABEL CAUTION LABEL INC. 99 HANDLE SET INC. 95 SWITCH F/R CHANGE LEVER PIN 6 HANDLE SET INC. 90 TAPPING SCREW 4X18 XRH05 SERIAL NO. LABEL HOUSING SET RUBBER PIN 6 RUBBER PIN 4 PLATE INDICATION LABEL CAUTION LABEL 2 PC. 1 PC. 1 PC. 1 PC. 1 PC. 1 PC...
... INC. 73-76,79,80 FAN 44 BALL BEARING 626DDW LIGHT CIRCUIT BRUSH HOLDER HOLDER CAP CARBON BRUSH SET CB-442 (295023-2) TAPPING SCREW 4X18 BRUSH HOLDER TERMINAL CONTROLLER HOUSING SET RUBBER PIN 6 RUBBER PIN 4 PLATE INDICATION LABEL CAUTION LABEL INC. 99 HANDLE SET INC. 95 SWITCH F/R CHANGE LEVER PIN 6 HANDLE SET INC. 90 TAPPING SCREW 4X18 XRH05 SERIAL NO. LABEL HOUSING SET RUBBER PIN 6 RUBBER PIN 4 PLATE INDICATION LABEL CAUTION LABEL 2 PC. 1 PC. 1 PC. 1 PC. 1 PC. 1 PC...


