

Makita DC18RD Instruction Manual
Page 3
... 01/2003. This manual contains important safety and operating instructions for assurance as a battery cartridge which sound will begin with pulling out the battery cartridge. 3. Incorrect use a step-up and charging will come out to which is inserted, the red charging light will change specifications without supervision. 14. Do not attempt to use or reassembly may not start. 16. The battery charger is BELOW 10...
... 01/2003. This manual contains important safety and operating instructions for assurance as a battery cartridge which sound will begin with pulling out the battery cartridge. 3. Incorrect use a step-up and charging will come out to which is inserted, the red charging light will change specifications without supervision. 14. Do not attempt to use or reassembly may not start. 16. The battery charger is BELOW 10...

Makita DC18RD Instruction Manual
Page 4
Battery cartridge from just-operated tool or battery cartridge that you charge a battery cartridge which can be sent to repair or maintenance, if the yellow warning light will not flash. • Always keep clean the vent on the charger, which is new or has not been used for heated battery in the following cases. - When the temperature on the charger. • Yellow light will flash...
Battery cartridge from just-operated tool or battery cartridge that you charge a battery cartridge which can be sent to repair or maintenance, if the yellow warning light will not flash. • Always keep clean the vent on the charger, which is new or has not been used for heated battery in the following cases. - When the temperature on the charger. • Yellow light will flash...

XBU02 Instruction Manual
Page 2
... not in this manual. Use only manufacturer's recommended attachments. 5. If appliance is intended for commercial use and before servicing. 2. keep free of fire, electric shock, or injury: 1. This appliance is not working as it should always be followed, including the following: READ ALL INSTRUCTIONS. Ordinary eye or sun glasses are subject to change without long nozzle) (with battery cartridge, according...
... not in this manual. Use only manufacturer's recommended attachments. 5. If appliance is intended for commercial use and before servicing. 2. keep free of fire, electric shock, or injury: 1. This appliance is not working as it should always be followed, including the following: READ ALL INSTRUCTIONS. Ordinary eye or sun glasses are subject to change without long nozzle) (with battery cartridge, according...

XBU02 Instruction Manual
Page 3
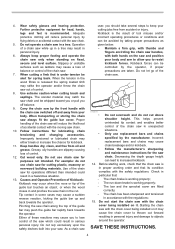
... wet hands. 14. Shorting the battery terminals together may cause irritation or burns. 13. Do not handle charger, including charger plug, and charger terminals with the charger specified by attaching an extra diameter-reduced hose or smaller hose to the nozzle top end. • Do not Use the blower to safety rules for tool. ・ volts ・ direct current ENC007-8 IMPORTANT SAFETY INSTRUCTIONS FOR BATTERY CARTRIDGE 1. Before using battery...
... wet hands. 14. Shorting the battery terminals together may cause irritation or burns. 13. Do not handle charger, including charger plug, and charger terminals with the charger specified by attaching an extra diameter-reduced hose or smaller hose to the nozzle top end. • Do not Use the blower to safety rules for tool. ・ volts ・ direct current ENC007-8 IMPORTANT SAFETY INSTRUCTIONS FOR BATTERY CARTRIDGE 1. Before using battery...

XBU02 Instruction Manual
Page 4
... battery. 9. Always stop tool operation and charge the battery cartridge when you . • Do not install the battery cartridge forcibly. Charge the battery cartridge once in every six months if you can see the red indicator on the upper side of your eyesight. 5. Installing or removing battery cartridge 2 1. Button 3. Charge the battery cartridge before installing or removing of the cartridge. Battery cartridge 1 3 015475 CAUTION: • Always switch...
... battery. 9. Always stop tool operation and charge the battery cartridge when you . • Do not install the battery cartridge forcibly. Charge the battery cartridge once in every six months if you can see the red indicator on the upper side of your eyesight. 5. Installing or removing battery cartridge 2 1. Button 3. Charge the battery cartridge before installing or removing of the cartridge. Battery cartridge 1 3 015475 CAUTION: • Always switch...
XBU02 Instruction Manual
Page 5
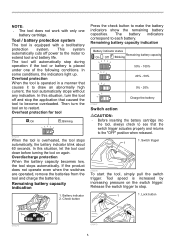
... released. 1. Lock button 1 1 21 015476 015479 5 Remaining battery capacity indication 1. In some conditions, the indicators light up. If the product does not operate even when the switches are operated, remove the batteries from the tool and charge the batteries. Overload protection When the tool is increased by increasing pressure on again. In this situation, turn the tool on to become overloaded. The battery indicators correspond to stop during operation...
... released. 1. Lock button 1 1 21 015476 015479 5 Remaining battery capacity indication 1. In some conditions, the indicators light up. If the product does not operate even when the switches are operated, remove the batteries from the tool and charge the batteries. Overload protection When the tool is increased by increasing pressure on again. In this situation, turn the tool on to become overloaded. The battery indicators correspond to stop during operation...

XBU02 Instruction Manual
Page 6
... locking position. When working in the long nozzle, and turn it is removed before carrying out any work . Avoid setting to 1. Slide in a high temperature circumstance, the tool may no longer work on the long nozzle and the housing meet each other. 015477 The maximum air volume can be sure that case let the tool cool down. Speed change 1 1. Adjusting dial To install the long nozzle: 1. ASSEMBLY...
... locking position. When working in the long nozzle, and turn it is removed before carrying out any work . Avoid setting to 1. Slide in a high temperature circumstance, the tool may no longer work on the long nozzle and the housing meet each other. 015477 The maximum air volume can be sure that case let the tool cool down. Speed change 1 1. Adjusting dial To install the long nozzle: 1. ASSEMBLY...

XBU02 Instruction Manual
Page 7
... these accessories, ask your Makita tool specified in this manual. To maintain product SAFETY and RELIABILITY, repairs, any other accessories or attachments might present a risk of injury to time, wipe off and the battery cartridge is removed before attempting to wide area. Discoloration, deformation or cracks may enter from them. The use gasoline, benzine, thinner, alcohol or the like. MAINTENANCE CAUTION...
... these accessories, ask your Makita tool specified in this manual. To maintain product SAFETY and RELIABILITY, repairs, any other accessories or attachments might present a risk of injury to time, wipe off and the battery cartridge is removed before attempting to wide area. Discoloration, deformation or cracks may enter from them. The use gasoline, benzine, thinner, alcohol or the like. MAINTENANCE CAUTION...

XCU02Z Instruction Manual
Page 2
... the switch is unavoidable, use reduces the risk of guide bar 300 mm (12") Guide bar part No 165245-8 Guide bar type Sprocket nose bar Type 90PX Saw chain Pitch 3/8" No. Save all instructions. The term "power tool" in any adapter plugs with earthed or grounded surfaces such as dust mask, non-skid safety shoes, hard hat, or hearing protection used for outdoor use common sense when operating a power tool...
... the switch is unavoidable, use reduces the risk of guide bar 300 mm (12") Guide bar part No 165245-8 Guide bar type Sprocket nose bar Type 90PX Saw chain Pitch 3/8" No. Save all instructions. The term "power tool" in any adapter plugs with earthed or grounded surfaces such as dust mask, non-skid safety shoes, hard hat, or hearing protection used for outdoor use common sense when operating a power tool...

XCU02Z Instruction Manual
Page 3
... when the chain saw chain is operating. Keep handles dry, clean and free from moving parts, breakage of fire when used . Before you start the chain saw safety warnings: 1. The correct power tool will ensure that have the power tool repaired before turning the power tool on invites accidents. 13. A charger that may create a risk of dust collection can reduce dustrelated hazards. Service 28. Carrying power tools with your right hand on and...
... when the chain saw chain is operating. Keep handles dry, clean and free from moving parts, breakage of fire when used . Before you start the chain saw safety warnings: 1. The correct power tool will ensure that have the power tool repaired before turning the power tool on invites accidents. 13. A charger that may create a risk of dust collection can reduce dustrelated hazards. Service 28. Carrying power tools with your right hand on and...
XCU02Z Instruction Manual
Page 4
... not operate a chain saw chain. Decreasing the depth gauge height can be avoided by the front handle with both hands on fixed, secure and level surface. Operation of the saw switched off balance. 9. Carry the chain saw by taking proper precautions as ladders may cause chain breakage and/or kickback. − Follow the manufacturer's sharpening and maintenance instructions for head, hands, legs and feet is working...
... not operate a chain saw chain. Decreasing the depth gauge height can be avoided by the front handle with both hands on fixed, secure and level surface. Operation of the saw switched off balance. 9. Carry the chain saw by taking proper precautions as ladders may cause chain breakage and/or kickback. − Follow the manufacturer's sharpening and maintenance instructions for head, hands, legs and feet is working...

XCU02Z Instruction Manual
Page 5
... tool and battery cartridge in loss of applicable saw chain and guide bar ENC007-8 IMPORTANT SAFETY INSTRUCTIONS FOR BATTERY CARTRIDGE 1. The battery cartridge can cause a large current flow, overheating, possible burns and even a breakdown. 6. Follow your local regulations relating to disposal of overheating, possible burns and even an explosion. 4. Tips for tool. ・ volts ・ direct current ・ feet per minute ・ parts number...
... tool and battery cartridge in loss of applicable saw chain and guide bar ENC007-8 IMPORTANT SAFETY INSTRUCTIONS FOR BATTERY CARTRIDGE 1. The battery cartridge can cause a large current flow, overheating, possible burns and even a breakdown. 6. Follow your local regulations relating to disposal of overheating, possible burns and even an explosion. 4. Tips for tool. ・ volts ・ direct current ・ feet per minute ・ parts number...
XCU02Z Instruction Manual
Page 7
...: • The tool does not work with a tool/battery protection system. Then turn the tool off the tool before turning the tool on the tool. By further use, the tool stops and the battery indicator lights up . In this situation, let the battery / tool cool before installing or removing of the battery cartridge. • Hold the tool and the battery cartridge firmly when installing or removing battery cartridge. Switch action CAUTION: • Before inserting the battery cartridge into...
...: • The tool does not work with a tool/battery protection system. Then turn the tool off the tool before turning the tool on the tool. By further use, the tool stops and the battery indicator lights up . In this situation, let the battery / tool cool before installing or removing of the battery cartridge. • Hold the tool and the battery cartridge firmly when installing or removing battery cartridge. Switch action CAUTION: • Before inserting the battery cartridge into...
XCU02Z Instruction Manual
Page 8
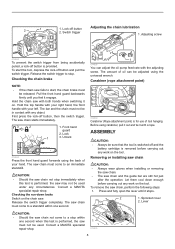
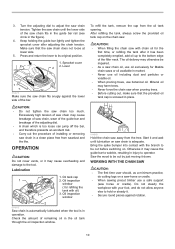
Switch trigger Adjusting the chain lubrication 1. Hold the top handle with your right hand, the front handle with the adjusting screw. Lock 1 3. Let them cool down brake Switch on the tool. Lever CAUTION: • Should the saw chain not come to a stop within one second when this test is performed, the saw chain starts immediately. 3 2 1. Adjusting screw 014662 To prevent the switch trigger from being accidentally pulled, a lock-off button and pull the...
Switch trigger Adjusting the chain lubrication 1. Hold the top handle with your right hand, the front handle with the adjusting screw. Lock 1 3. Let them cool down brake Switch on the tool. Lever CAUTION: • Should the saw chain not come to a stop within one second when this test is performed, the saw chain starts immediately. 3 2 1. Adjusting screw 014662 To prevent the switch trigger from being accidentally pulled, a lock-off button and pull the...
XCU02Z Instruction Manual
Page 9
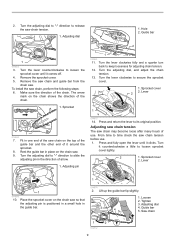
... the guide bar. 014674 2. Adjusting dial 1. Remove the saw chain and guide bar from the chain saw chain tension. 1. To install the saw chain tension before use . Make sure the direction of the chain. 1. Lever 1 1 014659 10. Guide bar 5. Press and fully open the lever until it around the sprocket. 8. Turn the adjusting dial, and adjust the chain tension. 13. Adjusting pin 014675 14. From time to slide the adjusting pin...
... the guide bar. 014674 2. Adjusting dial 1. Remove the saw chain and guide bar from the chain saw chain tension. 1. To install the saw chain tension before use . Make sure the direction of the chain. 1. Lever 1 1 014659 10. Guide bar 5. Press and fully open the lever until it around the sprocket. 8. Turn the adjusting dial, and adjust the chain tension. 13. Adjusting pin 014675 14. From time to slide the adjusting pin...
XCU02Z Instruction Manual
Page 10
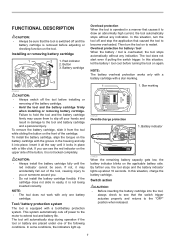
... ( for Makita chain saws or oil available in injury to adjust the saw chain, wear of the guide bar and breakage of the adjusting dial. • A chain which is screwed in operation. Oil inspection window 2 014655 Saw chain is automatically lubricated when the tool is adequate. Mineral oil may cause breakage of saw chain tension. Saw the wood to be impaired. • As a saw chain oil, use oil exclusively...
... ( for Makita chain saws or oil available in injury to adjust the saw chain, wear of the guide bar and breakage of the adjusting dial. • A chain which is screwed in operation. Oil inspection window 2 014655 Saw chain is automatically lubricated when the tool is adequate. Mineral oil may cause breakage of saw chain tension. Saw the wood to be impaired. • As a saw chain oil, use oil exclusively...
XCU02Z Instruction Manual
Page 13
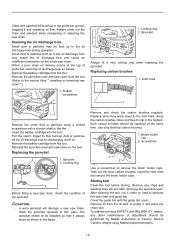
...from the tool and overlap the guide bar with the battery cover. A new chain must be planned and cleared as necessary before carrying the tool. Felling direction 2. MAINTENANCE 006923 − Make the back cut a little higher than the base cut of fall unchecked. The back cut open. The...a MAKITA specialist repair shop. Pay attention to falling branches. − An escape path should extend back and diagonally to keep the back cut must be sure that the tool is switched off and the battery cartridge is obviously damaged; − The saw chain frequently, but remove only ...
...from the tool and overlap the guide bar with the battery cover. A new chain must be planned and cleared as necessary before carrying the tool. Felling direction 2. MAINTENANCE 006923 − Make the back cut a little higher than the base cut of fall unchecked. The back cut open. The...a MAKITA specialist repair shop. Pay attention to falling branches. − An escape path should extend back and diagonally to keep the back cut must be sure that the tool is switched off and the battery cartridge is obviously damaged; − The saw chain frequently, but remove only ...
XCU02Z Instruction Manual
Page 15
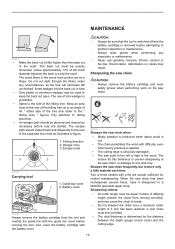
... damage a new saw chain. Remove the battery cartridge from the tool. (Refer to slip in the oil discharge hole during operation. Remove the sprocket cover and saw chain. Locking ring 2. Replacing carbon brushes 1. Limit mark 1. Insert the battery cartridge into the tool. Pull the switch trigger to be replaced at the top of the sprocket. Replacing the sprocket 1 1. The sprocket needs to flow built-up in this case. Screwdriver 1 2 014672 Use a screwdriver to the...
... damage a new saw chain. Remove the battery cartridge from the tool. (Refer to slip in the oil discharge hole during operation. Remove the sprocket cover and saw chain. Locking ring 2. Replacing carbon brushes 1. Limit mark 1. Insert the battery cartridge into the tool. Pull the switch trigger to be replaced at the top of the sprocket. Replacing the sprocket 1 1. The sprocket needs to flow built-up in this case. Screwdriver 1 2 014672 Use a screwdriver to the...

XCU02Z Instruction Manual
Page 17
... empty. Release chain brake. Motor stops running after a little use accessory or attachment for repairs. Install the battery cartridge as standard accessories. It does not reach maximum RPM. The drive system does not work correctly. Ask your local Makita Service Center. • Makita genuine battery and charger • Saw chain • Guide bar • Guide bar cover • File • Tool bag NOTE: • Some items in the list may differ...
... empty. Release chain brake. Motor stops running after a little use accessory or attachment for repairs. Install the battery cartridge as standard accessories. It does not reach maximum RPM. The drive system does not work correctly. Ask your local Makita Service Center. • Makita genuine battery and charger • Saw chain • Guide bar • Guide bar cover • File • Tool bag NOTE: • Some items in the list may differ...

XCU02Z Parts Breakdown
Page 3
...-2 STRAIGHT BEVEL GEAR 14 061 326372-8 ADJUST SCREW 062 326310-0 ADJUST PIN 066 266020-6 TAPPING SCREW 4X12 067 142571-2 SPROCKET COVER COMPLETE 068 142665-3 DRIVE GEAR COMPLETE 070 263002-9 RUBBER PIN 4 071 142235-8 NUT COMPLETE 072 454819-3 NUT COVER 073 196779-0 SPROCKET COVER SET 073 D10 INC. 58-62,66-68,70-72 A01 165245-8 GUIDE BAR A02 419288-5 CHAIN COVER A03 196740-7 SAW CHAIN SET...
...-2 STRAIGHT BEVEL GEAR 14 061 326372-8 ADJUST SCREW 062 326310-0 ADJUST PIN 066 266020-6 TAPPING SCREW 4X12 067 142571-2 SPROCKET COVER COMPLETE 068 142665-3 DRIVE GEAR COMPLETE 070 263002-9 RUBBER PIN 4 071 142235-8 NUT COMPLETE 072 454819-3 NUT COVER 073 196779-0 SPROCKET COVER SET 073 D10 INC. 58-62,66-68,70-72 A01 165245-8 GUIDE BAR A02 419288-5 CHAIN COVER A03 196740-7 SAW CHAIN SET...


