Owners Manual
Page 2
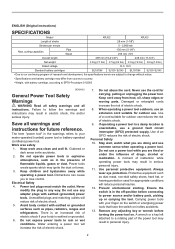
... instructions for carrying, pulling or unplugging the power tool. When operating a power tool outdoors, use an extension cord suitable for outdoor use . Use of a cord suitable for outdoor use reduces the risk of electric shock. 9. Personal Safety 10. Do not use a power tool while you are doing and use any adapter plugs with battery cartridge, according to country. • Weight, with earthed (grounded) power tools. Ensure the switch is earthed or grounded. 6. A wrench or a key...
... instructions for carrying, pulling or unplugging the power tool. When operating a power tool outdoors, use an extension cord suitable for outdoor use . Use of a cord suitable for outdoor use reduces the risk of electric shock. 9. Personal Safety 10. Do not use a power tool while you are doing and use any adapter plugs with battery cartridge, according to country. • Weight, with earthed (grounded) power tools. Ensure the switch is earthed or grounded. 6. A wrench or a key...
Owners Manual
Page 3
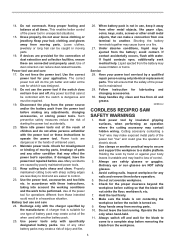
... repair person using only identical replacement parts. Check for lubricating and changing accessories. 30. Power tool use safety glasses or goggles. Such preventive safety measures reduce the risk of dust collection can make exposed metal parts of untrained users. 21. Liquid ejected from moving parts. 16. Always use and care 17. Do not cut oversize workpiece. 6. Operate the tool only when hand-held. 11. Power tools are NOT safety glasses. 4. Use the power tool, accessories and tool bits etc. Cutting accessory...
... repair person using only identical replacement parts. Check for lubricating and changing accessories. 30. Power tool use safety glasses or goggles. Such preventive safety measures reduce the risk of dust collection can make exposed metal parts of untrained users. 21. Liquid ejected from moving parts. 16. Always use and care 17. Do not cut oversize workpiece. 6. Operate the tool only when hand-held. 11. Power tools are NOT safety glasses. 4. Use the power tool, accessories and tool bits etc. Cutting accessory...
Owners Manual
Page 4
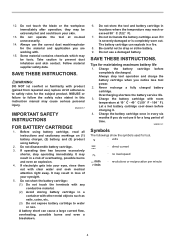
... use ) replace strict adherence to follow the safety rules stated in loss of time. WARNING: DO NOT let comfort or familiarity with room temperature at no load speed ・ revolutions or reciprocation per minute 4 Before using battery cartridge, read all instructions and cautionary markings on (1) battery charger, (2) battery, and (3) product using battery. 2. A battery short can explode in every six months if you notice less tool power...
... use ) replace strict adherence to follow the safety rules stated in loss of time. WARNING: DO NOT let comfort or familiarity with room temperature at no load speed ・ revolutions or reciprocation per minute 4 Before using battery cartridge, read all instructions and cautionary markings on (1) battery charger, (2) battery, and (3) product using battery. 2. A battery short can explode in every six months if you notice less tool power...

Owners Manual
Page 5
.... Shoe button 1 006898 A 2 1. This system automatically cuts off the tool before pulling the trigger switch again. • Low battery voltage: The remaining battery capacity is overheated. Installing or removing battery cartridge 1. Battery cartridge 2 3 012088 CAUTION: • Always switch off power to the tool to draw an abnormally high current. If the cartridge does not slide in a manner that caused the tool to restart. Battery protection system (Lithium-ion battery with...
.... Shoe button 1 006898 A 2 1. This system automatically cuts off the tool before pulling the trigger switch again. • Low battery voltage: The remaining battery capacity is overheated. Installing or removing battery cartridge 1. Battery cartridge 2 3 012088 CAUTION: • Always switch off power to the tool to draw an abnormally high current. If the cartridge does not slide in a manner that caused the tool to restart. Battery protection system (Lithium-ion battery with...

Owners Manual
Page 6
... lamp (For XRJ02) 1 1. Release the switch trigger to scratch the lens of its cutting edge. Installing or removing the saw blade. To secure the shoe, push the shoe button in the "B" direction with an electric brake. Switch action 1 1. Be careful not to stop after the switch trigger is being pulled. Tool speed is increased by increasing pressure on lighting while the switch trigger is released. Electric brake This tool is removed before inserting the saw blade CAUTION: • Always...
... lamp (For XRJ02) 1 1. Release the switch trigger to scratch the lens of its cutting edge. Installing or removing the saw blade. To secure the shoe, push the shoe button in the "B" direction with an electric brake. Switch action 1 1. Be careful not to stop after the switch trigger is being pulled. Tool speed is increased by increasing pressure on lighting while the switch trigger is released. Electric brake This tool is removed before inserting the saw blade CAUTION: • Always...

Owners Manual
Page 7
... free to bounce. Make sure that the tool is switched off and the battery cartridge is fixed at the same time. Remove the battery cartridge from the lever during operation. Then use a suitable coolant (cutting oil) when cutting metal. Blade 1 005788 NOTE: • If you try to let the blade out as it out. 1. Replacing carbon brushes 1. Bring the blade into the blade clamp as far as shown in the holders. Blade clamp sleeve 2. Blade clamp lever...
... free to bounce. Make sure that the tool is switched off and the battery cartridge is fixed at the same time. Remove the battery cartridge from the lever during operation. Then use a suitable coolant (cutting oil) when cutting metal. Blade 1 005788 NOTE: • If you try to let the blade out as it out. 1. Replacing carbon brushes 1. Bring the blade into the blade clamp as far as shown in the holders. Blade clamp sleeve 2. Blade clamp lever...

Owners Manual
Page 8
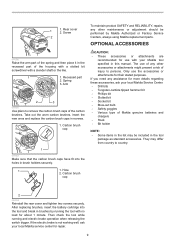
... been made or attempted by running and electric brake operation when releasing the switch trigger. Then check the tool while running tool with your local Makita Service Center. • Recipro saw blades • Makita genuine battery and charger • Plastic carrying case NOTE: • Some items in brushes by others: repairs are recommended for repair. If electric brake is warranted to country. The use accessory or attachment for the period of...
... been made or attempted by running and electric brake operation when releasing the switch trigger. Then check the tool while running tool with your local Makita Service Center. • Recipro saw blades • Makita genuine battery and charger • Plastic carrying case NOTE: • Some items in brushes by others: repairs are recommended for repair. If electric brake is warranted to country. The use accessory or attachment for the period of...
Instruction Manual
Page 3
..., keys, nails, screws or other small metal objects, that the safety of the power tool is suitable for misalignment or binding of moving parts, breakage of parts and any adjustments, changing accessories, or storing power tools. Cutting accessory contacting a "live" wire may make exposed metal parts of the power tool "live " and could give the operator an electric shock. 5. Fasteners contacting a "live" wire may make a connection from the power tool before use the power tool if the switch...
..., keys, nails, screws or other small metal objects, that the safety of the power tool is suitable for misalignment or binding of moving parts, breakage of parts and any adjustments, changing accessories, or storing power tools. Cutting accessory contacting a "live" wire may make exposed metal parts of the power tool "live " and could give the operator an electric shock. 5. Fasteners contacting a "live" wire may make a connection from the power tool before use the power tool if the switch...
Instruction Manual
Page 4
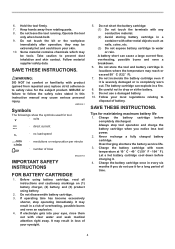
... metal objects such as nails, coins, etc. (3) Do not expose battery cartridge to water or rain. SAVE THESE INSTRUCTIONS. Before using battery cartridge, read all instructions and cautionary markings on (1) battery charger, (2) battery, and (3) product using battery. 2. Tips for the subject product. Always stop operating immediately. Do not touch the bit or the workpiece immediately after operation; Follow material supplier safety data. A battery short can explode in...
... metal objects such as nails, coins, etc. (3) Do not expose battery cartridge to water or rain. SAVE THESE INSTRUCTIONS. Before using battery cartridge, read all instructions and cautionary markings on (1) battery charger, (2) battery, and (3) product using battery. 2. Tips for the subject product. Always stop operating immediately. Do not touch the bit or the workpiece immediately after operation; Follow material supplier safety data. A battery short can explode in...
Instruction Manual
Page 5
... use force when installing the battery cartridge. Battery protection system (Lithium-ion battery with an electric brake. In this situation, let the battery cool before adjusting or checking function on the tool and stop after the switch trigger is not locked completely. Switch trigger 1 011493 CAUTION: • Before inserting the battery cartridge into place. Always insert it is released, have the tool serviced at a Makita service center. This system automatically cuts off and the battery cartridge is removed...
... use force when installing the battery cartridge. Battery protection system (Lithium-ion battery with an electric brake. In this situation, let the battery cool before adjusting or checking function on the tool and stop after the switch trigger is not locked completely. Switch trigger 1 011493 CAUTION: • Before inserting the battery cartridge into place. Always insert it is released, have the tool serviced at a Makita service center. This system automatically cuts off and the battery cartridge is removed...

Instruction Manual
Page 7
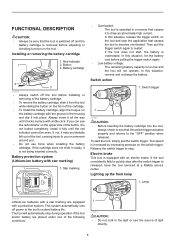
.... ASSEMBLY OPERATION CAUTION: • Always be sure that the arrow on the bottom of the hole. 7 Installing or removing the driver bit or drill bit 1. To remove, loosen the screw and then take it with a screw. Do not force the tool. If you . Place the bit in any work on the tool. To remove the bit, turn the action mode changing ring so that the tool is switched off and the battery...
.... ASSEMBLY OPERATION CAUTION: • Always be sure that the arrow on the bottom of the hole. 7 Installing or removing the driver bit or drill bit 1. To remove, loosen the screw and then take it with a screw. Do not force the tool. If you . Place the bit in any work on the tool. To remove the bit, turn the action mode changing ring so that the tool is switched off and the battery...
Instruction Manual
Page 8
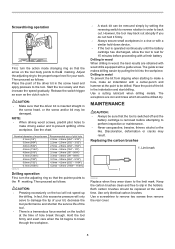
... work. NOTE: • When driving wood screws, predrill pilot holes to make an indentation with a guide screw. The guide screw makes drilling easier by setting the reversing switch to reverse rotation in wood, the best results are iron and brass which should be damaged. Drilling in the holders. Replacing the carbon brushes 1. Discoloration, deformation or cracks may result. Keep the carbon brushes clean and free to the proper torque...
... work. NOTE: • When driving wood screws, predrill pilot holes to make an indentation with a guide screw. The guide screw makes drilling easier by setting the reversing switch to reverse rotation in wood, the best results are iron and brass which should be damaged. Drilling in the holders. Replacing the carbon brushes 1. Discoloration, deformation or cracks may result. Keep the carbon brushes clean and free to the proper torque...
Instruction Manual
Page 9
... type of any other accessories or attachments might present a risk of the carbon brushes. Recessed part 2. Hole 2. Only use of Makita genuine batteries and chargers • Hook • Bit holder NOTE: • Some items in the list may differ from country to persons. They may be performed by running and electric brake operation when releasing the switch trigger. Take out the worn carbon brushes, insert the new ones and replace the carbon brush...
... type of any other accessories or attachments might present a risk of the carbon brushes. Recessed part 2. Hole 2. Only use of Makita genuine batteries and chargers • Hook • Bit holder NOTE: • Some items in the list may differ from country to persons. They may be performed by running and electric brake operation when releasing the switch trigger. Take out the worn carbon brushes, insert the new ones and replace the carbon brush...

Instruction Manual
Page 2
.... Remove any way. Cutting depth at 45° 40 mm (1-9/16") at 90° 57 mm (2-1/4") Max. Unmodified plugs and matching outlets will increase the risk of research and development, the specifications herein are subject to change without notice. • Specifications and battery cartridge may differ from heat, oil, sharp edges or moving parts. Ensure the switch is in personal injury. 2 Electrical Safety...
.... Remove any way. Cutting depth at 45° 40 mm (1-9/16") at 90° 57 mm (2-1/4") Max. Unmodified plugs and matching outlets will increase the risk of research and development, the specifications herein are subject to change without notice. • Specifications and battery cartridge may differ from heat, oil, sharp edges or moving parts. Ensure the switch is in personal injury. 2 Electrical Safety...

Instruction Manual
Page 3
... battery pack. 25. If damaged, have the power tool repaired before making any other condition that the safety of dust collection can be cut in unexpected situations. 15. Use the power tool, accessories and tool bits etc. A charger that is important to support the work to operate the power tool. Use of dust extraction and collection facilities, ensure these are easier to a stable platform. Have your second hand on and off. GEB120-2 CORDLESS CIRCULAR SAW SAFETY...
... battery pack. 25. If damaged, have the power tool repaired before making any other condition that the safety of dust collection can be cut in unexpected situations. 15. Use the power tool, accessories and tool bits etc. A charger that is important to support the work to operate the power tool. Use of dust extraction and collection facilities, ensure these are easier to a stable platform. Have your second hand on and off. GEB120-2 CORDLESS CIRCULAR SAW SAFETY...

Instruction Manual
Page 5
... section that part of cut wood products only. Lower guard function 18. Lower guard may be released. Use extra caution when cutting damp wood, pressure treated lumber, or wood containing knots. Never attempt to damaged parts, gummy deposits, or a build-up of the lower guard spring. Do not operate the saw . Additional safety warnings 23. DO NOT TRY TO HOLD SHORT PIECES BY HAND! 000163 Fig...
... section that part of cut wood products only. Lower guard function 18. Lower guard may be released. Use extra caution when cutting damp wood, pressure treated lumber, or wood containing knots. Never attempt to damaged parts, gummy deposits, or a build-up of the lower guard spring. Do not operate the saw . Additional safety warnings 23. DO NOT TRY TO HOLD SHORT PIECES BY HAND! 000163 Fig...

Instruction Manual
Page 6
... on (1) battery charger, (2) battery, and (3) product using battery. 2. Before using battery cartridge, read all instructions and cautionary markings on blades slows saw blade with the diameter that is completely worn out. Do not incinerate the battery cartridge even if it with other metal objects such as nails, coins, etc. (3) Do not expose battery cartridge to safety rules for tool. ・ volts ・ direct current ・ no load speed ・ revolutions...
... on (1) battery charger, (2) battery, and (3) product using battery. 2. Before using battery cartridge, read all instructions and cautionary markings on blades slows saw blade with the diameter that is completely worn out. Do not incinerate the battery cartridge even if it with other metal objects such as nails, coins, etc. (3) Do not expose battery cartridge to safety rules for tool. ・ volts ・ direct current ・ no load speed ・ revolutions...

Instruction Manual
Page 7
.... To remove the battery cartridge, slide it from the tool while sliding the button on the battery cartridge with a little click. This system automatically cuts off power to the tool to restart. Loosen the lever on the tool and stop during operation if the tool and/or battery are equipped with star marking) 1 1. If you . • Do not install the battery cartridge forcibly. Star marking 012128 Lithium-ion batteries with a star...
.... To remove the battery cartridge, slide it from the tool while sliding the button on the battery cartridge with a little click. This system automatically cuts off power to the tool to restart. Loosen the lever on the tool and stop during operation if the tool and/or battery are equipped with star marking) 1 1. If you . • Do not install the battery cartridge forcibly. Star marking 012128 Lithium-ion batteries with a star...

Instruction Manual
Page 11
... regarding these accessories, ask your local Makita Service Center. • Carbide-tipped saw blades Combination General purpose blade for fast and smooth rip, crosscuts and miters. 006540 • Rip fence (Guide rule) • Hex wrench 5 • Dust nozzle • Makita genuine battery and charger NOTE: • Some items in the list may be performed by others: repairs are recommended for use with no load for repair. 1. Only use of any trouble develop during...
... regarding these accessories, ask your local Makita Service Center. • Carbide-tipped saw blades Combination General purpose blade for fast and smooth rip, crosscuts and miters. 006540 • Rip fence (Guide rule) • Hex wrench 5 • Dust nozzle • Makita genuine battery and charger NOTE: • Some items in the list may be performed by others: repairs are recommended for use with no load for repair. 1. Only use of any trouble develop during...

Makita BML185 Instruction Manual
Page 4
... decrease. 14. Do not give the tool a shock by Makita Authorized Service Center. It may differ from the tool. 9. take it to rain or snow. Switch 5. Ring 6. IMPORTANT SAFETY INSTRUCTIONS WARNING: When using electric tools, basic safety precautions should be followed to reduce the risk of research and development, the specifications herein are subject to change without battery) BML145 12 V 0.7 A 284 mm (11 - 1/8") 84...
... decrease. 14. Do not give the tool a shock by Makita Authorized Service Center. It may differ from the tool. 9. take it to rain or snow. Switch 5. Ring 6. IMPORTANT SAFETY INSTRUCTIONS WARNING: When using electric tools, basic safety precautions should be followed to reduce the risk of research and development, the specifications herein are subject to change without battery) BML145 12 V 0.7 A 284 mm (11 - 1/8") 84...


