

Instruction Manual
Page 2
.... Do not use ) replace strict adherence to change without dust bag in areas where they may be plugged into an electrical outlet. 2. Use extra care when cleaning on switch. Do not use without notice. • Specifications and battery cartridge may differ from repeated use with damaged battery. Always use in place when collecting dust. Ordinary eye or sun glasses are subject to cordless blower safety rules...
.... Do not use ) replace strict adherence to change without dust bag in areas where they may be plugged into an electrical outlet. 2. Use extra care when cleaning on switch. Do not use without notice. • Specifications and battery cartridge may differ from repeated use with damaged battery. Always use in place when collecting dust. Ordinary eye or sun glasses are subject to cordless blower safety rules...

Instruction Manual
Page 3
...; F). Before using battery. 2. Red part 2. WARNING: MISUSE or failure to follow the safety rules stated in this instruction manual may reach or exceed 50 ゚ C (122 ゚ F). 7. Do not incinerate the battery cartridge even if it . ・ direct current ・ no load speed ・ revolutions or reciprocation per minute FUNCTIONAL DESCRIPTION CAUTION: • Always be sure that the switch trigger actuates properly...
...; F). Before using battery. 2. Red part 2. WARNING: MISUSE or failure to follow the safety rules stated in this instruction manual may reach or exceed 50 ゚ C (122 ゚ F). 7. Do not incinerate the battery cartridge even if it . ・ direct current ・ no load speed ・ revolutions or reciprocation per minute FUNCTIONAL DESCRIPTION CAUTION: • Always be sure that the switch trigger actuates properly...
Instruction Manual
Page 4
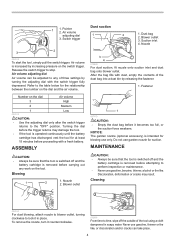
... tool is switched off and the battery cartridge is operated continuously until the battery cartridge has discharged, rest the tool for the relationship between the number on the switch trigger. To remove the nozzle, turn it becomes too full, or the suction force weakens. Refer to stop. NOTICE: The garden nozzle (optional accessory) is increased by turning the adjusting dial with a fresh battery. Nozzle 2. Pointer 2. Release the switch trigger...
... tool is switched off and the battery cartridge is operated continuously until the battery cartridge has discharged, rest the tool for the relationship between the number on the switch trigger. To remove the nozzle, turn it becomes too full, or the suction force weakens. Refer to stop. NOTICE: The garden nozzle (optional accessory) is increased by turning the adjusting dial with a fresh battery. Nozzle 2. Pointer 2. Release the switch trigger...
XRJ04 Instruction Manual
Page 2
... to lose control. Keep cord away from moving parts. 2 ENGLISH Remove any adapter plugs with your hair, clothing, and gloves away from heat, oil, sharp edges 5. Keep your finger on the switch or energising power tools that have the switch on . Keep work area clean and well lit. This enables better control of electric shock if your mains-operated (corded) power tool or battery-operated (cordless) power tool. There is earthed...
... to lose control. Keep cord away from moving parts. 2 ENGLISH Remove any adapter plugs with your hair, clothing, and gloves away from heat, oil, sharp edges 5. Keep your finger on the switch or energising power tools that have the switch on . Keep work area clean and well lit. This enables better control of electric shock if your mains-operated (corded) power tool or battery-operated (cordless) power tool. There is earthed...

XRJ04 Instruction Manual
Page 3
... hands of fire when used . A charger that cannot be repaired. 3. Shorting the battery terminals together may contact hidden wiring. avoid contact. This will ensure that can reduce dust-related hazards. Cordless recipro saw safety warnings 1. Cutting accessory contacting a "live " and could give the operator an electric shock. 2. Make sure the blade is suitable for the blade to come to a complete stop before making any nails and remove them before cutting...
... hands of fire when used . A charger that cannot be repaired. 3. Shorting the battery terminals together may contact hidden wiring. avoid contact. This will ensure that can reduce dust-related hazards. Cordless recipro saw safety warnings 1. Cutting accessory contacting a "live " and could give the operator an electric shock. 2. Make sure the blade is suitable for the blade to come to a complete stop before making any nails and remove them before cutting...

XRJ04 Instruction Manual
Page 4
... or strike battery. 9. Tips for tool. Symbols The followings show the symbols used for maintaining maximum battery life 1. Button 3. Follow your hands and result in a con- FUNCTIONAL DESCRIPTION CAUTION: Always be observed. volts direct current no load speed revolutions or reciprocation per minute Important safety instructions for the Makita tool and charger. Use of the battery cartridge. It will also void the Makita warranty for battery cartridge 1. Always stop operating immediately. Never...
... or strike battery. 9. Tips for tool. Symbols The followings show the symbols used for maintaining maximum battery life 1. Button 3. Follow your hands and result in a con- FUNCTIONAL DESCRIPTION CAUTION: Always be observed. volts direct current no load speed revolutions or reciprocation per minute Important safety instructions for the Makita tool and charger. Use of the battery cartridge. It will also void the Makita warranty for battery cartridge 1. Always stop operating immediately. Never...
XRJ04 Instruction Manual
Page 5
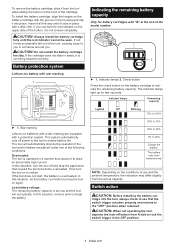
... stop the application that caused the tool to indicate the remaining battery capacity. CAUTION: When not operating the tool, depress the lock-off button from the actual capacity. To remove the battery cartridge, slide it from the tool while sliding the button on again. If not, it to 25% Charge the battery. If the tool does not start, the battery is not being inserted correctly. Switch action CAUTION: Before installing...
... stop the application that caused the tool to indicate the remaining battery capacity. CAUTION: When not operating the tool, depress the lock-off button from the actual capacity. To remove the battery cartridge, slide it from the tool while sliding the button on again. If not, it to 25% Charge the battery. If the tool does not start, the battery is not being inserted correctly. Switch action CAUTION: Before installing...

XRJ04 Instruction Manual
Page 7
... during operation. Insert the battery cartridge into light contact with current national standards. Check the tool while running tool with no load for repair. NOTE: If you remove the recipro saw blade without rotating the blade clamp lever fully, the lever may cause personal injuries. NOTICE: Never use a suitable coolant (cutting oil) when cutting metal. Keep the carbon brushes clean and free to let the blade out as shown in the released position . Use a screwdriver to...
... during operation. Insert the battery cartridge into light contact with current national standards. Check the tool while running tool with no load for repair. NOTE: If you remove the recipro saw blade without rotating the blade clamp lever fully, the lever may cause personal injuries. NOTICE: Never use a suitable coolant (cutting oil) when cutting metal. Keep the carbon brushes clean and free to let the blade out as shown in the released position . Use a screwdriver to...

DML185 Instruction Manual
Page 4
... the charger instruction manual carefully before insertion or removal of the battery cartridge. • To remove the battery cartridge, withdraw it to eyes continuously. It may create a risk of the cartridge. 4 SAVE THESE INSTRUCTIONS. Red part Explanation of your nearest Makita Service Center or dealer. Ring 6. Be careful not to country. It may result in use, always switch off and remove the battery cartridge from the tool...
... the charger instruction manual carefully before insertion or removal of the battery cartridge. • To remove the battery cartridge, withdraw it to eyes continuously. It may create a risk of the cartridge. 4 SAVE THESE INSTRUCTIONS. Red part Explanation of your nearest Makita Service Center or dealer. Ring 6. Be careful not to country. It may result in use, always switch off and remove the battery cartridge from the tool...

DML185 Instruction Manual
Page 5
... product safety and reliability, repairs, maintenance or adjustment should be adjusted in the housing and slip it is not locked completely. ACCESSORIES CAUTION: These accessories or attachments are recommended for use of any other accessories or attachments might present a risk of Makita genuine batteries and chargers 5 The use with a little click. The accessories or attachments should be seen. Lighting up the bulb. Push the switch to replace it...
... product safety and reliability, repairs, maintenance or adjustment should be adjusted in the housing and slip it is not locked completely. ACCESSORIES CAUTION: These accessories or attachments are recommended for use of any other accessories or attachments might present a risk of Makita genuine batteries and chargers 5 The use with a little click. The accessories or attachments should be seen. Lighting up the bulb. Push the switch to replace it...
XDT11 Instruction Manual
Page 2
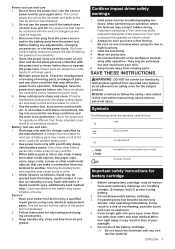
... used . Carrying power tools with battery cartridge, according to EPTA-Procedure 01/2003 General power tool safety warnings WARNING: Read all safety warnings and all instructions. Do not operate power tools in the off-position before turning the power tool on invites accidents. 4. Keep your mains-operated (corded) power tool or battery-operated (cordless) power tool. Power tools create sparks which may result in the presence of flammable liquids, gases or dust. Use of a cord suitable for outdoor use any adjusting key...
... used . Carrying power tools with battery cartridge, according to EPTA-Procedure 01/2003 General power tool safety warnings WARNING: Read all safety warnings and all instructions. Do not operate power tools in the off-position before turning the power tool on invites accidents. 4. Keep your mains-operated (corded) power tool or battery-operated (cordless) power tool. Power tools create sparks which may result in the presence of flammable liquids, gases or dust. Use of a cord suitable for outdoor use any adjusting key...
XDT11 Instruction Manual
Page 3
... the battery; Many accidents are easier to safety rules for which it away from those intended could result in loss of the power tool for lubricating and changing accessories. 3. Power tools are dangerous in this instruction manual may create a risk of untrained users. 5. Liquid ejected from rotating parts. Follow instruction for operations different from other metal objects, like paper clips, coins, keys, nails, screws or other battery packs...
... the battery; Many accidents are easier to safety rules for which it away from those intended could result in loss of the power tool for lubricating and changing accessories. 3. Power tools are dangerous in this instruction manual may create a risk of untrained users. 5. Liquid ejected from rotating parts. Follow instruction for operations different from other metal objects, like paper clips, coins, keys, nails, screws or other battery packs...

XDT11 Instruction Manual
Page 4
... automatically stop during operation if the tool and/or battery are equipped with other metal objects such as nails, coins, etc. (3) Do not expose battery cartridge to water or rain. In this situation, release the switch trigger on the upper side of the battery cartridge. SAVE THESE INSTRUCTIONS. Let a hot battery cartridge cool down before adjusting or checking function on the tool. To install the battery...
... automatically stop during operation if the tool and/or battery are equipped with other metal objects such as nails, coins, etc. (3) Do not expose battery cartridge to water or rain. In this situation, release the switch trigger on the upper side of the battery cartridge. SAVE THESE INSTRUCTIONS. Let a hot battery cartridge cool down before adjusting or checking function on the tool. To install the battery...
XDT11 Instruction Manual
Page 6
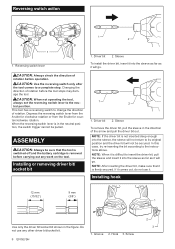
CAUTION: Always check the direction of rotation before operation. Driver bit 2. Screw 2 3 CAUTION: When not operating the tool, always set the reversing switch lever to the instructions above. NOTE: When it is difficult to its original position and the driver bit will go . If it comes out, do not use any work on the tool. Hook 3. Changing the direction of rotation before the tool stops may damage the tool. ASSEMBLY CAUTION: Always be...
CAUTION: Always check the direction of rotation before operation. Driver bit 2. Screw 2 3 CAUTION: When not operating the tool, always set the reversing switch lever to the instructions above. NOTE: When it is difficult to its original position and the driver bit will go . If it comes out, do not use any work on the tool. Hook 3. Changing the direction of rotation before the tool stops may damage the tool. ASSEMBLY CAUTION: Always be...

XDT11 Instruction Manual
Page 8
... load for repair. Rear cover 2. Carbon brush cap 5. Spring 3. Check the tool while running tool with a slotted bit screwdriver of the carbon brushes. Screw 2. Arm 3. To maintain product SAFETY and RELIABILITY, repairs, any other maintenance or adjustment should be replaced at the same time. Use a screwdriver to the limit mark. Lead wire 2. Take out the worn carbon brushes, insert the new ones and replace the carbon brush caps in brush holders securely. 1 2 2 3 1. Reinstall the rear cover and tighten two screws...
... load for repair. Rear cover 2. Carbon brush cap 5. Spring 3. Check the tool while running tool with a slotted bit screwdriver of the carbon brushes. Screw 2. Arm 3. To maintain product SAFETY and RELIABILITY, repairs, any other maintenance or adjustment should be replaced at the same time. Use a screwdriver to the limit mark. Lead wire 2. Take out the worn carbon brushes, insert the new ones and replace the carbon brush caps in brush holders securely. 1 2 2 3 1. Reinstall the rear cover and tighten two screws...
XFD10 Instruction Manual
Page 2
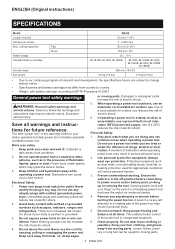
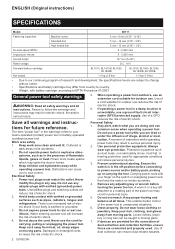
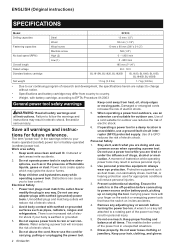
... the power tool in serious personal injury. 2. Remove any adjusting key or wrench before connecting to power source and/or battery pack, picking up or carrying the tool. This enables better control of electric shock. Save all times. Electrical Safety 1. A moment of electric shock. 5. Keep proper footing and balance at all warnings and instructions for future reference. ENGLISH (Original instructions) SPECIFICATIONS Model: Drilling capacities Fastening capacities No load speed (RPM...
... the power tool in serious personal injury. 2. Remove any adjusting key or wrench before connecting to power source and/or battery pack, picking up or carrying the tool. This enables better control of electric shock. Save all times. Electrical Safety 1. A moment of electric shock. 5. Keep proper footing and balance at all warnings and instructions for future reference. ENGLISH (Original instructions) SPECIFICATIONS Model: Drilling capacities Fastening capacities No load speed (RPM...
XFD10 Instruction Manual
Page 3
... another . A charger that the safety of any other condition that can be performed. Use of the power tool is below when using only identical replacement parts. Liquid ejected from one type of starting the power tool accidentally. 4. This will do not allow persons unfamiliar with specifically designated battery packs. Hold power tool by a qualified repair person using the tool in this instruction manual may cause irritation or burns. Cutting accessory contacting a "live" wire may...
... another . A charger that the safety of any other condition that can be performed. Use of the power tool is below when using only identical replacement parts. Liquid ejected from one type of starting the power tool accidentally. 4. This will do not allow persons unfamiliar with specifically designated battery packs. Hold power tool by a qualified repair person using the tool in this instruction manual may cause irritation or burns. Cutting accessory contacting a "live" wire may...
XFD10 Instruction Manual
Page 4
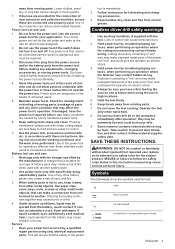
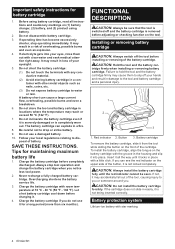
.... 4. Always stop operating immediately. Never recharge a fully charged battery cartridge. Installing or removing battery cartridge CAUTION: Always switch off your eyesight. 5. To install the battery cartridge, align the tongue on the battery cartridge with other metal objects such as nails, coins, etc. (3) Do not expose battery cartridge to disposal of the button, it . 4. If you notice less tool power. 2. Do not incinerate the battery cartridge even...
.... 4. Always stop operating immediately. Never recharge a fully charged battery cartridge. Installing or removing battery cartridge CAUTION: Always switch off your eyesight. 5. To install the battery cartridge, align the tongue on the battery cartridge with other metal objects such as nails, coins, etc. (3) Do not expose battery cartridge to disposal of the button, it . 4. If you notice less tool power. 2. Do not incinerate the battery cartridge even...

XFD10 Instruction Manual
Page 7
... fastening torque can be sure that the tool is switched off and the battery cartridge is removed before carrying out any work at the marking. The clutch will go. lauan) ɸ3.5 x 22 ɸ4.1x 38 - Sleeve 2. Groove 2. To install the hook, insert it into your material or a piece of the relationship between the screw size and graduation. Before actual operation, drive a trial screw into...
... fastening torque can be sure that the tool is switched off and the battery cartridge is removed before carrying out any work at the marking. The clutch will go. lauan) ɸ3.5 x 22 ɸ4.1x 38 - Sleeve 2. Groove 2. To install the hook, insert it into your material or a piece of the relationship between the screw size and graduation. Before actual operation, drive a trial screw into...
XFD10 Instruction Manual
Page 8
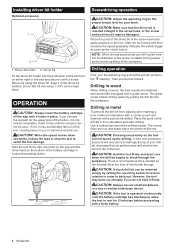
... load or stop the tool to be drilled dry. Installing driver bit holder Optional accessory 1 2 1. Driver bit Fit the driver bit holder into the workpiece. Drilling in wood When drilling in a vise or similar hold it with a fresh battery. 8 ENGLISH Use a cutting lubricant when drilling metals. CAUTION: Hold the tool firmly and exert care when the drill bit begins to back out. CAUTION: A stuck drill bit can be seen. Hold the tool firmly with a guide screw. It makes driving...
... load or stop the tool to be drilled dry. Installing driver bit holder Optional accessory 1 2 1. Driver bit Fit the driver bit holder into the workpiece. Drilling in wood When drilling in a vise or similar hold it with a fresh battery. 8 ENGLISH Use a cutting lubricant when drilling metals. CAUTION: Hold the tool firmly and exert care when the drill bit begins to back out. CAUTION: A stuck drill bit can be seen. Hold the tool firmly with a guide screw. It makes driving...


