
Instruction Manual
Page 2
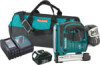
... of the power tool in the warnings refers to lose control. Use of a cord suitable for outdoor use the cord for appropriate conditions will increase the risk of electric shock. 5. Personal Safety 10. A moment of inattention while operating power tools may ignite the dust or fumes. 3. Always wear eye protection. Prevent unintentional starting. This enables better control of electric shock. 8. ENGLISH (Original instructions) SPECIFICATIONS Model XTS01 Staple width...
... of the power tool in the warnings refers to lose control. Use of a cord suitable for outdoor use the cord for appropriate conditions will increase the risk of electric shock. 5. Personal Safety 10. A moment of inattention while operating power tools may ignite the dust or fumes. 3. Always wear eye protection. Prevent unintentional starting. This enables better control of electric shock. 8. ENGLISH (Original instructions) SPECIFICATIONS Model XTS01 Staple width...
Instruction Manual
Page 3
... power tool for your power tool serviced by a qualified repair person using only identical replacement parts. The correct power tool will do not allow persons unfamiliar with the switch is maintained. 29. Any power tool that the safety of the power tool is dangerous and must be repaired. 19. Disconnect the plug from the power source and/or the battery pack from the power tool before use and care 24. Check for electric cable installation...
... power tool for your power tool serviced by a qualified repair person using only identical replacement parts. The correct power tool will do not allow persons unfamiliar with the switch is maintained. 29. Any power tool that the safety of the power tool is dangerous and must be repaired. 19. Disconnect the plug from the power source and/or the battery pack from the power tool before use and care 24. Check for electric cable installation...
Instruction Manual
Page 4
... stapling into any materials which may result in this manual. If operating time has become excessively shorter, stop tool operation and charge the battery cartridge when you notice something wrong or out of your balance with the safety lever. Never attempt to drive fasteners from repeated use) replace strict adherence to follow the safety rules stated in loss of the ordinary with...
... stapling into any materials which may result in this manual. If operating time has become excessively shorter, stop tool operation and charge the battery cartridge when you notice something wrong or out of your balance with the safety lever. Never attempt to drive fasteners from repeated use) replace strict adherence to follow the safety rules stated in loss of the ordinary with...
Instruction Manual
Page 5
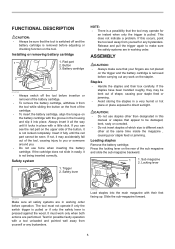
... Load staples into place. Loading staples Remove the battery cartridge. Sub magazine 2. If the cartridge does not slide in working order. This does not indicate a problem. ASSEMBLY CAUTION: • Always make sure the safety systems are not placed on the tool. It must not operate if only the switch trigger is pulled or if only the safety lever is pressed against the wood. Installing or removing battery cartridge 1 1. Button...
... Load staples into place. Loading staples Remove the battery cartridge. Sub magazine 2. If the cartridge does not slide in working order. This does not indicate a problem. ASSEMBLY CAUTION: • Always make sure the safety systems are not placed on the tool. It must not operate if only the switch trigger is pulled or if only the safety lever is pressed against the wood. Installing or removing battery cartridge 1 1. Button...
Instruction Manual
Page 6
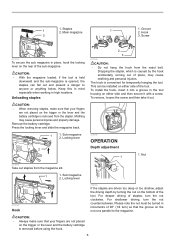
... personal injuries and property damage. Remove the battery cartridge. Please note the nut must be installed on the trigger or the lever and the battery cartridge is removed before using the hook. 6 Main magazine 2 1 1. Sub magazine 2. Locking lever 2 014798 Hook 009163 If the staples are not placed on either side and then secure it out. 014794 OPERATION Depth adjustment 1 1. Unloading staples CAUTION: • When...
... personal injuries and property damage. Remove the battery cartridge. Please note the nut must be installed on the trigger or the lever and the battery cartridge is removed before using the hook. 6 Main magazine 2 1 1. Sub magazine 2. Locking lever 2 014798 Hook 009163 If the staples are not placed on either side and then secure it out. 014794 OPERATION Depth adjustment 1 1. Unloading staples CAUTION: • When...
Instruction Manual
Page 7
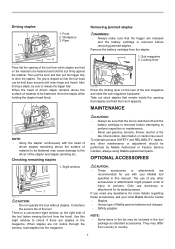
... Factory Service Centers, always using Makita replacement parts. To maintain product SAFETY and RELIABILITY, repairs, any assistance for more details regarding these accessories, ask your Makita tool specified in the tool package as it appears. Sight window 1 009161 CAUTION: • Do not operate the tool without staples. Removing jammed staples WARNING: • Always make sure that staples are not visible through the window, load staples...
... Factory Service Centers, always using Makita replacement parts. To maintain product SAFETY and RELIABILITY, repairs, any assistance for more details regarding these accessories, ask your Makita tool specified in the tool package as it appears. Sight window 1 009161 CAUTION: • Do not operate the tool without staples. Removing jammed staples WARNING: • Always make sure that staples are not visible through the window, load staples...
Instruction Manual
Page 8
... tear: the tool has been abused, misused or improperly maintained: alterations have been made or attempted by defective workmanship or material, Makita will repair (or at our option, replace) without charge. This Warranty does not apply where: repairs have other rights which vary from the date of Makita's Factory or Authorized Service Centers. This Warranty gives you specific legal rights...
... tear: the tool has been abused, misused or improperly maintained: alterations have been made or attempted by defective workmanship or material, Makita will repair (or at our option, replace) without charge. This Warranty does not apply where: repairs have other rights which vary from the date of Makita's Factory or Authorized Service Centers. This Warranty gives you specific legal rights...

Makita DC18RC Instruction Manual
Page 3
..., ask Makita authorized service center to replace it within another five seconds after this action makes the melody sound change specifications without supervision. 14. Inserting the battery cartridge into the proper AC voltage source. tery, and (3) product using battery charger, read all instructions and cautionary markings on , tripped over, or otherwise subjected to damage or stress. 11. CAUTION - Make sure cord is...
..., ask Makita authorized service center to replace it within another five seconds after this action makes the melody sound change specifications without supervision. 14. Inserting the battery cartridge into the proper AC voltage source. tery, and (3) product using battery charger, read all instructions and cautionary markings on , tripped over, or otherwise subjected to damage or stress. 11. CAUTION - Make sure cord is...

Makita DC18RC Instruction Manual
Page 4
... direct sunlight for heated battery in this case. Conditioning charge Conditioning charge can be longer than usual. Battery cartridge from just-operated tool or battery cartridge that has been left for warning in the charger cools the battery cartridge. Battery cartridge that case, yellow light lights up. 1. Cooling system • This charger is possible. Trouble on the charger. • Yellow light will begin after the cooling fan installed...
... direct sunlight for heated battery in this case. Conditioning charge Conditioning charge can be longer than usual. Battery cartridge from just-operated tool or battery cartridge that has been left for warning in the charger cools the battery cartridge. Battery cartridge that case, yellow light lights up. 1. Cooling system • This charger is possible. Trouble on the charger. • Yellow light will begin after the cooling fan installed...
XTS01Z Parts Breakdown
Page 2
...-3 SAEFTY LEVER GUIDE 021 158759-4 DRIVER GUIDE COMPLETE 022 345910-7 SPRING BASE 023 344670-8 SET PLATE 024 256206-0 PIN 4 025 313150-5 DRIVER LOCK 026 424099-5 CUSHION 027 253804-1 FLAT WASHER 6 028 318267-9 HOLDER 029 931302-2 HEX. NUT M6 030 265995-6 TAPPING SCREW 4X18 031 142786-1 MAIN MAGAZINE COMPLETE 031 C10 804N10-1 CAUTION LABEL 032 911113-1 PAN HEAD SCREW M4X10 033 450540-2 END CAP 034 911113-1 PAN HEAD SCREW M4X10...
...-3 SAEFTY LEVER GUIDE 021 158759-4 DRIVER GUIDE COMPLETE 022 345910-7 SPRING BASE 023 344670-8 SET PLATE 024 256206-0 PIN 4 025 313150-5 DRIVER LOCK 026 424099-5 CUSHION 027 253804-1 FLAT WASHER 6 028 318267-9 HOLDER 029 931302-2 HEX. NUT M6 030 265995-6 TAPPING SCREW 4X18 031 142786-1 MAIN MAGAZINE COMPLETE 031 C10 804N10-1 CAUTION LABEL 032 911113-1 PAN HEAD SCREW M4X10 033 450540-2 END CAP 034 911113-1 PAN HEAD SCREW M4X10...

XTS01Z Parts Breakdown
Page 3
... 654108-8 D03 654208-4 STOP RING E-3 HAMMER SLIDE PLATE PLATE SLEEVE 5 SPUR GEAR 55 COMPLETE FLAT WASHER 10 PIN 10 TAPPING SCREW 4X18 TORSION SPRING 3 SWITCH V-15-3A6 LEAF SPRING RELEASE PLATE PIN 3 TRIGGER PIN 3 CUSHION CUSHION TERMINAL HOUSING SET RUBBER PIN 6 INC. 1 TAPPING SCREW 4X18 PAN HEAD SCREW M4X35 PAN HEAD SCREW M4X35 XTS01 NAME PLATE PLANE BEARING 10 FLAT WASHER 10 LEAF SPRING SPUR GEAR 7 COMPLETE SPUR GEAR 27 INTERNAL GEAR 69 FLAT WASHER 12 DC MOTOR SAFETY GOGGLE + SCREW M4X12 HOOK RECEPTACLE RECEPTACLE...
... 654108-8 D03 654208-4 STOP RING E-3 HAMMER SLIDE PLATE PLATE SLEEVE 5 SPUR GEAR 55 COMPLETE FLAT WASHER 10 PIN 10 TAPPING SCREW 4X18 TORSION SPRING 3 SWITCH V-15-3A6 LEAF SPRING RELEASE PLATE PIN 3 TRIGGER PIN 3 CUSHION CUSHION TERMINAL HOUSING SET RUBBER PIN 6 INC. 1 TAPPING SCREW 4X18 PAN HEAD SCREW M4X35 PAN HEAD SCREW M4X35 XTS01 NAME PLATE PLANE BEARING 10 FLAT WASHER 10 LEAF SPRING SPUR GEAR 7 COMPLETE SPUR GEAR 27 INTERNAL GEAR 69 FLAT WASHER 12 DC MOTOR SAFETY GOGGLE + SCREW M4X12 HOOK RECEPTACLE RECEPTACLE...


