Instruction Manual
Page 1
IMPORTANT: Lire avant usage. INSTRUCTION MANUAL MANUEL D'INSTRUCTION MANUAL DE INSTRUCCIONES Cordless Impact Wrench Boulonneuse sans Fil Llave de Impacto Inalámbrica XWT02 014635 IMPORTANT: Read Before Using. IMPORTANTE: Leer antes de usar. 1
IMPORTANT: Lire avant usage. INSTRUCTION MANUAL MANUEL D'INSTRUCTION MANUAL DE INSTRUCCIONES Cordless Impact Wrench Boulonneuse sans Fil Llave de Impacto Inalámbrica XWT02 014635 IMPORTANT: Read Before Using. IMPORTANTE: Leer antes de usar. 1
Instruction Manual
Page 2
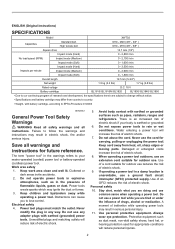
..., the specifications herein are doing and use the cord for appropriate conditions will reduce risk of electric shock if your mains-operated (corded) power tool or battery-operated (cordless) power tool. Always wear eye protection. M16 (3/8" - 5/8" ) Square drive 12.7 mm (1/2") Impact mode (Hard) 0 - 2,800 /min No load speed (RPM) Impact mode (Medium) 0 - 2,100 /min Impact mode (Soft) 0 - 1,600 /min Impact mode (Hard) 0 - 3,500 /min Impacts per minute Impact mode (Medium) 0 - 2,600 /min Impact mode...
..., the specifications herein are doing and use the cord for appropriate conditions will reduce risk of electric shock if your mains-operated (corded) power tool or battery-operated (cordless) power tool. Always wear eye protection. M16 (3/8" - 5/8" ) Square drive 12.7 mm (1/2") Impact mode (Hard) 0 - 2,800 /min No load speed (RPM) Impact mode (Medium) 0 - 2,100 /min Impact mode (Soft) 0 - 1,600 /min Impact mode (Hard) 0 - 3,500 /min Impacts per minute Impact mode (Medium) 0 - 2,600 /min Impact mode...
Instruction Manual
Page 3
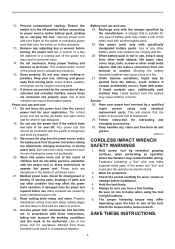
... connected and properly used with the switch is in a hazardous situation. Store idle power tools out of the reach of the power tool may contact hidden wiring. If damaged, have the power tool repaired before making any adjusting key or wrench before turning the power tool on and off -position before installation. 4. Recharge only with specifically designated battery packs. When battery pack is below when using only identical replacement parts. A wrench or a key left attached...
... connected and properly used with the switch is in a hazardous situation. Store idle power tools out of the reach of the power tool may contact hidden wiring. If damaged, have the power tool repaired before making any adjusting key or wrench before turning the power tool on and off -position before installation. 4. Recharge only with specifically designated battery packs. When battery pack is below when using only identical replacement parts. A wrench or a key left attached...
Instruction Manual
Page 4
... product. Before using battery cartridge, read all instructions and cautionary markings on (1) battery charger, (2) battery, and (3) product using battery. 2. Do not store the tool and battery cartridge in every six months if you notice less tool power. 2. MISUSE or failure to water or rain. It may result in a fire. 8. Do not use ) replace strict adherence to safety rules for tool. ・ volts ・ direct current ・ no load speed ・...
... product. Before using battery cartridge, read all instructions and cautionary markings on (1) battery charger, (2) battery, and (3) product using battery. 2. Do not store the tool and battery cartridge in every six months if you notice less tool power. 2. MISUSE or failure to water or rain. It may result in a fire. 8. Do not use ) replace strict adherence to safety rules for tool. ・ volts ・ direct current ・ no load speed ・...
Instruction Manual
Page 5
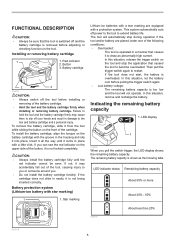
... marking Lithium-ion batteries with a star marking are placed under one of the battery cartridge. • Hold the tool and the battery cartridge firmly when installing or removing battery cartridge. This system automatically cuts off the tool before pulling the trigger switch again. • Low battery voltage: The remaining battery capacity is overheated. In this situation, let the battery cool before installing or removing of the following table. If...
... marking Lithium-ion batteries with a star marking are placed under one of the battery cartridge. • Hold the tool and the battery cartridge firmly when installing or removing battery cartridge. This system automatically cuts off the tool before pulling the trigger switch again. • Low battery voltage: The remaining battery capacity is overheated. In this situation, let the battery cool before installing or removing of the following table. If...
Instruction Manual
Page 6
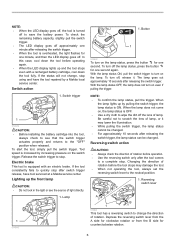
... start the tool, simply pull the switch trigger. Release the switch trigger to change , stop using and have tool serviced at a Makita service center. Electric brake This tool is OFF. • Use a dry cloth to a complete stop . To turn on the lamp. NOTE: • To confirm the lamp status, pull the trigger. Switch trigger 1 014639 CAUTION: • Before installing the battery cartridge into the tool, always check to see the source of light directly. 1. Depress the reversing switch lever...
... start the tool, simply pull the switch trigger. Release the switch trigger to change , stop using and have tool serviced at a Makita service center. Electric brake This tool is OFF. • Use a dry cloth to a complete stop . To turn on the lamp. NOTE: • To confirm the lamp status, pull the trigger. Switch trigger 1 014639 CAUTION: • Before installing the battery cartridge into the tool, always check to see the source of light directly. 1. Depress the reversing switch lever...
Instruction Manual
Page 7
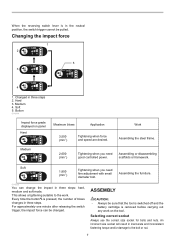
... you need good controlled power. This allows a tightening suitable to the bolt or nut. 7 When the reversing switch lever is in the neutral position, the switch trigger cannot be changed. Changing the impact force 1 2 5 3 4 1. ASSEMBLY CAUTION: • Always be sure that the tool is switched off and the battery cartridge is pressed, the number of blows changes in three steps 2. Changed in three steps. Every time the button is removed...
... you need good controlled power. This allows a tightening suitable to the bolt or nut. 7 When the reversing switch lever is in the neutral position, the switch trigger cannot be changed. Changing the impact force 1 2 5 3 4 1. ASSEMBLY CAUTION: • Always be sure that the tool is switched off and the battery cartridge is pressed, the number of blows changes in three steps 2. Changed in three steps. Every time the button is removed...
Instruction Manual
Page 8
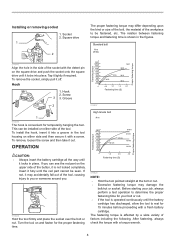
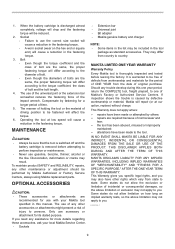
... the button, it may damage the bolt/nut or socket. Screw 3 3. OPERATION CAUTION: • Always insert the battery cartridge all the way until the battery cartridge has discharged, allow the tool to rest for 15 minutes before proceeding with a torque wrench. 8 Standard bolt N m (ft.lbs) Fastening torque Proper fastening torque 014643 Align the hole in the figures. Installing or removing socket 1. Socket 2. Before starting your...
... the button, it may damage the bolt/nut or socket. Screw 3 3. OPERATION CAUTION: • Always insert the battery cartridge all the way until the battery cartridge has discharged, allow the tool to rest for 15 minutes before proceeding with a torque wrench. 8 Standard bolt N m (ft.lbs) Fastening torque Proper fastening torque 014643 Align the hole in the figures. Installing or removing socket 1. Socket 2. Before starting your...
Instruction Manual
Page 9
... the battery cartridge is removed before leaving the factory. MAINTENANCE CAUTION: • Always be included in the list may not apply to the torque coefficient, the class of bolt and the bolt length. 4. EN0006-1 9 If inspection shows the trouble is caused by Makita Authorized or Factory Service Centers, always using Makita replacement parts. To maintain product SAFETY and RELIABILITY, repairs, any other accessories or attachments...
... the battery cartridge is removed before leaving the factory. MAINTENANCE CAUTION: • Always be included in the list may not apply to the torque coefficient, the class of bolt and the bolt length. 4. EN0006-1 9 If inspection shows the trouble is caused by Makita Authorized or Factory Service Centers, always using Makita replacement parts. To maintain product SAFETY and RELIABILITY, repairs, any other accessories or attachments...


