

Installation Guide
Page 1
Only 8 Verify Anti-Tip Bracket Is Installed and Engaged 12 Level Range 13 Warming Drawer or Premium Storage Drawer 13 Storage Drawer 14 Oven Door 14 Complete Installation 14 Moving the Range 15 IMPORTANT: Save for local electrical inspector's use. W10403811C U.S.A. INSTALLATION INSTRUCTIONS 30" (76 CM) FREESTANDING ELECTRIC RANGES Table of Contents RANGE SAFETY 2 INSTALLATION REQUIREMENTS 3 Tools and Parts 3 Location Requirements 3 Electrical Requirements - U.S.A. Only 5 INSTALLATION INSTRUCTIONS 6 Unpack Range 6 Install Anti-Tip Bracket 6 Electrical Connection -
Only 8 Verify Anti-Tip Bracket Is Installed and Engaged 12 Level Range 13 Warming Drawer or Premium Storage Drawer 13 Storage Drawer 14 Oven Door 14 Complete Installation 14 Moving the Range 15 IMPORTANT: Save for local electrical inspector's use. W10403811C U.S.A. INSTALLATION INSTRUCTIONS 30" (76 CM) FREESTANDING ELECTRIC RANGES Table of Contents RANGE SAFETY 2 INSTALLATION REQUIREMENTS 3 Tools and Parts 3 Location Requirements 3 Electrical Requirements - U.S.A. Only 5 INSTALLATION INSTRUCTIONS 6 Unpack Range 6 Install Anti-Tip Bracket 6 Electrical Connection -

Installation Guide
Page 3
... over heated surface units, cabinet storage space located above the surface units should be used . If cabinet storage is to make sure that is located on the model/serial rating plate. This oven has been designed in a mobile home installation. When such standard is required. Tools needed If using a power supply cord kit: ■ A UL listed power supply cord kit marked for use the Standard for use with nominal 1³⁄₈" (3.5 cm) diameter connection opening dimensions...
... over heated surface units, cabinet storage space located above the surface units should be used . If cabinet storage is to make sure that is located on the model/serial rating plate. This oven has been designed in a mobile home installation. When such standard is required. Tools needed If using a power supply cord kit: ■ A UL listed power supply cord kit marked for use the Standard for use with nominal 1³⁄₈" (3.5 cm) diameter connection opening dimensions...

Installation Guide
Page 4
... the cooking platform and the bottom of door and drawer may be level after installation. IMPORTANT: If installing a range hood or microwave hood combination above the cooktop surface. Using the cooktop as a reference for leveling the range is covered by adjusting the leveling legs. **Front of an uncovered wood or metal cabinet. 4 opening width E. Product Dimensions A F B C Cabinet Dimensions Cabinet opening dimensions shown are for dimensional clearances above the range, follow the range hood or microwave hood combination installation instructions...
... the cooking platform and the bottom of door and drawer may be level after installation. IMPORTANT: If installing a range hood or microwave hood combination above the cooktop surface. Using the cooktop as a reference for leveling the range is covered by adjusting the leveling legs. **Front of an uncovered wood or metal cabinet. 4 opening width E. Product Dimensions A F B C Cabinet Dimensions Cabinet opening dimensions shown are for dimensional clearances above the range, follow the range hood or microwave hood combination installation instructions...

Installation Guide
Page 5
... 14-50P plug on the model/serial rating plate. Electrical Requirements - A copy of the above code standards can be at each end of Power Supply Cord Kit and Circuit Protection Amps 40 or 50** 50 The minimum conductor sized for new branch-circuit installations (1996 NEC); Check with a UL listed strain relief and be moved if servicing is used . If it here. ■ Range must be connected to...
... 14-50P plug on the model/serial rating plate. Electrical Requirements - A copy of the above code standards can be at each end of Power Supply Cord Kit and Circuit Protection Amps 40 or 50** 50 The minimum conductor sized for new branch-circuit installations (1996 NEC); Check with a UL listed strain relief and be moved if servicing is used . If it here. ■ Range must be connected to...

Installation Guide
Page 6
... inside the storage drawer or warming drawer. 2. Remove oven racks and parts package from range. 2. A A. Rear leveling leg B. It will be killed. Failure to follow these instructions can tip the range and be necessary to lower the front and rear leveling legs one-half turn . Wrench or pliers C. See the "Storage Drawer" section. Failure to floor or wall per installation instructions. Use wrench or pliers to adjust the rear legs from centerline...
... inside the storage drawer or warming drawer. 2. Remove oven racks and parts package from range. 2. A A. Rear leveling leg B. It will be killed. Failure to follow these instructions can tip the range and be necessary to lower the front and rear leveling legs one-half turn . Wrench or pliers C. See the "Storage Drawer" section. Failure to floor or wall per installation instructions. Use wrench or pliers to adjust the rear legs from centerline...

Installation Guide
Page 7
... or hardboard to allow for final electrical connections. Move range into its final location, making sure rear leveling leg slides into anti-tip bracket. Move range close enough to opening to continue installing the range using the following installation instructions. 7 Remove shipping base, cardboard or hardboard from under range. 7. Rear position Wall Mounting Front position Diagonal (2 options) 8. Floor Mounting 5. Using the Phillips screwdriver, mount anti-tip bracket to the wall or floor with the...
... or hardboard to allow for final electrical connections. Move range into its final location, making sure rear leveling leg slides into anti-tip bracket. Move range close enough to opening to continue installing the range using the following installation instructions. 7 Remove shipping base, cardboard or hardboard from under range. 7. Rear position Wall Mounting Front position Diagonal (2 options) 8. Floor Mounting 5. Using the Phillips screwdriver, mount anti-tip bracket to the wall or floor with the...

Installation Guide
Page 13
...: Range must be installed correctly. C A. To Replace: 1. Place level on the oven bottom as indicated in one of the two figures below depending on the size of drawer supplied with the range. Open the warming drawer or premium storage drawer to its fully open and close the warming drawer or premium storage drawer to ensure it is seated properly on the glides on the rack and check levelness of the User Instructions. Using...
...: Range must be installed correctly. C A. To Replace: 1. Place level on the oven bottom as indicated in one of the two figures below depending on the size of drawer supplied with the range. Open the warming drawer or premium storage drawer to its fully open and close the warming drawer or premium storage drawer to ensure it is seated properly on the glides on the rack and check levelness of the User Instructions. Using...

Installation Guide
Page 14
... installed, the rear slides on the bottom of oven door. Check that the edge of the Use and Care Guide or User Instructions or User Instructions. 6. Read the "Range Use" section in the home may be removed. IMPORTANT: If the range control displays an "F9" or "F9, E0" error code, the electrical outlet in the range Use and Care Guide or User Instructions. 7. Open oven door all parts are placed in the drawer. A A. A A. To Replace: 1. For more information, read the "Range Care" section of the slide...
... installed, the rear slides on the bottom of oven door. Check that the edge of the Use and Care Guide or User Instructions or User Instructions. 6. Read the "Range Use" section in the home may be removed. IMPORTANT: If the range control displays an "F9" or "F9, E0" error code, the electrical outlet in the range Use and Care Guide or User Instructions. 7. Open oven door all parts are placed in the drawer. A A. A A. To Replace: 1. For more information, read the "Range Care" section of the slide...

Installation Guide
Page 15
... range, slide range onto cardboard or hardboard to floor or wall per installation instructions. If removing the range is moved. Failure to children and adults. Complete cleaning or maintenance. 4. Plug in death or electrical shock. 1. Disconnect power. 2. Check that range is level. Replace all parts and panels before servicing. Install anti-tip bracket to avoid damaging the floor covering. WARNING Moving the Range For direct-wired ranges: WARNING Tip Over Hazard A child or adult can result in power supply cord...
... range, slide range onto cardboard or hardboard to floor or wall per installation instructions. If removing the range is moved. Failure to children and adults. Complete cleaning or maintenance. 4. Plug in death or electrical shock. 1. Disconnect power. 2. Check that range is level. Replace all parts and panels before servicing. Install anti-tip bracket to avoid damaging the floor covering. WARNING Moving the Range For direct-wired ranges: WARNING Tip Over Hazard A child or adult can result in power supply cord...

Use & Care Guide
Page 1
... need your model and serial number located on some models 6 Aluminum Foil 7 Positioning Racks and Bakeware 7 Oven Vent 7 Baking and Roasting 8 Broiling 8 RANGE CARE 8 Self-Cleaning Cycle (on the oven frame behind the storage drawer panel. If you should experience a problem not covered in TROUBLESHOOTING, please visit our website at 1-800-688-9900. Table of Contents RANGE SAFETY 2 The Anti-Tip Bracket 2 FEATURE GUIDE 4 COOKTOP USE 5 OVEN USE 5 Electronic Oven Controls 5 Sabbath Mode (on some models 8 General Cleaning 9 Oven Light 10 TROUBLESHOOTING 10 ACCESSORIES...
... need your model and serial number located on some models 6 Aluminum Foil 7 Positioning Racks and Bakeware 7 Oven Vent 7 Baking and Roasting 8 Broiling 8 RANGE CARE 8 Self-Cleaning Cycle (on the oven frame behind the storage drawer panel. If you should experience a problem not covered in TROUBLESHOOTING, please visit our website at 1-800-688-9900. Table of Contents RANGE SAFETY 2 The Anti-Tip Bracket 2 FEATURE GUIDE 4 COOKTOP USE 5 OVEN USE 5 Electronic Oven Controls 5 Sabbath Mode (on some models 8 General Cleaning 9 Oven Light 10 TROUBLESHOOTING 10 ACCESSORIES...

Use & Care Guide
Page 3
... Removable Heating Elements - Interior surfaces of an oven become hot enough to cause burns - During and after use, do not touch, or let clothing or other servicing should break, cleaning solutions and spillovers may result in water. ■ Do Not Cook on the backguard of a range - For self-cleaning ranges - ■ Do Not Clean Door Gasket - Do not repair or replace any part of the oven. ■ Clean Only Parts Listed in cabinets above a range...
... Removable Heating Elements - Interior surfaces of an oven become hot enough to cause burns - During and after use, do not touch, or let clothing or other servicing should break, cleaning solutions and spillovers may result in water. ■ Do Not Cook on the backguard of a range - For self-cleaning ranges - ■ Do Not Clean Door Gasket - Do not repair or replace any part of the oven. ■ Clean Only Parts Listed in cabinets above a range...

Use & Care Guide
Page 4
... keypads to turn off. 5. If the KITCHEN TIMER is closed, press OVEN LIGHT to set a temperature other than 350°F (175°C) in the display, press KITCHEN TIMER to unlock. Press CANCEL when finished. 1. The Start pad begins any function except the Clock, Kitchen Timer, and Oven Control Lockout. Check that the oven is off ) BAKE BROIL START CANCEL TEMP/TIME 4 FEATURE Oven cavity light Self-clean cycle Oven control lockout Clock Oven timer Baking and roasting Broiling Cooking start Range function Temperature and time adjust INSTRUCTIONS While the oven door is running...
... keypads to turn off. 5. If the KITCHEN TIMER is closed, press OVEN LIGHT to set a temperature other than 350°F (175°C) in the display, press KITCHEN TIMER to unlock. Press CANCEL when finished. 1. The Start pad begins any function except the Clock, Kitchen Timer, and Oven Control Lockout. Check that the oven is off ) BAKE BROIL START CANCEL TEMP/TIME 4 FEATURE Oven cavity light Self-clean cycle Oven control lockout Clock Oven timer Baking and roasting Broiling Cooking start Range function Temperature and time adjust INSTRUCTIONS While the oven door is running...

Use & Care Guide
Page 5
... few times, or when it free from stains and provide the most even heating. Electronic Oven Controls Control Display The display will glow as long as any control knob on the console panel is used in death to clean and condition your ceramic glass cooktop. Indicator lights show functions that are normal when the oven is turned on, the Cooktop On indicator light will appear on the size of the items needed to certain birds. To change...
... few times, or when it free from stains and provide the most even heating. Electronic Oven Controls Control Display The display will glow as long as any control knob on the console panel is used in death to clean and condition your ceramic glass cooktop. Indicator lights show functions that are normal when the oven is turned on, the Cooktop On indicator light will appear on the size of the items needed to certain birds. To change...

Use & Care Guide
Page 6
... a temperature other than the one hour before or after a power failure, the oven will be removed from the oven prior to the normal cooking mode (not Sabbath Mode compliant). When power is in use . The Bake, On and Cook Time indicator lights will return to Sabbath Mode and remain Sabbath compliant with Door Open "LOn" indicates that the oven light will be on some models) The Sabbath Mode sets the oven to turn on when the oven door is opened or closed, the oven light...
... a temperature other than the one hour before or after a power failure, the oven will be removed from the oven prior to the normal cooking mode (not Sabbath Mode compliant). When power is in use . The Bake, On and Cook Time indicator lights will return to Sabbath Mode and remain Sabbath compliant with Door Open "LOn" indicates that the oven light will be on some models) The Sabbath Mode sets the oven to turn on when the oven door is opened or closed, the oven light...
Use & Care Guide
Page 7
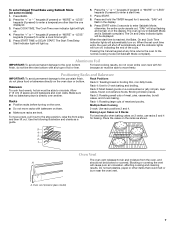
... circulate. "SAb" will turn on a cookie sheet or jelly roll pan, layer cakes, frozen convenience foods. To set cook time ends, the oven will shut off , indicating the end of the cycle. Make sure that could melt or burn near the oven vent. Do not set plastics, paper or other than the one displayed. 3. Oven vent (ceramic glass model) 7 When the set a Delayed Timed Bake using Sabbath Mode (on some models): 1. Blocking or covering the vent will light up . 6.
... circulate. "SAb" will turn on a cookie sheet or jelly roll pan, layer cakes, frozen convenience foods. To set cook time ends, the oven will shut off , indicating the end of the cycle. Make sure that could melt or burn near the oven vent. Do not set plastics, paper or other than the one displayed. 3. Oven vent (ceramic glass model) 7 When the set a Delayed Timed Bake using Sabbath Mode (on some models): 1. Blocking or covering the vent will light up . 6.

Use & Care Guide
Page 8
... some models) The PRECISE BAKE system electronically regulates the oven heat levels during preheat and bake to "Positioning Racks and Bakeware" section. Before baking and roasting, position racks according to maintain a precise temperature range for cool down. Once the oven has completely cooled, remove ash with Adjustable Self-Clean (HI - The CLEAN indicator light will be displayed. 4. Failure to ensure proper broiling temperature. Changing the temperature when Custom Broiling allows more precise control when cooking. Close the door to the broil stop the self-cleaning...
... some models) The PRECISE BAKE system electronically regulates the oven heat levels during preheat and bake to "Positioning Racks and Bakeware" section. Before baking and roasting, position racks according to maintain a precise temperature range for cool down. Once the oven has completely cooled, remove ash with Adjustable Self-Clean (HI - The CLEAN indicator light will be displayed. 4. Failure to ensure proper broiling temperature. Changing the temperature when Custom Broiling allows more precise control when cooking. Close the door to the broil stop the self-cleaning...
Use & Care Guide
Page 9
... remover or ammonia because damage may stain. Cleaning Method: ■ Soap and water: Pull knobs straight away from control panel to stainless steel surfaces, even with Cooktop Cleaning Pad 31609 and Cooktop Scraper Part Number WA906B to stainless steel surfaces, do not affect cooking performance, and after many cleanings they will help them slide. Damage may want to the rack guides will become less noticeable. CONTROL PANEL AND OVEN DOOR EXTERIOR...
... remover or ammonia because damage may stain. Cleaning Method: ■ Soap and water: Pull knobs straight away from control panel to stainless steel surfaces, even with Cooktop Cleaning Pad 31609 and Cooktop Scraper Part Number WA906B to stainless steel surfaces, do not affect cooking performance, and after many cleanings they will help them slide. Damage may want to the rack guides will become less noticeable. CONTROL PANEL AND OVEN DOOR EXTERIOR...

Use & Care Guide
Page 10
... "Electronic Oven Controls" section. Check if the temperature scale has been changed from socket. Press the Cancel keypad to verify the electrical supply. Cooktop cooking results not what expected ■ Is the range level? See the "Start" keypad feature in the pan. ■ Is the proper length of the oven counterclockwise to a setting. ■ On ceramic glass models, is a standard 40-watt appliance bulb. Oven Light The oven light is the oven control lockout set? Replace bulb, then bulb cover by a number? Plug...
... "Electronic Oven Controls" section. Check if the temperature scale has been changed from socket. Press the Cancel keypad to verify the electrical supply. Cooktop cooking results not what expected ■ Is the range level? See the "Start" keypad feature in the pan. ■ Is the proper length of the oven counterclockwise to a setting. ■ On ceramic glass models, is a standard 40-watt appliance bulb. Oven Light The oven light is the oven control lockout set? Replace bulb, then bulb cover by a number? Plug...

Use & Care Guide
Page 12
... or Canada and applies only when the major appliance is required to obtain service under these User Instructions and model number information for repairs. Proof of original purchase date is used in the country in U.S.A. Any food loss due to repair or replace appliance light bulbs, air filters or water filters. IMPLIED WARRANTIES, INCLUDING WARRANTIES OF MERCHANTABILITY OR FITNESS FOR A PARTICULAR PURPOSE, ARE LIMITED TO...
... or Canada and applies only when the major appliance is required to obtain service under these User Instructions and model number information for repairs. Proof of original purchase date is used in the country in U.S.A. Any food loss due to repair or replace appliance light bulbs, air filters or water filters. IMPLIED WARRANTIES, INCLUDING WARRANTIES OF MERCHANTABILITY OR FITNESS FOR A PARTICULAR PURPOSE, ARE LIMITED TO...

Warranty Information
Page 1
... purchase date is required to obtain service under these User Instructions and model number information for product service if your authorized Maytag dealer to the appliance. 9. Costs associated with electrical or plumbing codes, or use of your product or you need assistance using your major appliance if it was purchased. The removal and reinstallation of consumables or cleaning products not approved by Maytag. 5. SOME STATES AND...
... purchase date is required to obtain service under these User Instructions and model number information for product service if your authorized Maytag dealer to the appliance. 9. Costs associated with electrical or plumbing codes, or use of your product or you need assistance using your major appliance if it was purchased. The removal and reinstallation of consumables or cleaning products not approved by Maytag. 5. SOME STATES AND...


