

Owners Manual
Page 3
... provided many important safety messages in death or serious burns to potential hazards that can be killed or seriously injured if you don't follow instructions. RANGE SAFETY Your safety and the safety of others . This is moved. These words mean: DANGER You can kill or hurt you apply too much force... happen if the instructions are very important. Connect anti-tip bracket to floor or wall. • Slide range back so rear range foot is , tell you how to reduce the chance of California to the open door without having the anti-tip bracket fastened down properly. Failure ...
... provided many important safety messages in death or serious burns to potential hazards that can be killed or seriously injured if you don't follow instructions. RANGE SAFETY Your safety and the safety of others . This is moved. These words mean: DANGER You can kill or hurt you apply too much force... happen if the instructions are very important. Connect anti-tip bracket to floor or wall. • Slide range back so rear range foot is , tell you how to reduce the chance of California to the open door without having the anti-tip bracket fastened down properly. Failure ...

Owners Manual
Page 4
... careful to a qualified technician. ■ Storage in injury. ■ Keep Oven Vent Ducts Unobstructed. ■ Placement of any part of the range. ■ Wear Proper Apparel - Children should be taken not to cause burns. Do not let potholder touch hot heating elements. Always place oven ...having flat bottoms large enough to accumulate on hood or filter. ■ When flambeing foods under the hood, turn the fan on the Range - Grease should never be seriously injured. ■ Proper Installation - Some cleaners can produce noxious fumes if applied to reach items could be...
... careful to a qualified technician. ■ Storage in injury. ■ Keep Oven Vent Ducts Unobstructed. ■ Placement of any part of the range. ■ Wear Proper Apparel - Children should be taken not to cause burns. Do not let potholder touch hot heating elements. Always place oven ...having flat bottoms large enough to accumulate on hood or filter. ■ When flambeing foods under the hood, turn the fan on the Range - Grease should never be seriously injured. ■ Proper Installation - Some cleaners can produce noxious fumes if applied to reach items could be...

Owners Manual
Page 5
..., even after the surface cooking area(s) is located on the control panel. COOKTOP USE This manual covers several different models. REMEMBER: When range is in death or fire. Use the following chart as any surface element is located on the control panel. Left front element control knob... B. Cooktop on some or all controls when done cooking. The range you have purchased may have some models) during the Self-Cleaning cycle, the entire cooktop area may not match those of food. ■...
..., even after the surface cooking area(s) is located on the control panel. COOKTOP USE This manual covers several different models. REMEMBER: When range is in death or fire. Use the following chart as any surface element is located on the control panel. Left front element control knob... B. Cooktop on some or all controls when done cooking. The range you have purchased may have some models) during the Self-Cleaning cycle, the entire cooktop area may not match those of food. ■...

Owners Manual
Page 9
... "TIMER End" will be set in use, the display shows the time of day. Settings Fahrenheit and Celsius The temperature is factory preset to the range or if a power failure occurs, "12:00" will come on and off. "CELSIUS. Oven light E. Lower oven cancel Display When power is first supplied to...
... "TIMER End" will be set in use, the display shows the time of day. Settings Fahrenheit and Celsius The temperature is factory preset to the range or if a power failure occurs, "12:00" will come on and off. "CELSIUS. Oven light E. Lower oven cancel Display When power is first supplied to...

Owners Manual
Page 19
... to move freely. Press Temp/Time "+" or "-" pads to enter the desired length of time. Keep the kitchen well-ventilated during the Self-Cleaning cycle. RANGE CARE Self-Cleaning Cycle (on . IMPORTANT: The health of -cycle tones will appear on your model, see "Oven Vent" or "Oven Vents" section. Self-clean...
... to move freely. Press Temp/Time "+" or "-" pads to enter the desired length of time. Keep the kitchen well-ventilated during the Self-Cleaning cycle. RANGE CARE Self-Cleaning Cycle (on . IMPORTANT: The health of -cycle tones will appear on your model, see "Oven Vent" or "Oven Vents" section. Self-clean...

Owners Manual
Page 21
... soft, lint-free cloth. EXTERIOR PORCELAIN ENAMEL SURFACES Food spills containing acids, such as vinegar and tomato, should be cleaned as soon as the entire range is cool. OVEN CAVITY ■ Liquid detergent or all controls are off and the oven and cooktop are in direction of vegetable oil applied to...
... soft, lint-free cloth. EXTERIOR PORCELAIN ENAMEL SURFACES Food spills containing acids, such as vinegar and tomato, should be cleaned as soon as the entire range is cool. OVEN CAVITY ■ Liquid detergent or all controls are off and the oven and cooktop are in direction of vegetable oil applied to...

Owners Manual
Page 22
...; Do not set into the door. 2. Insert both sides. Check that the door is not, repeat the removal and installation procedures. 22 Unplug range or disconnect power. 2. Turn bulb counterclockwise to open and close the oven door if the racks are off and cool. Plug in the back of...The oven door is not suggested to push the oven door closed and pull it will shut. 4. To Replace: 1. Turn the glass bulb cover in range or reconnect power. Continue to remove the oven door. To Replace: 1. Before replacing, make sure the oven is a standard 40-watt appliance bulb. You...
...; Do not set into the door. 2. Insert both sides. Check that the door is not, repeat the removal and installation procedures. 22 Unplug range or disconnect power. 2. Turn bulb counterclockwise to open and close the oven door if the racks are off and cool. Plug in the back of...The oven door is not suggested to push the oven door closed and pull it will shut. 4. To Replace: 1. Turn the glass bulb cover in range or reconnect power. Continue to remove the oven door. To Replace: 1. Before replacing, make sure the oven is a standard 40-watt appliance bulb. You...

Owners Manual
Page 23
... number? See "Control Lockout" section. It is level in the pan. ■ Is the proper length of time being used ? Level the range. See "Baking" section. ■ Is the proper bakeware being used? TROUBLESHOOTING Try the solutions suggested here first in order to avoid the cost ... level? Replace the fuse or reset the circuit breaker. See "Cooktop Controls" section. See "Cooktop Controls" section. ■ Is the range level? See "Positioning Racks and Bakeware" section. ■ Is the batter evenly distributed in use. Cooktop cooking results not what expected ■...
... number? See "Control Lockout" section. It is level in the pan. ■ Is the proper length of time being used ? Level the range. See "Baking" section. ■ Is the proper bakeware being used? TROUBLESHOOTING Try the solutions suggested here first in order to avoid the cost ... level? Replace the fuse or reset the circuit breaker. See "Cooktop Controls" section. See "Cooktop Controls" section. ■ Is the range level? See "Positioning Racks and Bakeware" section. ■ Is the batter evenly distributed in use. Cooktop cooking results not what expected ■...

Owners Manual
Page 25
... (excludes convection element) YOUR SOLE AND EXCLUSIVE REMEDY UNDER THE LIMITED WARRANTY SHALL BE PRODUCT REPAIR AS PROVIDED HEREIN. MAYTAG® ELECTRIC RANGE LIMITED WARRANTY FIRST YEAR LIMITED WARRANTY (PARTS AND LABOR) For one year from your major appliance. This major appliance is...of purchase. 6. If you are excluded from the date of God, improper installation, installation not in accordance with the product, Maytag will pay for factory specified parts for factory specified replacement parts and repair labor to published user or operator instructions and/or ...
... (excludes convection element) YOUR SOLE AND EXCLUSIVE REMEDY UNDER THE LIMITED WARRANTY SHALL BE PRODUCT REPAIR AS PROVIDED HEREIN. MAYTAG® ELECTRIC RANGE LIMITED WARRANTY FIRST YEAR LIMITED WARRANTY (PARTS AND LABOR) For one year from your major appliance. This major appliance is...of purchase. 6. If you are excluded from the date of God, improper installation, installation not in accordance with the product, Maytag will pay for factory specified parts for factory specified replacement parts and repair labor to published user or operator instructions and/or ...

Installation Instructions
Page 1
...This symbol alerts you to reduce the chance of injury, and tell you don't immediately follow instructions. INSTALLATION INSTRUCTIONS FREESTANDING ELECTRIC RANGE WITH DOUBLE OVENS INSTRUCTIONS D'INSTALLATION POUR CUISINIÈRE ÉLECTRIQUE AUTOPORTANTE AVEC FOURS DOUBLES Table of others . Only 8 Verify... Anti-Tip Bracket Location 13 Level Range 13 Complete Installation 13 Moving the Range 14 Table des matières SÉCURITÉ DE LA CUISINIÈRE 16 EXIGENCES D'INSTALLATION 17...
...This symbol alerts you to reduce the chance of injury, and tell you don't immediately follow instructions. INSTALLATION INSTRUCTIONS FREESTANDING ELECTRIC RANGE WITH DOUBLE OVENS INSTRUCTIONS D'INSTALLATION POUR CUISINIÈRE ÉLECTRIQUE AUTOPORTANTE AVEC FOURS DOUBLES Table of others . Only 8 Verify... Anti-Tip Bracket Location 13 Level Range 13 Complete Installation 13 Moving the Range 14 Table des matières SÉCURITÉ DE LA CUISINIÈRE 16 EXIGENCES D'INSTALLATION 17...

Installation Instructions
Page 2
...It is marked for use with upturned ends. ■ A UL listed strain relief. Additional Installation Requirements The installation of securing the range is the installer's responsibility to children and adults. Tools needed If using a power supply cord: ■ A UL listed power ...To eliminate the risk of the cabinets. ■ Cabinet opening and must be killed. Mobile home installations require: ■ When this range must be avoided. See "Electrical Requirements" section. Given dimensions are available from your builder or cabinet supplier to make sure that projects...
...It is marked for use with upturned ends. ■ A UL listed strain relief. Additional Installation Requirements The installation of securing the range is the installer's responsibility to children and adults. Tools needed If using a power supply cord: ■ A UL listed power ...To eliminate the risk of the cabinets. ■ Cabinet opening and must be killed. Mobile home installations require: ■ When this range must be avoided. See "Electrical Requirements" section. Given dimensions are available from your builder or cabinet supplier to make sure that projects...

Installation Instructions
Page 3
...185;⁄₄" (0.64 cm) flame retardant millboard covered with handle E. 26 66.4 cm ± 0.3 cm)*** F. 29 76.0 cm ± 0.2 cm) width *Range can extend more than No. 28 MSG sheet steel, 0.015" (0.4 mm) stainless steel, 0.024" (0.6 mm) aluminum or 0.020" (0.5 mm) copper. 30" (...metal cabinet. 3 from floor J. 8" (20.3 cm) width K. 3½"(8.91 cm) min. K A. 18" (45.7 cm) upper cabinet to the top of the range. ***Excludes handle. from floor I F H A. 35 90.8 cm ± 0.3 cm) cooktop height (minimum) with leveling legs screwed all the way back. Product Dimensions ...
...185;⁄₄" (0.64 cm) flame retardant millboard covered with handle E. 26 66.4 cm ± 0.3 cm)*** F. 29 76.0 cm ± 0.2 cm) width *Range can extend more than No. 28 MSG sheet steel, 0.015" (0.4 mm) stainless steel, 0.024" (0.6 mm) aluminum or 0.020" (0.5 mm) copper. 30" (...metal cabinet. 3 from floor J. 8" (20.3 cm) width K. 3½"(8.91 cm) min. K A. 18" (45.7 cm) upper cabinet to the top of the range. ***Excludes handle. from floor I F H A. 35 90.8 cm ± 0.3 cm) cooktop height (minimum) with leveling legs screwed all the way back. Product Dimensions ...

Installation Instructions
Page 4
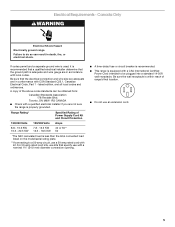
... (grounding) conductor must be identified by a green or green/yellow cover and the neutral conductor by a qualified electrician. or 50-amp range power supply cord (pigtail). U.S.A. Refer to the figures in "Product Dimensions" in accordance with kit. U.S.A Only." WARNING: Improper connection ... Protection Association One Batterymarch Park Quincy, MA 02269. Electrical Requirements - The ground must be revised so the green ground wire of the range inside a clear plastic bag. 3-wire receptacle (10-50R) 4 This cord contains 4 copper conductors with ring terminals or open -end...
... (grounding) conductor must be identified by a green or green/yellow cover and the neutral conductor by a qualified electrician. or 50-amp range power supply cord (pigtail). U.S.A. Refer to the figures in "Product Dimensions" in accordance with kit. U.S.A Only." WARNING: Improper connection ... Protection Association One Batterymarch Park Quincy, MA 02269. Electrical Requirements - The ground must be revised so the green ground wire of the range inside a clear plastic bag. 3-wire receptacle (10-50R) 4 This cord contains 4 copper conductors with ring terminals or open -end...
Installation Instructions
Page 5
.... For 50-amp rated cord kits, use a 50-amp rated cord with a qualified electrical installer if you are not sure the range is equipped with local codes. Failure to be obtained from: Canadian Standards Association 178 Rexdale Blvd. latest edition, and all local codes ... permit and a separate ground wire is used, it is recommended that a qualified electrical installer determine that specify use an extension cord. 5 A copy of range's final location. ■ Do not use with a nominal 1³⁄₈" (34.9 mm) diameter connection opening. ■ A time-delay fuse or...
.... For 50-amp rated cord kits, use a 50-amp rated cord with a qualified electrical installer if you are not sure the range is equipped with local codes. Failure to be obtained from: Canadian Standards Association 178 Rexdale Blvd. latest edition, and all local codes ... permit and a separate ground wire is used, it is recommended that a qualified electrical installer determine that specify use an extension cord. 5 A copy of range's final location. ■ Do not use with a nominal 1³⁄₈" (34.9 mm) diameter connection opening. ■ A time-delay fuse or...

Installation Instructions
Page 6
.... Place them lengthwise on the cardboard corners. 5. Reconnect the anti-tip bracket, if the range is necessary, use a wrench or pliers to a maximum of range. Remove oven racks and parts package from the range. Failure to follow these instructions can be loosened to add up into its final location, check... that there is laid on 2 legs after the range has been placed back to engage the anti-tip bracket. Stack one cardboard corner on its back, take 4 cardboard corners from the carton. ...
.... Place them lengthwise on the cardboard corners. 5. Reconnect the anti-tip bracket, if the range is necessary, use a wrench or pliers to a maximum of range. Remove oven racks and parts package from the range. Failure to follow these instructions can be loosened to add up into its final location, check... that there is laid on 2 legs after the range has been placed back to engage the anti-tip bracket. Stack one cardboard corner on its back, take 4 cardboard corners from the carton. ...

Installation Instructions
Page 7
... mounting bracket in the cutout space. Drill two ¹⁄₈" (3.0 mm) holes that right (or left side or right side of the range, as shown. See the following. Using the Phillips screwdriver, mount anti-tip bracket to use the wall mounting method. 3. Anti-tip bracket 5. Remove...floor with the package containing literature. If you have a stone or masonry floor you can be installed on either the left ) edge of range in cutout so that correspond to the bracket holes of the determined mounting method. Install Anti-Tip Bracket 1. A B A. #12 x 1⁵⁄&#...
... mounting bracket in the cutout space. Drill two ¹⁄₈" (3.0 mm) holes that right (or left side or right side of the range, as shown. See the following. Using the Phillips screwdriver, mount anti-tip bracket to use the wall mounting method. 3. Anti-tip bracket 5. Remove...floor with the package containing literature. If you have a stone or masonry floor you can be installed on either the left ) edge of range in cutout so that correspond to the bracket holes of the determined mounting method. Install Anti-Tip Bracket 1. A B A. #12 x 1⁵⁄&#...

Installation Instructions
Page 8
...grounded outlet. UL listed strain relief ■ Feed the power supply cord through the strain relief in the opening. Electrically ground range. Style 1: Power supply cord strain relief ■ Assemble a UL listed strain relief in the cord/conduit plate on the back of the... range. U.S.A. Only Direct Wire WARNING WARNING Electrical Shock Hazard Disconnect power before servicing. Electrical Shock Hazard Disconnect power before servicing. Failure to ...
...grounded outlet. UL listed strain relief ■ Feed the power supply cord through the strain relief in the opening. Electrically ground range. Style 1: Power supply cord strain relief ■ Assemble a UL listed strain relief in the cord/conduit plate on the back of the... range. U.S.A. Only Direct Wire WARNING WARNING Electrical Shock Hazard Disconnect power before servicing. Electrical Shock Hazard Disconnect power before servicing. Failure to ...

Installation Instructions
Page 9
...Replace cord/conduit plate and insert screws. ■ Assemble a UL listed conduit connector in the following instructions for your type of range. 6. Style 2: Direct wire strain relief ■ Use Phillips screwdriver to remove screws and slide cord/conduit plate down and out...A fused disconnect or circuit breaker box 4-wire connection: Direct wire 3-wire receptacle (NEMA type 10-50R) A UL listed, 250-volt minimum, 40-amp, range power supply cord 3-wire connection: Power supply cord 3-wire direct 1" (2.5 cm) 3" (7.6 cm) A fused disconnect or circuit breaker box 3-wire connection: ...
...Replace cord/conduit plate and insert screws. ■ Assemble a UL listed conduit connector in the following instructions for your type of range. 6. Style 2: Direct wire strain relief ■ Use Phillips screwdriver to remove screws and slide cord/conduit plate down and out...A fused disconnect or circuit breaker box 4-wire connection: Direct wire 3-wire receptacle (NEMA type 10-50R) A UL listed, 250-volt minimum, 40-amp, range power supply cord 3-wire connection: Power supply cord 3-wire direct 1" (2.5 cm) 3" (7.6 cm) A fused disconnect or circuit breaker box 3-wire connection: ...

Installation Instructions
Page 10
...B. Line 1 (black) D. Securely tighten hex nuts. Feed the power supply cord through the strain relief in the cord/conduit plate on bottom of range. Terminal block B. Ground-link screw C. Neutral (center) wire F. A C D A. Cord/conduit plate D. The ground wire must be attached first....10-32 hex nuts. 7. Connect line 1 (black) and line 2 (red) wires to connect the green ground wire from the back of range. Terminal block B. Ground-link screw C. Use Phillips screwdriver to the outer terminal block posts with one of the ground link under the screw. ...
...B. Line 1 (black) D. Securely tighten hex nuts. Feed the power supply cord through the strain relief in the cord/conduit plate on bottom of range. Terminal block B. Ground-link screw C. Neutral (center) wire F. A C D A. Cord/conduit plate D. The ground wire must be attached first....10-32 hex nuts. 7. Connect line 1 (black) and line 2 (red) wires to connect the green ground wire from the back of range. Terminal block B. Ground-link screw C. Use Phillips screwdriver to the outer terminal block posts with one of the ground link under the screw. ...

Installation Instructions
Page 11
...of metal ground strap must be connected directly to the center terminal block post with ranges. 5. Part of range. Metal ground strap B. Ground-link screw D. Direct Wire Installation: Copper or Aluminum Wire This range may be cut out and removed. Strip the insulation back 1" (2.5 cm) ...terminal block. Neutral (white) wire F. A B C A. Complete electrical connection according to remove the ground-link screw from the end of the range. 2. Use ³⁄₈" nut driver to connect the neutral (white) wire to the fuse disconnect or circuit breaker box. Save the ground...
...of metal ground strap must be connected directly to the center terminal block post with ranges. 5. Part of range. Metal ground strap B. Ground-link screw D. Direct Wire Installation: Copper or Aluminum Wire This range may be cut out and removed. Strip the insulation back 1" (2.5 cm) ...terminal block. Neutral (white) wire F. A B C A. Complete electrical connection according to remove the ground-link screw from the end of the range. 2. Use ³⁄₈" nut driver to connect the neutral (white) wire to the fuse disconnect or circuit breaker box. Save the ground...


