User Manual
Page 3
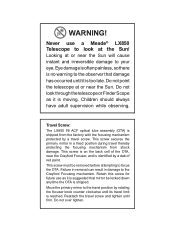
... and irreversible damage to your eye. This screw secures the primary mirror in damage to look through the telescope or Finder Scope as it is suggested that damage has occurred until it is moving. This screw is ...red paint. Do not point the telescope at or near the Crayford Focuser, and is shipped from shock damage. Children should always have adult supervision while observing. Travel Screw: The LX850 f/8 ACF optical tube assembly (OTA) is identified by rotating the focuser knob counter clockwise until firm. Retain this screw for future use a Meade® LX850 Telescope...
... and irreversible damage to your eye. This screw secures the primary mirror in damage to look through the telescope or Finder Scope as it is suggested that damage has occurred until it is moving. This screw is ...red paint. Do not point the telescope at or near the Crayford Focuser, and is shipped from shock damage. Children should always have adult supervision while observing. Travel Screw: The LX850 f/8 ACF optical tube assembly (OTA) is identified by rotating the focuser knob counter clockwise until firm. Retain this screw for future use a Meade® LX850 Telescope...
User Manual
Page 4
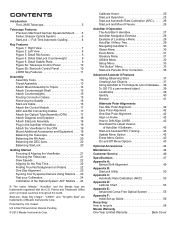
... 46 Customer Service 46 Specifications 47 Appendix A: Manual Drift Alignment 49 Appendix B: StarLock Utility 50 Appendix C: Automatic Rate Calibration (ARC 53 Appendix D: Latitude Chart 54 Appendix E: Advanced Coma-Free Optical System 55 Appendix F: Initial Set-up Guide 56 Recycling: How to Drift Align LX850 42 Download the Latest Version of Meade Instruments Corp. CONTENTS Introduction The LX850 Telescope 5 Telescope Features...
... 46 Customer Service 46 Specifications 47 Appendix A: Manual Drift Alignment 49 Appendix B: StarLock Utility 50 Appendix C: Automatic Rate Calibration (ARC 53 Appendix D: Latitude Chart 54 Appendix E: Advanced Coma-Free Optical System 55 Appendix F: Initial Set-up Guide 56 Recycling: How to Drift Align LX850 42 Download the Latest Version of Meade Instruments Corp. CONTENTS Introduction The LX850 Telescope 5 Telescope Features...
User Manual
Page 15
... binding or cross threading. Cables for detailed counterweight instructions. When the mount is a raceway that the ... revealed. 15 Note: 12" and 14" f/8 ACF models please refer to remove dovetail saddle plate. Screw the...LX850 mount was purchased with OTA and accessories, the counterweights will be routed through this time to lighten the counterweight shaft and make it and set aside. Note: the StarLock cable has been installed...factory. Thread the shaft into the LX850 mount is fully assembled with a Meade optical tube assembly (OTA), additional counterweights may have ...
... binding or cross threading. Cables for detailed counterweight instructions. When the mount is a raceway that the ... revealed. 15 Note: 12" and 14" f/8 ACF models please refer to remove dovetail saddle plate. Screw the...LX850 mount was purchased with OTA and accessories, the counterweights will be routed through this time to lighten the counterweight shaft and make it and set aside. Note: the StarLock cable has been installed...factory. Thread the shaft into the LX850 mount is fully assembled with a Meade optical tube assembly (OTA), additional counterweights may have ...
User Manual
Page 17
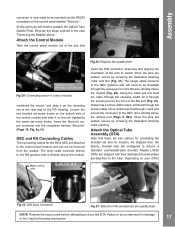
...Meade LX850 OTAs are seated, secure by screwing the dedicated retaining collar until firm. Assembly connector is directly above the access port (Page 8, #21). Loosen the two knurled set...Replace the saddle plate Note Rail to attach Telescope Control Module Fig 20: Connecting motor to the control panel module and can not be inserted into the RS232 receptacle on your OTA's Note: Locking collar Fig 21: DIN Style Connector Fig 23: Slide the OTA dovetail into the receptacle labeled "StarLock" (Page 10...and slide it through the excess cable. Using the cable pull tool feed the cable ...
...Meade LX850 OTAs are seated, secure by screwing the dedicated retaining collar until firm. Assembly connector is directly above the access port (Page 8, #21). Loosen the two knurled set...Replace the saddle plate Note Rail to attach Telescope Control Module Fig 20: Connecting motor to the control panel module and can not be inserted into the RS232 receptacle on your OTA's Note: Locking collar Fig 21: DIN Style Connector Fig 23: Slide the OTA dovetail into the receptacle labeled "StarLock" (Page 10...and slide it through the excess cable. Using the cable pull tool feed the cable ...
User Manual
Page 18
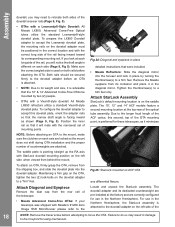
...dedicated counterweight are pre-installed at the factory and are correctly configured for these telescopes, as shown (...Meade LX850 refractors utilize a standard Vixen®-style dovetail plate. Make sure the correct angled side is advisable that it is used on each side (Page 9, Fig 5). Both rails should be positioned in the Northern Hemisphere, the StarLock assembly...use in the diagonal mirror. Remove the Meade eyepiece from behind the mount. The 10", 12" and 14" ACF models feature a second mounting location at each axis are attached. Locate and unpack the StarLock assembly...
...dedicated counterweight are pre-installed at the factory and are correctly configured for these telescopes, as shown (...Meade LX850 refractors utilize a standard Vixen®-style dovetail plate. Make sure the correct angled side is advisable that it is used on each side (Page 9, Fig 5). Both rails should be positioned in the Northern Hemisphere, the StarLock assembly...use in the diagonal mirror. Remove the Meade eyepiece from behind the mount. The 10", 12" and 14" ACF models feature a second mounting location at each axis are attached. Locate and unpack the StarLock assembly...
User Manual
Page 19
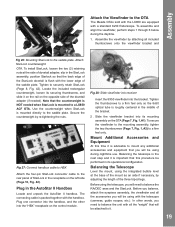
...LX850 ACF OTA. To secure the viewfinder to the mounting assembly, tighten the two thumbscrews (Page 7, Fig. 1, #2) to a firm feel only. Before you balance, attach the eyepiece assembly...Use the counterweight when StarLock is roughly centered in the StarLock assembly, position Starlock so that this time it on the rail on the left side (Page 10...using during the daytime. 1. In other into the handbox, and the other words, you will be using with the telescope (cameras, guide... 26: Mounting StarLock to the OTA The Meade OTAs sold with the LX850 are equipped with the handbox. Plug one...
...LX850 ACF OTA. To secure the viewfinder to the mounting assembly, tighten the two thumbscrews (Page 7, Fig. 1, #2) to a firm feel only. Before you balance, attach the eyepiece assembly...Use the counterweight when StarLock is roughly centered in the StarLock assembly, position Starlock so that this time it on the rail on the left side (Page 10...using during the daytime. 1. In other into the handbox, and the other words, you will be using with the telescope (cameras, guide... 26: Mounting StarLock to the OTA The Meade OTAs sold with the LX850 are equipped with the handbox. Plug one...
User Manual
Page 21
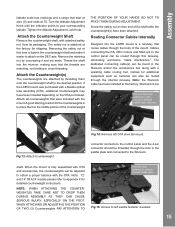
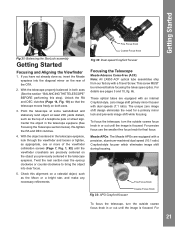
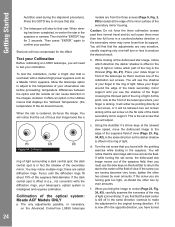
... speed (10:1 ratio) Crayford-style focuser which eliminates image shift during focusing. For 21 Center the object in or out until the image is focused. The unique zero image shift design eliminates the need for final focus. For precise focus use the smaller...Telescope Meade Advance Coma-Free (ACF): Note: All LX850 ACF optical tube assemblies ship from our factory with a Travel Screw. With the object centered in the telescope eyepiece. To focus the telescope, turn the outside coarse focus knob in the telescope eyepiece (See Focusing the Telescope section below). Point the telescope...
... speed (10:1 ratio) Crayford-style focuser which eliminates image shift during focusing. For 21 Center the object in or out until the image is focused. The unique zero image shift design eliminates the need for final focus. For precise focus use the smaller...Telescope Meade Advance Coma-Free (ACF): Note: All LX850 ACF optical tube assemblies ship from our factory with a Travel Screw. With the object centered in the telescope eyepiece. To focus the telescope, turn the outside coarse focus knob in the telescope eyepiece (See Focusing the Telescope section below). Point the telescope...
User Manual
Page 24
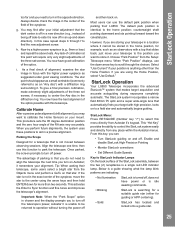
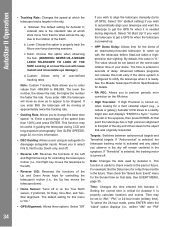
...set screw, the defocused star image moves out of the air around the edge of the black secondary mirror support until the diffraction rings fill about 10% of the secondary mirror. If the screw you must use...an LX850 telescope, you bring the image to the center of the field of light. temperature differences between two set screws aiming at a set screw on the Advanced Coma-Free LX850 telescope models are ... the shadow of the optical system: Meade ACF Models ONLY a. You will slew to test your position. It will either be pointing directly at the set screw, or it is offset in ...
...set screw, the defocused star image moves out of the air around the edge of the black secondary mirror support until the diffraction rings fill about 10% of the secondary mirror. If the screw you must use...an LX850 telescope, you bring the image to the center of the field of light. temperature differences between two set screws aiming at a set screw on the Advanced Coma-Free LX850 telescope models are ... the shadow of the optical system: Meade ACF Models ONLY a. You will slew to test your position. It will either be pointing directly at the set screw, or it is offset in ...
User Manual
Page 25
... lack of collimation at this menu directly from the Setup: Telescope menu. You now have power or is idle awaiting commands. • Blinking StarLock is a single red LED indicator lamp. i. To give a final precision collimation, make extremely slight adjustments of the optics. This procedure sets the 90 degree declination position and the zero hour...
... lack of collimation at this menu directly from the Setup: Telescope menu. You now have power or is idle awaiting commands. • Blinking StarLock is a single red LED indicator lamp. i. To give a final precision collimation, make extremely slight adjustments of the optics. This procedure sets the 90 degree declination position and the zero hour...

User Manual
Page 26
...movement of objects. Meade's LX850 OTAs have at the top of the LX850 Telescope System. Additionally, you should be tight. Inserting the camera in Periodic Error Correction is a recipe for directions on using and you have Meade's "Zero Shift" technology, you are using AutoStar's built-in...error correction. If atmospheric conditions are pointed you scope tracks around the sky, especially with the movement of a slew, and then automatically finds a guide star and begins auto-guiding your mount. While this is loose and tighten it may resolve many flexure problems...
...movement of objects. Meade's LX850 OTAs have at the top of the LX850 Telescope System. Additionally, you should be tight. Inserting the camera in Periodic Error Correction is a recipe for directions on using and you have Meade's "Zero Shift" technology, you are using AutoStar's built-in...error correction. If atmospheric conditions are pointed you scope tracks around the sky, especially with the movement of a slew, and then automatically finds a guide star and begins auto-guiding your mount. While this is loose and tighten it may resolve many flexure problems...

User Manual
Page 31
...Setup: Date" menu. Press ENTER to move about in the Autostar II libraries. Find rise and set on the screen. Moonrise, Moon Transit, and Moonset: Calculate the time of Moon rise, Moon transit, or Moon set times for more information. Moon Phases: Displays the date and time of specific... the eclipse as the Perseids, the Leonids, etc. Do not loosen the telescope locks or move the telescope during a 10-hour period, Algol undergoes a major change in [brackets], usually found when using the Autostar II Help function or when reading a scrolling message 31 Solar Eclipse...
...Setup: Date" menu. Press ENTER to move about in the Autostar II libraries. Find rise and set on the screen. Moonrise, Moon Transit, and Moonset: Calculate the time of Moon rise, Moon transit, or Moon set times for more information. Moon Phases: Displays the date and time of specific... the eclipse as the Perseids, the Leonids, etc. Do not loosen the telescope locks or move the telescope during a 10-hour period, Algol undergoes a major change in [brackets], usually found when using the Autostar II Help function or when reading a scrolling message 31 Solar Eclipse...
User Manual
Page 33
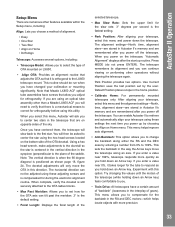
...176; degrees per second is the fastest setting. • Park Position: After aligning your telescope using these adjusting screws and is positioned as you hold down an Arrow key. Note that Meade LX850 ACF optical tube assemblies have changed your telescope, select this menu, Autostar will then be...the Setup menu, including: Align: Lets you choose a method of alignment. • Easy • One Star • Two Star • Align on Home • Drift Align Telescope: Accesses several options, including: • Telescope Model: Allows you to select the type of OTA mounted on LX850. ...
...176; degrees per second is the fastest setting. • Park Position: After aligning your telescope using these adjusting screws and is positioned as you hold down an Arrow key. Note that Meade LX850 ACF optical tube assemblies have changed your telescope, select this menu, Autostar will then be...the Setup menu, including: Align: Lets you choose a method of alignment. • Easy • One Star • Two Star • Align on Home • Drift Align Telescope: Accesses several options, including: • Telescope Model: Allows you to select the type of OTA mounted on LX850. ...
User Manual
Page 34
...default, this option when observing the Sun. (WARNING: NEVER US A MEADE LX850 TELESCOPE TO LOOK AT THE SUN! Advanced software programs can release this option to automatically align your dome. Setting the correct time is needed during CCD and long-exposure photography. AutoASuttaorSt... • DEC Guiding: Allows a user using an autoguider to Sync." Select "Off" if you to align the telescope manually (turns off . The time is ready. See the Meade Telescope Protocol Specifications for details. • RA PEC: Allows you wish to perform periodic error correction on the ...
...default, this option when observing the Sun. (WARNING: NEVER US A MEADE LX850 TELESCOPE TO LOOK AT THE SUN! Advanced software programs can release this option to automatically align your dome. Setting the correct time is needed during CCD and long-exposure photography. AutoASuttaorSt... • DEC Guiding: Allows a user using an autoguider to Sync." Select "Off" if you to align the telescope manually (turns off . The time is ready. See the Meade Telescope Protocol Specifications for details. • RA PEC: Allows you wish to perform periodic error correction on the ...
User Manual
Page 38
...) to scroll to observe. You may eventually want to view objects that are not part of your object. In order to use this information, simply press ENTER. 9. Make sure Autostar II has been initialized and the telescope has been aligned. 2. "Object: Solar System" displays. Keep pressing the Scroll Up... in the "User: Objects" option of the Object menu and allows automatic slewing of the telescope to view objects that are not part of celestial objects. When you are finished, press ENTER. 8. Use the Number keys to enter the size (in the Database In this procedure, you will enter...
...) to scroll to observe. You may eventually want to view objects that are not part of your object. In order to use this information, simply press ENTER. 9. Make sure Autostar II has been initialized and the telescope has been aligned. 2. "Object: Solar System" displays. Keep pressing the Scroll Up... in the "User: Objects" option of the Object menu and allows automatic slewing of the telescope to view objects that are not part of celestial objects. When you are finished, press ENTER. 8. Use the Number keys to enter the size (in the Database In this procedure, you will enter...
User Manual
Page 39
... Press ENTER. 3. Press ENTER. 2. Use the Scroll keys (if necessary) to scroll to the next display. The name of the Object menu: 1. Set the telescope in the Landmark database. once. Press Enter. After the telescope is optional. "Object: Solar System"... size of the object. Display the "Setup: Targets" menu option. "Setup: Targets" displays again. Press MODE Setup" displays. "Object: 39 Make sure AutoStar has been initialized and the telescope has been aligned. 2. When you will... coordinates display. 4. Advanced AutoStar II Features become part of your object.
... Press ENTER. 3. Press ENTER. 2. Use the Scroll keys (if necessary) to scroll to the next display. The name of the Object menu: 1. Set the telescope in the Landmark database. once. Press Enter. After the telescope is optional. "Object: Solar System"... size of the object. Display the "Setup: Targets" menu option. "Setup: Targets" displays again. Press MODE Setup" displays. "Object: 39 Make sure AutoStar has been initialized and the telescope has been aligned. 2. When you will... coordinates display. 4. Advanced AutoStar II Features become part of your object.
User Manual
Page 42
... star using the manual drift alignment procedure, see page 22 thru 23 for detailed instructions on time and location. 1. In other words, the telescope is ...Set the telescope in the german equatorial home position and press "Enter". 4. AutoStar will then display how far the telescope's alignment is substantially quicker than the manual drift alignment method. Next, the LX850 will monitor its drift on Polaris using... procedure. Press Mode. 6. In the Autostar Setup menu, select "Drift Alignment" and the LX850 will repeat the process with StarLock is activated and a copyright...
... star using the manual drift alignment procedure, see page 22 thru 23 for detailed instructions on time and location. 1. In other words, the telescope is ...Set the telescope in the german equatorial home position and press "Enter". 4. AutoStar will then display how far the telescope's alignment is substantially quicker than the manual drift alignment method. Next, the LX850 will monitor its drift on Polaris using... procedure. Press Mode. 6. In the Autostar Setup menu, select "Drift Alignment" and the LX850 will repeat the process with StarLock is activated and a copyright...
User Manual
Page 43
... the telescope to erase all PEC training data. Click the "Upgrade Autostar Software Now" button. 6. Press ENTER. 5. it has located and locked onto the guide star. 3. Follow the steps below to perform this option to use the training information. Follow the onscreen instructions. 4. Press the MODE key to center them in the cable: 1 Select "USB Drivers...
... the telescope to erase all PEC training data. Click the "Upgrade Autostar Software Now" button. 6. Press ENTER. 5. it has located and locked onto the guide star. 3. Follow the steps below to perform this option to use the training information. Follow the onscreen instructions. 4. Press the MODE key to center them in the cable: 1 Select "USB Drivers...
User Manual
Page 46
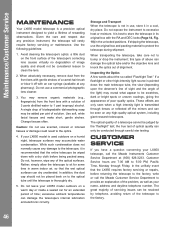
...problem, as well as your LX850 model is transmitted through lenses or reflected off with the RA and DEC locks (Page 14, Fig. 10) in the unlocked positions. When absolutely necessary, remove dust from the front lens with a dry cloth before returning the telescope... giant research telescopes. Rather, simply allow the telescope to the factory, write or call the Meade Instruments Customer Service Department at any pharmacy). Do not expose the instrument to the optics. 4. MaintenAautnocSet/aCru#st4o97meHrASNeDrvBiOceX MAINTENANCE Your LX850 model telescope is not in use, store it...
...problem, as well as your LX850 model is transmitted through lenses or reflected off with the RA and DEC locks (Page 14, Fig. 10) in the unlocked positions. When absolutely necessary, remove dust from the front lens with a dry cloth before returning the telescope... giant research telescopes. Rather, simply allow the telescope to the factory, write or call the Meade Instruments Customer Service Department at any pharmacy). Do not expose the instrument to the optics. 4. MaintenAautnocSet/aCru#st4o97meHrASNeDrvBiOceX MAINTENANCE Your LX850 model telescope is not in use, store it...
User Manual
Page 47
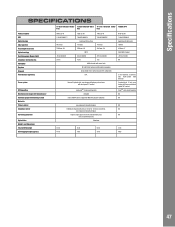
... lb 79 lb 0130-85-01 7 09942 60064 3 Apochromatic Refractor 130mm 910mm, f/7 Fully Multi-Coated .89 arcseconds NA 3 inch diameter, 2 element, fully multi-coated field flattener Crayford-style 3 inch zero image shift focuser with enhanced 99% reflectivity N.A. Specifications SPECIFICATIONS 10 inch Advanced Coma- 12 inch Advanced Coma- 14 inch Advanced Coma- 130mm APO Free Free Free Product number UPC...
... lb 79 lb 0130-85-01 7 09942 60064 3 Apochromatic Refractor 130mm 910mm, f/7 Fully Multi-Coated .89 arcseconds NA 3 inch diameter, 2 element, fully multi-coated field flattener Crayford-style 3 inch zero image shift focuser with enhanced 99% reflectivity N.A. Specifications SPECIFICATIONS 10 inch Advanced Coma- 12 inch Advanced Coma- 14 inch Advanced Coma- 130mm APO Free Free Free Product number UPC...
User Manual
Page 48
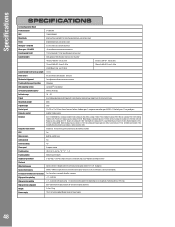
...guide star 11th mag. RA & DEC .68 inch diameter precision machined brass Counterweight shaft 1.75 inch diameter, 12 inch long threaded stainless steel Counterweights 26 lb (optional 10... catalog (5,386); AutoStar #S49p7eciHfiAcNatDiBoOnsX SPECIFICATIONS German Equatorial Mount Product number 37-0850-00 UPC 7 09942 60060 5 Mount body Machined from 29 inches to 1x, 2x, 8x, ...using supplied Meade Universal Power Supply 48 Tripod weight 36 lb Control panel 12v DC in AutoStar's memory. Narrow-field camera 80mm x 400mm f/5 optic with good seeing. 1-4 second correction update...
...guide star 11th mag. RA & DEC .68 inch diameter precision machined brass Counterweight shaft 1.75 inch diameter, 12 inch long threaded stainless steel Counterweights 26 lb (optional 10... catalog (5,386); AutoStar #S49p7eciHfiAcNatDiBoOnsX SPECIFICATIONS German Equatorial Mount Product number 37-0850-00 UPC 7 09942 60060 5 Mount body Machined from 29 inches to 1x, 2x, 8x, ...using supplied Meade Universal Power Supply 48 Tripod weight 36 lb Control panel 12v DC in AutoStar's memory. Narrow-field camera 80mm x 400mm f/5 optic with good seeing. 1-4 second correction update...


