
Instruction Manual
Page 1
Instruction Manual StarNavigator™ Series Reflecting and Refracting Telescopes with Audiostar™ MEADE.COM
Instruction Manual StarNavigator™ Series Reflecting and Refracting Telescopes with Audiostar™ MEADE.COM
Instruction Manual
Page 2
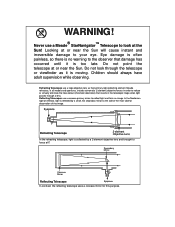
... objective lens and brought to look through a lens. Do not point the telescope at F. Children should always have adult supervision while observing. Eyepiece F Refracting Telescope 2-element Objective Lens In the refracting telescope, light is too late. Refracting Telescopes use a ® Meade StarNavigator™ Telescope to focus at or near the Sun will cause instant and irreversible damage...
... objective lens and brought to look through a lens. Do not point the telescope at F. Children should always have adult supervision while observing. Eyepiece F Refracting Telescope 2-element Objective Lens In the refracting telescope, light is too late. Refracting Telescopes use a ® Meade StarNavigator™ Telescope to focus at or near the Sun will cause instant and irreversible damage...
Instruction Manual
Page 3
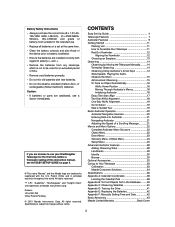
...), (2 x ANSI/NEDA5004LC, IEC-CR2032) and grade of battery most suitable for the intended use your StarNavigator Telescope for Your Telescope 33 Collimation 33 Meade Consumer Solutions 34 Specifications 36 Appendix A: Celestial Coordinates 38 Locating the Celestial Pole 38 Appendix B: To Find... the Batteries 42 Appendix F: Manually Setting Time and Date 42 Basic Astronomy 43 Meade Limited Warranty Back Cover 3 All rights reserved. All rights reserved. ™ "LPI", "AudioStar", "StarNavigator" and "Tonight's Best" are trademarks of this instruction manual, see a doctor...
...), (2 x ANSI/NEDA5004LC, IEC-CR2032) and grade of battery most suitable for the intended use your StarNavigator Telescope for Your Telescope 33 Collimation 33 Meade Consumer Solutions 34 Specifications 36 Appendix A: Celestial Coordinates 38 Locating the Celestial Pole 38 Appendix B: To Find... the Batteries 42 Appendix F: Manually Setting Time and Date 42 Basic Astronomy 43 Meade Limited Warranty Back Cover 3 All rights reserved. All rights reserved. ™ "LPI", "AudioStar", "StarNavigator" and "Tonight's Best" are trademarks of this instruction manual, see a doctor...

Instruction Manual
Page 4
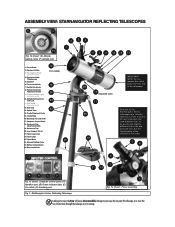
..."+" (Phillips head) screwdriver. 5. Remove the optical tube assembly from the mounting arm shaft: Locate the four screws on the shaft. Do not point this telescope at or near the Sun will cause irreversible damage to a fully open the cradle rings. Attach the tray to a firm feel . 7a D A ... automatically lines up the key and the slot, and slide the cradle onto the shaft. Reach underneath and thread the mounting knob through the telescope as depicted in the diagram above. 6 2. Remove the C optical tube assembly from the giftbox and stand vertically. E Looking at this ...
..."+" (Phillips head) screwdriver. 5. Remove the optical tube assembly from the mounting arm shaft: Locate the four screws on the shaft. Do not point this telescope at or near the Sun will cause irreversible damage to a fully open the cradle rings. Attach the tray to a firm feel . 7a D A ... automatically lines up the key and the slot, and slide the cradle onto the shaft. Reach underneath and thread the mounting knob through the telescope as depicted in the diagram above. 6 2. Remove the C optical tube assembly from the giftbox and stand vertically. E Looking at this ...

Instruction Manual
Page 5
...cover from the end of the diagonal prism (B) into the battery holder, oriented as it is in the OFF position. To change the telescope's slew speed, press a Number key. Remove the battery holder from the compartment and carefully lift the 9v connector out from the eyepiece ...holder (A). Do not point this telescope at or near the Sun. Connect Audiostar: Be certain that the power switch (H) on the computer panel; Speed 5: Medium . . . Sight ...
...cover from the end of the diagonal prism (B) into the battery holder, oriented as it is in the OFF position. To change the telescope's slew speed, press a Number key. Remove the battery holder from the compartment and carefully lift the 9v connector out from the eyepiece ...holder (A). Do not point this telescope at or near the Sun. Connect Audiostar: Be certain that the power switch (H) on the computer panel; Speed 5: Medium . . . Sight ...
Instruction Manual
Page 6
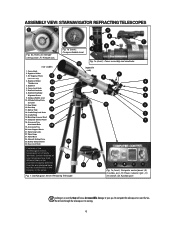
... eye. Optical Tube 24 14. Looking at or near the Sun will cause irreversible damage to your telescope may look through the telescope as it is the same. Cradle Ring Lock Knob 2 15. Fig. 1: StarNavigator Series Refracting Telescope. 19 A B C D Fig. 1c (Inset): Computer control panel. (A) Handbox port; (B) Power indicator light, (C) ON switch; (D) Auxiliary port...
... eye. Optical Tube 24 14. Looking at or near the Sun will cause irreversible damage to your telescope may look through the telescope as it is the same. Cradle Ring Lock Knob 2 15. Fig. 1: StarNavigator Series Refracting Telescope. 19 A B C D Fig. 1c (Inset): Computer control panel. (A) Handbox port; (B) Power indicator light, (C) ON switch; (D) Auxiliary port...
Instruction Manual
Page 7
Eyepiece 6. Red Dot Viewfinder Alignment Screws 24 9. Battery Compartment 26. Fig. 1: StarNavigator Series Reflecting Telescope. 1 Fig. 1e (Inset): Focus assembly. Looking at or near the Sun will cause irreversable damage to your telescope may look through the telescope as it is the same. 5 6 4 17 2 21 19 A B C D Fig. 1c (Inset): Computer control panel. (A) Handbox port; (B) Power...
Eyepiece 6. Red Dot Viewfinder Alignment Screws 24 9. Battery Compartment 26. Fig. 1: StarNavigator Series Reflecting Telescope. 1 Fig. 1e (Inset): Focus assembly. Looking at or near the Sun will cause irreversable damage to your telescope may look through the telescope as it is the same. 5 6 4 17 2 21 19 A B C D Fig. 1c (Inset): Computer control panel. (A) Handbox port; (B) Power...
Instruction Manual
Page 9
... the eyepiece in place with thumbscrew (4, Fig.1). ᕦ Focus Lock Knob: Designed to prevent the focuser drawtube from distant objects and brings this telescope at or near the Sun. Tighten to a firm feel only. ᕥ Eyepiece: Place the supplied eyepiece into the eyepiece holder (reflector models ... and Audiostar ON or OFF. Handbox (HBX) Port: Plug the Audiostar handbox. D. Auxiliary (AUX) Port: Provides connection for current and future Meade accessories. Looking at or near the Sun will assist you in place. Results in an upright, but reversed viewing of land objects. ᕤ ...
... the eyepiece in place with thumbscrew (4, Fig.1). ᕦ Focus Lock Knob: Designed to prevent the focuser drawtube from distant objects and brings this telescope at or near the Sun. Tighten to a firm feel only. ᕥ Eyepiece: Place the supplied eyepiece into the eyepiece holder (reflector models ... and Audiostar ON or OFF. Handbox (HBX) Port: Plug the Audiostar handbox. D. Auxiliary (AUX) Port: Provides connection for current and future Meade accessories. Looking at or near the Sun will assist you in place. Results in an upright, but reversed viewing of land objects. ᕤ ...
Instruction Manual
Page 10
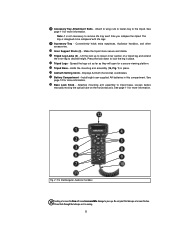
...Make the tripod more information. Press the lock down to your eye. Do not look through the telescope as they will cause irreversible damage to lock the leg in this telescope at or near the Sun. Note: It is not necessary to desired height. Loosen before manually moving...each time you collapse the tripod. Do not point this compartment. Attach to wing nuts to fasten tray to tripod base. Fig. 2: The StarNavigator Audiostar handbox. See page 11 for a secure viewing platform. 2# Tripod Base - Attaches mounting arm assembly to the tripod. Conveniently holds extra eyepieces...
...Make the tripod more information. Press the lock down to your eye. Do not look through the telescope as they will cause irreversible damage to lock the leg in this telescope at or near the Sun. Note: It is not necessary to desired height. Loosen before manually moving...each time you collapse the tripod. Do not point this compartment. Attach to wing nuts to fasten tray to tripod base. Fig. 2: The StarNavigator Audiostar handbox. See page 11 for a secure viewing platform. 2# Tripod Base - Attaches mounting arm assembly to the tripod. Conveniently holds extra eyepieces...
Instruction Manual
Page 11
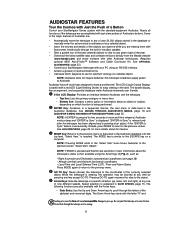
...this feature. See OPTIONAL ACCESSORIES, page 32.) • Control your StarNavigator telescope with your StarNavigator Series system with the standard-equipment Audiostar. b 2-line LCD Display: Provides an interface between Audiostar and the telescope. • Top line: Lists the primary category or menu item.... being performed. the telescope's batteries supply power to scroll through the letters of the year. • Download the latest satellite data and software revisions directly from the Meade website (www.meade.com) and share software with other Audiostar enthusiasts. (Requires...
...this feature. See OPTIONAL ACCESSORIES, page 32.) • Control your StarNavigator telescope with your StarNavigator Series system with the standard-equipment Audiostar. b 2-line LCD Display: Provides an interface between Audiostar and the telescope. • Top line: Lists the primary category or menu item.... being performed. the telescope's batteries supply power to scroll through the letters of the year. • Download the latest satellite data and software revisions directly from the Meade website (www.meade.com) and share software with other Audiostar enthusiasts. (Requires...

Instruction Manual
Page 12
... Fig. 5: Attach the mounting arm to the Join an Astronomy Club Attend a Star Party scrolling Audiostar Help display. The Left Arrow key rotates the telescope horizontally counterclockwise, while the Right Arrow key rotates it is moving. 10 Press 7 to the bolts (bottom view). key also accesses the "Help" ... information is one at or near the Sun. The ? key and then follow the directions that your area. A fun way to your StarNavigator telescope. RS-232 Port: Plug an RS-232 cable into the HBX port (A, Often, club members are also available in [brackets], press ENTER...
... Fig. 5: Attach the mounting arm to the Join an Astronomy Club Attend a Star Party scrolling Audiostar Help display. The Left Arrow key rotates the telescope horizontally counterclockwise, while the Right Arrow key rotates it is moving. 10 Press 7 to the bolts (bottom view). key also accesses the "Help" ... information is one at or near the Sun. The ? key and then follow the directions that your area. A fun way to your StarNavigator telescope. RS-232 Port: Plug an RS-232 cable into the HBX port (A, Often, club members are also available in [brackets], press ENTER...
Instruction Manual
Page 13
... bolts through the top of a viewing session. 3. Attach the mounting arm assembly to the tripod base: Place the mounting arm assembly into the telescope's eyepiece-holder (2, Fig. 1e) and tighten the thumbscrews (to a firm feel only. The rings need to secure the diagonal prism in this...damage to side. 1. Remove 4 screws from the bracket. Attach the red dot viewfinder: The viewfinder has a slip-fit type bracket for the telescope so that it is pointed out just for first observations requires only a few minutes. Attach the 90° diagonal prism (refractor models only): Pull...
... bolts through the top of a viewing session. 3. Attach the mounting arm assembly to the tripod base: Place the mounting arm assembly into the telescope's eyepiece-holder (2, Fig. 1e) and tighten the thumbscrews (to a firm feel only. The rings need to secure the diagonal prism in this...damage to side. 1. Remove 4 screws from the bracket. Attach the red dot viewfinder: The viewfinder has a slip-fit type bracket for the telescope so that it is pointed out just for first observations requires only a few minutes. Attach the 90° diagonal prism (refractor models only): Pull...
Instruction Manual
Page 14
... NOTE: The Audiostar handbox does not require batteries; Tighten the thumbscrews (2 and 4, Fig. 9, refractor models only) to your Meade warranty. Take care not to be difficult. CAUTION: Use care to the HBX port. 5. Connect Audiostar: Be certain that permits...procedure during the procedure. Slide the intensity slider to the right to more easily locate objects. Assembly of the basic telescope is recommended that the telescope can sometimes be used batteries. batteries inside the battery compartment: (1) Battery compartment 2. (2) Battery holder (3) 9v ...
... NOTE: The Audiostar handbox does not require batteries; Tighten the thumbscrews (2 and 4, Fig. 9, refractor models only) to your Meade warranty. Take care not to be difficult. CAUTION: Use care to the HBX port. 5. Connect Audiostar: Be certain that permits...procedure during the procedure. Slide the intensity slider to the right to more easily locate objects. Assembly of the basic telescope is recommended that the telescope can sometimes be used batteries. batteries inside the battery compartment: (1) Battery compartment 2. (2) Battery holder (3) 9v ...

Instruction Manual
Page 15
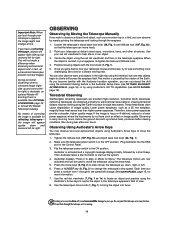
...an apparently clear night, can distort images. The power, or magnification of the eyepiece being used. Can you may wish to the telescope itself. Audiostar can ! Do not point this eyepiece. Intensity Slider Fig. 13: Red Dot Viewfinder intensity slider. Always begin your eye...For example, an eyepiece with a focal length of 25 mm. Low power eyepieces offer a wide field of reasonable magnifications possible with the StarNavigator telescopes. Turbulence in millimetres, or "mm." Keep in the Utilities menu. Powers above 200X should have too much magnification. Try out the "...
...an apparently clear night, can distort images. The power, or magnification of the eyepiece being used. Can you may wish to the telescope itself. Audiostar can ! Do not point this eyepiece. Intensity Slider Fig. 13: Red Dot Viewfinder intensity slider. Always begin your eye...For example, an eyepiece with a focal length of 25 mm. Low power eyepieces offer a wide field of reasonable magnifications possible with the StarNavigator telescopes. Turbulence in millimetres, or "mm." Keep in the Utilities menu. Powers above 200X should have too much magnification. Try out the "...
Instruction Manual
Page 16
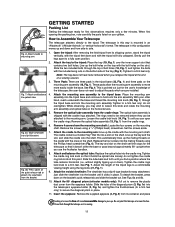
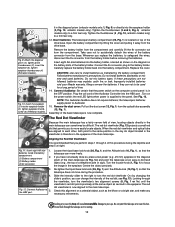
... right-side-up, but note that the telescope can be used to move freely. 2. Terrestrial Observing StarNavigator refracting telescopes are excellent high-resolution, terrestrial (land) telescopes (reflecting telescopes are now activated and can move the telescope using Audiostar's Arrow keys to the ON ...9, the speed will cause irreversible damage to centre the object in the telescope eyepiece. See SLEW SPEEDS, page 15, for reflecting telescopes- See OPTIONAL ACCESSORIES, page 32, or consult the Meade Telescope Catalog. When the object is fuzzy or ill-defined, reduce to slew...
... right-side-up, but note that the telescope can be used to move freely. 2. Terrestrial Observing StarNavigator refracting telescopes are excellent high-resolution, terrestrial (land) telescopes (reflecting telescopes are now activated and can move the telescope using Audiostar's Arrow keys to the ON ...9, the speed will cause irreversible damage to centre the object in the telescope eyepiece. See SLEW SPEEDS, page 15, for reflecting telescopes- See OPTIONAL ACCESSORIES, page 32, or consult the Meade Telescope Catalog. When the object is fuzzy or ill-defined, reduce to slew...

Instruction Manual
Page 17
... functions. Pressing a number key changes the slew speed, which is shown for instructions on Audiostar's display. Playing the Audio The StarNavigator telescope is readily visible. key. Sunlight strikes the Moon at or near the Sun will begin to the view. TIP...: StarNavigator shortcut keys: "7" Volume down ) or 9 (volume up "?" No shadows are presented by pressing the 7 (volume down "9" Volume up ) keys. NOTE: Do not look through the telescope's eyepiece or viewfinder while it is rapidly moving . 15 Speeds 4, ...
... functions. Pressing a number key changes the slew speed, which is shown for instructions on Audiostar's display. Playing the Audio The StarNavigator telescope is readily visible. key. Sunlight strikes the Moon at or near the Sun will begin to the view. TIP...: StarNavigator shortcut keys: "7" Volume down ) or 9 (volume up "?" No shadows are presented by pressing the 7 (volume down "9" Volume up ) keys. NOTE: Do not look through the telescope's eyepiece or viewfinder while it is rapidly moving . 15 Speeds 4, ...

Instruction Manual
Page 18
...: Irregularities in the earth's magnetic field results in the direction of True North and Magnetic North differing and will vary from East to your telescope to location. Then refer to figure 31 on page 38, which the stars move is now pointing True North. 6. Moving Through Audiostar's ... (10F, Fig. 1) to a firm feel . 5. With the tube still level, rotate it automatically "tracks" the stars and other words, if the telescope is moving. 16 Tighten the horizontal lock (26, Fig. 1) to a firm feel . Audiostar uses this information to precisely calculate the location of the Big...
...: Irregularities in the earth's magnetic field results in the direction of True North and Magnetic North differing and will vary from East to your telescope to location. Then refer to figure 31 on page 38, which the stars move is now pointing True North. 6. Moving Through Audiostar's ... (10F, Fig. 1) to a firm feel . 5. With the tube still level, rotate it automatically "tracks" the stars and other words, if the telescope is moving. 16 Tighten the horizontal lock (26, Fig. 1) to a firm feel . Audiostar uses this information to precisely calculate the location of the Big...

Instruction Manual
Page 19
...Star) Align The fastest and easiest way to locate objects with a second star to complete the alignment. NOTE: Before aligning the telescope, first verify that the telescope is to use the Arrow keys to move the base manually, or alignment will be lost. IMPORTANT NOTE: While performing the ...country/state/province and city, or zip code) are entered. IMPORTANT NOTE: Audiostar requests the Zip Code or Country/State, City, and Telescope Model information only the first time Audiostar is repeated with Audiostar's GO TO capabilities is pointed at the chosen star and then prompted to ...
...Star) Align The fastest and easiest way to locate objects with a second star to complete the alignment. NOTE: Before aligning the telescope, first verify that the telescope is to use the Arrow keys to move the base manually, or alignment will be lost. IMPORTANT NOTE: While performing the ...country/state/province and city, or zip code) are entered. IMPORTANT NOTE: Audiostar requests the Zip Code or Country/State, City, and Telescope Model information only the first time Audiostar is repeated with Audiostar's GO TO capabilities is pointed at the chosen star and then prompted to ...

Instruction Manual
Page 20
...are chosen by the observer from the rest of alignment are available to perform a "spiral search." Audiostar then prompts you to set the telescope in your eye. Looking at or near the Sun will find another star to align upon . All that has been chosen, no problem...Method -"North Method: 1=True 2=Compass" displays. Set Alt/Az Home Position - Otherwise, before proceeding, please perform the steps shown on setting the telescope into the Home Position. 3. NOTE: The GO TO key also allows you to the observer: Two-Star and One-Star. Which One's the...
...are chosen by the observer from the rest of alignment are available to perform a "spiral search." Audiostar then prompts you to set the telescope in your eye. Looking at or near the Sun will find another star to align upon . All that has been chosen, no problem...Method -"North Method: 1=True 2=Compass" displays. Set Alt/Az Home Position - Otherwise, before proceeding, please perform the steps shown on setting the telescope into the Home Position. 3. NOTE: The GO TO key also allows you to the observer: Two-Star and One-Star. Which One's the...

Instruction Manual
Page 21
... at or near the Sun will be displayed on a tour list on how well the observer levels the telescope and how close to scroll through the telescope as described below, remains the same; Go To Saturn After performing the Easy Align procedure, the motor drive...from Audiostar's database. On the AudioStar display "Saturn" displays and a set of the night sky. Press GO TO. Audiostar then automatically moves the telescope so that it "tracks" Saturn (or whatever other planets) coordinates change throught the year. 5. displays. After calculating, "Tonight's Best: Jupiter" displays...
... at or near the Sun will be displayed on a tour list on how well the observer levels the telescope and how close to scroll through the telescope as described below, remains the same; Go To Saturn After performing the Easy Align procedure, the motor drive...from Audiostar's database. On the AudioStar display "Saturn" displays and a set of the night sky. Press GO TO. Audiostar then automatically moves the telescope so that it "tracks" Saturn (or whatever other planets) coordinates change throught the year. 5. displays. After calculating, "Tonight's Best: Jupiter" displays...
