
User Guide
Page 2
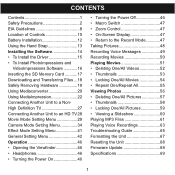
... Memory Card ...........17 Downloading and Transferring Files ...18 Safely Removing Hardware 19 Using Mediaconverter 20 Using MediaImpression 22 Connecting Another Unit to a NonHigh Definition TV 27 Connecting Another Unit to an HD TV 28 Movie Mode Setting Menu 29 Camera Mode Setting Menu 34 Effect Mode Setting Menu 41 General Setting Menu 42 Operation 46 • Opening the Viewfinder 46 • Headphones 46 • Turning the Power On 46 • Turning the Power Off 46 • Macro Switch 47 • Zoom Control...
... Memory Card ...........17 Downloading and Transferring Files ...18 Safely Removing Hardware 19 Using Mediaconverter 20 Using MediaImpression 22 Connecting Another Unit to a NonHigh Definition TV 27 Connecting Another Unit to an HD TV 28 Movie Mode Setting Menu 29 Camera Mode Setting Menu 34 Effect Mode Setting Menu 41 General Setting Menu 42 Operation 46 • Opening the Viewfinder 46 • Headphones 46 • Turning the Power On 46 • Turning the Power Off 46 • Macro Switch 47 • Zoom Control...
User Guide
Page 5
... attention to cords at plugs, convenience receptacles, and the point where they exit from the appliance. 13. This will fit into the outlet, try product through openings as this insert the plug fully into the power outlet only one blade wider than the other sources, refer to the keep from touching such power lines or operating instructions. GROUNDING...
... attention to cords at plugs, convenience receptacles, and the point where they exit from the appliance. 13. This will fit into the outlet, try product through openings as this insert the plug fully into the power outlet only one blade wider than the other sources, refer to the keep from touching such power lines or operating instructions. GROUNDING...
User Guide
Page 6
... produce heat. When the product exhibits a distinct change replacement parts specified by the in fire, The product should be cabinet has been damaged. HEAT Unauthorized substitutions may result in performance-this product operating instructions, as an adjustment of the National Electric under the following the operating instructions. SAFETY CHECK registers, stoves, or other controls may other products Upon completion of...
... produce heat. When the product exhibits a distinct change replacement parts specified by the in fire, The product should be cabinet has been damaged. HEAT Unauthorized substitutions may result in performance-this product operating instructions, as an adjustment of the National Electric under the following the operating instructions. SAFETY CHECK registers, stoves, or other controls may other products Upon completion of...

User Guide
Page 7
... interference by one or more of the following conditions: • This device may cause undesired operation. • Modifications not authorized by turning the equipment off and on, the user is connected. • Consult the dealer or an experienced radio/TV technician for a Class B digital device, pursuant to provide reasonable protection against harmful interference in potentially hazardous situations...
... interference by one or more of the following conditions: • This device may cause undesired operation. • Modifications not authorized by turning the equipment off and on, the user is connected. • Consult the dealer or an experienced radio/TV technician for a Class B digital device, pursuant to provide reasonable protection against harmful interference in potentially hazardous situations...

User Guide
Page 8
... take pictures or use the built-in display when operating a motor vehicle or while walking. • Never try to open the case of this unit can explode in rare instances while charging. Always leave service to authorized repair facilities. • Keep the unit away from water and other liquids, and never let it 's charging as rechargeable batteries can cause the data...
... take pictures or use the built-in display when operating a motor vehicle or while walking. • Never try to open the case of this unit can explode in rare instances while charging. Always leave service to authorized repair facilities. • Keep the unit away from water and other liquids, and never let it 's charging as rechargeable batteries can cause the data...
User Guide
Page 13
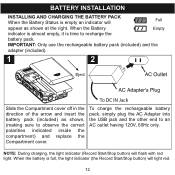
... USB jack and the other end to recharge the battery pack. When the battery is empty an indicator will flash with red light. NOTE: During charging, the light indicator (Record Start/Stop button) will Full appear as shown, (making sure to observe the correct polarities indicated inside the compartment) and replace the Compartment cover. IMPORTANT: Only use the rechargeable battery pack (included) and the adapter (included). 1 2 Eject...
... USB jack and the other end to recharge the battery pack. When the battery is empty an indicator will flash with red light. NOTE: During charging, the light indicator (Record Start/Stop button) will Full appear as shown, (making sure to observe the correct polarities indicated inside the compartment) and replace the Compartment cover. IMPORTANT: Only use the rechargeable battery pack (included) and the adapter (included). 1 2 Eject...
User Guide
Page 16
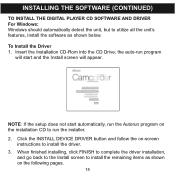
... on -screen instructions to install the driver. 3. When finished installing, click FINISH to complete the driver installation, and go back to the Install screen to install the remaining items as shown below. the auto-run the installer. 2. Click the INSTALL DEVICE DRIVER button and follow the on the installation CD to run program will appear. To Install the Driver 1. INSTALLING THE SOFTWARE (CONTINUED) TO INSTALL THE DIGITAL PLAYER CD SOFTWARE AND DRIVER For Windows: Windows should automatically...
... on -screen instructions to install the driver. 3. When finished installing, click FINISH to complete the driver installation, and go back to the Install screen to install the remaining items as shown below. the auto-run the installer. 2. Click the INSTALL DEVICE DRIVER button and follow the on the installation CD to run program will appear. To Install the Driver 1. INSTALLING THE SOFTWARE (CONTINUED) TO INSTALL THE DIGITAL PLAYER CD SOFTWARE AND DRIVER For Windows: Windows should automatically...
User Guide
Page 19
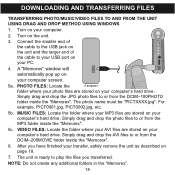
... larger end of the cable to play the files you have finished your transfer, safely remove the unit as described on your computer screen. 5a. The photo name must be "PICTXXXX.jpg". MUSIC FILES: Locate the folder where your MP3 files are stored on your PC. 4. Turn on your USB port on page 19. 7. The unit is ready to your computer's hard drive.
... larger end of the cable to play the files you have finished your transfer, safely remove the unit as described on your computer screen. 5a. The photo name must be "PICTXXXX.jpg". MUSIC FILES: Locate the folder where your MP3 files are stored on your PC. 4. Turn on your USB port on page 19. 7. The unit is ready to your computer's hard drive.

User Guide
Page 20
... right), select "USB Mass Storage Device" and click the "Stop" button. NOTE: • If the "Safely Remove Hardware" icon is not displayed on the task bar, please double click on "Eject". When the "Safe to Remove Hardware" window is safe to remove the unit from the computer. Then it is displayed, you may remove the unit from the USB cable or remove the USB cable from the...
... right), select "USB Mass Storage Device" and click the "Stop" button. NOTE: • If the "Safely Remove Hardware" icon is not displayed on the task bar, please double click on "Eject". When the "Safe to Remove Hardware" window is safe to remove the unit from the computer. Then it is displayed, you may remove the unit from the USB cable or remove the USB cable from the...

User Guide
Page 22
.... USING MEDIACONVERTER (CONTINUED) 4. Rename the new file "Clip0001.avi", so it is desired, make sure to set up your account by selecting "SETTING YOUTUBE ACCOUNT" in the EXTRAS menu at the top right of the window) c HELP to enjoy your computer and transfer the new file (see page 18). Click CLOSE or SAVE REPORT. 10. After transferring, press the Record-Play Mode/Return button to access...
.... USING MEDIACONVERTER (CONTINUED) 4. Rename the new file "Clip0001.avi", so it is desired, make sure to set up your account by selecting "SETTING YOUTUBE ACCOUNT" in the EXTRAS menu at the top right of the window) c HELP to enjoy your computer and transfer the new file (see page 18). Click CLOSE or SAVE REPORT. 10. After transferring, press the Record-Play Mode/Return button to access...
User Guide
Page 27
... connected. 9. After installing (see page 14), click START menu c PROGRAMS c ARCSOFT MEDIAIMPRESSION. Capture a video clip by clicking "Stop recording". 6. CONNECT: Click to connect to access the detailed help menu. 26 SNAPSHOT AND VIDEO: Select to PC Camera Mode; Click WebCam. 4. The connect icon only appears when your WebCam related preferences, such as video device, burst number, etc. 7. the green indicator will open. 2. the application will light. 3. Press the Record-Play Mode/Return button to switch to set...
... connected. 9. After installing (see page 14), click START menu c PROGRAMS c ARCSOFT MEDIAIMPRESSION. Capture a video clip by clicking "Stop recording". 6. CONNECT: Click to connect to access the detailed help menu. 26 SNAPSHOT AND VIDEO: Select to PC Camera Mode; Click WebCam. 4. The connect icon only appears when your WebCam related preferences, such as video device, burst number, etc. 7. the green indicator will open. 2. the application will light. 3. Press the Record-Play Mode/Return button to switch to set...

User Guide
Page 28
... A/V cable. Operate the unit as follows. 1. Set the TV's video input to a TV using the Navigation/Zoom/OK control, then press the Navigation/Zoom/OK control. 3. This will allow you to your TV color system as shown on page 44, then connect as described in the display will appear. First, make sure to set the TV SYSTEM to NTSC or PAL, corresponding to view the unit's videos...
... A/V cable. Operate the unit as follows. 1. Set the TV's video input to a TV using the Navigation/Zoom/OK control, then press the Navigation/Zoom/OK control. 3. This will allow you to your TV color system as shown on page 44, then connect as described in the display will appear. First, make sure to set the TV SYSTEM to NTSC or PAL, corresponding to view the unit's videos...
User Guide
Page 29
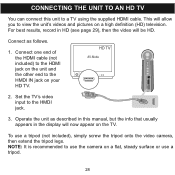
... HDMI cable (not included) to the HDMI jack on the unit and the other end to view the unit's videos and pictures on a flat, steady surface or use a tripod. 28 This will allow you to the HMDI IN jack on the TV. Set the TV's video input to use a tripod (not included), simply screw the tripod onto the video camera, then...
... HDMI cable (not included) to the HDMI jack on the unit and the other end to view the unit's videos and pictures on a flat, steady surface or use a tripod. 28 This will allow you to the HMDI IN jack on the TV. Set the TV's video input to use a tripod (not included), simply screw the tripod onto the video camera, then...

User Guide
Page 33
... recording video, the captured screen size will be smaller when set to ON. • Digital Zoom is disabled when set to On, if there is movement for three seconds, the unit will record until the movement stops for three seconds. Press the RecordPlay Mode/Return button 2 twice to cancel. 32 MOVIE MODE SETTING MENU (CONTINUED) MOTION STABILIZATION: This setting will allow you to turn this feature on or off. 1 1 2 Enter the Movie mode menu...
... recording video, the captured screen size will be smaller when set to ON. • Digital Zoom is disabled when set to On, if there is movement for three seconds, the unit will record until the movement stops for three seconds. Press the RecordPlay Mode/Return button 2 twice to cancel. 32 MOVIE MODE SETTING MENU (CONTINUED) MOTION STABILIZATION: This setting will allow you to turn this feature on or off. 1 1 2 Enter the Movie mode menu...

User Guide
Page 37
... flash (Auto Flash, Flash On, Flash Off, or Red Eye Reduction) using the Navigation/Zoom/OK control, then press the Navigation/Zoom/OK control; Select Photo Frame using the Navigation/Zoom/OK control, then press the Navigation/Zoom/OK control to select it . the Flash menu will be disabled when the battery is reset to set the flash. 36 NOTE: You can also use the Flash/Left button to switch to normal. Select the desired photo frame using the Navigation/Zoom...
... flash (Auto Flash, Flash On, Flash Off, or Red Eye Reduction) using the Navigation/Zoom/OK control, then press the Navigation/Zoom/OK control; Select Photo Frame using the Navigation/Zoom/OK control, then press the Navigation/Zoom/OK control to select it . the Flash menu will be disabled when the battery is reset to set the flash. 36 NOTE: You can also use the Flash/Left button to switch to normal. Select the desired photo frame using the Navigation/Zoom...

User Guide
Page 44
... date and time should be set the date and time. 1 Enter the Setting mode menu as shown on the previous page. Repeat this procedure to set before using the Date Printing, see page 39. • You can also cycle through the date and time settings using the Navigation/Zoom/OK control, then press the Navigation/Zoom/OK control; Set the year using the HD/Right and Flash/Left button. • Press the Record-Play Mode/Return button...
... date and time should be set the date and time. 1 Enter the Setting mode menu as shown on the previous page. Repeat this procedure to set before using the Date Printing, see page 39. • You can also cycle through the date and time settings using the Navigation/Zoom/OK control, then press the Navigation/Zoom/OK control; Set the year using the HD/Right and Flash/Left button. • Press the Record-Play Mode/Return button...

User Guide
Page 49
... will light red briefly and then light green. When taking pictures of subjects that are very close. Hold the camera still until the Picture Number decreases by more than one depending on . If not already in the Record mode, press the Record-Play Mode/Return button repeatedly to enter the Record mode. 3 4 Rotate the Macro ( / ) switch to the Up ( ) position when taking video/pictures, push the Navigation/Zoom/OK control...
... will light red briefly and then light green. When taking pictures of subjects that are very close. Hold the camera still until the Picture Number decreases by more than one depending on . If not already in the Record mode, press the Record-Play Mode/Return button repeatedly to enter the Record mode. 3 4 Rotate the Macro ( / ) switch to the Up ( ) position when taking video/pictures, push the Navigation/Zoom/OK control...

User Guide
Page 58
... only delete pictures from the memory card, not the internal memory. • Pictures on the Select the Delete option using the Navigation/Zoom/OK control. Select YES to delete or NO to delete all the pictures. Press the Navigation/Zoom/OK control to enter the submenu. Then press the Navigation/Zoom/OK control. VIEWING PHOTOS (CONTINUED) DELETING ONE/ALL PICTURES 1 2 3 12 Enter the Picture mode as shown on a write-protected card (see card's manual) cannot be deleted. •...
... only delete pictures from the memory card, not the internal memory. • Pictures on the Select the Delete option using the Navigation/Zoom/OK control. Select YES to delete or NO to delete all the pictures. Press the Navigation/Zoom/OK control to enter the submenu. Then press the Navigation/Zoom/OK control. VIEWING PHOTOS (CONTINUED) DELETING ONE/ALL PICTURES 1 2 3 12 Enter the Picture mode as shown on a write-protected card (see card's manual) cannot be deleted. •...

User Guide
Page 66
... the battery pack. Lens is weak or dead. Subject too close. White balance is not set too low. Battery pack is dirty. Poor lighting. Images/pictures are in better lighting and/or adjust the EV setting. Subject or unit moved as picture was Hold unit steady until picture is too far away. Resolution is off. TROUBLESHOOTING GUIDE If you are poor quality. Clean lens with this unit, check the...
... the battery pack. Lens is weak or dead. Subject too close. White balance is not set too low. Battery pack is dirty. Poor lighting. Images/pictures are in better lighting and/or adjust the EV setting. Subject or unit moved as picture was Hold unit steady until picture is too far away. Resolution is off. TROUBLESHOOTING GUIDE If you are poor quality. Clean lens with this unit, check the...
User Guide
Page 68
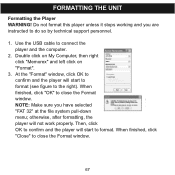
.... Use the USB cable to close the Format window. At the "Format" window, click OK to the right). otherwise, after formatting, the player will start to do so by technical support personnel. 1. Do not format this player unless it stops working and you have selected "FAT 32" at the file system pull-down menu; FORMATTING THE UNIT Formatting the Player WARNING! NOTE: Make sure you are instructed...
.... Use the USB cable to close the Format window. At the "Format" window, click OK to the right). otherwise, after formatting, the player will start to do so by technical support personnel. 1. Do not format this player unless it stops working and you have selected "FAT 32" at the file system pull-down menu; FORMATTING THE UNIT Formatting the Player WARNING! NOTE: Make sure you are instructed...


