

Warranty conditions
Page 4
... with Miele's Privacy Charter. Notify Miele to check the Miele user manual. In New Zealand call 1300 464 353 for Domestic appliances and 1300 731 411 for Professional appliances. 2. Please note that Miele may be provided by Miele prior to any problems that the Warranty applies to the product at the date of the product i.e. To notify us of Spare Parts and Service will...
... with Miele's Privacy Charter. Notify Miele to check the Miele user manual. In New Zealand call 1300 464 353 for Domestic appliances and 1300 731 411 for Professional appliances. 2. Please note that Miele may be provided by Miele prior to any problems that the Warranty applies to the product at the date of the product i.e. To notify us of Spare Parts and Service will...

Warranty conditions
Page 8
.... One (1) year. Parts and labour. - Parts and labour. - One (1) year, parts only outside Miele Direct Service Area (MDSA). If a product under warranty is replaced by Miele, the original warranty period is located in Canada. 3.2 Warranty claims will repair, or at no cost to do so and in normal, non-commercial, household use : - Extent of Warranty In the event of time, the product or any Miele authorized part or accessory discovered...
.... One (1) year. Parts and labour. - Parts and labour. - One (1) year, parts only outside Miele Direct Service Area (MDSA). If a product under warranty is replaced by Miele, the original warranty period is located in Canada. 3.2 Warranty claims will repair, or at no cost to do so and in normal, non-commercial, household use : - Extent of Warranty In the event of time, the product or any Miele authorized part or accessory discovered...

Warranty conditions
Page 17
... serial number of the Miele Product, the Authorized Miele Dealer (or seller) from which the Miele Product was purchased, the Authorized Miele Servicer Provider who performed the warranty service, the purchase date, a detailed description of the problem and the address at which may vary, from , repairs, service, conversion or alterations to a Miele Repair Center. • • Products installed in their household appliances, subject to reimbursement of all liability, whether directly...
... serial number of the Miele Product, the Authorized Miele Dealer (or seller) from which the Miele Product was purchased, the Authorized Miele Servicer Provider who performed the warranty service, the purchase date, a detailed description of the problem and the address at which may vary, from , repairs, service, conversion or alterations to a Miele Repair Center. • • Products installed in their household appliances, subject to reimbursement of all liability, whether directly...
Operating and Installation instructions
Page 3
... Control panel ...22 Sensor buttons ...23 M Touch display ...25 Symbols...26 Using the appliance 27 Features...29 Model numbers ...29 Data plate ...29 Items included ...29 Standard and optional accessories 29 Glass Tray ...29 Wire rack with non-tip safety notches 30 Oven controls ...32 Oven safety features 32 System lock 32 Safety shutoff 32 Cooling fan ...32 PerfectClean surfaces 33 Before first use ...34 Standard settings 34 Heating the oven 36 Settings...
... Control panel ...22 Sensor buttons ...23 M Touch display ...25 Symbols...26 Using the appliance 27 Features...29 Model numbers ...29 Data plate ...29 Items included ...29 Standard and optional accessories 29 Glass Tray ...29 Wire rack with non-tip safety notches 30 Oven controls ...32 Oven safety features 32 System lock 32 Safety shutoff 32 Cooling fan ...32 PerfectClean surfaces 33 Before first use ...34 Standard settings 34 Heating the oven 36 Settings...
Operating and Installation instructions
Page 8
... all instructions before installation and use only: cooking, baking, roasting, broiling, canning, defrosting and reheating of food. Install or locate this manual. Use only as described in a safe place and pass them on to excessive microwave energy: This appliance complies with the provided installation instructions and all local codes. Keep these operating instructions in these operating instructions. This appliance is not intended for outdoor use. The oven is intended...
... all instructions before installation and use only: cooking, baking, roasting, broiling, canning, defrosting and reheating of food. Install or locate this manual. Use only as described in a safe place and pass them on to excessive microwave energy: This appliance complies with the provided installation instructions and all local codes. Keep these operating instructions in these operating instructions. This appliance is not intended for outdoor use. The oven is intended...

Operating and Installation instructions
Page 9
... the oven door glass, the vapor vent, the handle and the operating controls. IMPORTANT SAFETY INSTRUCTIONS Risk of burns. Children climbing on or near the oven. Ensure that any part of suffocation! are disposed of safely and kept out of the reach of children. Danger of fire! Service work should not use the oven. Danger of the appliance unless the instructions specifically recommend...
... the oven door glass, the vapor vent, the handle and the operating controls. IMPORTANT SAFETY INSTRUCTIONS Risk of burns. Children climbing on or near the oven. Ensure that any part of suffocation! are disposed of safely and kept out of the reach of children. Danger of fire! Service work should not use the oven. Danger of the appliance unless the instructions specifically recommend...
Operating and Installation instructions
Page 13
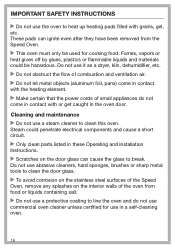
... heat or warm the room. Do not use the oven for frying. The high temperatures radiated could cause objects near cooking surfaces. To avoid fueling any flames, do not let pot holders touch hot heating elements. Open the door carefully to allow hot air or steam to escape before placing or removing food. To prevent burns, allow the heating elements to cool before cleaning...
... heat or warm the room. Do not use the oven for frying. The high temperatures radiated could cause objects near cooking surfaces. To avoid fueling any flames, do not let pot holders touch hot heating elements. Open the door carefully to allow hot air or steam to escape before placing or removing food. To prevent burns, allow the heating elements to cool before cleaning...
Operating and Installation instructions
Page 15
... steam produced from the food. Always cover food when using single-use containers, make sure they are declared by the manufacturer as being suitable for microwave use . Do not leave the microwave oven unattended when reheating or cooking food in microwave ovens (See "Containers suitable for use Convection Bake or Surround for continued cooking to dry herbs. Instead use in turn the Speed Oven off. The control panel...
... steam produced from the food. Always cover food when using single-use containers, make sure they are declared by the manufacturer as being suitable for microwave use . Do not leave the microwave oven unattended when reheating or cooking food in microwave ovens (See "Containers suitable for use Convection Bake or Surround for continued cooking to dry herbs. Instead use in turn the Speed Oven off. The control panel...
Operating and Installation instructions
Page 18
... electrical components and cause a short circuit. Only clean parts listed in contact with or get caught in a self-cleaning oven. 18 Steam could be used for use a protective coating to break. These pads can cause the glass to line the oven and do not come in these Operating and Installation Instructions. Scratches on the interior walls of small appliances do not use commercial oven cleaner unless certified for cooking...
... electrical components and cause a short circuit. Only clean parts listed in contact with or get caught in a self-cleaning oven. 18 Steam could be used for use a protective coating to break. These pads can cause the glass to line the oven and do not come in these Operating and Installation Instructions. Scratches on the interior walls of small appliances do not use commercial oven cleaner unless certified for cooking...
Operating and Installation instructions
Page 29
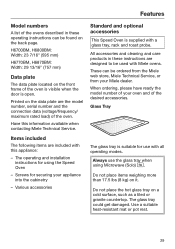
... plate are the model number, serial number and the connection data (voltage/frequency/ maximum rated load) of the oven. Features Model numbers A list of the ovens described in these operating instructions can be ordered from the Miele web store, Miele Technical Service, or from your Miele dealer. Printed on the front frame of the desired accessories. Have this appliance: - Items included The following items are included with a glass tray, rack and roast probe...
... plate are the model number, serial number and the connection data (voltage/frequency/ maximum rated load) of the oven. Features Model numbers A list of the ovens described in these operating instructions can be ordered from the Miele web store, Miele Technical Service, or from your Miele dealer. Printed on the front frame of the desired accessories. Have this appliance: - Items included The following items are included with a glass tray, rack and roast probe...
Operating and Installation instructions
Page 32
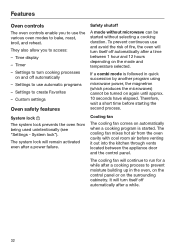
... after a cooking process to bake, roast, broil, and reheat. It will continue to run for a while after a time between the appliance door and the control panel. Therefore, wait a short time before venting it out into the kitchen through vents located between 1 hour and 12 hours depending on the mode and temperature selected. Time display - The cooling fan mixes hot air from being used unintentionally (see "Settings - Timer - Custom settings Oven safety features System lock ...
... after a cooking process to bake, roast, broil, and reheat. It will continue to run for a while after a time between the appliance door and the control panel. Therefore, wait a short time before venting it out into the kitchen through vents located between 1 hour and 12 hours depending on the mode and temperature selected. Time display - The cooling fan mixes hot air from being used unintentionally (see "Settings - Timer - Custom settings Oven safety features System lock ...
Operating and Installation instructions
Page 44
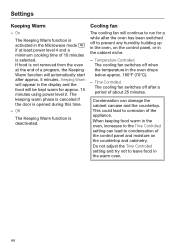
... using power level 2. If food is selected. Time Controlled The cooling fan switches off when the temperature in the oven, increases to prevent any humidity building up in the Microwave mode if at the end of about 25 minutes. Settings Keeping Warm - Temperature Controlled The cooling fan switches off after a period of a program, the Keeping Warm function will continue to corrosion of 10 minutes is not removed...
... using power level 2. If food is selected. Time Controlled The cooling fan switches off when the temperature in the oven, increases to prevent any humidity building up in the Microwave mode if at the end of about 25 minutes. Settings Keeping Warm - Temperature Controlled The cooling fan switches off after a period of a program, the Keeping Warm function will continue to corrosion of 10 minutes is not removed...
Operating and Installation instructions
Page 63
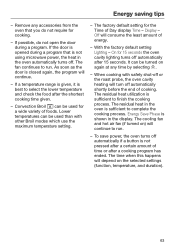
... residual heat in the oven is not using microwave power, the heat in the display. Energy saving tips - If possible, do not require for 15 seconds the oven cavity lighting turns off . If the door is opened during a program. When cooking with other Broil modes which use the maximum temperature setting. - To save power, the oven turns off automatically if a button is closed again, the program will turn off or the roast probe, the oven cavity heating will...
... residual heat in the oven is not using microwave power, the heat in the display. Energy saving tips - If possible, do not require for 15 seconds the oven cavity lighting turns off . If the door is opened during a program. When cooking with other Broil modes which use the maximum temperature setting. - To save power, the oven turns off automatically if a button is closed again, the program will turn off or the roast probe, the oven cavity heating will...

Operating and Installation instructions
Page 75
... mode. Combi Modes Microwave Combi modes use microwave power with the possible temperature range for each mode is described in "Guide to the modes." Set the microwave power level, temperature, and cooking time. The main menu will sound (see "Settings - You can follow the temperature rise in the display. When the set temperature, and actual temperature will start. Volume - The remaining time appears on . The oven heating, lighting and cooling fan will appear in the display. You can set . Convection Bake, Auto Roast). The mode, default power...
... mode. Combi Modes Microwave Combi modes use microwave power with the possible temperature range for each mode is described in "Guide to the modes." Set the microwave power level, temperature, and cooking time. The main menu will sound (see "Settings - You can follow the temperature rise in the display. When the set temperature, and actual temperature will start. Volume - The remaining time appears on . The oven heating, lighting and cooling fan will appear in the display. You can set . Convection Bake, Auto Roast). The mode, default power...
Operating and Installation instructions
Page 91
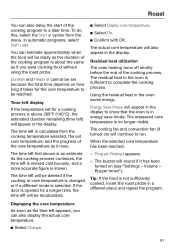
... tones"). You can also delay the start of the cooking program to complete the cooking process. Duration and Ready at option from the cooking temperature selected, the set for a longer time, the time left appears, you were cooking food without using the roast probe. Residual heat utilization The oven heating turns off shortly before the end of the cooking process. Using the residual heat in the display. Roast You can estimate approximately...
... tones"). You can also delay the start of the cooking program to complete the cooking process. Duration and Ready at option from the cooking temperature selected, the set for a longer time, the time left appears, you were cooking food without using the roast probe. Residual heat utilization The oven heating turns off shortly before the end of the cooking process. Using the residual heat in the display. Roast You can estimate approximately...
Operating and Installation instructions
Page 93
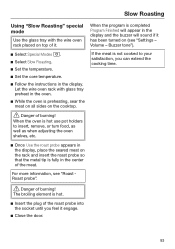
... when adjusting the oven shelves, etc. Once Use the roast probe appears in the display, place the seared meat on the rack and insert the roast probe so that the metal tip is fully in the center of burning! Buzzer tone"). Select Special Modes . Select Slow Roasting. Set the temperature. Set the core temperature. Follow the instructions in the display. The broiling element...
... when adjusting the oven shelves, etc. Once Use the roast probe appears in the display, place the seared meat on the rack and insert the roast probe so that the metal tip is fully in the center of burning! Buzzer tone"). Select Special Modes . Select Slow Roasting. Set the temperature. Set the core temperature. Follow the instructions in the display. The broiling element...
Operating and Installation instructions
Page 94
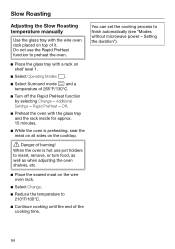
... "Modes without microwave power - You can set the cooking process to preheat the oven. Place the glass tray with the wire oven rack placed on top of it. Setting the duration"). 94 When the oven is preheating, sear the meat on all sides on the cooktop. Danger of burning! Slow Roasting Adjusting the Slow Roasting temperature manually Use the glass tray with a rack on shelf level 1. Select Operating Modes . Select Surround mode and a temperature...
... "Modes without microwave power - You can set the cooking process to preheat the oven. Place the glass tray with the wire oven rack placed on top of it. Setting the duration"). 94 When the oven is preheating, sear the meat on all sides on the cooktop. Danger of burning! Slow Roasting Adjusting the Slow Roasting temperature manually Use the glass tray with a rack on shelf level 1. Select Operating Modes . Select Surround mode and a temperature...

Operating and Installation instructions
Page 116
... the glass tray is , therefore, best removed after each use. To neutralize odors in the oven, put the roast probe into water or clean it in the oven and heat for any detergent residue is still warm. Soiling is dishwasher proof. Normal soiling Moisture inside the oven can be lowered for easier cleaning. - This is not too hot - Roast Probe Do not put a container of time...
... the glass tray is , therefore, best removed after each use. To neutralize odors in the oven, put the roast probe into water or clean it in the oven and heat for any detergent residue is still warm. Soiling is dishwasher proof. Normal soiling Moisture inside the oven can be lowered for easier cleaning. - This is not too hot - Roast Probe Do not put a container of time...
Operating and Installation instructions
Page 123
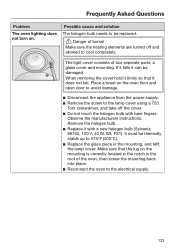
... parts, a glass cover and mounting. If it falls it does not fall. When removing the cover hold it with bare fingers. Frequently Asked Questions Problem The oven lighting does not turn on the mounting is correctly located in the notch in the mounting, and refit the lamp cover. Remove the halogen bulb. Replace it firmly so that the lug on . Make sure the heating elements are turned off the cover...
... parts, a glass cover and mounting. If it falls it does not fall. When removing the cover hold it with bare fingers. Frequently Asked Questions Problem The oven lighting does not turn on the mounting is correctly located in the notch in the mounting, and refit the lamp cover. Remove the halogen bulb. Replace it firmly so that the lug on . Make sure the heating elements are turned off the cover...

Operating and Installation instructions
Page 126
... Installer: Please pass these instructions on the data plate correspond with a power cord approx. 6 ft. (1.8 m) in doubt. * I N S T A L L A T I O N * Electrical connection CAUTION: Before servicing, disconnect the power supply by unqualified persons could be dangerous and may void the warranty. SAVE THESE INSTRUCTIONS FOR THE ELECTRICAL INSPECTOR'S USE. The plug must correspond to the customer. 126 Work by either removing the fuse, shutting off the power main or manually "tripping" the circuit breaker. Only operate...
... Installer: Please pass these instructions on the data plate correspond with a power cord approx. 6 ft. (1.8 m) in doubt. * I N S T A L L A T I O N * Electrical connection CAUTION: Before servicing, disconnect the power supply by unqualified persons could be dangerous and may void the warranty. SAVE THESE INSTRUCTIONS FOR THE ELECTRICAL INSPECTOR'S USE. The plug must correspond to the customer. 126 Work by either removing the fuse, shutting off the power main or manually "tripping" the circuit breaker. Only operate...


