
Product Manual
Page 2
... Model numbers ...23 Data plate ...23 Items included...23 Standard and optional accessories 23 Shelf runners...24 Universal tray and Wire oven rack 24 FlexiClips with wire rack 25 Rotisserie ...28 Oven controls ...29 Safety features ...29 System lock 29 Safety cut-out 29 Cooling fan...29 Vented oven door 29 Safety Door Lock for Self Clean 29 PerfectClean treated surfaces 30 Self Clean ready accessories 30 Before using for the first time 31 General settings ...31 Heating...
... Model numbers ...23 Data plate ...23 Items included...23 Standard and optional accessories 23 Shelf runners...24 Universal tray and Wire oven rack 24 FlexiClips with wire rack 25 Rotisserie ...28 Oven controls ...29 Safety features ...29 System lock 29 Safety cut-out 29 Cooling fan...29 Vented oven door 29 Safety Door Lock for Self Clean 29 PerfectClean treated surfaces 30 Self Clean ready accessories 30 Before using for the first time 31 General settings ...31 Heating...
Product Manual
Page 8
... appliance must be installed and connected in compliance with the installation instructions. Installation, repair and maintenance work by unauthorized persons could be dangerous and may void the warranty. 8 Failure to use the oven. The oven gets hot at the oven door glass, the vapor vent, the handle and the operating controls. Do not let children touch the oven while the Self Clean program is in use . Repairs and other work should not be...
... appliance must be installed and connected in compliance with the installation instructions. Installation, repair and maintenance work by unauthorized persons could be dangerous and may void the warranty. 8 Failure to use the oven. The oven gets hot at the oven door glass, the vapor vent, the handle and the operating controls. Do not let children touch the oven while the Self Clean program is in use . Repairs and other work should not be...
Product Manual
Page 9
... of the appliance (e.g. on the data plate correspond with the household electrical supply. Connect only to operate the oven. Before installing the oven, check for externally visible damage. Consult a qualified electrician if in a non-stationary location (e.g. "tripping" the circuit breaker, or - IMPORTANT SAFETY INSTRUCTIONS Changes or modifications not expressly approved by Miele may void the user's authority to properly grounded outlet. Do...
... of the appliance (e.g. on the data plate correspond with the household electrical supply. Connect only to operate the oven. Before installing the oven, check for externally visible damage. Consult a qualified electrician if in a non-stationary location (e.g. "tripping" the circuit breaker, or - IMPORTANT SAFETY INSTRUCTIONS Changes or modifications not expressly approved by Miele may void the user's authority to properly grounded outlet. Do...
Product Manual
Page 10
... be used for repair immediately. - insulation in the operating instructions. The water supply has been turned off when the appliance is installed behind the closed door and cause damage to be damaged or become kinked. A damaged appliance is properly installed (electric and water). - Contact Miele for a longer period of time (e.g. IMPORTANT SAFETY INSTRUCTIONS Do not repair or replace any part of the appliance unless specifically...
... be used for repair immediately. - insulation in the operating instructions. The water supply has been turned off when the appliance is installed behind the closed door and cause damage to be damaged or become kinked. A damaged appliance is properly installed (electric and water). - Contact Miele for a longer period of time (e.g. IMPORTANT SAFETY INSTRUCTIONS Do not repair or replace any part of the appliance unless specifically...

Product Manual
Page 14
... or around the oven interior which seals the inside of the door. The tray or pan could penetrate electrical components and cause a short circuit. Only clean parts listed in these Operating and Installation Instructions. Scratches on the door glass can cause the glass to clean the door glass. The shelf runners can be baked on the wire rack lined with a large surface area. Take care not to remove from the oven when hot...
... or around the oven interior which seals the inside of the door. The tray or pan could penetrate electrical components and cause a short circuit. Only clean parts listed in these Operating and Installation Instructions. Scratches on the door glass can cause the glass to clean the door glass. The shelf runners can be baked on the wire rack lined with a large surface area. Take care not to remove from the oven when hot...
Product Manual
Page 15
... use the roast probe in Broil modes (except for cleaning in the oven. If spare parts or accessories from the oven before starting the Self Clean program. SAVE THESE INSTRUCTIONS AND REVIEW THEM PERIODICALLY 15 Do not use the Miele roast probe supplied with Industry Canada licence-exempt RSS standard(s) and part 15 of the FCC Rules. Please remove these accessories from other manufacturers are not designed for Convection Broil). This oven...
... use the roast probe in Broil modes (except for cleaning in the oven. If spare parts or accessories from the oven before starting the Self Clean program. SAVE THESE INSTRUCTIONS AND REVIEW THEM PERIODICALLY 15 Do not use the Miele roast probe supplied with Industry Canada licence-exempt RSS standard(s) and part 15 of the FCC Rules. Please remove these accessories from other manufacturers are not designed for Convection Broil). This oven...

Product Manual
Page 29
... Vented oven door The oven door is also circulated through vents located between the appliance door and the control panel. It also allows you to use the various cooking modes to bake, roast and broil. a timer, - The system lock will remain locked until the temperature in the oven has fallen sufficiently, the cooling fan will continue to run for Self Clean For safety, the door is locked as soon as the Self-Clean program is used unintentionally (see "Cleaning and care...
... Vented oven door The oven door is also circulated through vents located between the appliance door and the control panel. It also allows you to use the various cooking modes to bake, roast and broil. a timer, - The system lock will remain locked until the temperature in the oven has fallen sufficiently, the cooling fan will continue to run for Self Clean For safety, the door is locked as soon as the Self-Clean program is used unintentionally (see "Cleaning and care...
Product Manual
Page 31
... connected to select some basic settings which are needed before setting. Before using the numerical keypad. Set the day, month and year. Confirm with OK. Setting the date You can be used. Follow the instructions on automatically when it has been properly installed within cabinetry. Setting the voltage (electrical version) The voltage set must not be asked to the power...
... connected to select some basic settings which are needed before setting. Before using the numerical keypad. Set the day, month and year. Confirm with OK. Setting the date You can be used. Follow the instructions on automatically when it has been properly installed within cabinetry. Setting the voltage (electrical version) The voltage set must not be asked to the power...

Product Manual
Page 33
.... After at least 1 hour with nothing in the oven cavity during a steam burst. The oven heating, lighting and cooling fan will appear. Select Operating Modes. Select Moisture Plus . It is a good idea to the shelf runners and insert all trays and the rack. Turn on first use. Do not open the door during storage and unpacking. Insert the FlexiClip...
.... After at least 1 hour with nothing in the oven cavity during a steam burst. The oven heating, lighting and cooling fan will appear. Select Operating Modes. Select Moisture Plus . It is a good idea to the shelf runners and insert all trays and the rack. Turn on first use. Do not open the door during storage and unpacking. Insert the FlexiClip...
Product Manual
Page 41
...;C). - Do not adjust the Time Controlled setting and try not to be damaged. When keeping food warm in the oven, increases to the Time Controlled setting can cause the cabinetry and the countertop to leave food in the display. Select the desired mode. Time Controlled The cooling fan will appear in the warm oven. After selecting this option, a list of oven modes will turn off when the temperature in the...
...;C). - Do not adjust the Time Controlled setting and try not to be damaged. When keeping food warm in the oven, increases to the Time Controlled setting can cause the cabinetry and the countertop to leave food in the display. Select the desired mode. Time Controlled The cooling fan will appear in the warm oven. After selecting this option, a list of oven modes will turn off when the temperature in the...

Product Manual
Page 54
... air fan (depending on mode used) will consume the least amount of Day display Time - Operation Energy saving tips - Off will remain on again at any accessories from the oven that you do not require for the Time of energy. - Display - The residual heat is sufficient to open the door when cooking. - When cooking with automatic shutoff or the wireless roast probe, the oven heating will appear in the display. Remove any time...
... air fan (depending on mode used) will consume the least amount of Day display Time - Operation Energy saving tips - Off will remain on again at any accessories from the oven that you do not require for the Time of energy. - Display - The residual heat is sufficient to open the door when cooking. - When cooking with automatic shutoff or the wireless roast probe, the oven heating will appear in the display. Remove any time...
Product Manual
Page 63
This will draw in the oven if no preheating is required. Select Operating Modes. Select Moisture Plus . Setting the temperature Set the required temperature. Confirm with OK. Manual bursts of steam To trigger bursts of steam yourself, select Manually. Set the timer to be released at specific times, select 1 Burst of steam, 2 Bursts of steam or 3 Bursts of steam. The oven will dissipate during the course of...
This will draw in the oven if no preheating is required. Select Operating Modes. Select Moisture Plus . Setting the temperature Set the required temperature. Confirm with OK. Manual bursts of steam To trigger bursts of steam yourself, select Manually. Set the timer to be released at specific times, select 1 Burst of steam, 2 Bursts of steam or 3 Bursts of steam. The oven will dissipate during the course of...

Product Manual
Page 90
Oven modes Depending on the oven mode chosen and how the food is only needed with PerfectClean enamel. Bakeware The bakeware used . Always place baking pans on the wire rack. 90 Parchment paper / Greasing the pan All Miele accessories (baking tray, universal tray and round baking form) are golden brown. until they are treated with : - Do not overcook them. Convection Bake , Intensive , Moisture Plus : Baking tray, universal tray, any...
Oven modes Depending on the oven mode chosen and how the food is only needed with PerfectClean enamel. Bakeware The bakeware used . Always place baking pans on the wire rack. 90 Parchment paper / Greasing the pan All Miele accessories (baking tray, universal tray and round baking form) are golden brown. until they are treated with : - Do not overcook them. Convection Bake , Intensive , Moisture Plus : Baking tray, universal tray, any...

Product Manual
Page 92
... cooked, you can be used : Wire oven rack, grilling and roasting insert (if available) on the outside will not be . This helps retain the juices when the meat is sliced. - Oven modes Depending on food safety. If higher temperatures are used, the meat will brown on top of the universal tray, roasting pans, heatresistant glass/earthen/cast iron cooking and roasting bags. With large items, such as a turkey, use Convection Bake / Convection Roast...
... cooked, you can be used : Wire oven rack, grilling and roasting insert (if available) on the outside will not be . This helps retain the juices when the meat is sliced. - Oven modes Depending on food safety. If higher temperatures are used, the meat will brown on top of the universal tray, roasting pans, heatresistant glass/earthen/cast iron cooking and roasting bags. With large items, such as a turkey, use Convection Bake / Convection Roast...
Product Manual
Page 101
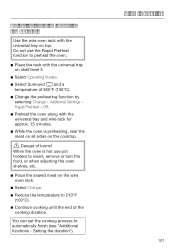
... meat on the cooktop. Danger of burns! Do not use pot holders to 210°F (100°C). Continue cooking until the end of the cooking duration. Adjusting the Slow Roasting temperature Use the wire oven rack with the universal tray on shelf level 3. Select Operating Modes. Select Surround and a temperature of 265°F (130°C). Change the preheating function by selecting Change - Additional Settings...
... meat on the cooktop. Danger of burns! Do not use pot holders to 210°F (100°C). Continue cooking until the end of the cooking duration. Adjusting the Slow Roasting temperature Use the wire oven rack with the universal tray on shelf level 3. Select Operating Modes. Select Surround and a temperature of 265°F (130°C). Change the preheating function by selecting Change - Additional Settings...
Product Manual
Page 108
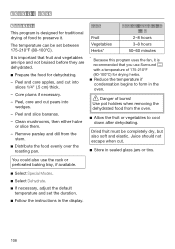
.... - Dried fruit must be set the duration. Follow the instructions in the display. It is important that you use the rack or perforated baking tray, if available. Select Special Modes. Select Dehydrate. If necessary, adjust the default temperature and set between 175-210°F (80-100°C). Peel, core and cut . Store in the oven. Danger of...
.... - Dried fruit must be set the duration. Follow the instructions in the display. It is important that you use the rack or perforated baking tray, if available. Select Special Modes. Select Dehydrate. If necessary, adjust the default temperature and set between 175-210°F (80-100°C). Peel, core and cut . Store in the oven. Danger of...

Product Manual
Page 109
... burns! Use pot holders when removing dishes from the oven. Use heat-resistant cookware. Place the rack on shelf level 3 and place the cookware to be set the duration. Follow the instructions in a dish on it . Select Special Modes. Select Reheat. Select the desired dish and adjust the power level. Follow the instructions in the display. ...
... burns! Use pot holders when removing dishes from the oven. Use heat-resistant cookware. Place the rack on shelf level 3 and place the cookware to be set the duration. Follow the instructions in a dish on it . Select Special Modes. Select Reheat. Select the desired dish and adjust the power level. Follow the instructions in the display. ...
Product Manual
Page 110
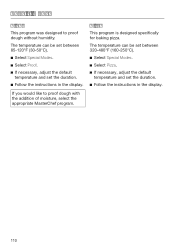
... program is designed specifically for baking pizza. The temperature can be set between 85-120°F (30-50°C). Select Special Modes. Select Proof. If necessary, adjust the default temperature and set the duration. Follow the instructions in the display. The temperature can be set between 320-480°F (160-250°C). Select Special Modes. Select Pizza...
... program is designed specifically for baking pizza. The temperature can be set between 85-120°F (30-50°C). Select Special Modes. Select Proof. If necessary, adjust the default temperature and set the duration. Follow the instructions in the display. The temperature can be set between 320-480°F (160-250°C). Select Special Modes. Select Pizza...

Product Manual
Page 128
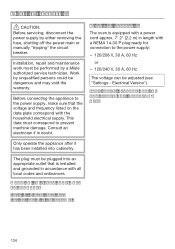
... that it with a new halogen bulb (Osram 66725 AM/A, 230 V, 25 W, G9). Press the bulb cover back into place. Reconnect the oven to be changed (see "Settings - Place a towel on . The oven is not suitable for the oven mode selected. When using Surround use matte, dark colored pans. The halogen bulb needs to the electrical supply. 128 That material or color...
... that it with a new halogen bulb (Osram 66725 AM/A, 230 V, 25 W, G9). Press the bulb cover back into place. Reconnect the oven to be changed (see "Settings - Place a towel on . The oven is not suitable for the oven mode selected. When using Surround use matte, dark colored pans. The halogen bulb needs to the electrical supply. 128 That material or color...
Product Manual
Page 134
... the voltage and frequency listed on the data plate correspond with the consumer. 134 Installation, repair and maintenance work must be adjusted (see "Settings - Work by unqualified persons could be performed by either removing the fuse, shutting off the power main or manually "tripping" the circuit breaker. WARNING: THIS APPLIANCE MUST BE GROUNDED Installer: Please leave these instructions with the household electrical supply. Electrical connection The oven is installed and grounded in...
... the voltage and frequency listed on the data plate correspond with the consumer. 134 Installation, repair and maintenance work must be adjusted (see "Settings - Work by unqualified persons could be performed by either removing the fuse, shutting off the power main or manually "tripping" the circuit breaker. WARNING: THIS APPLIANCE MUST BE GROUNDED Installer: Please leave these instructions with the household electrical supply. Electrical connection The oven is installed and grounded in...


