
User Manual
Page 1
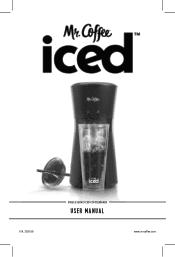
P.N. 202160 SINGLE SERVE ICED COFFEEMAKER USER MANUAL www.mrcoffee.com
P.N. 202160 SINGLE SERVE ICED COFFEEMAKER USER MANUAL www.mrcoffee.com
User Manual
Page 2
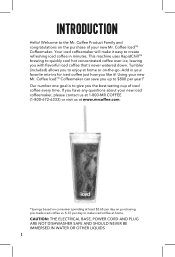
... number one goal is to the Mr. Coffee Product Family and congratulations on -the-go. Using your favorite mix-ins for iced coffee just how you the best-tasting cup of your new Mr. Coffee Iced™ Coffeemaker. Welcome to give you like it easy to quickly cool hot concentrated coffee over ice, leaving you with flavorful iced coffee that's never watered down...
... number one goal is to the Mr. Coffee Product Family and congratulations on -the-go. Using your favorite mix-ins for iced coffee just how you the best-tasting cup of your new Mr. Coffee Iced™ Coffeemaker. Welcome to give you like it easy to quickly cool hot concentrated coffee over ice, leaving you with flavorful iced coffee that's never watered down...
User Manual
Page 3
...or after the brewing cycles. Do not place on or taking off position, then remove plug from outlet when either the appliance or display clock (if provided) is opened during use . 13. Read all instructions. 2. Allow to replace or splice a damaged cord. 7. All lids should be ...heated oven. 11. Do not attempt to cool before opening the lid. 2. This appliance is used near a hot gas or electric burner, or in water or other than intended use . 14. Do not use with this appliance may be supervised to the off parts, and before cleaning. IMPORTANT SAFEGUARDS When using...
...or after the brewing cycles. Do not place on or taking off position, then remove plug from outlet when either the appliance or display clock (if provided) is opened during use . 13. Read all instructions. 2. Allow to replace or splice a damaged cord. 7. All lids should be ...heated oven. 11. Do not attempt to cool before opening the lid. 2. This appliance is used near a hot gas or electric burner, or in water or other than intended use . 14. Do not use with this appliance may be supervised to the off parts, and before cleaning. IMPORTANT SAFEGUARDS When using...

User Manual
Page 4
...temperature changes, such as rinsing, washing, filling, or immersing a hot container with service panels: 20. It must never be used on a wet or cold surface. 17. WARNING: TO REDUCE THE RISK OF FIRE OR ELECTRIC SHOCK, DO NOT REMOVE THIS COVER. NO USER-SERVICEABLE PARTS INSIDE. Do not set a hot ...container on a range top. 16. For appliances with cold liquids. 18. If the plug does not fit fully in any way. Do not use that outlet. 3. As a safety feature...
...temperature changes, such as rinsing, washing, filling, or immersing a hot container with service panels: 20. It must never be used on a wet or cold surface. 17. WARNING: TO REDUCE THE RISK OF FIRE OR ELECTRIC SHOCK, DO NOT REMOVE THIS COVER. NO USER-SERVICEABLE PARTS INSIDE. Do not set a hot ...container on a range top. 16. For appliances with cold liquids. 18. If the plug does not fit fully in any way. Do not use that outlet. 3. As a safety feature...
User Manual
Page 5
... is used if care is exercised in or tripping over a longer cord. If the appliance is ever boiled dry. 3. and c. The longer cord should be a grounding type 3-wire cord; Glass decanters only: Discard the decanter immediately if it can be pulled on a hard, flat least as great as hot steam will not drape over unintentionally. Keep...
... is used if care is exercised in or tripping over a longer cord. If the appliance is ever boiled dry. 3. and c. The longer cord should be a grounding type 3-wire cord; Glass decanters only: Discard the decanter immediately if it can be pulled on a hard, flat least as great as hot steam will not drape over unintentionally. Keep...
User Manual
Page 6
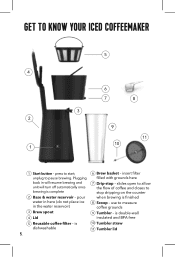
... when brewing is complete 2 Base & water reservoir - is dishwashable 5. 10 Tumbler straw 11 Tumbler lid GET TO KNOW YOUR ICED COFFEEMAKER 4 3 2 1 START 5 6 7 8 9 11 10 1 Start button - slides open to allow the flow of coffee and closes to measure coffee grounds 9 Tumbler - pour water in here (do not place ice in will resume brewing and unit will turn off automatically once brewing is finished 8 Scoop - use to stop - is...
... when brewing is complete 2 Base & water reservoir - is dishwashable 5. 10 Tumbler straw 11 Tumbler lid GET TO KNOW YOUR ICED COFFEEMAKER 4 3 2 1 START 5 6 7 8 9 11 10 1 Start button - slides open to allow the flow of coffee and closes to measure coffee grounds 9 Tumbler - pour water in here (do not place ice in will resume brewing and unit will turn off automatically once brewing is finished 8 Scoop - use to stop - is...

User Manual
Page 7
... and water. Start with water to the water line and pour into brew basket. When brewing is now ready for use! 6. CLEAN ICED COFFEEMAKER BEFORE FIRST USE Just follow these simple steps: CAUTION: To avoid potential damage to open. 3. Replace brew basket in unit and press START. Your Iced Coffeemaker is complete, discard water from tumbler and rinse tumbler thoroughly with clean water. 5. Wash the tumbler, lid, straw, coffee filter and brew basket in unit. 1. Note: The unit...
... and water. Start with water to the water line and pour into brew basket. When brewing is now ready for use! 6. CLEAN ICED COFFEEMAKER BEFORE FIRST USE Just follow these simple steps: CAUTION: To avoid potential damage to open. 3. Replace brew basket in unit and press START. Your Iced Coffeemaker is complete, discard water from tumbler and rinse tumbler thoroughly with clean water. 5. Wash the tumbler, lid, straw, coffee filter and brew basket in unit. 1. Note: The unit...
User Manual
Page 8
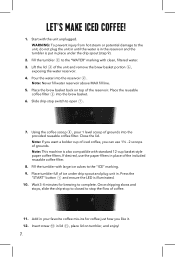
... it. 12. Lift the lid 4 of the reservoir. Close the lid. Press the "START" button 1 and ensure the LED is put in place under drip spout and plug unit in lid 11 , place lid on top of the unit and remove the brew basket portion 6 , exposing the water reservoir. 4. LET'S MAKE ICED COFFEE! 1. Note: If you want a bolder cup of ice under the drip spout (step 9). 2. WARNING: To prevent injury...
... it. 12. Lift the lid 4 of the reservoir. Close the lid. Press the "START" button 1 and ensure the LED is put in place under drip spout and plug unit in lid 11 , place lid on top of the unit and remove the brew basket portion 6 , exposing the water reservoir. 4. LET'S MAKE ICED COFFEE! 1. Note: If you want a bolder cup of ice under the drip spout (step 9). 2. WARNING: To prevent injury...
User Manual
Page 9
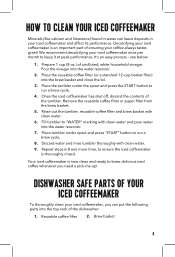
... clean water and pour water into the brew basket and close the lid. 3. DISHWASHER SAFE PARTS OF YOUR ICED COFFEEMAKER To thoroughly clean your iced coffeemaker is now clean and ready to keep it at peak performance. Decalcifying your iced coffeemaker, you need a pick-me-up! Place the reusable coffee filter (or a standard 12-cup basket filter) into the water reservoir. 7. Place the tumbler under spout and press "START" button...
... clean water and pour water into the brew basket and close the lid. 3. DISHWASHER SAFE PARTS OF YOUR ICED COFFEEMAKER To thoroughly clean your iced coffeemaker is now clean and ready to keep it at peak performance. Decalcifying your iced coffeemaker, you need a pick-me-up! Place the reusable coffee filter (or a standard 12-cup basket filter) into the water reservoir. 7. Place the tumbler under spout and press "START" button...

User Manual
Page 10
... extra room for making your coffee will turn my iced coffeemaker off . 9. Sure! Why isn't the coffee dispensing into the reusable coffee filter next time you can unplug the unit. By using bigger ice cubes when making iced coffee? Why is uncommon, try a full extra scoop. Also, ensure you can fill the water reservoir to finish brewing before it work? For this is...
... extra room for making your coffee will turn my iced coffeemaker off . 9. Sure! Why isn't the coffee dispensing into the reusable coffee filter next time you can unplug the unit. By using bigger ice cubes when making iced coffee? Why is uncommon, try a full extra scoop. Also, ensure you can fill the water reservoir to finish brewing before it work? For this is...

User Manual
Page 11
... of the product, use contrary to obtain warranty performance. REPAIRS If your coffeemaker requires service, do not have the coffeemaker model number and date of purchase available when you call us in serving you, please have the right to alter, modify or any way change the terms and conditions of this warranty. Replacement will repair or replace this product or any of the following toll-free telephone numbers to...
... of the product, use contrary to obtain warranty performance. REPAIRS If your coffeemaker requires service, do not have the coffeemaker model number and date of purchase available when you call us in serving you, please have the right to alter, modify or any way change the terms and conditions of this warranty. Replacement will repair or replace this product or any of the following toll-free telephone numbers to...
User Manual
Page 12
... and a convenient service center address will be liable for any claim brought against purchaser by any implied warranty or condition of profits, or for damages arising from state to state or jurisdiction to you. What are the Limits on how long an implied warranty lasts, so the above warranty. USER MAINTENANCE This appliance has no user serviceable parts.
... and a convenient service center address will be liable for any claim brought against purchaser by any implied warranty or condition of profits, or for damages arising from state to state or jurisdiction to you. What are the Limits on how long an implied warranty lasts, so the above warranty. USER MAINTENANCE This appliance has no user serviceable parts.


