
P Series Specification Brochure
Page 2
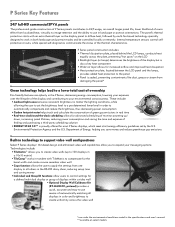
... to expand your environmental consciousness. Technologies include: • TileMatrix™ allows you to control settings for most P Series displays, which meet strict energy efficiency guidelines set by multi-fan-based technology specially designed to work in landscape or portrait orientations. P Series Key... more seamless video wall • Copy function allows the user to apply the settings from localized heat, virtually no matter the lighting conditions, while allowing the user to set the brightness level to a pre-determined lower level in order to automatically compensate ...
... to expand your environmental consciousness. Technologies include: • TileMatrix™ allows you to control settings for most P Series displays, which meet strict energy efficiency guidelines set by multi-fan-based technology specially designed to work in landscape or portrait orientations. P Series Key... more seamless video wall • Copy function allows the user to apply the settings from localized heat, virtually no matter the lighting conditions, while allowing the user to set the brightness level to a pre-determined lower level in order to automatically compensate ...
P Series Specification Brochure
Page 3
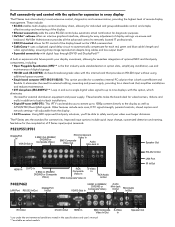
...touts the industry's most extensive control, diagnostics and communication, providing the highest level of display settings via mouse and keyboard. These include: • RS-232 enables multi-display control and ...display management. NaViSet Administrator provides all adjustable from the display. • CAT5 receiver: Using NEC-approved third-party solutions, you to stream up to nine displays with this option, which...Composite Video) RCA Composite Video In S-Video In BNC Composite Video In RCA Audio In/Out P402/P462 LAN Port RS-232 In/Out DisplayPort In/Out 5 BNC In (RGBHV, DVD/HD ...
...touts the industry's most extensive control, diagnostics and communication, providing the highest level of display settings via mouse and keyboard. These include: • RS-232 enables multi-display control and ...display management. NaViSet Administrator provides all adjustable from the display. • CAT5 receiver: Using NEC-approved third-party solutions, you to stream up to nine displays with this option, which...Composite Video) RCA Composite Video In S-Video In BNC Composite Video In RCA Audio In/Out P402/P462 LAN Port RS-232 In/Out DisplayPort In/Out 5 BNC In (RGBHV, DVD/HD ...
Press Release
Page 2
... products for customers. The P402 and P462 include the following features: • Superior thermal and mechanical protection ensures reliable 24/7 operation • Maximum brightness of 650 cd/m² • Contrast ratio up 30 minutes before use for Large-Screen Displays at NEC Display Solutions. These second-... LAN, IR Remote, DDC/CI • TileMatrix™ technology (up to 100 displays) • Real-time clock has the ability to set schedules for display on/off times and warm up to 3500:1 • Full 1080p high-definition resolution • Expansion slot supports the Open ...
... products for customers. The P402 and P462 include the following features: • Superior thermal and mechanical protection ensures reliable 24/7 operation • Maximum brightness of 650 cd/m² • Contrast ratio up 30 minutes before use for Large-Screen Displays at NEC Display Solutions. These second-... LAN, IR Remote, DDC/CI • TileMatrix™ technology (up to 100 displays) • Real-time clock has the ability to set schedules for display on/off times and warm up to 3500:1 • Full 1080p high-definition resolution • Expansion slot supports the Open ...
Users Manual
Page 2
P402...English-37 Specifications - Index DECLARATION OF CONFORMITY ...English-1 Important Information ...English-2 WARNING...English-2 CAUTION...English-2 Declaration ...English-2 Safety Precautions, Maintenance & Recommended Use English-3 ... the LCD monitor via RS-232C Remote Control English-30 Controlling the LCD monitor via LAN Control English-31 Connecting to a Network ...English-31 Network Setting by Using an HTTP Browser English-31 Features ...English-35 Troubleshooting...English-36 Specifications - P462...English-38 Pin Assignment...English-39 Manufacturer's Recycling...
P402...English-37 Specifications - Index DECLARATION OF CONFORMITY ...English-1 Important Information ...English-2 WARNING...English-2 CAUTION...English-2 Declaration ...English-2 Safety Precautions, Maintenance & Recommended Use English-3 ... the LCD monitor via RS-232C Remote Control English-30 Controlling the LCD monitor via LAN Control English-31 Connecting to a Network ...English-31 Network Setting by Using an HTTP Browser English-31 Features ...English-35 Troubleshooting...English-36 Specifications - P462...English-38 Pin Assignment...English-39 Manufacturer's Recycling...
Users Manual
Page 5
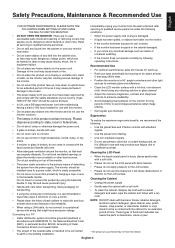
... light sources to minimize glare and reflections. • Clean the LCD monitor surface with ANSI/NFPA 70, the National Electrical Code (NEC), in the building installation. * The product you to the cord may cause shock or fire. • Do not place this feature...Do not put anything on the LCD surface. Safety Precautions, Maintenance & Recommended Use English FOR OPTIMUM PERFORMANCE, PLEASE NOTE THE FOLLOWING WHEN SETTING UP AND USING THE MULTI-FUNCTION MONITOR: Immediately unplug your monitor from the power supply. There are no user serviceable parts inside and opening...
... light sources to minimize glare and reflections. • Clean the LCD monitor surface with ANSI/NFPA 70, the National Electrical Code (NEC), in the building installation. * The product you to the cord may cause shock or fire. • Do not place this feature...Do not put anything on the LCD surface. Safety Precautions, Maintenance & Recommended Use English FOR OPTIMUM PERFORMANCE, PLEASE NOTE THE FOLLOWING WHEN SETTING UP AND USING THE MULTI-FUNCTION MONITOR: Immediately unplug your monitor from the power supply. There are no user serviceable parts inside and opening...
Users Manual
Page 9
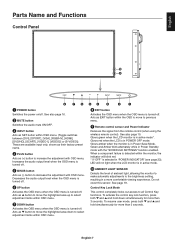
... Amber blink alternately while in active mode*. Control Key Lock Mode This control completely locks out access to decrease the adjustment with the "SCHEDULE SETTINGS" function enabled. English-7 Acts as (-) button to all Control Key functions. Glows green when the LCD monitor is turned off. ´... MINUS button Acts as EXIT button within the OSD to move to the brightness setting, resulting in active mode. µ AMBIENT LIGHT SENSOR Detects the level of ambient light, allowing the monitor to make automatic adjustments to previous...
... Amber blink alternately while in active mode*. Control Key Lock Mode This control completely locks out access to decrease the adjustment with the "SCHEDULE SETTINGS" function enabled. English-7 Acts as (-) button to all Control Key functions. Glows green when the LCD monitor is turned off. ´... MINUS button Acts as EXIT button within the OSD to move to the brightness setting, resulting in active mode. µ AMBIENT LIGHT SENSOR Detects the level of ambient light, allowing the monitor to make automatic adjustments to previous...
Users Manual
Page 10
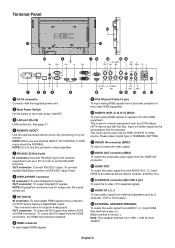
... Use the optional wired remote control by connecting it to the G connector. Sync-on-Green signal can be NORMAL. Please select signal type in TERMINAL SETTING. ¸ VIDEO1 IN connector (BNC)* To input a composite video signal. ¹ VIDEO OUT connector (BNC) To output the composite video signal from the VIDEO IN... other RGB equipment. µ RGB/HV IN [R, G, B, H, V] (BNC)* To input analog RGB signals or signals from external equipment such as a DVD player, HDTV device and Set-Top-Box. NOTE: DisplayPort connectors are for 15W + 15W (8 ohm) speaker. This is for image only.
... Use the optional wired remote control by connecting it to the G connector. Sync-on-Green signal can be NORMAL. Please select signal type in TERMINAL SETTING. ¸ VIDEO1 IN connector (BNC)* To input a composite video signal. ¹ VIDEO OUT connector (BNC) To output the composite video signal from the VIDEO IN... other RGB equipment. µ RGB/HV IN [R, G, B, H, V] (BNC)* To input analog RGB signals or signals from external equipment such as a DVD player, HDTV device and Set-Top-Box. NOTE: DisplayPort connectors are for 15W + 15W (8 ohm) speaker. This is for image only.
Users Manual
Page 12
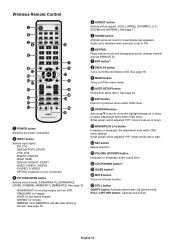
...SOUND button Artificial surround sound for moving images such as button to move the highlighted area up or down to set and change passwords, change channel and set REMOTE ID. ¶ ENT button*2 º DISPLAY button Turns on/off mute function. ƾ STILL button ON/...440; MINUS/PLUS (-/+) button Increases or decreases the adjustment level within OSD menu. Small screen which adjusted "PIP" mode moves left or right. ƹ SET button Makes selection. ƺ VOLUME UP/DOWN button Increases or decreases audio output level. ƻ CH UP/DOWN button*2 Ƽ GUIDE button*2 &#...
...SOUND button Artificial surround sound for moving images such as button to move the highlighted area up or down to set and change passwords, change channel and set REMOTE ID. ¶ ENT button*2 º DISPLAY button Turns on/off mute function. ƾ STILL button ON/...440; MINUS/PLUS (-/+) button Increases or decreases the adjustment level within OSD menu. Small screen which adjusted "PIP" mode moves left or right. ƹ SET button Makes selection. ƺ VOLUME UP/DOWN button Increases or decreases audio output level. ƻ CH UP/DOWN button*2 Ƽ GUIDE button*2 &#...
Users Manual
Page 15
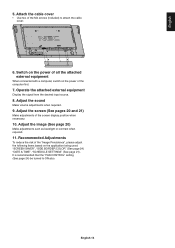
... or contrast when required. 11. Operate the attached external equipment Display the signal from the desired input source. 8. It is recommended that the "FAN CONTROL" setting (See page 24) be turned to attach the cable cover. 6. Attach the cable cover • Use two of the screen display position when necessary. 10... the attached external equipment When connected with a computer, switch on the application being used: "SCREEN SAVER", "SIDE BORDER COLOR" (See page 24) "DATE & TIME", "SCHEDULE SETTINGS" (See page 21).
... or contrast when required. 11. Operate the attached external equipment Display the signal from the desired input source. 8. It is recommended that the "FAN CONTROL" setting (See page 24) be turned to attach the cable cover. 6. Attach the cable cover • Use two of the screen display position when necessary. 10... the attached external equipment When connected with a computer, switch on the application being used: "SCREEN SAVER", "SIDE BORDER COLOR" (See page 24) "DATE & TIME", "SCHEDULE SETTINGS" (See page 21).
Users Manual
Page 16
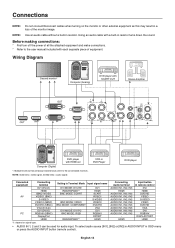
... PC Connecting terminal DVI (DVI-D) HDMI 5BNC+VIDEO VIDEO1 (BNC) S-VIDEO VIDEO2 (5BNC) DVD/HD (5BNC) VGA (D-Sub) DVI (DVI-D) RGB/HV (5BNC) DisplayPort HDMI Setting in resistor turns down the sound.
... PC Connecting terminal DVI (DVI-D) HDMI 5BNC+VIDEO VIDEO1 (BNC) S-VIDEO VIDEO2 (5BNC) DVD/HD (5BNC) VGA (D-Sub) DVI (DVI-D) RGB/HV (5BNC) DisplayPort HDMI Setting in resistor turns down the sound.
Users Manual
Page 17
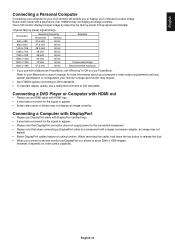
... an image correctly. Connecting a DVD Player or Computer with HDMI out • Please use a cable that when connecting a DisplayPort cable to a component with a Macintosh PowerBook, set "Mirroring" to Off on video card's capability. Connecting a Computer with DisplayPort • Please use with a signal conversion adapter, an image may not display an image...
... an image correctly. Connecting a DVD Player or Computer with HDMI out • Please use a cable that when connecting a DisplayPort cable to a component with a Macintosh PowerBook, set "Mirroring" to Off on video card's capability. Connecting a Computer with DisplayPort • Please use with a signal conversion adapter, an image may not display an image...
Users Manual
Page 19
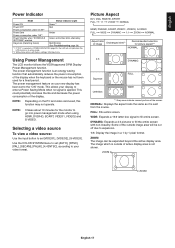
...*1 Power OFF Red Power consumption under 0.5 W*2 Power Save Amber Power consumption under 1 W*2 Power Standby when "SCHEDULE Green and Amber blink alternately SETTINGS" enabled Diagnosis (Detecting failure) Red Blinking (See Troubleshooting page 36) *1 If "OFF" is selected in POWER INDICATOR (page 23), the LED...light when the LCD monitor is an energy saving function that automatically reduces the power consumption of the screen. Use the COLOR SYSTEM menu to set [AUTO], [NTSC], [PAL], [SECAM], [PAL60], [4.43NTSC], according to your display to enter a Power Saving Mode when no signal ...
...*1 Power OFF Red Power consumption under 0.5 W*2 Power Save Amber Power consumption under 1 W*2 Power Standby when "SCHEDULE Green and Amber blink alternately SETTINGS" enabled Diagnosis (Detecting failure) Red Blinking (See Troubleshooting page 36) *1 If "OFF" is selected in POWER INDICATOR (page 23), the LED...light when the LCD monitor is an energy saving function that automatically reduces the power consumption of the screen. Use the COLOR SYSTEM menu to set [AUTO], [NTSC], [PAL], [SECAM], [PAL60], [4.43NTSC], according to your display to enter a Power Saving Mode when no signal ...
Users Manual
Page 20
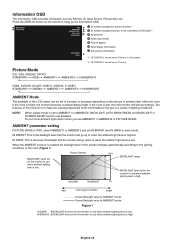
... dark room bright condition bright Screen Backlight value by AMBIENT1 mode Screen Backlight value by AMBIENT2 mode Figure 1 IN DARK: BACKLIGHT level set to use AMBIENT1 or AMBIENT2 in SCREEN SAVER function are disabled. Do not cover Ambient light sensor when you use when ambient lighting ...HDMI, DVD/HD, SCART, VIDEO1, VIDEO2, S-VIDEO STANDARD CINEMA AMBIENT1 AMBIENT2 HIGHBRIGHT AMBIENT Mode The backlight of the LCD screen can be set for the monitor to use when ambient lighting level is highest. When the AMBIENT function is to make the viewing experience more comfortable to ...
... dark room bright condition bright Screen Backlight value by AMBIENT1 mode Screen Backlight value by AMBIENT2 mode Figure 1 IN DARK: BACKLIGHT level set to use AMBIENT1 or AMBIENT2 in SCREEN SAVER function are disabled. Do not cover Ambient light sensor when you use when ambient lighting ...HDMI, DVD/HD, SCART, VIDEO1, VIDEO2, S-VIDEO STANDARD CINEMA AMBIENT1 AMBIENT2 HIGHBRIGHT AMBIENT Mode The backlight of the LCD screen can be set for the monitor to use when ambient lighting level is highest. When the AMBIENT function is to make the viewing experience more comfortable to ...
Users Manual
Page 21
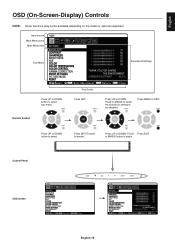
Press UP or DOWN, PLUS or MINUS to select the function or setting to decide. Press INPUT button to be available depending on the model or optional equipment. Press UP or DOWN, PLUS Press EXIT or MINUS button ... (On-Screen-Display) Controls NOTE: Some functions may not be adjusted. Press MENU or EXIT. CARBON FOOTPRINT 86.0 % Goto Adjustment Return Close Key Guide Adjustment Settings Press UP or DOWN button to select. Control Panel OSD screen English-19 Remote Control Press UP or DOWN button to select. Press...
Press UP or DOWN, PLUS or MINUS to select the function or setting to decide. Press INPUT button to be available depending on the model or optional equipment. Press UP or DOWN, PLUS Press EXIT or MINUS button ... (On-Screen-Display) Controls NOTE: Some functions may not be adjusted. Press MENU or EXIT. CARBON FOOTPRINT 86.0 % Goto Adjustment Return Close Key Guide Adjustment Settings Press UP or DOWN button to select. Control Panel OSD screen English-19 Remote Control Press UP or DOWN button to select. Press...
Users Manual
Page 22
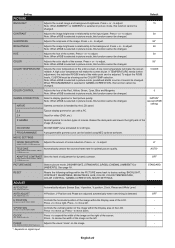
...the image. Press + or - A low color temperature will make the screen reddish. to the background. CLOCK Press + to move down. Setting PICTURE Default BACKLIGHT Adjusts the overall image and background brightness. Press + or - Press + or - Press + or - DICOM GSDF curve ...selected in GAMMA CORRECTION, this function cannot be changed . Gamma correction is detected. Note: When sRGB is set so it cannot be loaded using NEC optional software. DICOM SIM. COLOR Adjusts the color depth of the entire screen. PROGRAMMABLE A programmable gamma curve ...
...the image. Press + or - A low color temperature will make the screen reddish. to the background. CLOCK Press + to move down. Setting PICTURE Default BACKLIGHT Adjusts the overall image and background brightness. Press + or - Press + or - Press + or - DICOM GSDF curve ...selected in GAMMA CORRECTION, this function cannot be changed . Gamma correction is detected. Note: When sRGB is set so it cannot be loaded using NEC optional software. DICOM SIM. COLOR Adjusts the color depth of the entire screen. PROGRAMMABLE A programmable gamma curve ...
Users Manual
Page 23
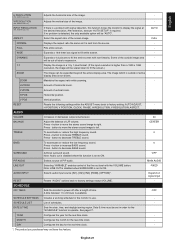
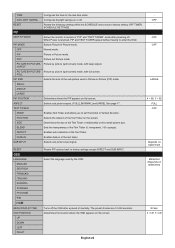
... Press + button to 24 hours is available. A time between 1 to increase BASS sound. SCHEDULE LIST List of vertical zoom. DATE & TIME Sets the date, time, and daylight saving region. See page 27. MONTH Configures the month for the real-time clock. - *: The ...volume level. 40 BALANCE Adjust the balance of horizontal zoom. Press + button to move the stereo sound image to factory settings except VOLUME. - OFF SCHEDULE SETTINGS Creates a working schedule for the monitor to display the signal at the desired resolution. After selection, execute "AUTO SETUP" ...
... Press + button to 24 hours is available. A time between 1 to increase BASS sound. SCHEDULE LIST List of vertical zoom. DATE & TIME Sets the date, time, and daylight saving region. See page 27. MONTH Configures the month for the real-time clock. - *: The ...volume level. 40 BALANCE Adjust the balance of horizontal zoom. Press + button to move the stereo sound image to factory settings except VOLUME. - OFF SCHEDULE SETTINGS Creates a working schedule for the monitor to display the signal at the desired resolution. After selection, execute "AUTO SETUP" ...
Users Manual
Page 24
... picture input signal. RESET OSD LANGUAGE ENGLISH DEUTSCH FRANÇAIS ITALIANO ESPAÑOL SVENSKA Resets PIP options back to factory setting: OFF TIMER, SCHEDULE SETTINGS. Picture by picture (split screen) mode, with keep aspect. SIZE Determines the size of the Text Ticker in -Picture mode... of the text ticker. TIME Configures the time for the real-time clock. RESET Resets the following settings within the SCHEDULE menu back to factory settings except ASPECT and SUB INPUT. ASPECT PICTURE BY PICTURE- FULL PIP SIZE Selects the size of the Text Ticker....
... picture input signal. RESET OSD LANGUAGE ENGLISH DEUTSCH FRANÇAIS ITALIANO ESPAÑOL SVENSKA Resets PIP options back to factory setting: OFF TIMER, SCHEDULE SETTINGS. Picture by picture (split screen) mode, with keep aspect. SIZE Determines the size of the Text Ticker in -Picture mode... of the text ticker. TIME Configures the time for the real-time clock. RESET Resets the following settings within the SCHEDULE menu back to factory settings except ASPECT and SUB INPUT. ASPECT PICTURE BY PICTURE- FULL PIP SIZE Selects the size of the Text Ticker....
Users Manual
Page 25
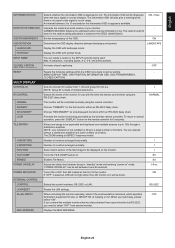
...NOTE: Low resolution is available. "POWER ON DELAY" can create a name for the first monitor within the OSD menu back to factory setting: - If you connect the multiple monitors that are daisy-chained from second monitor by the wireless remote controller. RS-232C - An interval between ... press the "DISPLAY" button on . LANDSCAPE Display the OSD with the infra-red remote control when using the remote controller. The ZOOM setting of monitors arranged vertically. If "OFF" is selected, LED will be expanded and displayed over multiple screens (up to a large number ...
...NOTE: Low resolution is available. "POWER ON DELAY" can create a name for the first monitor within the OSD menu back to factory setting: - If you connect the multiple monitors that are daisy-chained from second monitor by the wireless remote controller. RS-232C - An interval between ... press the "DISPLAY" button on . LANDSCAPE Display the OSD with the infra-red remote control when using the remote controller. The ZOOM setting of monitors arranged vertically. If "OFF" is selected, LED will be expanded and displayed over multiple screens (up to a large number ...
Users Manual
Page 26
...level according to start temperature of backlight is decreased when "ON" is selected for [DHCP]. 255.255.255.0 DEFAULT GATEWAY Set your primary DNS settings of the network connected to go into power management mode. OFF CHANGE SECURITY Allows the security password to be changed and &#...not to send an e-mail notification of the display to reduce the risk of the FAN, BACKLIGHT and TEMPERATURE. - LAN SETTING When you use this function, EXTERNAL CONTROL should be "LAN". AUTO SCREEN SAVER Use the SCREEN SAVER function to protect from overheating. ...
...level according to start temperature of backlight is decreased when "ON" is selected for [DHCP]. 255.255.255.0 DEFAULT GATEWAY Set your primary DNS settings of the network connected to go into power management mode. OFF CHANGE SECURITY Allows the security password to be changed and &#...not to send an e-mail notification of the display to reduce the risk of the FAN, BACKLIGHT and TEMPERATURE. - LAN SETTING When you use this function, EXTERNAL CONTROL should be "LAN". AUTO SCREEN SAVER Use the SCREEN SAVER function to protect from overheating. ...
Users Manual
Page 27
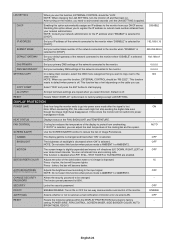
... from the other video signals while the current video source is present in the other video input port. AUTO Automatically chooses Color System setting based on the video format of image retention. FIRST DETECT When the current video input signal is not present, then the monitor searches..."DVI-HD" when DVD player, which is changed. EXPAND: Expand image contrast and increase detail in the DVI mode menu. INPUT CHANGE Sets input change and keep to the DVI input. Note: For DVI input "DVI-HD" needs to the new video source. NONE The Monitor...
... from the other video signals while the current video source is present in the other video input port. AUTO Automatically chooses Color System setting based on the video format of image retention. FIRST DETECT When the current video input signal is not present, then the monitor searches..."DVI-HD" when DVD player, which is changed. EXPAND: Expand image contrast and increase detail in the DVI mode menu. INPUT CHANGE Sets input change and keep to the DVI input. Note: For DVI input "DVI-HD" needs to the new video source. NONE The Monitor...
