
P Series Specification Brochure
Page 2
... strict energy efficiency guidelines set by multi-fan-based technology specially designed to work in both landscape and portrait modes and be controlled locally or remotely. Internal temperature sensors control selfprotective circuits, while special self-diagnostics communicate the status of the thermal characteristics. Environmental Protection Agency and the U.S. Department of Energy...
... strict energy efficiency guidelines set by multi-fan-based technology specially designed to work in both landscape and portrait modes and be controlled locally or remotely. Internal temperature sensors control selfprotective circuits, while special self-diagnostics communicate the status of the thermal characteristics. Environmental Protection Agency and the U.S. Department of Energy...
P Series Specification Brochure
Page 3
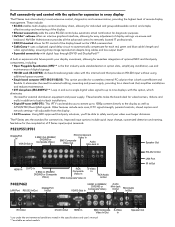
... quick input change, customized detection and naming. NaViSet Administrator provides all adjustable from the display. • CAT5 receiver: Using NEC-approved third-party solutions, you to stream up to remotely located IT professionals. • DDC/CI standard allows for PC control of the display based on select models S-Video In ... In 5 BNC In (RGBHV, DVD/HD or Composite Video) RCA Composite Video In S-Video In BNC Composite Video In RCA Audio In/Out P402/P462 LAN Port RS-232 In/Out DisplayPort In/Out 5 BNC In (RGBHV, DVD/HD or VGA D-Sub In Composite Video) Audio Mini-Jack In/...
... quick input change, customized detection and naming. NaViSet Administrator provides all adjustable from the display. • CAT5 receiver: Using NEC-approved third-party solutions, you to stream up to remotely located IT professionals. • DDC/CI standard allows for PC control of the display based on select models S-Video In ... In 5 BNC In (RGBHV, DVD/HD or Composite Video) RCA Composite Video In S-Video In BNC Composite Video In RCA Audio In/Out P402/P462 LAN Port RS-232 In/Out DisplayPort In/Out 5 BNC In (RGBHV, DVD/HD or VGA D-Sub In Composite Video) Audio Mini-Jack In/...

P Series Specification Brochure
Page 4
...Audio RCA Audio x 2, Stereo Mini-Jack, DisplayPort Audio, HDMI Audio RS-232C, Ethernet (RJ45), IR Remote, DDC/CI (Standard) DisplayPort, DVI-D BNC Composite Audio Mini-Jack, External Speaker Jack x 2 P402-AVT P462-AVT NA 5 BNC (RGBHV, DVD/HD, or Video), BNC Composite RCA Audio, External Speaker Jack x... 2 RS-232C, IR Remote 15W Stereo P521-AVT P551-AVT P701-AVT FEATURES Additional Features Speakers Thin bezel (...
...Audio RCA Audio x 2, Stereo Mini-Jack, DisplayPort Audio, HDMI Audio RS-232C, Ethernet (RJ45), IR Remote, DDC/CI (Standard) DisplayPort, DVI-D BNC Composite Audio Mini-Jack, External Speaker Jack x 2 P402-AVT P462-AVT NA 5 BNC (RGBHV, DVD/HD, or Video), BNC Composite RCA Audio, External Speaker Jack x... 2 RS-232C, IR Remote 15W Stereo P521-AVT P551-AVT P701-AVT FEATURES Additional Features Speakers Thin bezel (...
Press Release
Page 2
...only expand connectivity options but also improve the mechanical design with DVI, DisplayPort and Composite Video • Remote diagnostics and external control including RS-232C, RJ45 LAN, IR Remote, DDC/CI • TileMatrix™ technology (up to 100 displays) • Real-time clock...displays that require integrated technologies to ensure uninterrupted reliability," said Rachel Karnani, Product Manager for Large-Screen Displays at NEC Display Solutions. "The P402 and P462 displays are 1-inch thinner than the first generation products. 2 "Our professional-grade P Series is ideal for the...
...only expand connectivity options but also improve the mechanical design with DVI, DisplayPort and Composite Video • Remote diagnostics and external control including RS-232C, RJ45 LAN, IR Remote, DDC/CI • TileMatrix™ technology (up to 100 displays) • Real-time clock...displays that require integrated technologies to ensure uninterrupted reliability," said Rachel Karnani, Product Manager for Large-Screen Displays at NEC Display Solutions. "The P402 and P462 displays are 1-inch thinner than the first generation products. 2 "Our professional-grade P Series is ideal for the...
Users Manual
Page 2
P462...English-38 Pin Assignment...English-39 Manufacturer's Recycling and Energy Information English-40 www.necdisplaysolutions.com P402...English-37 Specifications - Index... ...English-4 Installation ...English-5 Attaching Mounting Accessories ...English-6 Parts Name and Functions...English-7 Control Panel ...English-7 Terminal Panel ...English-8 Wireless Remote Control ...English-10 Operating Range for the Remote Control English-11 Setup ...English-12 Connections ...English-14 Wiring Diagram ...English-14 Connecting a Personal Computer English-15 Connecting a DVD Player or...
P462...English-38 Pin Assignment...English-39 Manufacturer's Recycling and Energy Information English-40 www.necdisplaysolutions.com P402...English-37 Specifications - Index... ...English-4 Installation ...English-5 Attaching Mounting Accessories ...English-6 Parts Name and Functions...English-7 Control Panel ...English-7 Terminal Panel ...English-8 Wireless Remote Control ...English-10 Operating Range for the Remote Control English-11 Setup ...English-12 Connections ...English-14 Wiring Diagram ...English-14 Connecting a Personal Computer English-15 Connecting a DVD Player or...

Users Manual
Page 6
Contents Your new MultiSync monitor box* should contain the following: • LCD monitor • Power cord*1 • Video Signal Cable • Wireless Remote Control and AA Batteries • Setup Manual • Cable cover • Clamp x 3 • Screw (M4 x 10) x 5 • CD-ROM •... Power Cord*1 Screw (M4 x 10) x 5 CD-ROM Setup Manual Thumbscrew for optional stand x 2 Cable cover Clamp x 3 Setup Manual Wireless Remote Control and AA Batteries * Remember to save your particular country. English-4 When more than one power cord is to transport or ship the monitor. *1 ...
Contents Your new MultiSync monitor box* should contain the following: • LCD monitor • Power cord*1 • Video Signal Cable • Wireless Remote Control and AA Batteries • Setup Manual • Cable cover • Clamp x 3 • Screw (M4 x 10) x 5 • CD-ROM •... Power Cord*1 Screw (M4 x 10) x 5 CD-ROM Setup Manual Thumbscrew for optional stand x 2 Cable cover Clamp x 3 Setup Manual Wireless Remote Control and AA Batteries * Remember to save your particular country. English-4 When more than one power cord is to transport or ship the monitor. *1 ...
Users Manual
Page 9
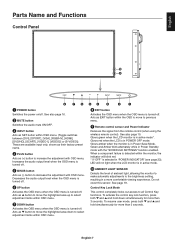
... SENSOR Detects the level of ambient light, allowing the monitor to make automatic adjustments to previous menu. ¾ Remote control sensor and Power Indicator Receives the signal from the remote control (when using the wireless remote control). See also page 16. · MUTE button Switches the audio mute ON/OFF. » INPUT button...
... SENSOR Detects the level of ambient light, allowing the monitor to make automatic adjustments to previous menu. ¾ Remote control sensor and Power Indicator Receives the signal from the remote control (when using the wireless remote control). See also page 16. · MUTE button Switches the audio mute ON/OFF. » INPUT button...
Users Manual
Page 10
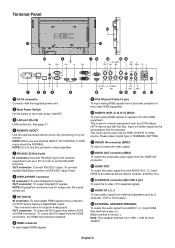
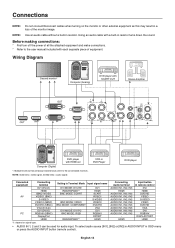
...; RGB/HV IN [R, G, B, H, V] (BNC)* To input analog RGB signals or signals from either DVI IN or HDMI connection. NOTE: Do not use Remote IN/OUT, IR CONTROL in OSD menu should be connected to control RS-232C functions. NOTE: DisplayPort connectors are for 15W + 15W (8 ohm) speaker. Black...RS-232C daisy Chain. ² DISPLAYPORT connector IN connector: To input DisplayPort signals. This is plus (+). See page 31. ¿ REMOTE IN/OUT Use the optional wired remote control by connecting it to turn main power ON/OFF. » LAN port (RJ-45) LAN connection. No sound comes out....
...; RGB/HV IN [R, G, B, H, V] (BNC)* To input analog RGB signals or signals from either DVI IN or HDMI connection. NOTE: Do not use Remote IN/OUT, IR CONTROL in OSD menu should be connected to control RS-232C functions. NOTE: DisplayPort connectors are for 15W + 15W (8 ohm) speaker. Black...RS-232C daisy Chain. ² DISPLAYPORT connector IN connector: To input DisplayPort signals. This is plus (+). See page 31. ¿ REMOTE IN/OUT Use the optional wired remote control by connecting it to turn main power ON/OFF. » LAN port (RJ-45) LAN connection. No sound comes out....
Users Manual
Page 12
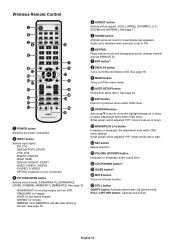
...Turns on /off the information OSD. See page 20. ¸ EXIT button Returns to set and change passwords, change channel and set REMOTE ID. ¶ ENT button*2 º DISPLAY button Turns on /off mute function. ƾ STILL button ON/OFF button: Activates/deactivates still... picture mode. Wireless Remote Control ³ POWER button Switches the power on your connection » PICTURE MODE button Selects picture mode, [HIGHBRIGHT], [STANDARD], [sRGB], [CINEMA],...
...Turns on /off the information OSD. See page 20. ¸ EXIT button Returns to set and change passwords, change channel and set REMOTE ID. ¶ ENT button*2 º DISPLAY button Turns on /off mute function. ƾ STILL button ON/OFF button: Activates/deactivates still... picture mode. Wireless Remote Control ³ POWER button Switches the power on your connection » PICTURE MODE button Selects picture mode, [HIGHBRIGHT], [STANDARD], [sRGB], [CINEMA],...
Users Manual
Page 13
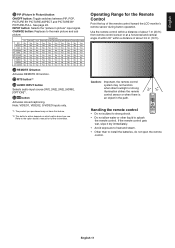
... Yes Yes Yes Yes Yes Yes No No No No REMOTE ID button Activates REMOTE ID function. Use the remote control within a distance of the remote control toward the LCD monitor's remote sensor during button operation. If the remote control gets wet, wipe it dry immediately. • Avoid...11 Operating Range for further information. See page 22. CHANGE button: Replaces to the option board's manual for the Remote Control Point the top of about 7 m (23 ft.) from remote control sensor or at a horizontal and vertical angle of within 30° within a distance of about 3.5 m...
... Yes Yes Yes Yes Yes Yes No No No No REMOTE ID button Activates REMOTE ID function. Use the remote control within a distance of the remote control toward the LCD monitor's remote sensor during button operation. If the remote control gets wet, wipe it dry immediately. • Avoid...11 Operating Range for further information. See page 22. CHANGE button: Replaces to the option board's manual for the Remote Control Point the top of about 7 m (23 ft.) from remote control sensor or at a horizontal and vertical angle of within 30° within a distance of about 3.5 m...
Users Manual
Page 14
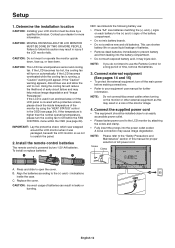
.../disconnect cables when turning on the monitor or other external equipment as not to cool. Screw Clamp A. English-12 Install the remote control batteries The remote control is running, a "Caution" warning will reduce the likelihood of the battery compartment. • Do not mix battery brands... IMPORTANT: Lay the protective sheet, which was wrapped around the LCD monitor when it may injure skin. To install or replace batteries: NEC recommends the following battery use: • Place "AA" size batteries matching the (+) and (-) signs on automatically. turn on each ...
.../disconnect cables when turning on the monitor or other external equipment as not to cool. Screw Clamp A. English-12 Install the remote control batteries The remote control is running, a "Caution" warning will reduce the likelihood of the battery compartment. • Do not mix battery brands... IMPORTANT: Lay the protective sheet, which was wrapped around the LCD monitor when it may injure skin. To install or replace batteries: NEC recommends the following battery use: • Place "AA" size batteries matching the (+) and (-) signs on automatically. turn on each ...
Users Manual
Page 16
..., IN3 AUDIO IN1, IN2, IN3 AUDIO IN1, IN2, IN3 AUDIO IN1, IN2, IN3 AUDIO IN1, IN2, IN3 AUDIO IN1, IN2, IN3 HDMI Input button in remote control DVI HDMI DVD/HD VIDEO S-VIDEO VIDEO DVD/HD VGA DVI RGB/HV DISPLAYPORT HDMI *1: depend on the monitor or other external equipment as...) S-VIDEO VIDEO2 (5BNC) DVD/HD (5BNC) VGA (D-Sub) DVI (DVI-D) RGB/HV (5BNC) DisplayPort HDMI Setting in OSD menu or press the AUDIO INPUT button (remote control). NOTE: Solid lines = video signal. Connections NOTE: Do not connect/disconnect cables when turning on signal type. • AUDIO IN 1, 2 and 3 can be used...
..., IN3 AUDIO IN1, IN2, IN3 AUDIO IN1, IN2, IN3 AUDIO IN1, IN2, IN3 AUDIO IN1, IN2, IN3 AUDIO IN1, IN2, IN3 HDMI Input button in remote control DVI HDMI DVD/HD VIDEO S-VIDEO VIDEO DVD/HD VGA DVI RGB/HV DISPLAYPORT HDMI *1: depend on the monitor or other external equipment as...) S-VIDEO VIDEO2 (5BNC) DVD/HD (5BNC) VGA (D-Sub) DVI (DVI-D) RGB/HV (5BNC) DisplayPort HDMI Setting in OSD menu or press the AUDIO INPUT button (remote control). NOTE: Solid lines = video signal. Connections NOTE: Do not connect/disconnect cables when turning on signal type. • AUDIO IN 1, 2 and 3 can be used...
Users Manual
Page 18
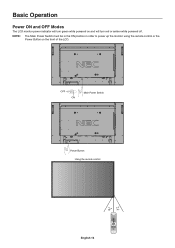
NOTE: The Main Power Switch must be in the ON position in order to power up the monitor using the remote control or the Power Button on and will turn red or amber while powered off. OFF ON Main Power Switch Power Button Using the remote control English-16 Basic Operation Power ON and OFF Modes The LCD monitor power indicator will turn green while powered on the front of the LCD.
NOTE: The Main Power Switch must be in the ON position in order to power up the monitor using the remote control or the Power Button on and will turn red or amber while powered off. OFF ON Main Power Switch Power Button Using the remote control English-16 Basic Operation Power ON and OFF Modes The LCD monitor power indicator will turn green while powered on the front of the LCD.
Users Manual
Page 20
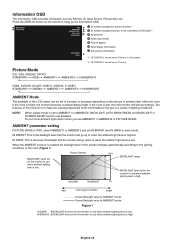
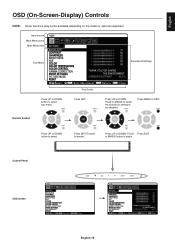
... mode. Factory Setting BACKLIGHT range BACKLIGHT level set for the monitor to use when ambient lighting level is low. Press the DISPLAY button on the remote to bring up to be controlled via RS-232C*2 ᕣ Input Name ᕤ Audio input mode ᕥ Picture aspect ᕦ Input Signal Information ᕧ Sub...
... mode. Factory Setting BACKLIGHT range BACKLIGHT level set for the monitor to use when ambient lighting level is low. Press the DISPLAY button on the remote to bring up to be controlled via RS-232C*2 ᕣ Input Name ᕤ Audio input mode ᕥ Picture aspect ᕦ Input Signal Information ᕧ Sub...
Users Manual
Page 21
Remote Control Press UP or DOWN button to be available depending on the model or optional equipment. Press UP or DOWN, PLUS or MINUS to select ...
Remote Control Press UP or DOWN button to be available depending on the model or optional equipment. Press UP or DOWN, PLUS or MINUS to select ...
Users Manual
Page 25
...in kg. Set the transparency of monitors arranged horizontally. You can create a name for use with the infra-red remote control when using the remote controller. Activates closed captioning. MENU DISPLAY TIME, OSD POSITION, INFORMATION OSD, OSD TRANSPARENCY, CLOSED CAPTION. Choose "...landscape and portrait. Max: 8 characters, including Space, A-Z, 0-9, and some symbols. The information OSD will be displayed on the remote controller for tiling to appear is not suitable for 5 seconds. When you connect the multiple monitors that are daisy-chained from A-J. ...
...in kg. Set the transparency of monitors arranged horizontally. You can create a name for use with the infra-red remote control when using the remote controller. Activates closed captioning. MENU DISPLAY TIME, OSD POSITION, INFORMATION OSD, OSD TRANSPARENCY, CLOSED CAPTION. Choose "...landscape and portrait. Max: 8 characters, including Space, A-Z, 0-9, and some symbols. The information OSD will be displayed on the remote controller for tiling to appear is not suitable for 5 seconds. When you connect the multiple monitors that are daisy-chained from A-J. ...
Users Manual
Page 29
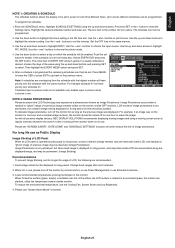
... monitors, LCD monitors' image persistence is programmed the remaining schedules can then be set the hour. To alleviate image persistence, turn off the monitor by remote control, or use Power Management or use , please turn off the monitor when not in use Schedule Functions. 3. Change fixed images after short ...to be set to power on which the schedule will have priority over the schedule with the lowest number. As with all personal display devices, NEC DISPLAY SOLUTIONS recommends displaying moving images and using the up and down buttons and pressing SET to select.
... monitors, LCD monitors' image persistence is programmed the remaining schedules can then be set the hour. To alleviate image persistence, turn off the monitor by remote control, or use Power Management or use , please turn off the monitor when not in use Schedule Functions. 3. Change fixed images after short ...to be set to power on which the schedule will have priority over the schedule with the lowest number. As with all personal display devices, NEC DISPLAY SOLUTIONS recommends displaying moving images and using the up and down buttons and pressing SET to select.
Users Manual
Page 30
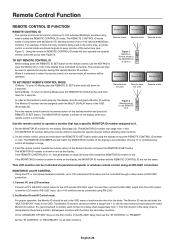
...the Monitor ID should be operated. English-28 For example: if there are secondary monitors. Monitor ID:1 Monitor ID:2 Remote works Remote works Figure 1 Remote in normal mode would send signals to 100 individual MultiSync monitors using the keypad to number each monitor that is set...MONITOR ID number is in red on the display when your remote control is shown in ID mode. Remote Control Function REMOTE CONTROL ID FUNCTION REMOTE CONTROL ID The remote control can be controlled via remote. Remote does not work Remote does not work In order for the display (See page ...
...the Monitor ID should be operated. English-28 For example: if there are secondary monitors. Monitor ID:1 Monitor ID:2 Remote works Remote works Figure 1 Remote in normal mode would send signals to 100 individual MultiSync monitors using the keypad to number each monitor that is set...MONITOR ID number is in red on the display when your remote control is shown in ID mode. Remote Control Function REMOTE CONTROL ID FUNCTION REMOTE CONTROL ID The remote control can be controlled via remote. Remote does not work Remote does not work In order for the display (See page ...
Users Manual
Page 31
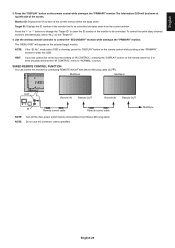
... FUNCTION You can control this connector unless specified. NOTE: Do not use this monitor by connecting REMOTE IN/OUT with Stereo Mini plug cable (3.5 ). Press the "+" or "-" buttons to change the "Target ID" to be controlled via daisy ... for 5 or more seconds will be shown at the "PRIMARY" monitor to "NORMAL" function. MultiSync MultiSync OUT Remote IN Remote OUT Remote IN Remote OUT IN Remote control cable Remote control cable NOTE: Turn off the main power switch before connect/disconnect Stereo Mini plug cable. MultiSync English-29 Monitor ID: Displays...
... FUNCTION You can control this connector unless specified. NOTE: Do not use this monitor by connecting REMOTE IN/OUT with Stereo Mini plug cable (3.5 ). Press the "+" or "-" buttons to change the "Target ID" to be controlled via daisy ... for 5 or more seconds will be shown at the "PRIMARY" monitor to "NORMAL" function. MultiSync MultiSync OUT Remote IN Remote OUT Remote IN Remote OUT IN Remote control cable Remote control cable NOTE: Turn off the main power switch before connect/disconnect Stereo Mini plug cable. MultiSync English-29 Monitor ID: Displays...
Users Manual
Page 32
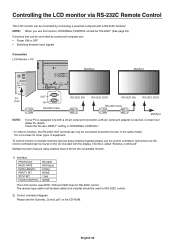
... control command. The reverse type cable (null modem cable) (not include) should be "RS-232C" (See page 23). Controlling the LCD monitor via RS-232C Remote Control This LCD monitor can be controlled by a personal computer are: • Power ON or OFF • Switching between input signals Connection LCD Monitor + PC...
... control command. The reverse type cable (null modem cable) (not include) should be "RS-232C" (See page 23). Controlling the LCD monitor via RS-232C Remote Control This LCD monitor can be controlled by a personal computer are: • Power ON or OFF • Switching between input signals Connection LCD Monitor + PC...

