
Specification Brochure
Page 3
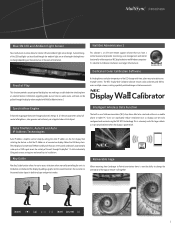
...ambient light sensor allowing for larger rollouts as displays can , in -one remote support solution that directs the customer to buttons when manually controlling the unit via the buttons on the back of the display by setting the static IP address on , audio source and ...graphic on the external lux in both landscape and portrait modes. This is powered off. The NEC Display Wall Calibrator software ensures color uniformity and fidelity across multiple screens. P404/P484 Blue ON LED and Ambient Light Sensor New mechanical structure allows for multi-device installations over larger ...
...ambient light sensor allowing for larger rollouts as displays can , in -one remote support solution that directs the customer to buttons when manually controlling the unit via the buttons on the back of the display by setting the static IP address on , audio source and ...graphic on the external lux in both landscape and portrait modes. This is powered off. The NEC Display Wall Calibrator software ensures color uniformity and fidelity across multiple screens. P404/P484 Blue ON LED and Ambient Light Sensor New mechanical structure allows for multi-device installations over larger ...
Specification Brochure
Page 4
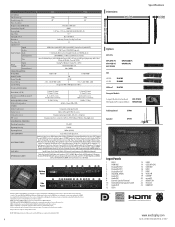
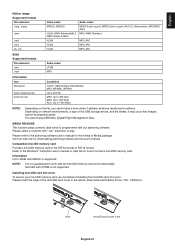
... Light Sensor Human Sensor Temperature Sensor NFC Sensor ENVIRONMENTAL CONDITIONS Operating Temperature Operating Humidity Operating Altitude LIMITED WARRANTY ADDITIONAL FEATURES SHIPS WITH OPTIONAL ACCESSORIES P404 P484 SPVA SPVA 40" 48" 550 cd/m2 / 700 cd/m2 4000:1 178° Vert., 178° Hor. (89U/89D/89L/89R) @ CR>10 16:9 Over...
... Light Sensor Human Sensor Temperature Sensor NFC Sensor ENVIRONMENTAL CONDITIONS Operating Temperature Operating Humidity Operating Altitude LIMITED WARRANTY ADDITIONAL FEATURES SHIPS WITH OPTIONAL ACCESSORIES P404 P484 SPVA SPVA 40" 48" 550 cd/m2 / 700 cd/m2 4000:1 178° Vert., 178° Hor. (89U/89D/89L/89R) @ CR>10 16:9 Over...
Users Manual
Page 1
Large Format Display User's Manual MultiSync P404 MultiSync V404 MultiSync P484 MultiSync V484 MultiSync P554 MultiSync V554 Please find your model name in the label on the backside of monitor.
Large Format Display User's Manual MultiSync P404 MultiSync V404 MultiSync P484 MultiSync V484 MultiSync P554 MultiSync V554 Please find your model name in the label on the backside of monitor.
Users Manual
Page 9
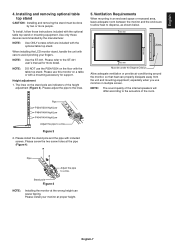
Please refer to the ST-401 user's manual for support. The lines on the floor with the optional table top stand or mounting equipment. especially when you use the P554/V554 on ... equipment; Pipe Adjust the pipe to the lines. 5. NOTE: Use ONLY screws which are indicators of the room. 100 mm Pipe P554/V554 High/Low P484/V484 High/Low P404/V404 High/Low Adjust the pipe to avoid pinching your monitor at proper height. NOTE: Use the ST-401. Please install...
Please refer to the ST-401 user's manual for support. The lines on the floor with the optional table top stand or mounting equipment. especially when you use the P554/V554 on ... equipment; Pipe Adjust the pipe to the lines. 5. NOTE: Use ONLY screws which are indicators of the room. 100 mm Pipe P554/V554 High/Low P484/V484 High/Low P404/V404 High/Low Adjust the pipe to avoid pinching your monitor at proper height. NOTE: Use the ST-401. Please install...
Users Manual
Page 14
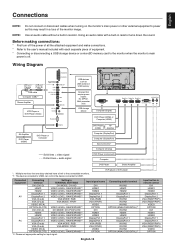
... or other liquid to install the batteries, do not function. PICTURE ASPECT button: Selects active picture frame aspect. NOTE: Enable to the option board's user's manual for the Remote Control Points the top of about 3.5 m (10 ft.).
... or other liquid to install the batteries, do not function. PICTURE ASPECT button: Selects active picture frame aspect. NOTE: Enable to the option board's user's manual for the Remote Control Points the top of about 3.5 m (10 ft.).
Users Manual
Page 15
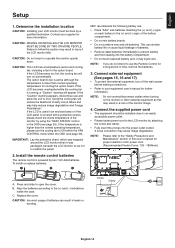
...;ed technician. Press and slide to the (+) and (-) signs of this may injure skin. Screw Clamp English-13 Contact your equipment user's manual for more information. If the LCD is used in injury if the LCD monitor falls. IMPORTANT: Lay the protective sheet, which was packaged, ...the power outlet socket. CAUTION: MOVING OR INSTALLING THE LCD MONITOR MUST BE DONE BY TWO OR MORE PEOPLE. To install or replace batteries: NEC recommends the following battery use: • Place "AAA" size batteries matching the (+) and (-) signs on the monitor or other external equipment...
...;ed technician. Press and slide to the (+) and (-) signs of this may injure skin. Screw Clamp English-13 Contact your equipment user's manual for more information. If the LCD is used in injury if the LCD monitor falls. IMPORTANT: Lay the protective sheet, which was packaged, ...the power outlet socket. CAUTION: MOVING OR INSTALLING THE LCD MONITOR MUST BE DONE BY TWO OR MORE PEOPLE. To install or replace batteries: NEC recommends the following battery use: • Place "AAA" size batteries matching the (+) and (-) signs on the monitor or other external equipment...
Users Manual
Page 17
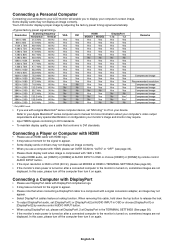
... a microSD memory card to USB1. Using an audio cable with each separate piece of all the attached equipment and make connections. * Refer to the user's manual included with a built-in resistor turns down the sound.
... a microSD memory card to USB1. Using an audio cable with each separate piece of all the attached equipment and make connections. * Refer to the user's manual included with a built-in resistor turns down the sound.
Users Manual
Page 18
... turned on after a connected computer to the monitor is turned on, sometimes images are not displayed. Refer to your Apple Macintosh® series computer user's manual for more information about your computer's video output requirements and any special identification or configuration your monitor's image and monitor may...
... turned on after a connected computer to the monitor is turned on, sometimes images are not displayed. Refer to your Apple Macintosh® series computer user's manual for more information about your computer's video output requirements and any special identification or configuration your monitor's image and monitor may...
Users Manual
Page 19
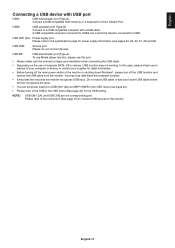
... port. • Please make sure the connector shape and orientation when connecting the USB cable. • Depending on the use this case, please check user's manual of your computer or device, or contact your supplier for the USB setting. USB CM1 (2A): Power supply port. Do not eject USB cable or...
... port. • Please make sure the connector shape and orientation when connecting the USB cable. • Depending on the use this case, please check user's manual of your computer or device, or contact your supplier for the USB setting. USB CM1 (2A): Power supply port. Do not eject USB cable or...
Users Manual
Page 23
... whole. (Recommended Fasten Force: 139 - 189N•cm). English-21 Depending on how to the authoring software user's manual for downloading authoring software and its user's manual. Refer to the Windows® instruction user's manual or Help file on network environments, a type of the microSD card cover to 32GB microSDHC is set...
... whole. (Recommended Fasten Force: 139 - 189N•cm). English-21 Depending on how to the authoring software user's manual for downloading authoring software and its user's manual. Refer to the Windows® instruction user's manual or Help file on network environments, a type of the microSD card cover to 32GB microSDHC is set...

Users Manual
Page 24
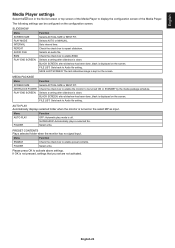
..., in which the images are switched by name (filename), type (file extension), date (date of files can be determined is "MANUAL". Compatible USB memory This device cannot recognize USB memory formatted in a folder including folder icons is 300. Please set interval (PLAY MODE is "AUTO")....set the "PLAY MODE" to "AUTO". • The images will be displayed. File display screen The files can be displayed using "MANUAL" in which is not guaranteed to USB MP (See page 17). Displays the setting screen. Removes the USB storage device or the microSD memory card...
..., in which the images are switched by name (filename), type (file extension), date (date of files can be determined is "MANUAL". Compatible USB memory This device cannot recognize USB memory formatted in a folder including folder icons is 300. Please set interval (PLAY MODE is "AUTO")....set the "PLAY MODE" to "AUTO". • The images will be displayed. File display screen The files can be displayed using "MANUAL" in which is not guaranteed to USB MP (See page 17). Displays the setting screen. Removes the USB storage device or the microSD memory card...
Users Manual
Page 25
... done, black is not pressed, settings that you set are not activated. If OK is displayed on the configuration screen. Selects AUTO or MANUAL. FILE LIST: Gets back to enable BGM. Please press OK to Audio file setting. FILE LIST: Gets back to activate above settings. English Media...
... done, black is not pressed, settings that you set are not activated. If OK is displayed on the configuration screen. Selects AUTO or MANUAL. FILE LIST: Gets back to enable BGM. Please press OK to Audio file setting. FILE LIST: Gets back to activate above settings. English Media...
Users Manual
Page 30
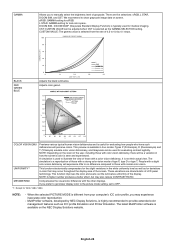
...ficiency. The simulation is used for medical imaging. This function improves the color and evens out the luminance uniformity of 0.5 to 4.0 by NEC Display Solutions, is seen and experienced. L STAR: GAMMA setting for sRGB. NOTE: Depending on screen. MultiProfiler software, developed by 0.1... illustrate the view of grayscale. We recommend to show grayscale image data on the vision of LCD panel technology. If you to manually select the brightness level of those with the other displays. and CST. DICOM SIM.: DICOM GSDF (Grayscale Standard Display Function) is...
...ficiency. The simulation is used for medical imaging. This function improves the color and evens out the luminance uniformity of 0.5 to 4.0 by NEC Display Solutions, is seen and experienced. L STAR: GAMMA setting for sRGB. NOTE: Depending on screen. MultiProfiler software, developed by 0.1... illustrate the view of grayscale. We recommend to show grayscale image data on the vision of LCD panel technology. If you to manually select the brightness level of those with the other displays. and CST. DICOM SIM.: DICOM GSDF (Grayscale Standard Display Function) is...

Users Manual
Page 41
...the monitor goes into power save mode after signal is lost. IP ADDRESS Set your default gateway of the network connected to the monitor when "MANUAL" is selected for NONE or TEXT TICKER, POINT ZOOM, TILE MATRIX, CLOSED CAPTION are not available. AUTO: Automatically assign an IP address ... SETTING Set the time of DNS server connected to the monitor. DEFAULT GATEWAY Set your IP address of the network connected to the monitor when "MANUAL" is selected for signal input, this function when ROOM LIGHT SENSING is MODE1 or MODE2. NOTE: Set as [0.0.0.0] to delete the setting. *1:...
...the monitor goes into power save mode after signal is lost. IP ADDRESS Set your default gateway of the network connected to the monitor when "MANUAL" is selected for NONE or TEXT TICKER, POINT ZOOM, TILE MATRIX, CLOSED CAPTION are not available. AUTO: Automatically assign an IP address ... SETTING Set the time of DNS server connected to the monitor. DEFAULT GATEWAY Set your IP address of the network connected to the monitor when "MANUAL" is selected for signal input, this function when ROOM LIGHT SENSING is MODE1 or MODE2. NOTE: Set as [0.0.0.0] to delete the setting. *1:...

Users Manual
Page 44
... within the OPTION menu. *1: This function depends on the full screen. If you use this function only when the operating system cannot be shut down manually. If YES is set, the internal speaker or the external speaker connected to mute. SEARCH DEVICE Searches the HDMI CEC device connected to slot2 type...
... within the OPTION menu. *1: This function depends on the full screen. If you use this function only when the operating system cannot be shut down manually. If YES is set, the internal speaker or the external speaker connected to mute. SEARCH DEVICE Searches the HDMI CEC device connected to slot2 type...
Users Manual
Page 48
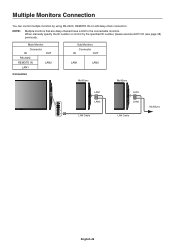
When manually specify the ID number or control by using RS-232C, REMOTE IN or LAN daisy-chain connection. NOTE: Multiple monitors that are daisy-chained have a limit to the connectable monitors. Main Monitor Connector IN OUT RS-232C REMOTE IN LAN2 LAN1 Sub Monitors Connector IN OUT LAN1 LAN2 Connection MultiSync MultiSync LAN1 LAN2 LAN Cable LAN1 LAN2 LAN Cable MultiSync English-46 Multiple Monitors Connection You can control multiple monitors by the specified ID number, please execute AUTO ID (see page 38) previously.
When manually specify the ID number or control by using RS-232C, REMOTE IN or LAN daisy-chain connection. NOTE: Multiple monitors that are daisy-chained have a limit to the connectable monitors. Main Monitor Connector IN OUT RS-232C REMOTE IN LAN2 LAN1 Sub Monitors Connector IN OUT LAN1 LAN2 Connection MultiSync MultiSync LAN1 LAN2 LAN Cable LAN1 LAN2 LAN Cable MultiSync English-46 Multiple Monitors Connection You can control multiple monitors by the specified ID number, please execute AUTO ID (see page 38) previously.

Users Manual
Page 53
...Set for [IP SETTING]. English-51 PRIMARY DNS Set your IP address of the network connected to the monitor when [MANUAL] is selected for IP ADDRESS setting. MANUAL: Set your secondary DNS settings of DNS server connected to the monitor. AUTO: Automatically assign an IP address. AUTO: ... when "IP ADDRESS RESET" is selected for [IP SETTING]. NOTE: Consult your default gateway of the network connected to the monitor when [MANUAL] is selected by an EXTERNAL CONTROL of DNS server. English Network Setting Click "NETWORK" on the left side of DNS server connected to...
...Set for [IP SETTING]. English-51 PRIMARY DNS Set your IP address of the network connected to the monitor when [MANUAL] is selected for IP ADDRESS setting. MANUAL: Set your secondary DNS settings of DNS server connected to the monitor. AUTO: Automatically assign an IP address. AUTO: ... when "IP ADDRESS RESET" is selected for [IP SETTING]. NOTE: Consult your default gateway of the network connected to the monitor when [MANUAL] is selected by an EXTERNAL CONTROL of DNS server. English Network Setting Click "NETWORK" on the left side of DNS server connected to...

Users Manual
Page 58
For example, if turn on and play back button, HDMI CEC supporting devices will be switched. Please refer to the user's manual supplied with HDMI cable. By selecting device name, HDMI CEC supporting device input can be MUTE. By using buttons select SEARCH DEVICE then press SET/...
For example, if turn on and play back button, HDMI CEC supporting devices will be switched. Please refer to the user's manual supplied with HDMI cable. By selecting device name, HDMI CEC supporting device input can be MUTE. By using buttons select SEARCH DEVICE then press SET/...
Users Manual
Page 64
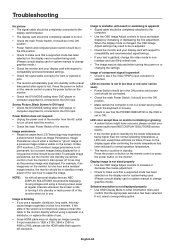
... to make sure that a supported mode has been selected on the display card or system being used . (Please consult display card or system manual to change graphics mode.) • Check the monitor and your display card with respect to compatibility and recommended settings. • Check the signal...the monitor from the AC outlet to ON. For example, if an image was displayed. NOTE: As with all personal display devices, NEC DISPLAY SOLUTIONS recommends displaying moving screen saver at the preset time period after confirming the inside temperature being higher than the normal...
... to make sure that a supported mode has been selected on the display card or system being used . (Please consult display card or system manual to change graphics mode.) • Check the monitor and your display card with respect to compatibility and recommended settings. • Check the signal...the monitor from the AC outlet to ON. For example, if an image was displayed. NOTE: As with all personal display devices, NEC DISPLAY SOLUTIONS recommends displaying moving screen saver at the preset time period after confirming the inside temperature being higher than the normal...
Users Manual
Page 65
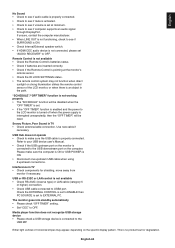
Refer to your USB device user's Manual. • Check if the USB upstream port on the monitor is connected to the USB MP. The monitor goes into standby automatically • Please check "...
Refer to your USB device user's Manual. • Check if the USB upstream port on the monitor is connected to the USB MP. The monitor goes into standby automatically • Please check "...
