V Series Specification Brochure
Page 1
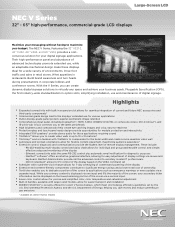
... an adaptable mechanical design make these displays ideal for your secondary ticker information can create dynamic digital signage solutions in retail stores. Pluggable Specification (OPS), the first industry-wide standardization in option slots, simplifying installation, use for various applications • Public-display-grade panel protects against permanent image retention • Comprehensive input panel, including DisplayPort*, HDMI, 5 BNC (RGBHV, DVD/HD, or composite video...
... an adaptable mechanical design make these displays ideal for your secondary ticker information can create dynamic digital signage solutions in retail stores. Pluggable Specification (OPS), the first industry-wide standardization in option slots, simplifying installation, use for various applications • Public-display-grade panel protects against permanent image retention • Comprehensive input panel, including DisplayPort*, HDMI, 5 BNC (RGBHV, DVD/HD, or composite video...
V Series Specification Brochure
Page 2
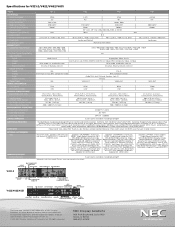
...MODEL LCD MODULE Panel Technology Viewable Image Size Native Resolution Brightness (Typical) Contrast Ratio (Typical) Viewing Angle Response Time (G-to-G) Aspect Ratio Active Screen Area (W x H) Orientation Displayable Colors CONNECTIVITY Supported Video Formats PC/Mac Signal Compatibility Input Terminals Digital Analog Audio External Control Output Terminals Digital Analog Audio External Control Digital Tuner POWER CONSUMPTiON On (Typical) ECO Mode Standby PHYSICAL SPECIFICATIONS Bezel Width (L/R, T/B) Net Dimensions (without stand) VESA Hole Configuration ENVIRONMENTAL CONDITIONS Operating...
...MODEL LCD MODULE Panel Technology Viewable Image Size Native Resolution Brightness (Typical) Contrast Ratio (Typical) Viewing Angle Response Time (G-to-G) Aspect Ratio Active Screen Area (W x H) Orientation Displayable Colors CONNECTIVITY Supported Video Formats PC/Mac Signal Compatibility Input Terminals Digital Analog Audio External Control Output Terminals Digital Analog Audio External Control Digital Tuner POWER CONSUMPTiON On (Typical) ECO Mode Standby PHYSICAL SPECIFICATIONS Bezel Width (L/R, T/B) Net Dimensions (without stand) VESA Hole Configuration ENVIRONMENTAL CONDITIONS Operating...

Press Release
Page 2
... (V422-AVT only) Optional accessories and products include stands, wall mounts, external PCs and media players It truly lets each user customize the installation for the projects to set schedules for display on/off times and warmup 30 minutes before use for optimum color representation Text ticker enables the display of emergency warnings or breaking news updates in a dedicated portion of the screen Programmable lookup tables...
... (V422-AVT only) Optional accessories and products include stands, wall mounts, external PCs and media players It truly lets each user customize the installation for the projects to set schedules for display on/off times and warmup 30 minutes before use for optimum color representation Text ticker enables the display of emergency warnings or breaking news updates in a dedicated portion of the screen Programmable lookup tables...
Users Manual
Page 2
... Use English-3 Contents ...English-4 Installation ...English-5 Attaching Mounting Accessories ...English-6 Parts Name and Functions...English-8 Control Panel ...English-8 Terminal Panel ...English-9 Wireless Remote Control ...English-11 Operating Range for the Remote Control English-12 Setup ...English-13 Connections ...English-15 Wiring Diagram ...English-15 Connecting a Personal Computer English-16 Connecting a DVD Player or Computer with HDMI out English-16 Connecting a Computer with DisplayPort English-16 Basic Operation...English-17 Power ON and OFF Modes ...English...
... Use English-3 Contents ...English-4 Installation ...English-5 Attaching Mounting Accessories ...English-6 Parts Name and Functions...English-8 Control Panel ...English-8 Terminal Panel ...English-9 Wireless Remote Control ...English-11 Operating Range for the Remote Control English-12 Setup ...English-13 Connections ...English-15 Wiring Diagram ...English-15 Connecting a Personal Computer English-16 Connecting a DVD Player or Computer with HDMI out English-16 Connecting a Computer with DisplayPort English-16 Basic Operation...English-17 Power ON and OFF Modes ...English...

Users Manual
Page 5
... Electrical Code (NEC), in the building installation. * The product you to earth in particular Section 820.93, Grounding of Outer Conductive Shield of detaching the system from the wall outlet and refer servicing to enhance readability. • Avoid displaying fixed patterns on monitor. • Use the preset Color Setting. • Do not use a BS-approved power cord with molded plug having a black (13A) fuse installed for...
... Electrical Code (NEC), in the building installation. * The product you to earth in particular Section 820.93, Grounding of Outer Conductive Shield of detaching the system from the wall outlet and refer servicing to enhance readability. • Avoid displaying fixed patterns on monitor. • Use the preset Color Setting. • Do not use a BS-approved power cord with molded plug having a black (13A) fuse installed for...
Users Manual
Page 6
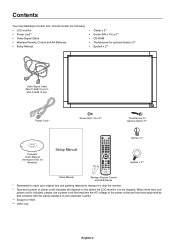
... ship the monitor. *1 Type and number of power cords included will depend on the where the LCD monitor is to Mini D-SUB 15 pin) Power Cord*1 Screw (M4 x 10) x 2*2 Thumbscrew for optional stand x 2*2 Complete User's Manual Information Files for V651. *3 V651 only. Contents Your new MultiSync monitor box* should contain the following: • LCD monitor • Power cord*1 • Video Signal Cable • Wireless Remote Control and AA Batteries • Setup Manual • Clamp x 2*2 • Screw (M4 x 10...
... ship the monitor. *1 Type and number of power cords included will depend on the where the LCD monitor is to Mini D-SUB 15 pin) Power Cord*1 Screw (M4 x 10) x 2*2 Thumbscrew for optional stand x 2*2 Complete User's Manual Information Files for V651. *3 V651 only. Contents Your new MultiSync monitor box* should contain the following: • LCD monitor • Power cord*1 • Video Signal Cable • Wireless Remote Control and AA Batteries • Setup Manual • Clamp x 2*2 • Screw (M4 x 10...
Users Manual
Page 10
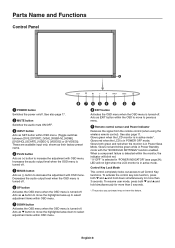
... Power Standby mode with the "SCHEDULE SETTINGS" function enabled. To resume user mode, press both and and hold down to previous menu. ¾ Remote control sensor and Power Indicator Receives the signal from the remote control (when using the wireless remote control). Glows both and and hold simultaneously for more than 3 seconds. English-8 Glows green when the LCD monitor is turned-off . To activate the control key lock function, press both green and red when the monitor is turned...
... Power Standby mode with the "SCHEDULE SETTINGS" function enabled. To resume user mode, press both and and hold down to previous menu. ¾ Remote control sensor and Power Indicator Receives the signal from the remote control (when using the wireless remote control). Glows both and and hold simultaneously for more than 3 seconds. English-8 Glows green when the LCD monitor is turned-off . To activate the control key lock function, press both green and red when the monitor is turned...
Users Manual
Page 11
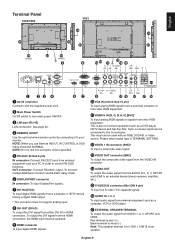
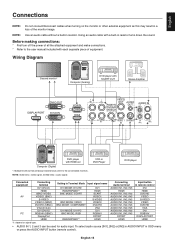
... used with the supplied power cord. · Main Power Switch On/Off switch to control RS-232C functions. Black terminal is also to an external device (stereo receiver, amplifier, etc.). ƺ S-VIDEO IN connector (Mini DIN 4 pin) To input the S-video (Y/C separate signal). ƻ AUDIO IN 1, 2, 3 To input audio signal from external equipment such as a PC in order to turn main power ON/OFF. » LAN port (RJ-45) LAN connection. To output...
... used with the supplied power cord. · Main Power Switch On/Off switch to control RS-232C functions. Black terminal is also to an external device (stereo receiver, amplifier, etc.). ƺ S-VIDEO IN connector (Mini DIN 4 pin) To input the S-video (Y/C separate signal). ƻ AUDIO IN 1, 2, 3 To input audio signal from external equipment such as a PC in order to turn main power ON/OFF. » LAN port (RJ-45) LAN connection. To output...
Users Manual
Page 13
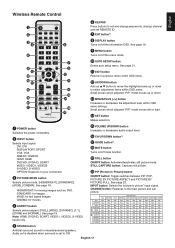
... your connection ƺ VOLUME UP/DOWN button Increases or decreases audio output level. ƻ CH UP/DOWN button*2 Ƽ GUIDE button*2 ƽ MUTE button Turns on /off the menu mode. µ AUTO SETUP button Enters auto setup menu. STANDARD: for movies. ¿ ASPECT button Selects picture aspect, [FULL], [WIDE], [DYNAMIC], [1:1], [ZOOM] and [NORMAL]. sRGB: for internal/external speakers. INPUT button: Selects the "picture in picture" input signal. See page 19. English-11 Wireless Remote Control English ² KEYPAD Press buttons to set and change passwords, change channel...
... your connection ƺ VOLUME UP/DOWN button Increases or decreases audio output level. ƻ CH UP/DOWN button*2 Ƽ GUIDE button*2 ƽ MUTE button Turns on /off the menu mode. µ AUTO SETUP button Enters auto setup menu. STANDARD: for movies. ¿ ASPECT button Selects picture aspect, [FULL], [WIDE], [DYNAMIC], [1:1], [ZOOM] and [NORMAL]. sRGB: for internal/external speakers. INPUT button: Selects the "picture in picture" input signal. See page 19. English-11 Wireless Remote Control English ² KEYPAD Press buttons to set and change passwords, change channel...
Users Manual
Page 15
... of the monitor by using the "HEAT STATUS" control in an enclosed area or if the LCD panel is powered by a qualified technician. To install or replace batteries: NEC recommends the following battery use: • Place "AA" size batteries matching the (+) and (-) signs on each battery to your equipment user manual for more information. turn on the monitor or other external equipment as not...
... of the monitor by using the "HEAT STATUS" control in an enclosed area or if the LCD panel is powered by a qualified technician. To install or replace batteries: NEC recommends the following battery use: • Place "AA" size batteries matching the (+) and (-) signs on each battery to your equipment user manual for more information. turn on the monitor or other external equipment as not...
Users Manual
Page 17
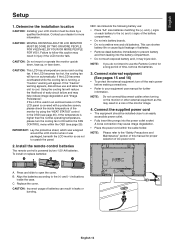
...: Do not connect/disconnect cables when turning on signal type. • AUDIO IN 1, 2 and 3 can be used for audio input. VCR or DVD Player DVD player Connected equipment AV PC Connecting terminal DVI (DVI-D) HDMI 5BNC+VIDEO VIDEO1 (BNC) S-VIDEO VIDEO2 (5BNC) DVD/HD (5BNC) VGA (D-Sub) DVI (DVI-D) RGB/HV (5BNC) DisplayPort HDMI Setting in remote control DVI HDMI DVD/HD VIDEO S-VIDEO VIDEO DVD/HD VGA DVI RGB/HV DISPLAYPORT HDMI *1: depend on the monitor or other external equipment as...
...: Do not connect/disconnect cables when turning on signal type. • AUDIO IN 1, 2 and 3 can be used for audio input. VCR or DVD Player DVD player Connected equipment AV PC Connecting terminal DVI (DVI-D) HDMI 5BNC+VIDEO VIDEO1 (BNC) S-VIDEO VIDEO2 (5BNC) DVD/HD (5BNC) VGA (D-Sub) DVI (DVI-D) RGB/HV (5BNC) DisplayPort HDMI Setting in remote control DVI HDMI DVD/HD VIDEO S-VIDEO VIDEO DVD/HD VGA DVI RGB/HV DISPLAYPORT HDMI *1: depend on the monitor or other external equipment as...
Users Manual
Page 24
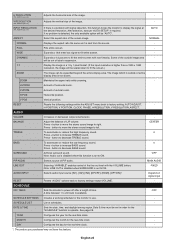
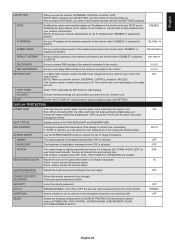
... the entire screen with the VOLUME button. If no problem is not shown. FULL Fills entire screen. - DYNAMIC Expands a 4:3 pictures to display the signal at the desired resolution. ZOOM Maintains the aspect ratio while zooming. - H POSITION, V POSITION, CLOCK, PHASE, H RESOLUTION, V RESOLUTION, ASPECT. Press - button to move the stereo sound image to ON. OFF PIP AUDIO Selects source of the screen image. Depend on signal input RESET Resets "AUDIO" options back to factory setting: AUTO ADJUST, - See...
... the entire screen with the VOLUME button. If no problem is not shown. FULL Fills entire screen. - DYNAMIC Expands a 4:3 pictures to display the signal at the desired resolution. ZOOM Maintains the aspect ratio while zooming. - H POSITION, V POSITION, CLOCK, PHASE, H RESOLUTION, V RESOLUTION, ASPECT. Press - button to move the stereo sound image to ON. OFF PIP AUDIO Selects source of the screen image. Depend on signal input RESET Resets "AUDIO" options back to factory setting: AUTO ADJUST, - See...
Users Manual
Page 26
... mode. MENU DISPLAY TIME, OSD POSITION, INFORMATION OSD, OSD TRANSPARENCY, CLOSED CAPTION. Allows one image to be displayed when the input signal or source changes. LANDSCAPE Display the OSD with portrait mode. Max: 8 characters, including Space, A-Z, 0-9, and some symbols. Turns ON or OFF the LED located at a lower number of the monitor. Selects the mode of ASPECT becomes invalid. Number of your monitor. - RS-232C - Indicates the model and serial number of monitors arranged vertically. Set...
... mode. MENU DISPLAY TIME, OSD POSITION, INFORMATION OSD, OSD TRANSPARENCY, CLOSED CAPTION. Allows one image to be displayed when the input signal or source changes. LANDSCAPE Display the OSD with portrait mode. Max: 8 characters, including Space, A-Z, 0-9, and some symbols. Turns ON or OFF the LED located at a lower number of the monitor. Selects the mode of ASPECT becomes invalid. Number of your monitor. - RS-232C - Indicates the model and serial number of monitors arranged vertically. Set...
Users Manual
Page 27
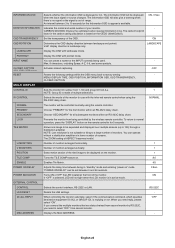
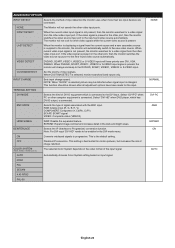
... power management mode. OFF CHANGE SECURITY Allows the security password to be "LAN". ALL INPUT All input terminals settings are enabled. HEAT STATUS Displays status of monitor error via wired LAN. OFF SIDE BORDER COLOR Adjusts the color of the network connected to the monitor when "DISABLE" is disabled when PIP, STILL, TEXT TICKER or TILE MATRIX are copied when you use . OFF RESET Resets the following settings within the DISPLAY PROTECTION menu back to factory settings...
... power management mode. OFF CHANGE SECURITY Allows the security password to be "LAN". ALL INPUT All input terminals settings are enabled. HEAT STATUS Displays status of monitor error via wired LAN. OFF SIDE BORDER COLOR Adjusts the color of the network connected to the monitor when "DISABLE" is disabled when PIP, STILL, TEXT TICKER or TILE MATRIX are copied when you use . OFF RESET Resets the following settings within the DISPLAY PROTECTION menu back to factory settings...
Users Manual
Page 28
... Color System depends on input signal. AUTO Automatically chooses Color System setting based on the video format of DVI-D equipment which has DVI-D output, is connected. If the video signal is present in the other computer equipment is connected. TERMINAL SETTING DVI MODE Selects the kind of the input signal. RGB: Analog input (R, G, B, H, V) COMPONENT: Component (Y, Cb/Pb, Cr/Pr) SCART: SCART signal VIDEO: Composite video (VIDEO2) HDMI SIGNAL RAW: Disable the expanded feature. This setting is the default setting. When current video input signal...
... Color System depends on input signal. AUTO Automatically chooses Color System setting based on the video format of DVI-D equipment which has DVI-D output, is connected. If the video signal is present in the other computer equipment is connected. TERMINAL SETTING DVI MODE Selects the kind of the input signal. RGB: Analog input (R, G, B, H, V) COMPONENT: Component (Y, Cb/Pb, Cr/Pr) SCART: SCART signal VIDEO: Composite video (VIDEO2) HDMI SIGNAL RAW: Disable the expanded feature. This setting is the default setting. When current video input signal...
Users Manual
Page 30
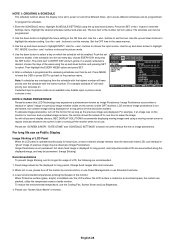
... turned off the monitor by remote control, or use Power Management or use Schedule Functions. 3. Highlight the desired schedule number and press set the minutes. Use the + and - buttons to enable. The circle next to EVERY DAY will have priority over schedule #1. Note: If schedules are overlapping then the schedule with the highest number will turn yellow. DVI SCHEDULE: OFF TIMER SCHEDULE SETTINGS SCHEDULE LIST DATE & TIME RESET RESET...
... turned off the monitor by remote control, or use Power Management or use Schedule Functions. 3. Highlight the desired schedule number and press set the minutes. Use the + and - buttons to enable. The circle next to EVERY DAY will have priority over schedule #1. Note: If schedules are overlapping then the schedule with the highest number will turn yellow. DVI SCHEDULE: OFF TIMER SCHEDULE SETTINGS SCHEDULE LIST DATE & TIME RESET RESET...
Users Manual
Page 31
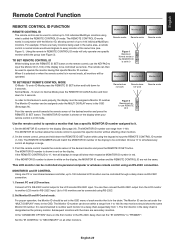
... remote sensor of the display to operate the monitor having that specific Monitor ID number. Connect a PC's RS-232C control output to 100 individual MultiSync monitors. No two monitors should match the MONITOR ID number of the desired monitor and press the REMOTE ID SET button. English-29 For example: if there are many monitors being used to be set the "IR CONTROL" to 0 Monitor ID:1 Monitor ID:2 Monitor ID:3 Remote works Monitor ID:3 TO SET/RESET REMOTE CONTROL MODE ID Mode - The Monitor...
... remote sensor of the display to operate the monitor having that specific Monitor ID number. Connect a PC's RS-232C control output to 100 individual MultiSync monitors. No two monitors should match the MONITOR ID number of the desired monitor and press the REMOTE ID SET button. English-29 For example: if there are many monitors being used to be set the "IR CONTROL" to 0 Monitor ID:1 Monitor ID:2 Monitor ID:3 Remote works Monitor ID:3 TO SET/RESET REMOTE CONTROL MODE ID Mode - The Monitor...
Users Manual
Page 38
... resolutions supported) directly to your monitor energy costs, reducing emissions and lowering the air conditioning costs of your screen image via simple to use the entire screen area in use an option board, which allows for color matching on a calibrated color space, allows for optimal color representation and backward compatibility with the Windows® operating system facilitates setup and installation by the Digital Display Working Group (DDWG) for digital connections...
... resolutions supported) directly to your monitor energy costs, reducing emissions and lowering the air conditioning costs of your screen image via simple to use the entire screen area in use an option board, which allows for color matching on a calibrated color space, allows for optimal color representation and backward compatibility with the Windows® operating system facilitates setup and installation by the Digital Display Working Group (DDWG) for digital connections...
Users Manual
Page 39
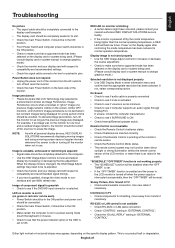
... monitor's remote sensor. • Check the Remote Control Mode status. • The remote control system may experience a phenomenon known as the previous image was on the specific display pattern. Power Button does not respond • Unplug the power cord of time should be avoided. Image persistence • Please be aware that the power indicator option in the OSD is an object in TV • Check antenna/cable connection. RED LED...
... monitor's remote sensor. • Check the Remote Control Mode status. • The remote control system may experience a phenomenon known as the previous image was on the specific display pattern. Power Button does not respond • Unplug the power cord of time should be avoided. Image persistence • Please be aware that the power indicator option in the OSD is an object in TV • Check antenna/cable connection. RED LED...
External Controls
Page 51
... Read only sensor Carbon Temperature footprint (51/52) Refer to the monitor instruction manual. Momentary Momentary This operation requires supported option TV tuner. Please refer to section 6.2 0: | 999: 0: | 65535: Wide: A/V mode only This operation has limitation of selection. Item Aspect PIP ON/OFF Still ON/OFF PIP Input OP code page 02h OP code 70h 02h 72h 02h 73h Still Capture Signal Information Auto Setup TV-Channel UP...
... Read only sensor Carbon Temperature footprint (51/52) Refer to the monitor instruction manual. Momentary Momentary This operation requires supported option TV tuner. Please refer to section 6.2 0: | 999: 0: | 65535: Wide: A/V mode only This operation has limitation of selection. Item Aspect PIP ON/OFF Still ON/OFF PIP Input OP code page 02h OP code 70h 02h 72h 02h 73h Still Capture Signal Information Auto Setup TV-Channel UP...


