

Specification Brochure
Page 3
... LCD change with NaViSet Administrator 2. OPS Interface Expansion 3 The NEC Display Wall Calibrator software ensures color uniformity and fidelity across the video wall. It is extremely useful for dynamic control of Play This function provides accurate proof that runs from an external location. No motion detected BACKLIGHT : 40 VOLUME : 30 INPUT SELECT : DP Motion detected BACKLIGHT : 60 VOLUME : 70 INPUT SELECT: HDMI Dedicated Color Calibration Software As the brightness and color temperature of ambient light...
... LCD change with NaViSet Administrator 2. OPS Interface Expansion 3 The NEC Display Wall Calibrator software ensures color uniformity and fidelity across the video wall. It is extremely useful for dynamic control of Play This function provides accurate proof that runs from an external location. No motion detected BACKLIGHT : 40 VOLUME : 30 INPUT SELECT : DP Motion detected BACKLIGHT : 60 VOLUME : 70 INPUT SELECT: HDMI Dedicated Color Calibration Software As the brightness and color temperature of ambient light...

Specification Brochure
Page 4
MODEL LCD MODULE Panel Technology Viewable Image Size Native Resolution Brightness (Typical/Max) Contrast Ratio (Typical) Viewing Angle Aspect Ratio Displayable Colors Orientation Displayable Colors CONNECTIVITY PC/Mac Signal Compatibility Input Terminals Digital Analog Audio External Control Output Terminals Digital Analog Audio External Control POWER CONSUMPTiON On (Typical) Power Management Current Rating PHYSICAL SPECIFICATIONS Bezel Width (L/R, T/B) Net Dimensions (without stand) VESA Hole Configuration ENVIRONMENTAL CONDITIONS Operating Temperature Operating Humidity Operating ...
MODEL LCD MODULE Panel Technology Viewable Image Size Native Resolution Brightness (Typical/Max) Contrast Ratio (Typical) Viewing Angle Aspect Ratio Displayable Colors Orientation Displayable Colors CONNECTIVITY PC/Mac Signal Compatibility Input Terminals Digital Analog Audio External Control Output Terminals Digital Analog Audio External Control POWER CONSUMPTiON On (Typical) Power Management Current Rating PHYSICAL SPECIFICATIONS Bezel Width (L/R, T/B) Net Dimensions (without stand) VESA Hole Configuration ENVIRONMENTAL CONDITIONS Operating Temperature Operating Humidity Operating ...
Launch Press Release
Page 2
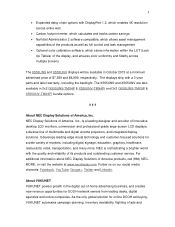
... and temperature sensor • Direct LED-backlighting, which translates to improved brightness uniformity, reduced power consumption and mercury-free components. • Bezel gap of just 3.5mm between neighboring displays • Auto ID, Auto IP Address and Auto TileMatrix, which compensates for up to 2160p, allowing 4x the resolution across the video walls • Panel brightness of 500 cd/m² for the X555UNV and 700...
... and temperature sensor • Direct LED-backlighting, which translates to improved brightness uniformity, reduced power consumption and mercury-free components. • Bezel gap of just 3.5mm between neighboring displays • Auto ID, Auto IP Address and Auto TileMatrix, which compensates for up to 2160p, allowing 4x the resolution across the video walls • Panel brightness of 500 cd/m² for the X555UNV and 700...
Launch Press Release
Page 3
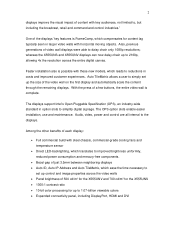
... 4K resolution across entire wall Carbon footprint meter, which calculates and tracks carbon savings NaViSet Administrator 2 software compatible, which allows asset management capabilities of the products as well as full control and task management Optional color calibration software, which stores information within the LUT (Look Up Tables) of the display, and ensures color uniformity and fidelity across multiple screens...
... 4K resolution across entire wall Carbon footprint meter, which calculates and tracks carbon savings NaViSet Administrator 2 software compatible, which allows asset management capabilities of the products as well as full control and task management Optional color calibration software, which stores information within the LUT (Look Up Tables) of the display, and ensures color uniformity and fidelity across multiple screens...
Users Manual
Page 2
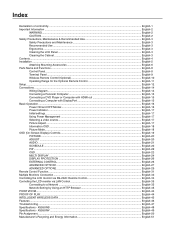
......English-8 Control Panel ...English-8 Terminal Panel ...English-9 Wireless Remote Control (Optional English-10 Operating Range for the Optional Remote Control English-11 Setup ...English-12 Connections ...English-14 Wiring Diagram ...English-14 Connecting a Personal Computer English-15 Connecting a DVD Player or Computer with HDMI out English-15 Connecting a Computer with DisplayPort English-15 Basic Operation...English-16 Power ON and OFF Modes ...English-16 Power Indicator...English-17 Initial settings ...English-17 Using Power Management...
......English-8 Control Panel ...English-8 Terminal Panel ...English-9 Wireless Remote Control (Optional English-10 Operating Range for the Optional Remote Control English-11 Setup ...English-12 Connections ...English-14 Wiring Diagram ...English-14 Connecting a Personal Computer English-15 Connecting a DVD Player or Computer with HDMI out English-15 Connecting a Computer with DisplayPort English-15 Basic Operation...English-16 Power ON and OFF Modes ...English-16 Power Indicator...English-17 Initial settings ...English-17 Using Power Management...
Users Manual
Page 5
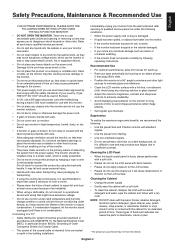
... cleaner! • Adjust the monitor's brightness, contrast and sharpness controls to enhance readability. • Avoid displaying fixed patterns on monitor. • Do not use monitor in Europe) • In UK, use a BS-approved power cord with a lint-free, non-abrasive cloth. Cleaning the LCD Panel • When the liquid crystal panel is easily accessible. • Do not move or mount this product on the LCD surface. Damage...
... cleaner! • Adjust the monitor's brightness, contrast and sharpness controls to enhance readability. • Avoid displaying fixed patterns on monitor. • Do not use monitor in Europe) • In UK, use a BS-approved power cord with a lint-free, non-abrasive cloth. Cleaning the LCD Panel • When the liquid crystal panel is easily accessible. • Do not move or mount this product on the LCD surface. Damage...
Users Manual
Page 7
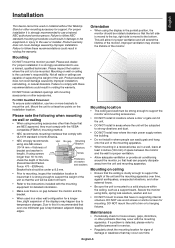
... voiding the warranty. If a problem is strong enough to support the weight of the monitor. Failure to follow these recommendations could result in areas where the unit will be mounted. Orientation • When using screws under 8.5 mm. • Prior to mounting, inspect the installation location to insure that it is mounted to a solid structure within the ceiling, such as in a video wall confi...
... voiding the warranty. If a problem is strong enough to support the weight of the monitor. Failure to follow these recommendations could result in areas where the unit will be mounted. Orientation • When using screws under 8.5 mm. • Prior to mounting, inspect the installation location to insure that it is mounted to a solid structure within the ceiling, such as in a video wall confi...

Users Manual
Page 10
... Power Standby mode with the "SCHEDULE SETTINGS" function enabled. Glows green when the LCD monitor is turned-off . Control Key Lock Mode This control completely locks out access to all Control Key functions. These are available input only, shown as their factory preset name. ¿ PLUS button (+) Acts as (+) button to increase the adjustment with OSD menu. Acts as button to move to previous menu. ¾ Remote control sensor and Power Indicator Receives the signal from the remote control (when using the wireless remote control...
... Power Standby mode with the "SCHEDULE SETTINGS" function enabled. Glows green when the LCD monitor is turned-off . Control Key Lock Mode This control completely locks out access to all Control Key functions. These are available input only, shown as their factory preset name. ¿ PLUS button (+) Acts as (+) button to increase the adjustment with OSD menu. Acts as button to move to previous menu. ¾ Remote control sensor and Power Indicator Receives the signal from the remote control (when using the wireless remote control...
Users Manual
Page 11
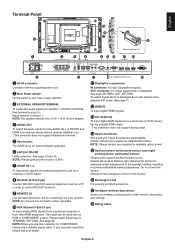
... picture when selected PIP mode. Red terminal is minus (-). NOTE: Please give priority for COMPONENT, please use this sensor. This input can be used with the supplied power cord. · Main Power Switch On/Off switch to your dealer. Please select signal type in order to control RS-232C functions. ¾ REMOTE IN Use the optional sensor unit by connecting it to turn main power ON/OFF. » EXTERNAL SPEAKER TERMINAL To output the audio signal from a computer or HDTV...
... picture when selected PIP mode. Red terminal is minus (-). NOTE: Please give priority for COMPONENT, please use this sensor. This input can be used with the supplied power cord. · Main Power Switch On/Off switch to your dealer. Please select signal type in order to control RS-232C functions. ¾ REMOTE IN Use the optional sensor unit by connecting it to turn main power ON/OFF. » EXTERNAL SPEAKER TERMINAL To output the audio signal from a computer or HDTV...
Users Manual
Page 12
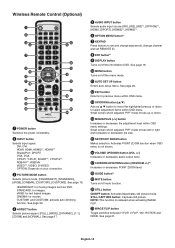
... NONE. See page 17. ´ AUDIO INPUT button Selects audio input source [IN1], [IN2], [IN3]*2, [OPTION]*2, [HDMI], [DPORT], [HDMI2]*2, [HDMI3]*2. ² OPTION MENU button*1 ¶ KEYPAD Press buttons to previous menu within OSD menu. CUSTOM1 and CUSTOM2: activate auto dimming function. See page 20. ¹ EXIT button Returns to set and change passwords, change channel and set REMOTE ID. º ENT button*1 ¾ DISPLAY button Turns on your connection » PICTURE MODE button Selects picture mode, [HIGHBRIGHT], [STANDARD], [sRGB], [CINEMA], [CUSTOM1...
... NONE. See page 17. ´ AUDIO INPUT button Selects audio input source [IN1], [IN2], [IN3]*2, [OPTION]*2, [HDMI], [DPORT], [HDMI2]*2, [HDMI3]*2. ² OPTION MENU button*1 ¶ KEYPAD Press buttons to previous menu within OSD menu. CUSTOM1 and CUSTOM2: activate auto dimming function. See page 20. ¹ EXIT button Returns to set and change passwords, change channel and set REMOTE ID. º ENT button*1 ¾ DISPLAY button Turns on your connection » PICTURE MODE button Selects picture mode, [HIGHBRIGHT], [STANDARD], [sRGB], [CINEMA], [CUSTOM1...
Users Manual
Page 14
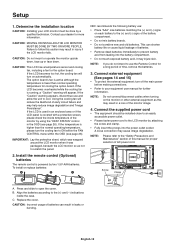
... equipment user manual for proper selection of AC power cord. CAUTION: Do not mount or operate the monitor upside down, face up or face down. If the LCD becomes overheated while the cooling fan is running, a "Caution" warning will turn on...LCD is used in an enclosed area or if the LCD panel is powered by using the "HEAT STATUS" control in leaks or bursting. Install the remote control (Optional) batteries The remote control is covered with a protective screen, please check the inside the case. Connect the supplied power cord • The equipment should be done by attaching the screw...
... equipment user manual for proper selection of AC power cord. CAUTION: Do not mount or operate the monitor upside down, face up or face down. If the LCD becomes overheated while the cooling fan is running, a "Caution" warning will turn on...LCD is used in an enclosed area or if the LCD panel is powered by using the "HEAT STATUS" control in leaks or bursting. Install the remote control (Optional) batteries The remote control is covered with a protective screen, please check the inside the case. Connect the supplied power cord • The equipment should be done by attaching the screw...
Users Manual
Page 16
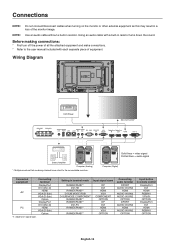
... DPORT AUDIO IN1/IN2 HDMI AUDIO IN1/IN2 OPTION Input button in resistor turns down the sound. Wiring Diagram DVD Player Second monitor* Stereo Amplifier Computer (Analog) *: Multiple monitors that are daisy-chained have a limit to the user manual included with a built-in remote control DisplayPort DVI HDMI RGB/HV Y/Pb/Pr OPTION DisplayPort DVI HDMI RGB/HV OPTION English-14 Solid lines = video signal Dotted lines = audio signal Computer (Digital) Connected equipment Connecting...
... DPORT AUDIO IN1/IN2 HDMI AUDIO IN1/IN2 OPTION Input button in resistor turns down the sound. Wiring Diagram DVD Player Second monitor* Stereo Amplifier Computer (Analog) *: Multiple monitors that are daisy-chained have a limit to the user manual included with a built-in remote control DisplayPort DVI HDMI RGB/HV Y/Pb/Pr OPTION DisplayPort DVI HDMI RGB/HV OPTION English-14 Solid lines = video signal Dotted lines = audio signal Computer (Digital) Connected equipment Connecting...
Users Manual
Page 28
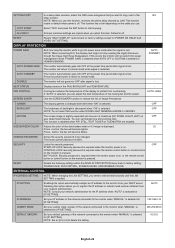
... power save mode after signal is slightly expanded and moves in HUMAN SENSING. Press the power button to return to delete the setting. 0.0.0.0 English-26 OFF SIDE BORDER COLOR Adjusts the color of the cooling fan and fan speed. CHANGE PASSWORD Allows the security password to the monitor when "MANUAL" is selected for [IP SETTING]. 255.255.255.0 DEFAULT GATEWAY Set your network administrator for [IP SETTING]. POWER SAVE, FAN CONTROL, SCREEN...
... power save mode after signal is slightly expanded and moves in HUMAN SENSING. Press the power button to return to delete the setting. 0.0.0.0 English-26 OFF SIDE BORDER COLOR Adjusts the color of the cooling fan and fan speed. CHANGE PASSWORD Allows the security password to the monitor when "MANUAL" is selected for [IP SETTING]. 255.255.255.0 DEFAULT GATEWAY Set your network administrator for [IP SETTING]. POWER SAVE, FAN CONTROL, SCREEN...
Users Manual
Page 29
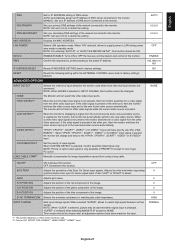
...*1, HDMI, HDMI2*1, HDMI3*1 input. LONG CABLE COMP*1 (Analog input only) Manually compensates for matching the cable impedance. OFF SOG PEAK Adjusts the sensitivity of input signals. GAIN Adjusts gain value. 0 R-H.POSITION Adjusts the position of the red component of the image. 0 G-H.POSITION Adjusts the position of the green component of the image. 0 B-H.POSITION Adjusts the position of the blue component of the network connected to the new found video source automatically. AUTO DNS PRIMARY Set...
...*1, HDMI, HDMI2*1, HDMI3*1 input. LONG CABLE COMP*1 (Analog input only) Manually compensates for matching the cable impedance. OFF SOG PEAK Adjusts the sensitivity of input signals. GAIN Adjusts gain value. 0 R-H.POSITION Adjusts the position of the red component of the image. 0 G-H.POSITION Adjusts the position of the green component of the image. 0 B-H.POSITION Adjusts the position of the blue component of the network connected to the new found video source automatically. AUTO DNS PRIMARY Set...
Users Manual
Page 32
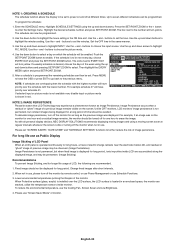
... the number will turn off the monitor by remote control, or use Power Management or use , please turn yellow. buttons to highlight INPUT. Use the up and down button to highlight the minutes setting. Use the + and - buttons to select a day on the screen. Use the down arrows to set . The circle next to the previous menu. After a schedule is shown in use as Public Display Image Sticking of LCD Panel When an LCD panel is operated...
... the number will turn off the monitor by remote control, or use Power Management or use , please turn yellow. buttons to highlight INPUT. Use the up and down button to highlight the minutes setting. Use the + and - buttons to select a day on the screen. Use the down arrows to set . The circle next to the previous menu. After a schedule is shown in use as Public Display Image Sticking of LCD Panel When an LCD panel is operated...
Users Manual
Page 33
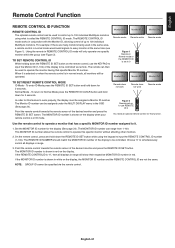
... monitors being used in the same area, a remote control in white on the display. English Remote Control Function REMOTE CONTROL ID FUNCTION REMOTE CONTROL ID The optional remote control can then be used to operate the monitor having that has a specific MONITOR ID number assigned to it. 1. Choose "0" to 0 Monitor ID:1 Monitor ID:2 Monitor ID:3 Remote works Monitor ID:3 TO SET/RESET REMOTE CONTROL MODE ID Mode - If the MONITOR ID number is set up to 100 individual MultiSync monitors using the keypad to input the REMOTE CONTROL...
... monitors being used in the same area, a remote control in white on the display. English Remote Control Function REMOTE CONTROL ID FUNCTION REMOTE CONTROL ID The optional remote control can then be used to operate the monitor having that has a specific MONITOR ID number assigned to it. 1. Choose "0" to 0 Monitor ID:1 Monitor ID:2 Monitor ID:3 Remote works Monitor ID:3 TO SET/RESET REMOTE CONTROL MODE ID Mode - If the MONITOR ID number is set up to 100 individual MultiSync monitors using the keypad to input the REMOTE CONTROL...
Users Manual
Page 48
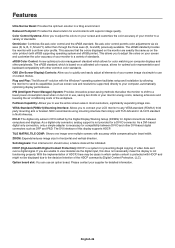
... as screen size and resolutions supported) directly to use , saving two-thirds of the workplace. The sRGB standard, which certain content is not functioning properly. IPM (Intelligent Power Manager) System: Provides innovative power-saving methods that allow the monitor to shift to a variety of video data sent over multiple screens with the Windows® operating system facilitates setup and installation by the Digital Display Working Group...
... as screen size and resolutions supported) directly to use , saving two-thirds of the workplace. The sRGB standard, which certain content is not functioning properly. IPM (Intelligent Power Manager) System: Provides innovative power-saving methods that allow the monitor to shift to a variety of video data sent over multiple screens with the Windows® operating system facilitates setup and installation by the Digital Display Working Group...
Users Manual
Page 49
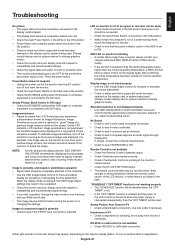
... DVI MODE setting when DVD player or computer equipment is connected to the DVI input. Press the power button. Image is unstable, unfocused or swimming is apparent • Signal cable should be reset. Unlike CRT monitors, LCD monitors' image persistence is not permanent, but constant images being higher than the normal operating temperature, a RED LED will be completely attached to the computer. • Use the OSD Image Adjust controls to...
... DVI MODE setting when DVD player or computer equipment is connected to the DVI input. Press the power button. Image is unstable, unfocused or swimming is apparent • Signal cable should be reset. Unlike CRT monitors, LCD monitors' image persistence is not permanent, but constant images being higher than the normal operating temperature, a RED LED will be completely attached to the computer. • Use the OSD Image Adjust controls to...

Users Manual
Page 50
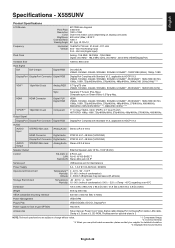
... - 40°C) regarding over 40°C Dimension 1213.4 (W) x 684.2 (H) x 95.3 (D) mm / 47.8 (W) x 26.9 (H) x 3.8 (D) inches Weight 29.5 kg (65.0 lbs) VESA compatible mounting interface 400 mm x 400 mm (M6, 4 Holes) Power Management VESA DPM Plug & Play VESA DDC2Bi, DDC/CI, DisplayPort Power supply for Slot 2 type OPTION 16V/3.6 A Accessories Setup manual, Power Cord, Video Signal cable (DisplayPort to DisplayPort cable), LAN cable, Clamp x 3, Screw x 3, CD-ROM, Thumbscrew for optional stand x 2 NOTE: Technical specifications are...
... - 40°C) regarding over 40°C Dimension 1213.4 (W) x 684.2 (H) x 95.3 (D) mm / 47.8 (W) x 26.9 (H) x 3.8 (D) inches Weight 29.5 kg (65.0 lbs) VESA compatible mounting interface 400 mm x 400 mm (M6, 4 Holes) Power Management VESA DPM Plug & Play VESA DDC2Bi, DDC/CI, DisplayPort Power supply for Slot 2 type OPTION 16V/3.6 A Accessories Setup manual, Power Cord, Video Signal cable (DisplayPort to DisplayPort cable), LAN cable, Clamp x 3, Screw x 3, CD-ROM, Thumbscrew for optional stand x 2 NOTE: Technical specifications are...
Users Manual
Page 51
... KHz (16/20/24bit) DisplayPort Connector Digital Audio PCM 32, 44.1, 48 KHz (16/20/24bit) AUDIO Output STEREO Mini Jack Analog Audio Stereo L/R 0.5 Vrms Speaker Output External Speaker Jack 15 W + 15 W (8 ohm) Control RS-232C In: 9 Pin D-sub LAN: RJ-45 10/100 BASE-T Remote IN: Stereo Mini jack 3.5 Service port USB service port for maintenance Power Supply 3.4 - 1.2 A @ 100-240V AC, 50/60Hz Operational Environment Temperature*3: 0 - 40°C / 32 - 104...
... KHz (16/20/24bit) DisplayPort Connector Digital Audio PCM 32, 44.1, 48 KHz (16/20/24bit) AUDIO Output STEREO Mini Jack Analog Audio Stereo L/R 0.5 Vrms Speaker Output External Speaker Jack 15 W + 15 W (8 ohm) Control RS-232C In: 9 Pin D-sub LAN: RJ-45 10/100 BASE-T Remote IN: Stereo Mini jack 3.5 Service port USB service port for maintenance Power Supply 3.4 - 1.2 A @ 100-240V AC, 50/60Hz Operational Environment Temperature*3: 0 - 40°C / 32 - 104...


