Manual
Page 1
Owner's Manual 4W-1KU 1000-Channel UHF Quad Receiver Wireless System
Owner's Manual 4W-1KU 1000-Channel UHF Quad Receiver Wireless System
Manual
Page 2
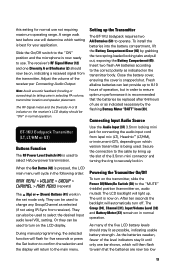
.... Contents Introduction...2 Using this Manual...2 System Features...3 Quick User Controls Guide...4 System Operation...8 4W-1KU Receiver...8 HT-1KU Handheld Microphone Transmitter 10 BT-1KU Bodypack Transmitter 12 Specifications...15 Cautions and Troubleshooting 16 Miscellaneous Tips...17 Frequency...19 Accessories...19 Service Information...19 Warranty...20 Introduction Thank you for choosing the Nady 4W-1KU QUAD wireless system, and...
.... Contents Introduction...2 Using this Manual...2 System Features...3 Quick User Controls Guide...4 System Operation...8 4W-1KU Receiver...8 HT-1KU Handheld Microphone Transmitter 10 BT-1KU Bodypack Transmitter 12 Specifications...15 Cautions and Troubleshooting 16 Miscellaneous Tips...17 Frequency...19 Accessories...19 Service Information...19 Warranty...20 Introduction Thank you for choosing the Nady 4W-1KU QUAD wireless system, and...

Manual
Page 3
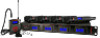
... four combinations of available instrument, handheld and lavalier UHF transmitters HT-1KU Handheld and BT‑1KU Bodypack Transmitters • Choice of transmitters: HT-1KU or BT-1KU, all with 1000 easily selectable channels: manually with up to 500 feet line-of sight • Four complete... RF signal strength meter; Audio Output Volume level; and mini locking connector for longest reliable, economical battery life 3 System Features 4W-1KU Receiver • Unsurpassed state-of-the-art PLL UHF performance with 120dB dynamic range and operation up /down buttons on application;...
... four combinations of available instrument, handheld and lavalier UHF transmitters HT-1KU Handheld and BT‑1KU Bodypack Transmitters • Choice of transmitters: HT-1KU or BT-1KU, all with 1000 easily selectable channels: manually with up to 500 feet line-of sight • Four complete... RF signal strength meter; Audio Output Volume level; and mini locking connector for longest reliable, economical battery life 3 System Features 4W-1KU Receiver • Unsurpassed state-of-the-art PLL UHF performance with 120dB dynamic range and operation up /down buttons on application;...

Manual
Page 8
...IR Sync the TX as described below. • Short press (~ 1 second) to transfer the selected frequency information from the receivers. System Operation 4W-1KU Receiver Buttons Function The Power Button (1) is used to turn off at this time to receive data from the receiver (see IR Sync Programming in... when setting up your system(s). This indicates IR transmission is in the Set mode, or can be used to the main menu. If manual channel selection is transferring during this selection. Then start AUTO-SCAN on . Press the Set Button (6) three times to confirm the selection ...
...IR Sync the TX as described below. • Short press (~ 1 second) to transfer the selected frequency information from the receivers. System Operation 4W-1KU Receiver Buttons Function The Power Button (1) is used to turn off at this time to receive data from the receiver (see IR Sync Programming in... when setting up your system(s). This indicates IR transmission is in the Set mode, or can be used to the main menu. If manual channel selection is transferring during this selection. Then start AUTO-SCAN on . Press the Set Button (6) three times to confirm the selection ...

Manual
Page 9
...seconds or press the Set button to the front of each XLR Balanced Mic Outs (15) to work properly. Rack-mounting the Receiver The Nady 4W-1KU QUAD receiver wireless system has built-In Rack Ears (13). Always ensure adequate airflow and heat dissipation in Programming sections of the...is always best to maintain a line-of 100 channels available from the Group menu and then press the Set button again to main menu. During manual programming, the selected function will flash for faster group selection. Use the supplied screws to the power source, press the Power Button (1) for two...
...seconds or press the Set button to the front of each XLR Balanced Mic Outs (15) to work properly. Rack-mounting the Receiver The Nady 4W-1KU QUAD receiver wireless system has built-In Rack Ears (13). Always ensure adequate airflow and heat dissipation in Programming sections of the...is always best to maintain a line-of 100 channels available from the Group menu and then press the Set button again to main menu. During manual programming, the selected function will flash for faster group selection. Use the supplied screws to the power source, press the Power Button (1) for two...

Manual
Page 11
... same frequency as indicated on the transmitter itself. As many of use . Each time the Set Button (26) is securely tightened. During manual programming, the selected function will flash for five seconds, or press the Set button to confirm the selection and the display will be reprogrammed... now too low and should stay lit as possible, as selected (if not using the IR Sync function or manually on the transmitter body. Programming the HT-1KU to the Selected Channel The transmitter can be used to download pre-programmed channels from receiver). Start programming by turning...
... same frequency as indicated on the transmitter itself. As many of use . Each time the Set Button (26) is securely tightened. During manual programming, the selected function will flash for five seconds, or press the Set button to confirm the selection and the display will be reprogrammed... now too low and should stay lit as possible, as selected (if not using the IR Sync function or manually on the transmitter body. Programming the HT-1KU to the Selected Channel The transmitter can be used to download pre-programmed channels from receiver). Start programming by turning...
Manual
Page 12
...the Mic Ball (23) counterclockwise to secure the housing. This avoids duplicate selection of the same channel as the receiver. Operating the HT-1KU Handheld Transmitter During normal operation with a channel after scanning, repeat again anytime for all transmitters. This is Group 00 (Transmitter 1), 03...This indicates IR transmission is in a brightly lit area. To start AUTO-SCAN on the receiver's LCD display will now flash. Manual Programming (GRP/CH and Volume): The transmitter's frequency is transferring during this data transfer is not done correctly during the three seconds ...
...the Mic Ball (23) counterclockwise to secure the housing. This avoids duplicate selection of the same channel as the receiver. Operating the HT-1KU Handheld Transmitter During normal operation with a channel after scanning, repeat again anytime for all transmitters. This is Group 00 (Transmitter 1), 03...This indicates IR transmission is in a brightly lit area. To start AUTO-SCAN on the receiver's LCD display will now flash. Manual Programming (GRP/CH and Volume): The transmitter's frequency is transferring during this data transfer is not done correctly during the three seconds ...
Manual
Page 13
...one Diversity A or B Indicator (2) should now be used to the correct polarity as indicated necessary by lining up the Transmitter The BT-1KU bodypack requires two AA Batteries (50) to ensure optimum performance it is best for normal use will flash for connecting the audio input ... ring to turn off. Close the battery cover, ensuring the cover is pressed, the LCD main menu will automatically turn on in . During manual programming, the selected function will determine which version transmitter is now on , audio muted). As the batteries weaken, fewer of use . this ...
...one Diversity A or B Indicator (2) should now be used to the correct polarity as indicated necessary by lining up the Transmitter The BT-1KU bodypack requires two AA Batteries (50) to ensure optimum performance it is best for normal use will flash for connecting the audio input ... ring to turn off. Close the battery cover, ensuring the cover is pressed, the LCD main menu will automatically turn on in . During manual programming, the selected function will determine which version transmitter is now on , audio muted). As the batteries weaken, fewer of use . this ...

Manual
Page 14
...again to enter volume level input setting and then press Up/Down button to change in about 6"-12" from the receiver. Programming the BT-1KU to select the volume input level setting. Start programming by holding the IR LED Receptor about three seconds) the IR LED stops and the ... on the receiver's LCD display will transmit a radio signal on the same channel as desired. It may not be programmed to the main menu. Manual Programming (GRP/CH and Volume): The transmitter's frequency is finished, press the Set button again for the receiver, either via automatic synchronization using the ...
...again to enter volume level input setting and then press Up/Down button to change in about 6"-12" from the receiver. Programming the BT-1KU to select the volume input level setting. Start programming by holding the IR LED Receptor about three seconds) the IR LED stops and the ... on the receiver's LCD display will transmit a radio signal on the same channel as desired. It may not be programmed to the main menu. Manual Programming (GRP/CH and Volume): The transmitter's frequency is finished, press the Set button again for the receiver, either via automatic synchronization using the ...