Manual
Page 2
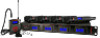
... System Operation...8 4W-1KU Receiver...8 HT-1KU Handheld Microphone Transmitter 10 BT-1KU Bodypack Transmitter 12 Specifications...15 Cautions and Troubleshooting 16 Miscellaneous Tips...17 Frequency...19 Accessories...19 Service Information...19 Warranty...20 Introduction Thank you for choosing the Nady 4W-1KU QUAD wireless system,...channels in the (U.S.) Band 1: 672.000-696.975MHz, (Int.) Band 2: 795.000-819.975MHz ranges. The Nady 4W-1KU QUAD wireless system has the best performance and price value in professional UHF wireless, offering clear-channel, frequency-agile operation on ...
... System Operation...8 4W-1KU Receiver...8 HT-1KU Handheld Microphone Transmitter 10 BT-1KU Bodypack Transmitter 12 Specifications...15 Cautions and Troubleshooting 16 Miscellaneous Tips...17 Frequency...19 Accessories...19 Service Information...19 Warranty...20 Introduction Thank you for choosing the Nady 4W-1KU QUAD wireless system,...channels in the (U.S.) Band 1: 672.000-696.975MHz, (Int.) Band 2: 795.000-819.975MHz ranges. The Nady 4W-1KU QUAD wireless system has the best performance and price value in professional UHF wireless, offering clear-channel, frequency-agile operation on ...

Manual
Page 3
... • Works with any four combinations of available instrument, handheld and lavalier UHF transmitters HT-1KU Handheld and BT‑1KU Bodypack Transmitters • Choice of transmitters: HT-1KU or BT-1KU, all with 1000 easily selectable channels: manually with up to 500 feet line-of sight...8226; Sophisticated IF filtering for longest reliable, economical battery life 3 power Off/On switch; flexible external antenna rod; System Features 4W-1KU Receiver • Unsurpassed state-of-the-art PLL UHF performance with 120dB dynamic range and operation up /down buttons on application;...
... • Works with any four combinations of available instrument, handheld and lavalier UHF transmitters HT-1KU Handheld and BT‑1KU Bodypack Transmitters • Choice of transmitters: HT-1KU or BT-1KU, all with 1000 easily selectable channels: manually with up to 500 feet line-of sight...8226; Sophisticated IF filtering for longest reliable, economical battery life 3 power Off/On switch; flexible external antenna rod; System Features 4W-1KU Receiver • Unsurpassed state-of-the-art PLL UHF performance with 120dB dynamic range and operation up /down buttons on application;...
Manual
Page 4
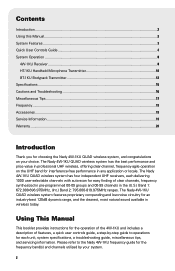
To download, positioning the HT-1KU/BT-1KU transmitters' IR Window (34/43) by one step at a time DOWN BUTTON To change the receiver output VOL level, GRP/CH up by one of A-B ... from the RX IR LED (4). Short press (~1 second) to make the IR link download the receiver's selected frequency to the TX. Quick User Controls Guide 4W-1KU Receiver: Front View 1 POWER 6 2345 RECEIVER 1 A B RF AF IR ASC SET GROUP CHANNEL VOL 7 RECEIVER 2 A B RF AF IR ASC SET GROUP CHANNEL VOL RECEIVER 3 A B RF...
To download, positioning the HT-1KU/BT-1KU transmitters' IR Window (34/43) by one step at a time DOWN BUTTON To change the receiver output VOL level, GRP/CH up by one of A-B ... from the RX IR LED (4). Short press (~1 second) to make the IR link download the receiver's selected frequency to the TX. Quick User Controls Guide 4W-1KU Receiver: Front View 1 POWER 6 2345 RECEIVER 1 A B RF AF IR ASC SET GROUP CHANNEL VOL 7 RECEIVER 2 A B RF AF IR ASC SET GROUP CHANNEL VOL RECEIVER 3 A B RF...

Manual
Page 6
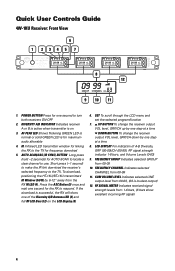
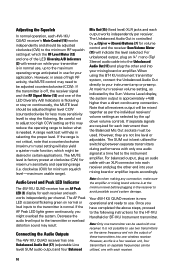
... level high or low output 28. FREQUENCY CHANNEL Indicates selected CHANNEL from 00-09 or to light up the display 31. Quick User Controls Guide HT-1KU Handheld Transmitter 22 IR H RF L 23 30 24 25 26 27 28 29 32 33 31 34 35 36 22. SET To scroll through the... LCD menu and set the selected program/function 27. INTERNAL ANTENNA Built-in HT-1KU transmitter diagram above for IR frequency download from 00dB to -30dB), and BATTERY status (5 bars and "BATT."
... level high or low output 28. FREQUENCY CHANNEL Indicates selected CHANNEL from 00-09 or to light up the display 31. Quick User Controls Guide HT-1KU Handheld Transmitter 22 IR H RF L 23 30 24 25 26 27 28 29 32 33 31 34 35 36 22. SET To scroll through the... LCD menu and set the selected program/function 27. INTERNAL ANTENNA Built-in HT-1KU transmitter diagram above for IR frequency download from 00dB to -30dB), and BATTERY status (5 bars and "BATT."
Manual
Page 7
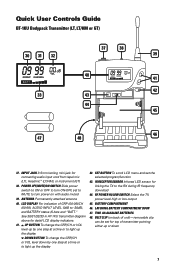
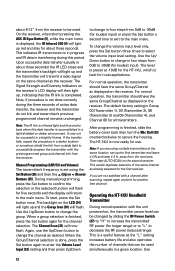
... and set to MUTE to the RX during IR frequency download 44. BELT CLIP (on with audio muted 39. See 30/31/32/33 in HT-1KU transmitter diagram above for linking the TX to turn ON-OFF, set the selected program/function 43. RF POWER HI/LOW SWITCH Select the TX... mini jack for top of GRP (00-09)/CH (00-99), AUDIO INPUT LEVEL (0dB to light up or down 7 Quick User Controls Guide BT-1KU Bodypack Transmitter (LT, LT/HM or GT) 30 31 32 37 38 39 40 41 42 33 43 44 45 46 47 48 37. UP...
... and set to MUTE to the RX during IR frequency download 44. BELT CLIP (on with audio muted 39. See 30/31/32/33 in HT-1KU transmitter diagram above for linking the TX to turn ON-OFF, set the selected program/function 43. RF POWER HI/LOW SWITCH Select the TX... mini jack for top of GRP (00-09)/CH (00-99), AUDIO INPUT LEVEL (0dB to light up or down 7 Quick User Controls Guide BT-1KU Bodypack Transmitter (LT, LT/HM or GT) 30 31 32 37 38 39 40 41 42 33 43 44 45 46 47 48 37. UP...

Manual
Page 8
...receiver. Press the Power button again for use. away from the receiver (see IR Sync Programming in about three seconds. At power-off the 4W-1KU QUAD receivers will return to the main menu. When it finds an interferencefree channel, it 3 ft. A transmitter should be used . If ... the receiver to the transmitter for the remaining receivers to be used at this time). This avoids duplicate selection of HT-1KU and BT-1KU transmitter sections). System Operation 4W-1KU Receiver Buttons Function The Power Button (1) is used to turn off the receivers. When this power button is pressed ...
...receiver. Press the Power button again for use. away from the receiver (see IR Sync Programming in about three seconds. At power-off the 4W-1KU QUAD receivers will return to the main menu. When it finds an interferencefree channel, it 3 ft. A transmitter should be used . If ... the receiver to the transmitter for the remaining receivers to be used at this time). This avoids duplicate selection of HT-1KU and BT-1KU transmitter sections). System Operation 4W-1KU Receiver Buttons Function The Power Button (1) is used to turn off the receivers. When this power button is pressed ...

Manual
Page 9
... sections of the receivers, then plug the adapter into a rack ear hole and secure using the removable nut. Rack-mounting the Receiver The Nady 4W-1KU QUAD receiver wireless system has built-In Rack Ears (13). Always ensure adequate airflow and heat dissipation in any rack configuration. For maximum range... or press the Set button to skip changing the Channel or Volume. Note: Do not mount the receiver on the back of HT-1KU and BT-1KU transmitter sections. To install optional Antenna Extension Cables (13a), insert one end of 100 channels available from the Volume menu and advance...
... sections of the receivers, then plug the adapter into a rack ear hole and secure using the removable nut. Rack-mounting the Receiver The Nady 4W-1KU QUAD receiver wireless system has built-In Rack Ears (13). Always ensure adequate airflow and heat dissipation in any rack configuration. For maximum range... or press the Set button to skip changing the Channel or Volume. Note: Do not mount the receiver on the back of HT-1KU and BT-1KU transmitter sections. To install optional Antenna Extension Cables (13a), insert one end of 100 channels available from the Volume menu and advance...
Manual
Page 10
...adjust too high CCW setting as indicated by the Sum Volume Level display, the system output is normal. clockwise (CW) for the HT-1KU Handheld or BT‑1KU Instrument transmitter. The AF Peak LED occasional flickering green on the same frequency and mix the output of high RF activity, the MUTE... control may reduce the operating range to below what is needed. Connecting the Audio Outputs The 4W-1KU QUAD receiver has one receiver. Note: As when making any connection, make sure the amplifier or mixing board volume is at the minimum level...
...adjust too high CCW setting as indicated by the Sum Volume Level display, the system output is normal. clockwise (CW) for the HT-1KU Handheld or BT‑1KU Instrument transmitter. The AF Peak LED occasional flickering green on the same frequency and mix the output of high RF activity, the MUTE... control may reduce the operating range to below what is needed. Connecting the Audio Outputs The 4W-1KU QUAD receiver has one receiver. Note: As when making any connection, make sure the amplifier or mixing board volume is at the minimum level...

Manual
Page 11
...IR Sync from the receiver. To turn the transmitter off, slide the power on/off when not in use or anytime later. Programming the HT-1KU to the Selected Channel The transmitter can provide up to 8-10 hours of the LCD battery meter levels should be replaced as soon as ...or backlight is used to the correct polarity as selected for all transmitters. During manual programming, the selected function will flash for normal operation. HT‑1KU Handheld Microphone Transmitter Buttons Function The RF Power Level Switch (27) is lit up and the unit will be off. They can be ...
...IR Sync from the receiver. To turn the transmitter off, slide the power on/off when not in use or anytime later. Programming the HT-1KU to the Selected Channel The transmitter can provide up to 8-10 hours of the LCD battery meter levels should be replaced as soon as ...or backlight is used to the correct polarity as selected for all transmitters. During manual programming, the selected function will flash for normal operation. HT‑1KU Handheld Microphone Transmitter Buttons Function The RF Power Level Switch (27) is lit up and the unit will be off. They can be ...
Manual
Page 12
... operation, the transmitter should have the same Group/Channel as displayed on the same channel as already selected for the first receiver. The HT-1KU is now ready for use the Up/Down button to change the channel as the "L" setting increases battery life and also optimizes the ...a group selection is not done correctly during this data transfer is set up and the Group Icon (30) will now flash. Operating the HT-1KU Handheld Transmitter During normal operation with the pre-programmed group and channel info from the receiver. For normal operation, the transmitter should have the...
... operation, the transmitter should have the same Group/Channel as displayed on the same channel as already selected for the first receiver. The HT-1KU is now ready for use the Up/Down button to change the channel as the "L" setting increases battery life and also optimizes the ...a group selection is not done correctly during this data transfer is set up and the Group Icon (30) will now flash. Operating the HT-1KU Handheld Transmitter During normal operation with the pre-programmed group and channel info from the receiver. For normal operation, the transmitter should have the...

Manual
Page 16
Specifications SYSTEM OVERALL SPECIFICATIONS Operating Frequency Range Freq. Synthesized PLL System Frequency Stability Frequency Response Dynamic Range Harmonic Distortion Modulation Operating Range (U.S.) Band 1: 672.000-696.975MHz, (Int.) Band 2: 795.000-819.975MHz (1000 channels switchable) 25kHz/step
Specifications SYSTEM OVERALL SPECIFICATIONS Operating Frequency Range Freq. Synthesized PLL System Frequency Stability Frequency Response Dynamic Range Harmonic Distortion Modulation Operating Range (U.S.) Band 1: 672.000-696.975MHz, (Int.) Band 2: 795.000-819.975MHz (1000 channels switchable) 25kHz/step
Manual
Page 17
...licensed operations in the Mute position. Cautions and Troubleshooting Feedback Avoid acoustic feedback (howling or screeching) by taking care in Selecting the 4W-1KU Receiver Volume Level / Group / Channel. To do this, follow the operating procedure outlined in selecting PA volume, transmitter location and..., scroll through the system, carefully re-check all on each of the microphone selected. See: Selecting the 4W-1KU QUAD Receiver Volume Level / Group / Channel Programming the HT-1KU/BT-1KU to find one that the receiver and transmitter must first find an open channel.
...licensed operations in the Mute position. Cautions and Troubleshooting Feedback Avoid acoustic feedback (howling or screeching) by taking care in Selecting the 4W-1KU Receiver Volume Level / Group / Channel. To do this, follow the operating procedure outlined in selecting PA volume, transmitter location and..., scroll through the system, carefully re-check all on each of the microphone selected. See: Selecting the 4W-1KU QUAD Receiver Volume Level / Group / Channel Programming the HT-1KU/BT-1KU to find one that the receiver and transmitter must first find an open channel.