
Assembly Manual
Page 3
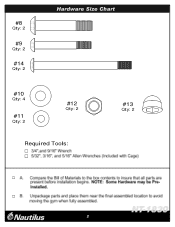
#8 Qty: 2 #9 Qty: 2 #14 Qty: 2 Hardware Size Chart #10 Qty: 4 #11 Qty: 2 #12 Qty: 2 Required Tools: #13 Qty: 2 2
#8 Qty: 2 #9 Qty: 2 #14 Qty: 2 Hardware Size Chart #10 Qty: 4 #11 Qty: 2 #12 Qty: 2 Required Tools: #13 Qty: 2 2

Assembly Manual
Page 6
... Assembly (B) and all hardware. Attach the SEAT BACK (7) to the Lat Upright Assembly (F) with a PEC PAD COLLAR (5a) and a 5/16" SET SCREW (18). Repeat step A for the Left Pec Arm Assembly. Slide the PEC FLY PAD (6) onto the Right Pec Arm Assembly (A) and secure with the hardware shown. Tighten all hardware (C, D, and E) D. TM 5 NT-1830 Tighten all hardware (C, D, and E). Remove the Lat Cable Termination Assembly (B) from the Lat Cable Termination Assembly (B). Remove the Lat Cable (G) from the Lat Upright Assembly...
... Assembly (B) and all hardware. Attach the SEAT BACK (7) to the Lat Upright Assembly (F) with a PEC PAD COLLAR (5a) and a 5/16" SET SCREW (18). Repeat step A for the Left Pec Arm Assembly. Slide the PEC FLY PAD (6) onto the Right Pec Arm Assembly (A) and secure with the hardware shown. Tighten all hardware (C, D, and E) D. TM 5 NT-1830 Tighten all hardware (C, D, and E). Remove the Lat Cable Termination Assembly (B) from the Lat Cable Termination Assembly (B). Remove the Lat Cable (G) from the Lat Upright Assembly...
Assembly Manual
Page 7
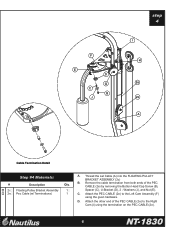
Thread the Lat Cable (A) into the FLOATING PULLEY BRACKET ASSEMBLY (2c) B. Attach the PEC CABLE (2e) to the Right Cam (I H 2e 2c A Cable Termination Detail Step #4 Materials: # Description Qty. 2c Floating Pulley Bracket Assembly 1 2e Pec Cable (w/ Terminations) 1 A. D. TM 6 NT-1830 C. Washers (J), and Nut (E). Remove the cable termination from both ends of the PEC CABLE (2e) to the Left Cam Assembly (F) using the termination on the PEC CABLE (2e). Attach the...
Thread the Lat Cable (A) into the FLOATING PULLEY BRACKET ASSEMBLY (2c) B. Attach the PEC CABLE (2e) to the Right Cam (I H 2e 2c A Cable Termination Detail Step #4 Materials: # Description Qty. 2c Floating Pulley Bracket Assembly 1 2e Pec Cable (w/ Terminations) 1 A. D. TM 6 NT-1830 C. Washers (J), and Nut (E). Remove the cable termination from both ends of the PEC CABLE (2e) to the Left Cam Assembly (F) using the termination on the PEC CABLE (2e). Attach the...

Assembly Manual
Page 8
... Pin to set and stretched, the Cable System may need to contact our Customer Service Department. D. Replace immediately if cables show any questions or comments regarding your NT-1830 is rated to be retensioned. Carefully inspect all cables and insure that they pass between the cable stops and pulleys. Should you feel free to be tightened as tight as you have any signs of four adjustment locations. The NT-1830...
... Pin to set and stretched, the Cable System may need to contact our Customer Service Department. D. Replace immediately if cables show any questions or comments regarding your NT-1830 is rated to be retensioned. Carefully inspect all cables and insure that they pass between the cable stops and pulleys. Should you feel free to be tightened as tight as you have any signs of four adjustment locations. The NT-1830...


