NCV-573 English Manual
Page 1
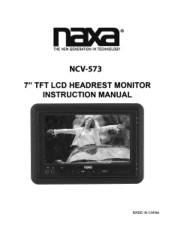
THE NEW GENERATION IN TECHNOLOGY NCV-573 7" TFT LCD HEADREST MONITOR INSTRUCTION MANUAL 00 I MENU POWER MADE IN CHINA
THE NEW GENERATION IN TECHNOLOGY NCV-573 7" TFT LCD HEADREST MONITOR INSTRUCTION MANUAL 00 I MENU POWER MADE IN CHINA
NCV-573 English Manual
Page 2
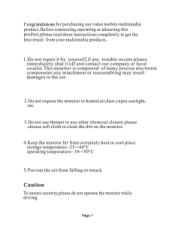
...video mobile multimedia product.Before connecting,operating or adiusting this product,please read these instructions completely to get the best result from your multimedia products. 1.Do not repair it by yourself,if any trouble occurs please immediately shut it off and contact our company or local retailer.This monitor... use thinner or any other chemical cleaner.please choose soft cloth to clean the dirt on the monitor. 4.Keep the monitor far from extremely heat or cool place storage temperature:-25-+60°C operating temperature:-10-+50°C 5.Prevent the set from falling or struck Caution ...
...video mobile multimedia product.Before connecting,operating or adiusting this product,please read these instructions completely to get the best result from your multimedia products. 1.Do not repair it by yourself,if any trouble occurs please immediately shut it off and contact our company or local retailer.This monitor... use thinner or any other chemical cleaner.please choose soft cloth to clean the dirt on the monitor. 4.Keep the monitor far from extremely heat or cool place storage temperature:-25-+60°C operating temperature:-10-+50°C 5.Prevent the set from falling or struck Caution ...
NCV-573 English Manual
Page 3
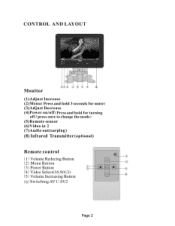
CONTROL AND LAYOUT Monitor 67 5 3 (1)Adjust Increase (2)Menu( Press and hold 3 seconds for mute) (3)Adjust Decrease (4)Power on/off (Press and hold for turning off / press once to change the mode) (5)Remote sensor (6)Video in 2 (7)Audio out(earplug) (8) Infrared Transmitter(optional) Remote control (1) Volume Reducing Button (2) Menu Button (3) Power Button (4) Video Select(16:9/4:3) (5) Volume Increasing Button (6) Switching AV1/AV2 I 2 Page 2
CONTROL AND LAYOUT Monitor 67 5 3 (1)Adjust Increase (2)Menu( Press and hold 3 seconds for mute) (3)Adjust Decrease (4)Power on/off (Press and hold for turning off / press once to change the mode) (5)Remote sensor (6)Video in 2 (7)Audio out(earplug) (8) Infrared Transmitter(optional) Remote control (1) Volume Reducing Button (2) Menu Button (3) Power Button (4) Video Select(16:9/4:3) (5) Volume Increasing Button (6) Switching AV1/AV2 I 2 Page 2

NCV-573 English Manual
Page 4
INSTALLATION FUSE BOX Red wire Power 12V BLACK WIRE GND YELLOW VIDEO IN(1) WHITE AUDIO IN REMOTE CONTROL REPLACING BATTERIES Pull out Push 1.Always use new batteries when replacing the old set. 2.Do not attempt to charge,short-circuit,disassemble, or burn used batteries. 3.Battery replacement is necessary when remote control acts sporadically or stops operating. 4.Do not drop,apply shock or step on the remote control. 5.Do not spill water on the remote control. 6.Do not place objects between...
INSTALLATION FUSE BOX Red wire Power 12V BLACK WIRE GND YELLOW VIDEO IN(1) WHITE AUDIO IN REMOTE CONTROL REPLACING BATTERIES Pull out Push 1.Always use new batteries when replacing the old set. 2.Do not attempt to charge,short-circuit,disassemble, or burn used batteries. 3.Battery replacement is necessary when remote control acts sporadically or stops operating. 4.Do not drop,apply shock or step on the remote control. 5.Do not spill water on the remote control. 6.Do not place objects between...

NCV-573 English Manual
Page 5
... :to rotate image up/down,left/right -Language:to change to different OSD language -Reset:to reset all settings to default TECHNICAL PARAMETERS LCD Drive Method:TFT Active Matrix Display Size: 7 Inch(diagonal) Aspect:16: 9 Display Format: 180XRGB X234 Number of Pixels:1440 X234 Video System Input:PAL/NTSC Back Light:High Brightness Power Source:DC 12V Power Consumption:8W Dimensions: 126X186 X24mm SUPPLIED ACCESSORIES Wire cord 1 Stand 1 Remote control 1 Headrest bracket...
... :to rotate image up/down,left/right -Language:to change to different OSD language -Reset:to reset all settings to default TECHNICAL PARAMETERS LCD Drive Method:TFT Active Matrix Display Size: 7 Inch(diagonal) Aspect:16: 9 Display Format: 180XRGB X234 Number of Pixels:1440 X234 Video System Input:PAL/NTSC Back Light:High Brightness Power Source:DC 12V Power Consumption:8W Dimensions: 126X186 X24mm SUPPLIED ACCESSORIES Wire cord 1 Stand 1 Remote control 1 Headrest bracket...

NCV-573 English Manual
Page 6
Bracket 1 For mounting stand purpose CD Mounting Stand 11 Key-for release the monitor from headrest frame I I Headrest Shroud Page 5
Bracket 1 For mounting stand purpose CD Mounting Stand 11 Key-for release the monitor from headrest frame I I Headrest Shroud Page 5

NCV-573 English Manual
Page 7
Page 6 Remove the bracket 2 from the monitor and install bracket 1 as follows diagrams for stand style use Bracket 1 Il I i I i Use Bracket 1 for stand style INSTALLING HEADREST FRAME Getting started 1.Remove the headrest and set it in an uncluttered work area.Take the appropriate precautions to be cut. Measurements 2.Push on the headliner with your fingers to make sure there are no obstructions that would hinder the installation.Use the paper template to mark the area to ensure than it is not damaged during installation.
Page 6 Remove the bracket 2 from the monitor and install bracket 1 as follows diagrams for stand style use Bracket 1 Il I i I i Use Bracket 1 for stand style INSTALLING HEADREST FRAME Getting started 1.Remove the headrest and set it in an uncluttered work area.Take the appropriate precautions to be cut. Measurements 2.Push on the headliner with your fingers to make sure there are no obstructions that would hinder the installation.Use the paper template to mark the area to ensure than it is not damaged during installation.

NCV-573 English Manual
Page 8
... supplied cable through the opening and out the bottom of the foam and use the blade to measure the fit and make adjustments if necessary. Insert the monitor to cut underneath.Remove small section at a time,using a shft covering.Connect the power, ground and video leads to remove other two corners. Use a dremel or other appropriate tool to test the monitor.Before connecting the monitor,pull the connecting cable assembly...
... supplied cable through the opening and out the bottom of the foam and use the blade to measure the fit and make adjustments if necessary. Insert the monitor to cut underneath.Remove small section at a time,using a shft covering.Connect the power, ground and video leads to remove other two corners. Use a dremel or other appropriate tool to test the monitor.Before connecting the monitor,pull the connecting cable assembly...
NCV-573 English Manual
Page 9
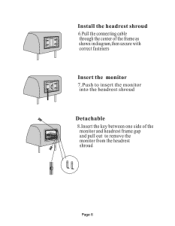
■ Install the headrest shroud 6.Pu11 the connecting cable through the center of the frame as shown indiagram,then secure with correct fasteners Insert the monitor 7.Push to insert the monitor into the headrest shroud Detachable 8.Insert the key between one side of the monitor and headrest frame gap and pull out to remove the monitor from the headrest shroud Page 8
■ Install the headrest shroud 6.Pu11 the connecting cable through the center of the frame as shown indiagram,then secure with correct fasteners Insert the monitor 7.Push to insert the monitor into the headrest shroud Detachable 8.Insert the key between one side of the monitor and headrest frame gap and pull out to remove the monitor from the headrest shroud Page 8