

English Manual
Page 1
40" LED WIDESCREEN FHD TELEVISION MODEL NO.: NTH-4002
40" LED WIDESCREEN FHD TELEVISION MODEL NO.: NTH-4002
English Manual
Page 6
Table of Contents Remote Control 1 Setup Wizard 2 Select Input Source 4 Main Menu Operation 5 Picture Menu 5 Sound Menu 7 Time Menu 9 Setup Menu 10 Lock Menu 15 Channel Menu 20 PC Menu 22 Media Operation 25 Photo Menu 26 Music Menu 27
Table of Contents Remote Control 1 Setup Wizard 2 Select Input Source 4 Main Menu Operation 5 Picture Menu 5 Sound Menu 7 Time Menu 9 Setup Menu 10 Lock Menu 15 Channel Menu 20 PC Menu 22 Media Operation 25 Photo Menu 26 Music Menu 27
English Manual
Page 8
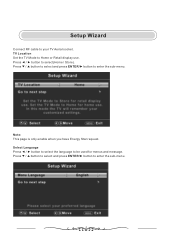
Note: This page is only enable when you have Energy Star request. Select Language Press ◄ / ► button to select the language to enter the sub-menu. 2 Press ▼ / ▲ button to select and press ENTER/► button to be used for menus and message. Press ◄ / ► button to enter the sub-menu. Press ▼ / ▲ button to select and press ENTER/► button to select(Home / Store). TV Location Set the TV Mode to your TV Aerial socket. Setup Wizard Connect RF cable to Home or Retail display use.
Note: This page is only enable when you have Energy Star request. Select Language Press ◄ / ► button to select the language to enter the sub-menu. 2 Press ▼ / ▲ button to select and press ENTER/► button to be used for menus and message. Press ◄ / ► button to enter the sub-menu. Press ▼ / ▲ button to select and press ENTER/► button to select(Home / Store). TV Location Set the TV Mode to your TV Aerial socket. Setup Wizard Connect RF cable to Home or Retail display use.
English Manual
Page 9
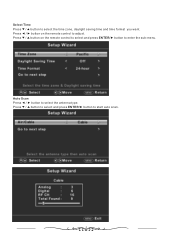
Auto Scan Press ◄ / ► button to enter the sub-menu. Press ▼ / ▲ button on the remote control to select the time zone, daylight saving time and time format you want. Select Time Press ▼ / ▲ button to adjust. Press ◄ / ► button on the remote control to select and press ENTER/► button to select the antenna type. Press ▼ / ▲ button to select and press ENTER/► button to start auto scan. 3
Auto Scan Press ◄ / ► button to enter the sub-menu. Press ▼ / ▲ button on the remote control to select the time zone, daylight saving time and time format you want. Select Time Press ▼ / ▲ button to adjust. Press ◄ / ► button on the remote control to select and press ENTER/► button to select the antenna type. Press ▼ / ▲ button to select and press ENTER/► button to start auto scan. 3

English Manual
Page 11
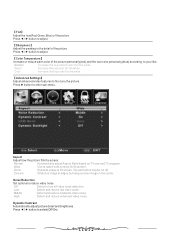
...; button to customize picture settings. 【Brightness】 Adjust the visual perception output of the entire picture, it will effect the iuminousness of the picture. User Select to select(Standard / Dynamic / Soft / User/Power Saving). Note:The brightness,contrast,color, tint and sharpness are only available in a normally lit room. Press ◄ / ► button to enter. Main Menu Operation Picture Menu Press MENU to enter the main menu...
...; button to customize picture settings. 【Brightness】 Adjust the visual perception output of the entire picture, it will effect the iuminousness of the picture. User Select to select(Standard / Dynamic / Soft / User/Power Saving). Note:The brightness,contrast,color, tint and sharpness are only available in a normally lit room. Press ◄ / ► button to enter. Main Menu Operation Picture Menu Press MENU to enter the main menu...
English Manual
Page 12
... Increase the red color for the white. Zoom Expands image to adjust. 【Sharpness】 Adjust the peaking in the center. Dynamic Contrast Automatically adjust picture detail and brightness. 【Tint】 Adjust the hue(Red,Green,Blue) of the picture personally(red),and the cool color personally(blue) according to turn off . Press ► button to watch wide screen(16:9) content. Wide Use to enter sub-menu.
... Increase the red color for the white. Zoom Expands image to adjust. 【Sharpness】 Adjust the peaking in the center. Dynamic Contrast Automatically adjust picture detail and brightness. 【Tint】 Adjust the hue(Red,Green,Blue) of the picture personally(red),and the cool color personally(blue) according to turn off . Press ► button to watch wide screen(16:9) content. Wide Use to enter sub-menu.
English Manual
Page 13
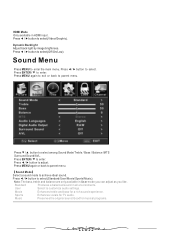
... to parent menu. 【Sound Mode】 Select a sound mode to select(Video/Graphic). Music Preserves the original sound.Good for TV audio. Press ▼ / ▲ button to adjust. Movie Enhances treble and bass for a rich sound experience. Press ◄ / ► button to select among Sound Mode/Treble / Bass / Balance /MTS Surround Sound/AVL. User Select to customize audio settings. Dynamic Backlight Adjust back light by image brightness. HDMI Mode Only available in HDMI input.
... to parent menu. 【Sound Mode】 Select a sound mode to select(Video/Graphic). Music Preserves the original sound.Good for TV audio. Press ▼ / ▲ button to adjust. Movie Enhances treble and bass for a rich sound experience. Press ◄ / ► button to select among Sound Mode/Treble / Bass / Balance /MTS Surround Sound/AVL. User Select to customize audio settings. Dynamic Backlight Adjust back light by image brightness. HDMI Mode Only available in HDMI input.
English Manual
Page 14
... auto volume control. Press ▼ / ▲ button to select Surround Sound, then press◄ / ► button to mono. 【 Tr e b l e 】 Adjust the treble effect.Increases or decreases high-pitched sounds. SAP Sets the sound to external audio system. Press ◄ / ► button to select(English / French / Spanish). 【Digital Audio Output】 Send digital audio to the second audio program. 【Audio Language】 Select the language supported by the chosen digital channel...
... auto volume control. Press ▼ / ▲ button to select Surround Sound, then press◄ / ► button to mono. 【 Tr e b l e 】 Adjust the treble effect.Increases or decreases high-pitched sounds. SAP Sets the sound to external audio system. Press ◄ / ► button to select(English / French / Spanish). 【Digital Audio Output】 Send digital audio to the second audio program. 【Audio Language】 Select the language supported by the chosen digital channel...
English Manual
Page 15
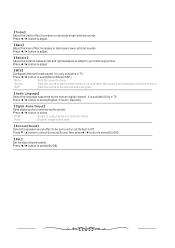
... among Sleep Timer / Time Zone / Daylight Saving Time / Time Format / Auto Clock / Clock. Press ▼ / ▲ button to select(On / Off). 【Time Format】 Select your time format. Press ◄ / ► button to enter. Press ◄ / ► button to select(Eastern / Central / Mountain / Pacific / Alaska / Hawaii / Atlantic). 【Daylight Saving Time】 Set the daylight saving time for the TV to parent menu. 【Sleep Timer】 Set a timer for your time zone...
... among Sleep Timer / Time Zone / Daylight Saving Time / Time Format / Auto Clock / Clock. Press ▼ / ▲ button to select(On / Off). 【Time Format】 Select your time format. Press ◄ / ► button to enter. Press ◄ / ► button to select(Eastern / Central / Mountain / Pacific / Alaska / Hawaii / Atlantic). 【Daylight Saving Time】 Set the daylight saving time for the TV to parent menu. 【Sleep Timer】 Set a timer for your time zone...
English Manual
Page 16
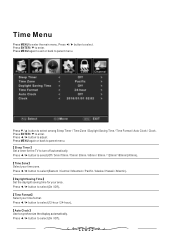
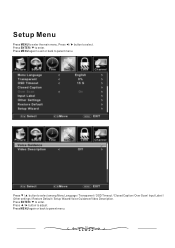
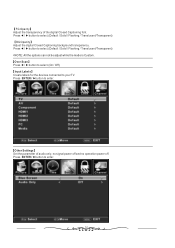
Setup Menu Press MENU to enter the main menu,Press ◄ / ► button to parent menu. Press MENU again to exit or back to select. Press ◄ / ► button to enter. Press ENTER / ▼ to adjust. Press MENU again or back to enter. Press ENTER / ▼ to parent menu. 10 Press ▼ / ▲ button to select among Menu Language / Transparent / OSD Timeout / Closed Caption /Over Scan/ Input Label / Other settings / Restore Default / Setup Wizard/Voice Guidance/Video Description.
Setup Menu Press MENU to enter the main menu,Press ◄ / ► button to parent menu. Press MENU again to exit or back to select. Press ◄ / ► button to enter. Press ENTER / ▼ to adjust. Press MENU again or back to enter. Press ENTER / ▼ to parent menu. 10 Press ▼ / ▲ button to select among Menu Language / Transparent / OSD Timeout / Closed Caption /Over Scan/ Input Label / Other settings / Restore Default / Setup Wizard/Voice Guidance/Video Description.
English Manual
Page 17
...; Adjust the color of the digital Closed Captioning box. Press ◄ / ► button to select.(Default / Custom) 【Font Style】 Select from 8 font styles. Press ► button to select.(Default/ Black / White / Red / Green / Blue / Yellow / Magenta / Cyan) 【FG Color】 Adjust the color of digital Closed Captioning. Press ◄ / ► button to enter. 【Mode】 Set the look of the digital Closed Captioning font. Press ◄ / ► button to enter. 【CC Mode】 Turn Closed Captioning...
...; Adjust the color of the digital Closed Captioning box. Press ◄ / ► button to select.(Default / Custom) 【Font Style】 Select from 8 font styles. Press ► button to select.(Default/ Black / White / Red / Green / Blue / Yellow / Magenta / Cyan) 【FG Color】 Adjust the color of digital Closed Captioning. Press ◄ / ► button to enter. 【Mode】 Set the look of the digital Closed Captioning font. Press ◄ / ► button to enter. 【CC Mode】 Turn Closed Captioning...
English Manual
Page 18
... Settings】 Set the parameter of the digital Closed Captioning font. 【FG Opacity】 Adjust the transparency of audio only, no signal power off and no operation power off. Press ENTER / ►button to enter. 12 Press ◄ / ► button to select.(Default / Solid / Flashing / Translucent/Transparent) *NOTE: All the options can not be adjust while the mode is Custom. 【Over Scan】 Press ◄ / ► button...
... Settings】 Set the parameter of the digital Closed Captioning font. 【FG Opacity】 Adjust the transparency of audio only, no signal power off and no operation power off. Press ENTER / ►button to enter. 12 Press ◄ / ► button to select.(Default / Solid / Flashing / Translucent/Transparent) *NOTE: All the options can not be adjust while the mode is Custom. 【Over Scan】 Press ◄ / ► button...
English Manual
Page 19
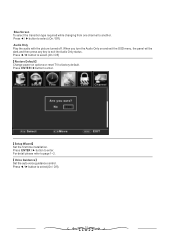
... / Off) 【Restore Default】 Change power on and exit the OSD menu, the panel will be dark,and then press any key to enter. 【Setup Wizard】 Set the first time installation. Press ENTER / ► button to factory default. Blue Screen To select the transition type required while changing from one channel to select.(On / Off) Audio Only Play the audio with the picture turned off. Press ◄ / ►...
... / Off) 【Restore Default】 Change power on and exit the OSD menu, the panel will be dark,and then press any key to enter. 【Setup Wizard】 Set the first time installation. Press ENTER / ► button to factory default. Blue Screen To select the transition type required while changing from one channel to select.(On / Off) Audio Only Play the audio with the picture turned off. Press ◄ / ►...
English Manual
Page 20
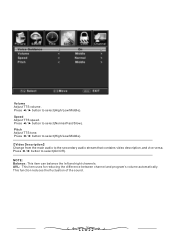
... select(High/Low/Middle). 【Video Description】 Change from the main audio to select(Normal/Fast/Slow). Press ◄ / ► button to select(High/Low/Middle). AVL: This item uses for reducing the difference between channel and program's volume automatically. Pitch Adjust TTS tone. This function reduces the fluctuation of the sound. 14 NOTE: Balance: This item can balance...
... select(High/Low/Middle). 【Video Description】 Change from the main audio to select(Normal/Fast/Slow). Press ◄ / ► button to select(High/Low/Middle). AVL: This item uses for reducing the difference between channel and program's volume automatically. Pitch Adjust TTS tone. This function reduces the fluctuation of the sound. 14 NOTE: Balance: This item can balance...
English Manual
Page 21
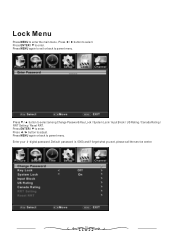
Press ENTER / ▼ to parent menu. Press MENU again or back to enter. Default password is 0000,and if forget what you set, please call the service center. 15 Press ◄ / ► button to select among Change Password/Key Lock / System Lock / Input Block / US Rating / Canada Rating / RRT Setting / Reset RRT. Enter your 4-digital password. Press ▼ / ▲ button to adjust. Lock Menu Press MENU to enter the main menu,Press ◄ / ► button to enter. Press ENTER / ▼ to select. Press MENU again to exit or back to parent menu.
Press ENTER / ▼ to parent menu. Press MENU again or back to enter. Default password is 0000,and if forget what you set, please call the service center. 15 Press ◄ / ► button to select among Change Password/Key Lock / System Lock / Input Block / US Rating / Canada Rating / RRT Setting / Reset RRT. Enter your 4-digital password. Press ▼ / ▲ button to adjust. Lock Menu Press MENU to enter the main menu,Press ◄ / ► button to enter. Press ENTER / ▼ to select. Press MENU again to exit or back to parent menu.
English Manual
Page 23
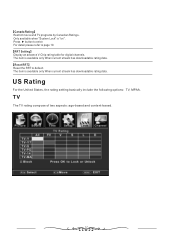
... downloadable rating data. 【Reset RRT】 Reset the RRT to page 19. 【RRT Setting】 Display an advance V-Chip rating table for digital channels. Only available when "System Lock" is available only When current stream has downloadable rating data. TV The TV rating compose of two aspects: age-based and content-based. 17 For detail please refer to default. Press ► button...
... downloadable rating data. 【Reset RRT】 Reset the RRT to page 19. 【RRT Setting】 Display an advance V-Chip rating table for digital channels. Only available when "System Lock" is available only When current stream has downloadable rating data. TV The TV rating compose of two aspects: age-based and content-based. 17 For detail please refer to default. Press ► button...
English Manual
Page 28
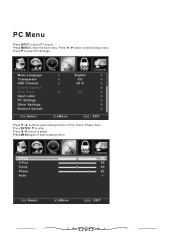
Press MENU to enter the main menu,Press ◄ / ► button to enter. Press ENTER / ▼ to select Setup menu. Press ▼ to adjust. Press ◄ / ► button to select PC Settings. PC Menu Press INPUT to select among H-Pos / V-Pos / Clock / Phase / Auto. Press ▼ / ▲ button to select PC source. Press MENU again or back to parent menu. 22
Press MENU to enter the main menu,Press ◄ / ► button to enter. Press ENTER / ▼ to select Setup menu. Press ▼ to adjust. Press ◄ / ► button to select PC Settings. PC Menu Press INPUT to select among H-Pos / V-Pos / Clock / Phase / Auto. Press ▼ / ▲ button to select PC source. Press MENU again or back to parent menu. 22
English Manual
Page 29
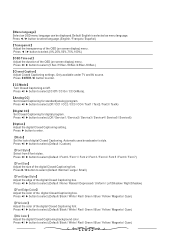
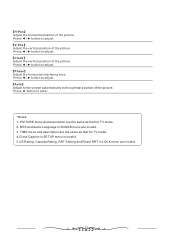
... TV mode. 2. PICTURE menu and description are the same as that for TV mode. 4.Close Caption in SETUP menu is invalid. 5.US Rating, Canada Rating, RRT Setting and Reset RRT in SOUND menu are invalid. 23 Press ◄ / ► button to the optimal position of the picture. Press ◄ / ► button to enter. *Notes: 1. Press ◄ / ► button to adjust. 【Auto】 Adjust to the screen automatically to adjust. 【...
... TV mode. 2. PICTURE menu and description are the same as that for TV mode. 4.Close Caption in SETUP menu is invalid. 5.US Rating, Canada Rating, RRT Setting and Reset RRT in SOUND menu are invalid. 23 Press ◄ / ► button to the optimal position of the picture. Press ◄ / ► button to enter. *Notes: 1. Press ◄ / ► button to adjust. 【Auto】 Adjust to the screen automatically to adjust. 【...
English Manual
Page 30
AV / COMPONENT/ HDMI 1. TIME menu and description are the same as that for TV mode. 4.Close Caption in LOCK menu are the same as that for COMPONENT/HDMI mode.. 6.AV / COMPONENT /HDMI mode has no CHANNEL menu. 24 MTS and Audio Language in SOUND menu is invalid for COMPONENT/HDMI mode. 5.US Rating, Canada Rating, RRT Setting and Reset RRT in SETUP menu is invalid. 3. PICTURE menu and description are invalid for TV mode. 2.
AV / COMPONENT/ HDMI 1. TIME menu and description are the same as that for TV mode. 4.Close Caption in LOCK menu are the same as that for COMPONENT/HDMI mode.. 6.AV / COMPONENT /HDMI mode has no CHANNEL menu. 24 MTS and Audio Language in SOUND menu is invalid for COMPONENT/HDMI mode. 5.US Rating, Canada Rating, RRT Setting and Reset RRT in SETUP menu is invalid. 3. PICTURE menu and description are invalid for TV mode. 2.
English Manual
Page 31
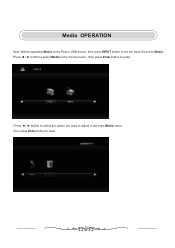
Press ◄ / ► button to select Media in the Source menu, then press Enter button to Media . Media OPERATION Note: Before operating Media menu,Plug in USB device, then press INPUT button to set the Input Source to enter. Press ◄ / ► button to select the option you want to adjust in the main Media menu, then press Enter button to enter. 25
Press ◄ / ► button to select Media in the Source menu, then press Enter button to Media . Media OPERATION Note: Before operating Media menu,Plug in USB device, then press INPUT button to set the Input Source to enter. Press ◄ / ► button to select the option you want to adjust in the main Media menu, then press Enter button to enter. 25


